Feedback
Table Of Contents
Synchronizing clocks in a network
Disabling the USB in-band interface
Configuring the global login settings
Configuring remote alert settings
Configuring remote alert recipients
Configuring global remote alert settings
Configuring SNMP alert settings
Configuring network interfaces
Setting up a client to use the LDAP server
Configuring LDAP client authentication
Configuring LDAP search attributes
Service Location Protocol (SLP)
Secure Web server and secure LDAP
SSL server certificate management
Generating a self-signed certificate
Generating a certificate-signing request
Enabling SSL for the secure Web server
SSL client certificate management
SSL client trusted certificate management
Enabling SSL for the LDAP client
Configuring the Secure Shell server
Generating a Secure Shell server key
Enabling the Secure Shell server
Backing up your current configuration
Restoring and modifying your IMM configuration
Configuring the IMM
Use the links under IMM Control in the navigation pane to configure the IMM.
•
From the System Settings page, you can:
–
–
–
–
•
–
–
–
•
–
–
–
–
•
•
•
–
–
–
–
–
–
•
•
•
•
Setting system information
To set the IMM system information, complete the following steps:
Step 1
Step 2
Note
Step 3
Use the Name field to specify a name for the IMM in this server. The name is included with e-mail and SNMP alert notifications to identify the source of the alert.
Note
Step 4
Step 5
Step 6
Setting server timeouts
Note
Note
To set the server timeout values, complete the following steps:
Step 1
Step 2
You can set the IMM to respond automatically to the following events:
•
•
Step 3
OS watchdog - Use the OS watchdog field to specify the number of minutes between checks of the operating system by the IMM. If the operating system fails to respond to one of these checks, the IMM generates an OS timeout alert and restarts the server. After the server is restarted, the OS watchdog is disabled until the operating system is shut down and the server is power cycled.
To set the OS watchdog value, select a time interval from the menu. To turn off this watchdog, select 0.0 from the menu. To capture operating-system-failure screens, you must enable the watchdog in the OS watchdog field.
Loader watchdog - Use the Loader watchdog field to specify the number of minutes that the IMM waits between the completion of POST and the starting of the operating system. If this interval is exceeded, the IMM generates a loader timeout alert and automatically restarts the server. After the server is restarted, the loader timeout is automatically disabled until the operating system is shut down and the server is power cycled (or until the operating system starts and the software is successfully loaded).
To set the loader timeout value, select the time limit that the IMM waits for the operating-system startup to be completed. To turn off this watchdog, select 0.0 from the menu.
Step 4
Setting the IMM date and time
The IMM uses its own real-time clock to time stamp all events that are logged in the event log.
Note
Alerts that are sent by e-mail and SNMP use the real-time clock setting to time stamp the alerts. The clock settings support Greenwich mean time (GMT) offsets and daylight saving time (DST) for added ease-of-use for administrators who are managing systems remotely over different time zones. You can remotely access the event log even if the server is turned off or disabled.
To verify the date and time settings of the IMM, complete the following steps:
Step 1
Step 2
Step 3
Step 4
Step 5
Step 6
Step 7
Step 8
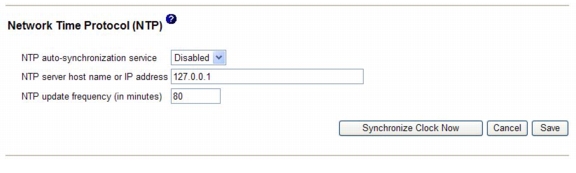
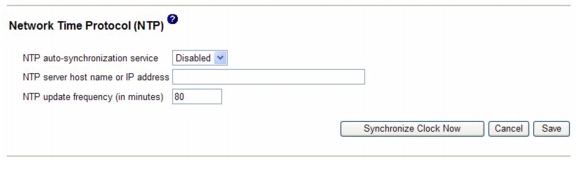
Synchronizing clocks in a network
The Network Time Protocol (NTP) provides a way to synchronize clocks throughout a computer network, enabling any NTP client to obtain the correct time from an NTP server.
The IMM NTP feature provides a way to synchronize the IMM real-time clock with the time that is provided by an NTP server. You can specify the NTP server that is to be used, specify the frequency with which the IMM is synchronized, enable or disable the NTP feature, and request immediate time synchronization.
The NTP feature does not provide the extended security and authentication that are provided through encryption algorithms in NTP Version 3 and NTP Version 4. The IMM NTP feature supports only the Simple Network Time Protocol (SNTP) without authentication.
To set up the IMM NTP feature settings, complete the following steps:
Step 1
Step 2
Step 3
Step 4
NTP auto-synchronization service - Use this selection to enable or disable automatic synchronization of the IMM clock with an NTP server.
NTP server host name or IP address - Use this field to specify the name of the NTP server to be used for clock synchronization.
NTP update frequency - Use this field to specify the approximate interval (in minutes) between synchronization requests. Enter a value between 3 - 1440 minutes.
Synchronize Clock Now - Click this button to request an immediate synchronization instead of waiting for the interval time to lapse.
Step 5
Disabling the USB in-band interface
Note
Note
If you disable the USB in-band interface, also disable the watchdog timeouts to prevent the server from restarting unexpectedly. For more information, see "Setting server timeouts" section.The USB in-band interface, or LAN over USB, is used for in-band communications to the IMM. To prevent any application that is running on the server from requesting the IMM to perform tasks, you must disable the USB in-band interface.
To disable the USB in-band interface, complete the following steps:
Step 1
Step 2
Step 3
Note
If you try to use systems-management applications while the in-band interface is disabled, they might not work.
Step 4
To enable the USB device driver interface after it has been disabled, clear the Do not allow commands on USB interface check box and click Save.
Note
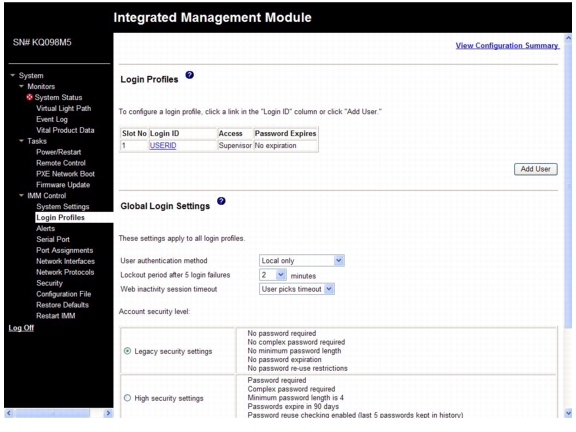
Creating a login profile
Use the Login Profiles table to view, configure, or change individual login profiles. Use the links in the Login ID column to configure individual login profiles. You can define up to 12 unique profiles. Each link in the Login ID column is labeled with the configured login ID of the associated profile.
Certain login profiles are shared with the IPMI user IDs, providing a single set of local user accounts (username/password) that work with all of the IMM user interfaces, including IPMI. Rules that pertain to these shared login profiles are described in the following list:
•
•
•
For example, if a user is added through IPMI commands, that user information is also available for authentication through the Web, Telnet, SSH, and other interfaces. Conversely, if a user is added on the Web or other interfaces, that user information is available for starting an IPMI session.
Because the user accounts are shared with IPMI, certain restrictions are imposed to provide a common ground between the interfaces that use these accounts. The following list describes IMM and IPMI login profile restrictions:
•
•
•
•
•
•
–
–
–
–
–
–
–
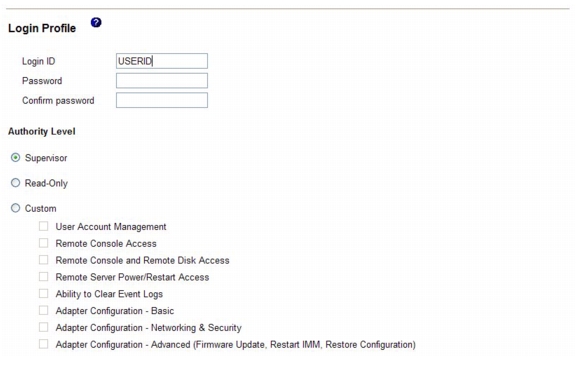
To configure a login profile, complete the following steps:
Step 1
Step 2
Note
The Login Profiles page displays each login ID, the login access level, and the password expiration information, as shown in the following illustration.
Important: By default, the IMM is configured with one login profile that enables remote access using a login user ID of USERID and a password of PASSW0RD (the 0 is a zero, not the letter O). To avoid a potential security exposure, change this default login profile during the initial setup of the IMM.
Step 3
Step 4
You can type a maximum of 16 characters in the Login ID field. Valid characters are uppercase and lowercase letters, numbers, periods, and underscores.
Note
Step 5
A password must contain a minimum of five characters, one of which must be a nonalphabetic character. Null or empty passwords are accepted.
Note
Step 6
Step 7
Supervisor - The user has no restrictions.
Read Only - The user has read-only access only and cannot perform actions such as file transfers, power and restart actions, or remote presence functions.
Custom - If you select the Custom option, you must select one or more of the following custom authority levels:
•
•
•
•
•
•
•
•
When a user sets the authority level of an IMM login ID, the resulting IPMI privilege level of the corresponding IPMI User ID is set according to these priorities:
•
•
•
–
–
–
–
–
•
•
Note
Step 8
Use following fields to configure the SNMPv3 settings for the user profile:
Authentication Protocol - Use this field to specify either HMAC-MD5 or HMAC-SHA as the authentication protocol. These are hash algorithms used by the SNMPv3 security model for the authentication. The password for the Linux account will be used for authentication. If you choose None, authentication protocol is not used.
Privacy Protocol - Data transfer between the SNMP client and the agent can be protected using encryption. The supported methods are DES and AES. Privacy protocol is valid only if the authentication protocol is set to either HMAC-MD5 or HMAC-SHA.
Privacy Password -Use this field to specify the encryption password.
Confirm Privacy Password - Use this field to confirm the encryption password.
Access Type - Use this field to specify either Get or Set as the access type. SNMPv3 users with the access type Get can perform only query operations. With the access type Set, SNMPv3 users can both perform query operations and modify settings (for example, setting the password for an user).
Hostname/IP address for traps - Use this field to specify the trap destination for the user. This can be an IP address or hostname. Using traps, the SNMP agent notifies the management station about events (for example, when a processor temperature exceeds the limit).
Step 9
Deleting a login profile
To delete a login profile, complete the following steps:
Step 1
Step 2
Step 3
Step 4
Configuring the global login settings
Complete the following steps to set conditions that apply to all login profiles for the IMM:
Step 1
Step 2
Step 3
Step 4
•
•
•
•
Note
Note
Step 5
Step 6
Step 7
Step 8
User login password required - Use this field to indicate whether a login ID with no password is allowed.
Number of previous passwords that cannot be used - Use this field to indicate the number of previous passwords that cannot be reused. Up to five previous passwords can be compared. Select 0 to allow the reuse of all previous passwords.
Maximum Password Age - Use this field to indicate the maximum password age that is allowed before the password must be changed. Values of 0 - 365 days are supported. Select 0 to disable the password expiration checking.
Step 9
Configuring remote alert settings
You can configure remote alert recipients, the number of alert attempts, incidents that trigger remote alerts, and local alerts from the Alerts link on the navigation pane.
After you configure a remote alert recipient, the IMM sends an alert to that recipient through a network connection when any event selected from the Monitored Alerts group occurs. The alert contains information about the nature of the event, the time and date of the event, and the name of the system that generated the alert.
Note
Configuring remote alert recipients
You can define up to 12 unique remote alert recipients. Each link for an alert recipient is labeled with the recipient name and alert status.
Note
To configure a remote alert recipient, complete the following steps:
Step 1
Step 2
Step 3
Step 4
Step 5
Step 6
Step 7
Step 8
The remote alerts are categorized by the following levels of severity:
Critical alerts - Critical alerts are generated for events that signal that a server component is no longer functioning.
Warning alerts - Warning alerts are generated for events that might progress to a critical level.
System alerts - System alerts are generated for events that occur as a result of system errors or for events that occur as a result of configuration changes. All alerts are stored in the event log and sent to all configured remote alert recipients.
Step 9
Configuring global remote alert settings
The global remote alert settings apply only to forwarded alerts.
Complete the following steps to set the number of times that the IMM attempts to send an alert:
Step 1
Step 2
Use these settings to define the number of remote alert attempts and the length of time between the attempts. The settings apply to all configured remote alert recipients.
Remote alert retry limit - Use the Remote alert retry limit field to specify the number of additional times that the IMM attempts to send an alert to a recipient. The IMM does not send multiple alerts; additional alert attempts occur only if there is a failure when the IMM attempts to send the initial alert.
Note
Delay between entries - Use the Delay between entries field to specify the time interval (in minutes) that the IMM waits before sending an alert to the next recipient in the list.
Delay between retries - Use the Delay between retries field to specify the time interval (in minutes) that the IMM waits between retries to send an alert to a recipient.
Step 3
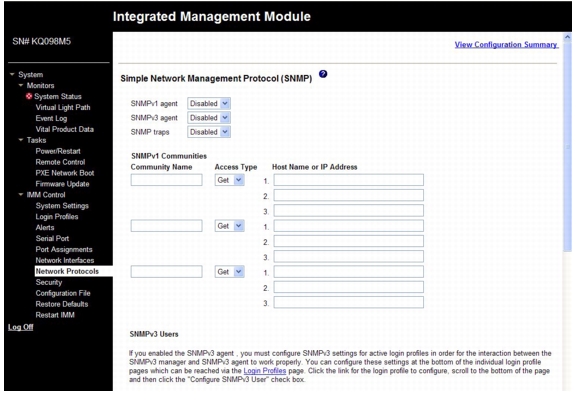
Configuring SNMP alert settings
The SNMP agent notifies the IMM about events through SNMP traps. You can configure the SNMP to filter the events based on the event type. Event categories that are available for filtering are Critical, Warning and System. The SNMP alert settings are global for all SNMP traps.
Note
Note
Complete the following steps to select the type or types of alerts that are sent to SNMP:
Step 1
Step 2
Step 3
•
•
•
Step 4
Configuring port assignments
To change the port numbers of IMM services, complete the following steps:
Step 1
Step 2
Step 3
HTTP - This is the port number for the HTTP server of the IMM. The default port number is 80. Other valid values are in the range 1 - 65535. If you change this port number, you must add this port number, preceded by a colon, at the end of the Web address. For example, if the HTTP port is changed to 8500, type http://hostname:8500/ to open the IMM Web interface. Note that you must type the prefix http:// before the IP address and port number.
HTTPS - This is the port number that is used for Web interface HTTPS (SSL) traffic. The default value is 443. Other valid values are in the range 1 - 65535.
Telnet Legacy CLI - This is the port number for Legacy CLI to log in through the Telnet service. The default value is 23. Other valid values are in the range 1 - 65535.
SSH Legacy CLI - This is the port number that is configured for Legacy CLI to log in through SSH. The default is 22.
SNMP Agent - This is the port number for the SNMP agent that runs on the IMM. The default value is 161. Other valid values are in the range 1 - 65535.
SNMP Traps - This is the port number that is used for SNMP traps. The default value is 162. Other valid values are in the range 1 - 65535.
Remote Presence - This feature is not supported on any of the three products.
The following port numbers are reserved and can be used only for the corresponding services.
Table 3-1 Reserved port numbers
427
SLP
7070 through 7077
Partition management
Step 4
Configuring network interfaces
On the Network Interfaces page, you can set access to the IMM by configuring an Ethernet connection to the IMM. To configure the Ethernet setup for the IMM, complete the following steps:
Step 1
Step 2
Note
Step 3
Note
Step 4
•
•
The default setting is Try DHCP server. If it fails, use static IP config.
Note
If you want to assign a static IP address to the IMM, select Disabled - Use static IP configuration.
If DHCP is enabled, the host name is assigned as follows:
•
•
Step 5
You can enter a maximum of 63 characters in this field, which represents the IP host name of the IMM. The host name defaults to IMMA, followed by the IMM burned-in media access control (MAC) address.
Note
If you enabled DHCP, go to Step 12.
If you have not enabled DHCP, continue with Step 6.
Step 6
Step 7
The default setting is 255.255.255.0.
Step 8
Step 9
Step 10
The following table describes the functions on the Advanced Ethernet Setup page.
Step 11
Step 12
Step 13
Step 14
Step 15
Step 16
Step 17
Configuring network protocols
On the Network Protocols page, you can perform the following functions:
•
•
•
•
•
•
Changes to the network protocol settings require that the IMM be restarted for the changes to take effect. If you are changing more than one protocol, you can wait until all of the protocol changes have been made and saved before you restart the IMM.
Configuring SNMP
You can use the SNMP agent to collect information and to control the server. The IMM can also be configured to send SNMP alerts to the configured host names or IP addresses.
Note
Note
To configure SNMP, complete the following steps:
Step 1
Step 2
Step 3
Note
Step 4
•
•
•
•
Note
Step 5
•
•
•
If any of these parameters is not correct, SNMP management access is not granted.
Note
Step 6
Step 7
Step 8
Step 9
Step 10
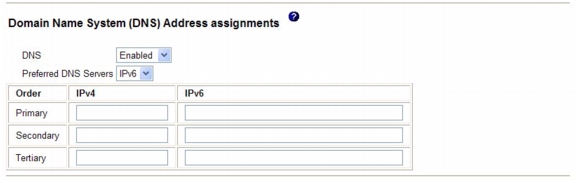
Configuring DNS
To configure the Domain Name System (DNS), complete the following steps:
Step 1
Step 2
Step 3
Step 4
Step 5
Step 6
Configuring Telnet
To configure Telnet, complete the following steps:
Step 1
Step 2
Step 3
Step 4
Configuring SMTP
To specify the IP address or host name of the Simple Mail Transfer Protocol (SMTP) server, complete the following steps.
Step 1
Step 2
Step 3
Step 4
Step 5
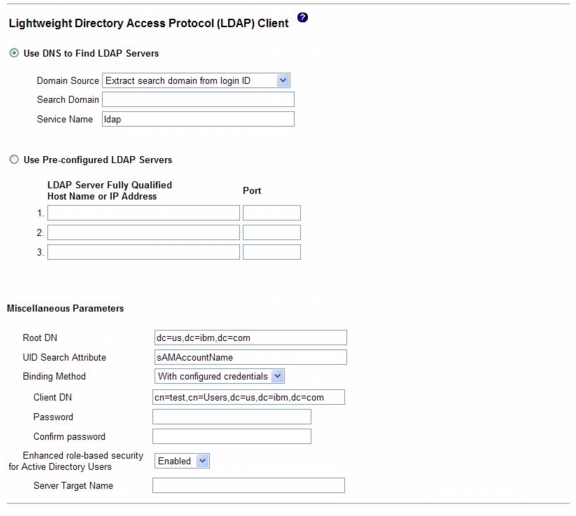
Configuring LDAP
Using a Lightweight Directory Access Protocol (LDAP) server, the IMM can authenticate a user by querying or searching an LDAP directory on an LDAP server, instead of going through its local user database. Then, the IMM can remotely authenticate any user access through a central LDAP server. This requires LDAP client support on the IMM. You can also assign authority levels according to information that is found on the LDAP server.
You can also use LDAP to assign users and IMMs to groups and perform group authentication, in addition to the normal user (password check) authentication. For example, an IMM can be associated with one or more groups, and a user would pass group authentication only if the user belongs to at least one group that is associated with the IMM.
Setting up a client to use the LDAP server
To set up a client to use the LDAP server, complete the following steps:
Step 1
Step 2
The IMM contains a Version 2.0 LDAP client that you can configure to provide user authentication through one or more LDAP servers. The LDAP server that is to be used for authentication can be discovered dynamically or manually preconfigured.
Step 3
•
If you choose to discover the LDAP server dynamically, the mechanisms that are described by RFC2782 (a DNS RR for specifying the location of services) are applied to find the server. This is known as DNS SRV. The parameters are described in the following list:
Domain Source - The DNS SRV request that is sent to the DNS server must specify a domain name. The LDAP client determines where to get this domain name according to which option is selected. There are three options:
–
–
–
Search Domain - This parameter can be used as the domain name in the DNS SRV request, depending on how the Domain Source parameter is configured.
Service Name - The DNS SRV request that is sent to the DNS server must also specify a service name. The configured value is used. If this field is left blank, the default value is ldap. The DNS SRV request must also specify a protocol name. The default is tcp and is not configurable.
•
Note
You can configure the following parameters:
Root DN - This is the distinguished name (DN) of the root entry of the directory tree on the LDAP server (for example, dn=mycompany,dc=com). This DN is used as the base object for all searches.
UID Search Attribute - When the selected binding method is Anonymously or w/ Configured Credentials, the initial bind to the LDAP server is followed by a search request that is aimed at retrieving specific information about the user, including the user's DN, login permissions, and group membership. This search request must specify the attribute name that is used to represent user IDs on that server. This attribute name is configured here.
On Active Directory servers, this attribute name is usually sAMAccountName. On Novell eDirectory and OpenLDAP servers, it is usually uid. If this field is left blank, it defaults to uid.
Group Filter - This field is used for group authentication. Group authentication is attempted after the user's credentials are successfully verified. If group authentication fails, the user's attempt to log on is denied. When the group filter is configured, it is used to specify to which groups the service processor belongs. This means that the user must belong to at least one of the groups that are configured for group authentication to succeed.
If the Group Filter field is left blank, group authentication automatically succeeds. If the group filter is configured, an attempt is made to match at least one group in the list to a group to which the user belongs. If there is no match, the user fails authentication and is denied access. If there is at least one match, group authentication is successful. The comparisons are case sensitive.
The filter is limited to 511 characters and can consist of one or more group names. The colon (:) character must be used to delimit multiple group names. Leading and trailing spaces are ignored, but any other space is treated as part of the group name. A selection to allow or not allow the use of wildcards in the group name is provided. The filter can be a specific group name (for example, IMMWest), a wildcard (*) that matches everything, or a wildcard with a prefix (for example, IMM*). The default filter is IMM*. If security policies in your installation prohibit the use of wildcards, you can choose to not allow the use of wildcards, and the wildcard character (*) is treated as a normal character instead of the wildcard.
A group name can be specified as a full DN or using only the cn portion. For example, a group with a DN of cn=adminGroup,dc=mycompany,dc=com can be specified using the actual DN or with adminGroup.
For Active Directory environments only, nested group membership is supported. For example, if a user is a member of GroupA and GroupB and GroupA is a member of GroupC, the user is said to be a member of GroupC also. Nested searches stop if 128 groups have been searched. Groups in one level are searched before groups in a lower level. Loops are not detected.
Binding Method - Before the LDAP server can be searched or queried, a bind request must be sent. This parameter controls how this initial bind to the LDAP server is performed. Choose from the following three options:
–
–
–
If the initial bind is successful, a search is performed to find an entry on the LDAP server that belongs to the user who is logging in. If necessary, a second attempt to bind is attempted, this time with the DN that is retrieved from the user's LDAP record and the password that was entered during the login process. If this fails, the user is denied access. The second bind is performed only when the Anonymous or Configured Credentials binding methods are used.
Configuring LDAP client authentication
To configure the LDAP client authentication, complete the following steps:
Step 1
Step 2
Step 3
Configuring LDAP search attributes
To configure the LDAP search attributes, complete the following steps:
Step 1
Step 2
Step 3
UID Search Attribute - When the selected binding method is Anonymously or w/ Configured Credentials, the initial bind to the LDAP server is followed by a search request that is directed at retrieving specific information about the user, including the distinguished name, login permissions, and group membership. To retrieve this information, the search request must specify the attribute name that is used to represent user IDs on that server. Specifically, this name is used as a search filter against the login ID that is entered by the user. This attribute name is configured here. For example, on Active Directory servers, the attribute name that is used for user IDs is usually sAMAccoutName. On Novell eDirectory and OpenLDAP servers, it is usually uid. If this field is left blank, a default of UID is used during user authentication.
Group Search Attribute - In an Active Directory or Novell eDirectory environment, this parameter specifies the attribute name that is used to identify the groups to which a user belongs. In Active Directory, this is usually memberOf, and with eDirectory, this is usually groupMembership.
In an OpenLDAP server environment, users are usually assigned to groups whose objectClass equals PosixGroup. In that context, this parameter specifies the attribute name that is used to identify the members of a particular PosixGroup. This is usually memberUid.
If this field is left blank, the attribute name in the filter defaults to memberOf.
Login Permission Attribute - When a user is authenticated through an LDAP server successfully, the login permissions for this user must be retrieved. To retrieve these permissions, the search filter that is sent to the server must specify the attribute name that is associated with login permissions. This field specifies this attribute name.
If this field is left blank, the user is assigned a default of read-only permissions, assuming that the user passes the user and group authentication.
The attribute value that is returned by the LDAP server is searched for the keyword string IBMRBSPermissions=. This keyword must be immediately followed by a bit string that is entered as 12 consecutive 0s or 1s. Each bit represents a set of functions. The bits are numbered according to their positions. The leftmost bit is bit position 0, and the rightmost bit is bit position 11. A value of 1 at a position enables the function that is associated with that position. A value of 0 disables that function. The string IBMRBSPermissions=010000000000 is a valid example.
The IBMRBSPermissions= keyword is used to allow it to be placed anywhere in the attribute field. This enables the LDAP administrator to reuse an existing attribute, therefore preventing an extension to the LDAP schema. This also enables the attribute to be used for its original purpose. You can add the keyword string anywhere in the attribute field. The attribute that you use should allow for a free-formatted string.
When the attribute is retrieved successfully, the value that is returned by the LDAP server is interpreted according to the following information:
•
•
•
•
•
•
•
•
•
•
•
•
If none of the bits are set, the user has read-only authority.
Priority is given to login permissions that are retrieved directly from the user record. If the login permission attribute is not in the user's record, an attempt is made to retrieve the permissions from the groups to which the user belongs. This is done as part of the group authentication phase. The user is assigned the inclusive OR of all the bits for all of the groups. The Read Only bit is set only if all the other bits are zero. If the Deny Always bit is set for any of the groups, the user is refused access. The Deny Always bit always has precedence over every other bit.
Important: If you give a user the ability to modify basic, networking, and security-related IMM configuration parameters, consider giving this same user the ability to restart the IMM (bit position 10). Otherwise, a user might be able to change parameters (for example, the IP address of the IMM) but cannot make them take effect.
Service Location Protocol (SLP)
To view the SLP setting, complete the following steps:
Step 1
Step 2
Configuring security
Use the general procedure in this section to configure security for the IMM Web server and for the connection between the IMM and an LDAP server. If you are not familiar with the use of SSL certificates, read the information in "SSL certificate overview" section.
Use the following general tasks list to configure the security for the IMM:
1.
a.
b.
c.
2.
a.
b.
c.
d.
3.
Note
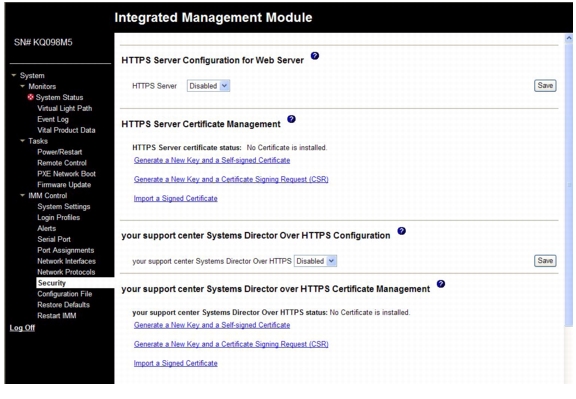
Secure Web server and secure LDAP
Secure Sockets Layer (SSL) is a security protocol that provides communication privacy. SSL enables client/server applications to communicate in a way that is designed to prevent eavesdropping, tampering, and message forgery.
You can configure the IMM to use SSL support for two types of connections: secure server (HTTPS) and secure LDAP connection (LDAPS). The IMM takes on the role of SSL client or SSL server depending on the type of connection. The following table shows that the IMM acts as an SSL server for secure Web server connections. The IMM acts as an SSL client for secure LDAP connections.
You can view or change the SSL settings from the Security page. You can enable or disable SSL and manage the certificates that are required for SSL.
SSL certificate overview
You can use SSL with either a self-signed certificate or with a certificate that is signed by a third-party certificate authority. Using a self-signed certificate is the simplest method for using SSL, but it does create a small security risk. The risk arises because the SSL client has no way of validating the identity of the SSL server for the first connection that is attempted between the client and server. It is possible that a third party might impersonate the server and intercept data that is flowing between the IMM and the Web browser. If, at the time of the initial connection between the browser and the IMM, the self-signed certificate is imported into the certificate store of the browser, all future communications will be secure for that browser (assuming that the initial connection was not compromised by an attack).
For more complete security, you can use a certificate that is signed by a certificate authority. To obtain a signed certificate, use the SSL Certificate Management page to generate a certificate-signing request. You must then send the certificate-signing request to a certificate authority and make arrangements to procure a certificate. When the certificate is received, it is then imported into the IMM through the Import a Signed Certificate link, and you can enable SSL.
The function of the certificate authority is to verify the identity of the IMM. A certificate contains digital signatures for the certificate authority and the IMM. If a well-known certificate authority issues the certificate or if the certificate of the certificate authority has already been imported into the Web browser, the browser can validate the certificate and positively identify the IMM Web server.
The IMM requires a certificate for the secure Web server and one for the secure LDAP client. Also, the secure LDAP client requires one or more trusted certificates. The trusted certificate is used by the secure LDAP client to positively identify the LDAP server. The trusted certificate is the certificate of the certificate authority that signed the certificate of the LDAP server. If the LDAP server uses self-signed certificates, the trusted certificate can be the certificate of the LDAP server itself. Additional trusted certificates must be imported if more than one LDAP server is used in your configuration.
SSL server certificate management
The SSL server requires that a valid certificate and corresponding private encryption key be installed before SSL is enabled. Two methods are available for generating the private key and required certificate: using a self-signed certificate and using a certificate that is signed by a certificate authority. If you want to use a self-signed certificate for the SSL server, see "Generating a self-signed certificate" section. If you want to use a certificate-authority-signed certificate for the SSL server, see "Generating a certificate-signing request" section.
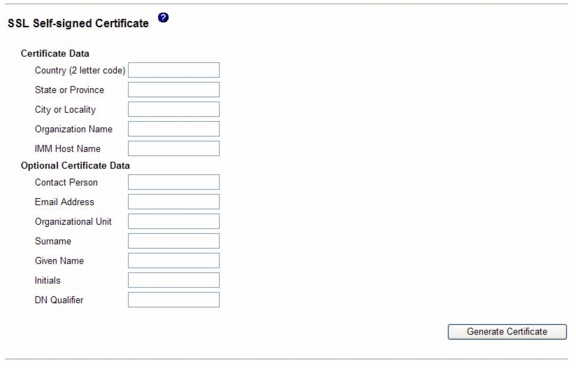
Generating a self-signed certificate
To generate a new private encryption key and self-signed certificate, complete the following steps:
Step 1
Step 2
Note
Note
Note
Step 3
Step 4
Generating a certificate-signing request
To generate a new private encryption key and certificate-signing request, complete the following steps:
Step 1
Step 2
Step 3
Step 4
Read the information in the following sections for a description of each of the common fields.
Required certificate data
The following user-input fields are required for generating a self-signed certificate or a certificate-signing request:
Country - Use this field to indicate the country where the IMM is physically located. This field must contain the 2-character country code.
State or Province - Use this field to indicate the state or province where the IMM is physically located. This field can contain a maximum of 30 characters.
City or Locality - Use this field to indicate the city or locality where the IMM is physically located. This field can contain a maximum of 50 characters.
Organization Name - Use this field to indicate the company or organization that owns the IMM. When this is used to generate a certificate-signing request, the issuing certificate authority can verify that the organization that is requesting the certificate is legally entitled to claim ownership of the given company or organization name. This field can contain a maximum of 60 characters.
IMM Host Name - Use this field to indicate the IMM host name that currently appears in the browser Web address bar.
Make sure that the value that you typed in this field exactly matches the host name as it is known by the Web browser. The browser compares the host name in the resolved Web address to the name that appears in the certificate. To prevent certificate warnings from the browser, the value that is used in this field must match the host name that is used by the browser to connect to the IMM. For example, if the address in the Web address bar is http://mm11.xyz.com/private/main.ssi, the value that is used for the IMM Host Name field must be mm11.xyz.com. If the Web address is http://mm11/private/main.ssi, the value that is used must be mm11. If the Web address is http://192.168.70.2/private/main.ssi, the value that is used must be 192.168.70.2.
This certificate attribute is generally referred to as the common name.
This field can contain a maximum of 60 characters.
Contact Person - Use this field to indicate the name of a contact person who is responsible for the IMM. This field can contain a maximum of 60 characters.
Email Address - Use this field to indicate the e-mail address of a contact person who is responsible for the IMM. This field can contain a maximum of 60 characters.
Optional certificate data
The following user-input fields are optional for generating a self-signed certificate or a certificate-signing request:
Organizational Unit - Use this field to indicate the unit within the company or organization that owns the IMM. This field can contain a maximum of 60 characters.
Surname - Use this field for additional information, such as the surname of a person who is responsible for the IMM. This field can contain a maximum of 60 characters.
Given Name - Use this field for additional information, such as the given name of a person who is responsible for the IMM. This field can contain a maximum of 60 characters.
Initials - Use this field for additional information, such as the initials of a person who is responsible for the IMM. This field can contain a maximum of 20 characters.
DN Qualifier - Use this field for additional information, such as a distinguished name qualifier for the IMM. This field can contain a maximum of 60 characters.
Certificate-Signing request attributes
The following fields are optional unless they are required by your selected certificate authority:
Challenge Password - Use this field to assign a password to the certificate-signing request. This field can contain a maximum of 30 characters.
Unstructured Name - Use this field for additional information, such as an unstructured name that is assigned to the IMM. This field can contain a maximum of 60 characters.
Step 5
Step 6
The command for converting a certificate-signing request from DER to PEM format using OpenSSL is similar to the following example:
openssl req -in csr.der -inform DER -out csr.pem -outform PEMStep 7
openssl x509 -in cert.pem -inform PEM -out cert.der -outform DER
Go to Step 8 after the signed certificate is returned from the certificate authority.
Step 8
Step 9
Step 10
Step 11
Step 12
Enabling SSL for the secure Web server
Note
Complete the following steps to enable the secure Web server:
Step 1
Step 2
SSL client certificate management
The SSL client requires that a valid certificate and corresponding private encryption key be installed before SSL is enabled. Two methods are available for generating the private key and required certificate: using a self-signed certificate, or using a certificate signed by a certificate authority.
The procedure for generating the private encryption key and certificate for the SSL client is the same as the procedure for the SSL server, except that you use the SSL Client Certificate Management area of the Security Web page instead of the SSL Server Certificate Management area. If you want to use a self-signed certificate for the SSL client, see "Generating a self-signed certificate" section. If you want to use a certificate authority signed certificate for the SSL client, see "Generating a certificate-signing request" section.
SSL client trusted certificate management
The secure SSL client (LDAP client) uses trusted certificates to positively identify the LDAP server. A trusted certificate can be the certificate of the certificate authority that signed the certificate of the LDAP server, or it can be the actual certificate of the LDAP server. At least one certificate must be imported to the IMM before the SSL client is enabled. You can import up to three trusted certificates.
To import a trusted certificate, complete the following steps:
Step 1
Step 2
Step 3
Step 4
Step 5
Step 6
Step 7
The Remove button is now available for the Trusted CA Certificate 1 option. If you want to remove a trusted certificate, click the corresponding Remove button.
You can import other trusted certificates by using the Trusted CA Certificate 2 and the Trusted CA Certificate 3 Import buttons.
Enabling SSL for the LDAP client
Use the SSL Client Configuration for LDAP Client area of the Security page to enable or disable SSL for the LDAP Client. To enable SSL, a valid SSL client certificate and at least one trusted certificate must first be installed.
To enable SSL for the client, complete the following steps:
Step 1
The Security page shows an installed SSL client certificate and Trusted CA Certificate 1.
Step 2
Note
Note
Note
Step 3
Configuring the Secure Shell server
The Secure Shell (SSH) feature provides secure access to the command-line interface and the serial (text console) redirect features of the IMM.
Secure Shell users are authenticated by exchanging user ID and password. The password and user ID are sent after the encryption channel is established. The user ID and password pair can be one of the 12 locally stored user IDs and passwords, or they can be stored on an LDAP server. Public key authentication is not supported.
Generating a Secure Shell server key
A Secure Shell server key is used to authenticate the identity of the Secure Shell server to the client. Secure shell must be disabled before you create a new Secure Shell server private key. You must create a server key before you enable the Secure Shell server.
When you request a new server key, both a Rivest, Shamir, and Adelman key and a DSA key are created to allow access to the IMM from an SSH version 2 client. For security, the Secure Shell server private key is not backed up during a configuration save and restore operation.
To create a new Secure Shell server key, complete the following steps:
Step 1
Step 2
Step 3
Step 4
Enabling the Secure Shell server
From the Security page you can enable or disable the Secure Shell server. The selection that you make takes effect only after the IMM is restarted. The value that is displayed on the screen (Enabled or Disabled) is the last selected value and is the value that is used when the IMM is restarted.
Note
To enable the Secure Shell server, complete the following steps:
Step 1
Step 2
Step 3
Step 4
Using the Secure Shell server
If you are using the Secure Shell client that is included in Red Hat Linux version 7.3, to start a Secure Shell session to an IMM with network address 192.168.70.132, type a command similar to the following example:
ssh -x -l userid 192.168.70.132where -x indicates no X Window System forwarding and -l indicates that the session should use the user ID userid.
Using the configuration file
Select Configuration File in the navigation pane to back up and restore the IMM configuration.
Important: Security page settings are not saved with the backup operation and cannot be restored with the restore operation.
Backing up your current configuration
You can download a copy of your current IMM configuration to the client computer that is running the IMM Web interface. Use this backup copy to restore your IMM configuration if it is accidentally changed or damaged. Use it as a base that you can modify to configure multiple IMMs with similar configurations.
The configuration information that is saved under this procedure does not include System x server firmware configuration settings or any IPMI settings that are not common with the non-IMPI user interfaces.
To back up your current configuration, complete the following steps:
Step 1
Step 2
Step 3
Step 4
Step 5
Step 6
In Mozilla Firefox, click Save File, then click OK.
In Microsoft Internet Explorer, click Save this file to disk, then click OK.
Restoring and modifying your IMM configuration
You can restore a saved configuration in full, or you can modify key fields in the saved configuration before you restore the configuration to your IMM. By modifying the configuration file before you restore it, you can set up multiple IMMs with similar configurations. You can quickly specify parameters that require unique values such as names and IP addresses, without having to enter common, shared information.
To restore or modify your current configuration, complete the following steps:
Step 1
Step 2
Step 3
Step 4
Step 5
If you want to make changes to the configuration file before you restore the configuration, click Modify and Restore to open an editable configuration summary window. Initially, only the fields that allow changes are displayed. To change between this view and the complete configuration summary view, click the Toggle View button at the top or bottom of the window. To modify the contents of a field, click the corresponding text box and enter the data.
Note
Step 6
Note
Step 7
Step 8
Step 9
Step 10
Restoring defaults
Use the Restore Defaults link to restore the default configuration of the IMM, if you have Supervisor access.
Attention: When you click Restore Defaults, you will lose all the modifications that you made to the IMM.
To restore the IMM defaults, complete the following steps:
Step 1
Step 2
Step 3
Step 4
Restarting IMM
Use the Restart IMM link to restart the IMM. You can perform this function only if you have Supervisor access. Any Ethernet connections are temporarily dropped. You must log in again to use the IMM Web interface. To restart the IMM, complete the following steps:
Step 1
Step 2
Step 3
Logging off
To log off the IMM or another remote server, click Log Off in the navigation pane.