Table Of Contents
Operating and Configuring Cisco SPA
After Installing Cisco SPA
Starting and Stopping Cisco SPA
Logging In to Cisco SPA
About Cisco SPA Operation and Configuration Tool Features
Starting the Cisco SPA Operation and Configuration Tool
About Using the Tabs in Cisco SPA OCT
Using the Status Tab
About the Operations Tab
Using the Backup and Restore Tab
Using the Audit Tab
Using the Configuration Tab
Implementing Cisco SPA Configuration Changes
About Enabling SSL Connections on Cisco SPA
Task 1: Generating and Downloading a Certificate Signing Request File
Task 2: Sending the Certificate Signing Request File to a Certificate Signing Authority
Task 3: Importing the New Certificate and Root Certificate
Branding Tab
Validation Tab
About the Audit Tool
Running the Audit Tool
About the Bulk Load Function
Location of Bulk Load Directories
Location of the Document Type Definition (DTD) File
Example of an XML Input File
Example of an Output File
Operating and Configuring Cisco SPA
This chapter contains the following topics:
•
After Installing Cisco SPA
•
Starting and Stopping Cisco SPA
•
Logging In to Cisco SPA
•
About Cisco SPA Operation and Configuration Tool Features
•
Starting the Cisco SPA Operation and Configuration Tool
•
About Using the Tabs in Cisco SPA OCT
•
About the Audit Tool
•
About the Bulk Load Function
After Installing Cisco SPA
When you have successfully installed Cisco SPA complete these steps before accessing the application.
Step 1
Enter Cisco BTS EMS server information to establish a connection with the Cisco BTS EMS 10200 Softswitch (see the "Using the Configuration Tab" section).
Step 2
Set up a connection to the mail server (see the "Using the Configuration Tab" section).
Step 3
Generate and import security certificates to set up a Secure Socket Layer (SSL) connection from the service provider to Cisco SPA (see the "Using the Configuration Tab" section).
Step 4
If necessary, select the Use Secure HTTP Connections option (see the "Using the Configuration Tab" section).
Starting and Stopping Cisco SPA
You can start and stop Cisco SPA from the Cisco SPA configuration tool interface (see the "Using the Status Tab" section).
Logging In to Cisco SPA
This section describes how to access the Cisco SPA application as an administrator by using a web browser.
Step 1
Start a web browser window. (For supported web browsers, see the Release Notes for Cisco Self-Service Phone Administration.)
Step 2
Access Cisco SPA from a web browser. (For supported web browsers, see the Release Notes for Cisco Self-Service Phone Administration.)
Step 3
Log in as the default administrator:
User Name: admin
Password: admin
Step 4
Click Login.
When you log in successfully, the failed login counter is reset.
About Cisco SPA Operation and Configuration Tool Features
After you have installed Cisco SPA, configure and customize the product by using the supplied operation and configuration tool. This tool is a standalone (not web-based) GUI application that runs directly on the hardware platform on which Cisco SPA is installed. With this tool, you can check the status of the application, configure initial settings and perform maintenance in the following areas:
•
Branding customization
•
Database management
•
Cisco BTS 10200 Softswitch connection configuration
•
Web server configuration
•
Data logging level
•
Backup and restore database and configuration information
•
Start and stop operations
The Cisco SPA operation and configuration tool (OCT) is located in the /opt/SPA/bin directory.
Starting the Cisco SPA Operation and Configuration Tool
Step 1
Log in to the server where Cisco SPA is installed:
Login: spausr
Note
The spausr is created at the time of Cisco SPA installation.
Step 2
Set a password for future logins:
New password: xxxxxxxx
Reenter password: xxxxxxxx
Enter a new password that is up to 20 characters in length.
Note
You are prompted for this password the first time that you log in (as spausr) to the Cisco SPA server.
Step 3
Enter the following command:
oct.sh
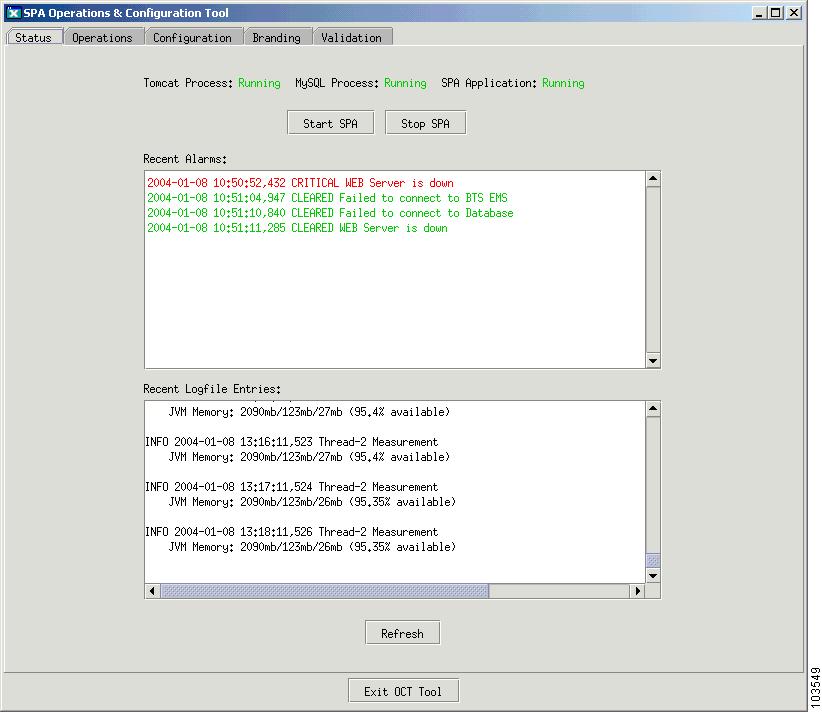
The Cisco SPA OCT GUI opens (see Figure 4-1).
Figure 4-1 Cisco SPA Operation and Configuration Tool
About Using the Tabs in Cisco SPA OCT
The Cisco SPA operation and configuration tool (OCT) window contains five tabs described in the following sections:
•
Using the Status Tab
•
About the Operations Tab
•
Using the Configuration Tab
•
Branding Tab
•
Validation Tab
Note
First set up the connection to the Cisco BTS 10200 Softswitch (see the "After Installing Cisco SPA" section; then to start the Cisco SPA application, see the "Using the Status Tab" section.
Using the Status Tab
The Status tab in the Cisco SPA operation and configuration tool enables you to do the following:
•
Start and stop Cisco SPA operation
•
Check if Tomcat and MySQL processes are running
•
Check if the Cisco SPA application is running
•
View recent alarms generated by Cisco SPA
•
View recent entries to Cisco SPA log files
Field
|
Description
|
Tomcat Process
|
Shows if this process is running. When you click Start SPA, the Tomcat and MySQL processes start running almost immediately, whereas the Cisco SPA application takes longer to start operation.
Click the Refresh button to check if processes have started running since you clicked Start SPA.
|
MySQL process
|
SPA Application
|
Start SPA
|
Starts the Cisco SPA application.
|
Stop SPA
|
Stops the Cisco SPA application.
|
Recent Alarms
|
Shows recent alarms generated by Cisco SPA.
• Red text indicates current alarm conditions.
• Green text indicates cleared alarm conditions.
|
Recent Logfile Entries
|
Shows recent entries to the log files located at /opt/SPA/data/log.
|
About the Operations Tab
The Operations tab in the Cisco SPA operation and configuration tool contains two tabs:
•
Using the Backup and Restore Tab
•
Using the Audit Tab
Using the Backup and Restore Tab
The Backup and Restore tab enables you to do the following:
•
Backup the Cisco SPA database and configuration settings either immediately or at a future time
•
Restore the Cisco SPA database
Field
|
Description
|
Scheduled Backups
|
Scheduling up to Five Data Backups
1. Select a time for the backup.
– For the hour, enter a value from 0 to 23.
– For the minute, enter a value from 00 to 59.
2. Select the days when you want the data backup to occur.
3. Click Save Schedule.
The backed up data is stored at /opt/SPA/data.
Canceling a Scheduled Data Backup
1. Select Delete for that data backup.
2. Click Save Schedule.
|
Save Schedule
|
To save any changes to the scheduled data backups, click Save Schedule.
|
Backup Now
|
Starts an immediate data backup.
You are prompted for a location where the data will be stored.
|
Restore
|
You are prompted to choose a dataset that you want to restore.
|
Using the Audit Tab
The Audit tab enables you to schedule future audits that compare the data in the Cisco SPA database with the data in the Cisco BTS EMS server database. You can narrow the scope of the audit by selecting specific components to be audited.
Note
To perform immediate database audits, follow the procedure described in "Running the Audit Tool" section.
Field
|
Description
|
Scheduled Audits
|
You can schedule up to five database audits:
1. Select a time for the audit.
– For the hour, enter a value from 0 to 23.
– For the minute, enter a value from 00 to 59.
2. Select the days on which the audit will occur.
3. Click Save Schedule.
The audit results are stored at in a timestamped log file called audit.log.yyyy-mm-dd_hh:mm:ss which is located at /opt/SPA/data/logs.
Where,
yyyy-mm-dd is the date (year, month, and day) when the audit was started.
hh:mm:ss is the time (hour, minute, and second) when the audit was started.
Tip The audit function stores seven days of audit results.
Canceling a Scheduled Database Audit
1. Select Delete for that audit.
2. Click Save Schedule.
|
Options
|
To run a complete audit of all components, select all the options.
Note To further restrict the scope of the audit, see the "Running the Audit Tool" section.
|
Phones
|
• The audit tool checks if the phones on Cisco SPA exist in the Cisco BTS EMS server database. If a discrepancy is detected, the audit tool displays a message. For more information on messages, see the "About Cisco SPA Alarms" section.
• The audit tool checks if phones in Centrex and multiline hunt groups on the Cisco BTS EMS server also exist on Cisco SPA. If a discrepancy is detected, the audit tool displays a message. For more information on messages, see the "About Cisco SPA Alarms" section.
|
COS
|
• Checks if each class of services in Cisco SPA exists on the Cisco BTS EMS server. If a discrepancy is detected, the audit tool displays a message and the class of services is deleted from Cisco SPA. For more information on messages, see the "About Cisco SPA Alarms" section.
• Checks which phones are using each class of service on the Cisco BTS EMS server.
– If a class of services is being used by phones assigned to more than one Cisco SPA account, the audit tool displays a message. A class of service ID is unique and can be used by only one account. For more information on messages, see the "About Cisco SPA Alarms" section.
– If a class of services is being used by phones on the Cisco BTS EMS server that are not on Cisco SPA, the audit tool displays a message. For more information on messages, see the "About Cisco SPA Alarms" section.
– If a class of services is not in the Cisco SPA database and there are no other errors, the audit tool displays a message and adds the class of service to the Cisco SPA database. For more information on messages, see the "About Cisco SPA Alarms" section.
|
AC Group
|
• The audit tool checks if each authorization code group in the Cisco SPA database also exists on the Cisco BTS EMS server. If a discrepancy is detected, the audit tool displays a message and deletes the authorization code group from the Cisco SPA database.
• The audit tool checks which class of services are using which authorization code group on the Cisco BTS EMS server.
– If an authorization code group on the Cisco BTS EMS server is being used by class of services in more than one Cisco SPA account, the audit tool displays a message. An authorization code group ID is unique and can be used by only one account. For more information on messages, see the "About Cisco SPA Alarms" section.
– If an authorization code group is not in the Cisco SPA database and there are no other errors, the authorization code group is added to the Cisco SPA database, and the audit tool displays a message. For more information on messages, see the "About Cisco SPA Alarms" section.
|
Save Schedule
|
Saves any changes to the scheduled database audits.
|
Using the Configuration Tab
The Configuration tab in the Cisco SPA operation and configuration tool enables you to do the following:
•
Set up connectivity to the Cisco BTS EMS server
•
Specify security parameters
•
Import and generate security certificates
•
Specify e-mail contact information
•
Select secure HTTP connections
•
Select a data logging level
•
Perform administrative functions such as resetting the administrator's password and unlocking the root account user
•
Specify SNMP parameters
Field
|
Description
|
BTS Connection
|
EMS Host Name
|
Enter the name or IP address of the Cisco BTS EMS server where the Cisco BTS 10200 Softswitch is installed.
Note If you are using the IP aliasing feature on the Cisco BTS 10200 Softswitch, enter an IP address for this field.
If you are not using the IP aliasing feature, enter either an IP address or a host name.
|
EMS Port Number
|
Enter the port number on the Cisco BTS EMS server that communicates with Cisco SPA.
The default is 14001.
|
EMS Site ID
|
Enter the site ID of the Cisco BTS EMS server.
|
EMS Login User ID
|
Login name that is already set on the Cisco BTS EMS server.
|
EMS Login Password
|
This password is used for the Cisco SPA application to log in to the Cisco BTS EMS server. If the Cisco BTS EMS server login password changes, you must specify a new password for Cisco SPA to communicate with the Cisco BTS EMS server.
1. Enter a new password that is up to 20 characters in length.
2. Verify the new password.
3. Click Save Configuration to accept the new password.
|
Confirm Password
|
Number of BTS Connections
|
Enter the number of simultaneous connections allowed between Cisco SPA and the Cisco BTS EMS server.
|
Security
|
SPAUSR Database Password
|
1. Enter a new password that is up to 20 characters in length.
2. Verify the new password.
3. Click Save Configuration to accept the new password.
|
Confirm Password
|
SPAROOT Database Password
|
Confirm Password
|
Lock User Account after...failed login attempts
|
Cisco SPA logs and maintains a counter for the number of consecutive failed passwords for a user ID. When this number is exceeded, the user ID is locked, and an alarm occurs.
Enter a value in the range 1 to 6; the default is 5.
The service provider or account administrator can unlock the user ID (see the Unlock Root Account field in this table).
|
Session Timeout (minutes)
|
Enter a value in the range 5 to 30; the default is 10.
|
Use Secure HTTP Connections
|
For secure HTTP connections, select this checkbox.
For secure connections, the port used is 443; for nonsecure connections, the port used is 80.
|
SNMP
|
Community String
|
Enter one of the following:
• public—Same as RO (read-only).
• private—Same as RW (read-write).
|
Manager Host IP Address for Traps
|
The IP address of the host where SNMP traps are stored.
|
Email Information
|
Mail Server Name
|
Enter the name of the outgoing mail server that sends new passwords or user ID reminders.
|
Mail from Address
|
Enter the sending address that is sent on password and user ID reminders.
Tip Enter an invalid e-mail address, so that users do not reply to it.
|
Logging
|
Select a level at which data will be logged:
• Debug
• Information
• Warning
• Error
• Fatal
Note Select the Debug log level for troubleshooting purposes only. During normal system operation, select either the Warning or Error log level.
|
Keep log files for....
|
Enter a value in the range 1 to 30 days; the default is 7.
|
Miscellaneous
|
Reset Admin Password
|
To reset the current password to the default value of "admin," click Reset Admin Password.
Note This is the password that the admin user ID uses to log in to the Cisco SPA application.
If the service provider root administrator account is locked, this button does not automatically unlock it. Click Unlock Root Account to unlock the account.
|
Unlock Root Account
|
To unlock the root account, click this button.
This action is necessary when the service provider root administrator has not created additional service provider administrators and is then locked out of the application because failed password attempts exceed the maximum number allowed.
The maximum number of failed password attempts is specified in the "Lock User Account after...failed login attempts" field in this table.
|
Import Certificate
|
To set up a Secure Socket Layer (SSL) connection from the service provider to Cisco SPA, see the "About Enabling SSL Connections on Cisco SPA" section.
|
Generate Certificate
|
Save Configuration
|
Click Save Configuration to save all changes that you make to this window.
Note In order for configuration changes to take effect, first stop Cisco SPA (see the "Using the Status Tab" section), then click Save Configuration.
|
Implementing Cisco SPA Configuration Changes
In order for configuration changes to take effect, complete these steps:
Step 1
Stop Cisco SPA (see the "Using the Status Tab" section).
Step 2
Make changes on the Configuration tab.
Step 3
Click Save Configuration.
If Cisco SPA is running when you click Save Configuration, you are prompted to stop Cisco SPA and then click Save Configuration. If you leave the Configuration tab to stop Cisco SPA, your changes are kept intact until you return to save them.
About Enabling SSL Connections on Cisco SPA
To set up a Secure Socket Layer (SSL) to Cisco SPA, follow these procedures:
•
Task 1: Generating and Downloading a Certificate Signing Request File
•
Task 2: Sending the Certificate Signing Request File to a Certificate Signing Authority
•
Task 3: Importing the New Certificate and Root Certificate
Task 1: Generating and Downloading a Certificate Signing Request File
Step 1
Log in to Cisco SPA as described in "Starting the Cisco SPA Operation and Configuration Tool" section.
Step 2
Select the Configuration tab.
Step 3
Click Generate Certificate.
Enter information in the Generate Key dialog fields:
Field
|
Description
|
Host Name
|
Enter the name of the server on which Cisco SPA is installed.
|
Organizational Unit
|
Enter the name of your company.
|
Organization
|
Enter the name of your organization within your company.
|
City or Locality
|
Enter the name of your city.
|
State or Province
|
Enter the name of your state.
|
Two Character Country Code
|
Enter the code for your country.
|
Replace existing certificate file
|
Select this option to generate a new certificate.
Note If you do not select this option, the existing certificate is used.
|
Create a Certificate Signing Request File to send to Server Certificate Authorities.
|
Certificate File Name
|
Enter a location where the Certificate Signing Request (CSR) File will be stored.
The default storage location is /opt/SPA/spa_request.csr.
|
Step 4
Click OK.
Step 5
Download the spa_request.csr file to your PC.
Task 2: Sending the Certificate Signing Request File to a Certificate Signing Authority
Step 1
For signing, send the spa_request.csr file to a Certificate Signing Authority (CSA), such as Verisign (www.verisign.com).
Step 2
To get the CSR signed, follow the CSA's instructions.
The CSA sends back a signed certificate.
Step 3
Save the signed certificate in the signed-cert.txt file.
Step 4
If the CSA also sends back a Root Certificate File, save it in the root-cert.txt file.
Step 5
Upload the signed-cert.txt and root-cert.txt files to Cisco SPA, and store them at /opt/SPA/signed-cert.txt.
Task 3: Importing the New Certificate and Root Certificate
Step 1
Log in to Cisco SPA as described in "Starting the Cisco SPA Operation and Configuration Tool" section.
Step 2
Select the Configuration tab.
Step 3
Click Import Certificate.
Enter information in the Import Certificates dialog fields:
Field
|
Description
|
Certfication Authorities (CA) Root Certificate File
|
1. Click Browse.
2. Navigate to the root-cert.txt file and select it.
|
New Certificate Issued for this Server
|
1. Click Browse.
2. Navigate to the signed-cert.txt file and select it.
|
Step 4
Click OK.
Step 5
From the Status tab, click Stop SPA.
Step 6
Click Start SPA.
Branding Tab
The Branding tab in the operation and configuration tool enables you to customize product properties and the text displayed on the Cisco SPA home page.
The default logo (that displays on the home page) is the Cisco logo stored in logo.gif. You can replace this with the logo of your choice.
Field
|
Description
|
Customer Support Info
|
Application Name
|
Enter the name of your application or product.
|
Support Email Address
|
Enter up to 64 characters.
|
Support Phone Number
|
Enter a phone number.
|
Logo
|
Enter the name and location of a file in the .gif format. (Example: /opt/SPA/config/logo.gif.)
To browse to a file:
1. Click Select.
2. When you locate the file, click Open to select it, or Cancel to start over.
|
Customize your Home Page
|
In the customization box, enter the text in HTML format.
Example:
<div valign='middle'><h1 align='center'>Welcome to
SPA</h1></div>
|
Save Branding
|
To save any changes made to this dialog box, click Save Branding.
|
Validation Tab
The Validation tab in the operation and configuration tool enables you to specify the minimum number of alphanumeric characters for these user entries and the validation patterns used for each entry.
Note
You cannot change the maximum length of validations.
Field
|
Description
|
Validation Rules
|
Account Minimum Value
|
The maximum length is 20 characters; the default minimum length is 6.
|
Email Minimum Value
|
The maximum length is 64 characters; the default minimum length is 7.
|
Password Minimum Value
|
The maximum length is 20 characters; the default minimum length is 6.
|
Phone Minimum Value
|
The maximum length varies depending on your geographical location; the default minimum length is 7.
|
User Id Minimum Value
|
The maximum length is 20 characters; the default minimum length is 3.
|
Pattern
|
Shows how each value is validated.
|
Update Validation Rules
|
Click this to save any changes to either the minimum values or validation patterns entered in this dialog box.
|
Reset to Default Patterns
|
Click this to reinstate the default validation patterns for all the values.
|
About the Audit Tool
Cisco SPA contains a standalone (not web-based) application that compares the data in the Cisco SPA database with the data in the Cisco BTS EMS server database.
The audit results are displayed and stored in a timestamped log file called audit.log.yyyy-mm-dd_hh:mm:ss which is located at /opt/SPA/data/logs.
Where,
yyyy-mm-dd is the date (year, month, and day) when the audit was started.
hh:mm:ss is the time (hour, minute, and second) when the audit was started.
The audit tool stores seven days of audit results.
Note
For Existing Cisco BTS 10200 Softswitch customers:
If you are an existing Cisco BTS 10200 Softswitch customer who has installed Cisco SPA for the first time, run the audit tool immediately after creating Cisco SPA accounts (see Figure 1-2, Workflow for Existing Cisco BTS 10200 Customers).
The audit tool retrieves the class of service and authorization code group information (from the Cisco BTS EMS server) for the phones in your accounts and stores this information in the Cisco SPA database.
If you attempt to assign class of services and authorization code groups from Cisco SPA, the assignments fail because the phones already have these assigned on the Cisco BTS EMS server. In this event, an error message appears.
Running the Audit Tool
This procedure enables you to run an immediate audit on the Cisco SPA and Cisco BTS EMS server databases. You can also schedule audits to run at a future time (see the "Using the Audit Tab" section).
Step 1
Log in to the server where Cisco SPA is installed:
Login: spausr
Step 2
Enter a password:
Password: xxxxxxxx
Step 3
Enter the following command:
audit.sh-value
Where,
value is one of the following:
•
h—Help. Displays all the options that you can enter with this command.
•
1—Checks if the phones on Cisco SPA exist in the Cisco BTS EMS server database. If a discrepancy is detected, the audit tool displays a message. For more information on messages, see the "About Cisco SPA Alarms" section.
•
2—Checks if phones in Centrex and multiline hunt groups on the Cisco BTS EMS server also exist on Cisco SPA. If a discrepancy is detected, the audit tool displays a message. For more information on messages, see the "About Cisco SPA Alarms" section.
Note
This check is for phones in groups only. If a certain number of phones exist in a group on the Cisco BTS EMS server, the audit tool checks that the same number of phones exist in the same group on Cisco SPA.
•
3—Checks if each class of service in Cisco SPA exists on the Cisco BTS EMS server. If a discrepancy is detected, the audit tool displays a message, and the class of service is deleted from Cisco SPA. For more information on messages, see the "About Cisco SPA Alarms" section.
•
4—Checks which phones are using which class of service on the Cisco BTS EMS server.
–
If a class of service is being used by phones assigned to more than one Cisco SPA account, the audit tool displays a message. A class of service ID is unique and can be used by only one account. For more information on messages, see the "About Cisco SPA Alarms" section.
–
If a class of service is being used by phones on the Cisco BTS EMS server and is not on
Cisco SPA, the audit tool displays a message. For more information on messages, see the "About Cisco SPA Alarms" section.
–
If a class of service is not in the Cisco SPA database and there are no other errors, the audit tool displays a message and adds the class of service to the Cisco SPA database. For more information on messages, see the "About Cisco SPA Alarms" section.
•
5—Checks if each authorization code group in the Cisco SPA database also exists on the
Cisco BTS EMS server. If a discrepancy is detected, the audit tool displays a message and deletes the authorization code group from the Cisco SPA database.
•
6—Checks which class of services is using which authorization code group on the Cisco BTS EMS server.
–
If an authorization code group on the Cisco BTS EMS server is being used by a class of services in more than one Cisco SPA account, the audit tool displays a message. An authorization code group ID is unique and can be used by only one account. For more information on messages, see the "About Cisco SPA Alarms" section.
–
If an authorization code group is not in the Cisco SPA database and there are no other errors, the authorization code group is added to the Cisco SPA database, and the audit tool displays a message. For more information on messages, see the "About Cisco SPA Alarms" section.
•
a—Runs all the checks described in options 1 through 6.
•
b—Runs the audit in batch mode and does not display results.
The audit results are displayed as well as written to the log file (see the "About the Audit Tool" section).
About the Bulk Load Function
The bulk load function allows you to create, edit, and delete accounts in Cisco SPA without using the GUI. Because service providers have existing systems for tracking their customers, the data from these systems can be extracted and placed in an XML file that Cisco SPA processes.
The bulk load function checks the bulk load depot directory once a minute to determine if there are files to process. These checks start when Cisco SPA is started and stop when Cisco SPA is shut down.
If Cisco SPA is shut down while processing a file, the processing stops, and a results file indicates that the processing was interrupted. The status of the records processed up to that point will be in the results directory. You can resubmit the records that were not processed in the last attempt.
Location of Bulk Load Directories
You can find the bulk load directories at the following locations:
/opt/SPA/bulk-load/depot
/opt/SPA/bulk-load/results
Note
You can place multiple bulk load files in the depot directory, and as each file is processed successfully a response is sent to the results directory.
Location of the Document Type Definition (DTD) File
The DTD describes the format of the XML file and is found at the following location:
/opt/SPA/bulk-load/spa-bulk-load.dtd
Example of an XML Input File
<?xml version="1.0" encoding="UTF-8"?>
<!DOCTYPE spa-bulk-load SYSTEM "/vob/bts-spa/spa-bulk-load.dtd">
<spa-bulk-load>
<records>
<record id="1">
<account verb="delete">
<id>account-1</id>
</account>
</record>
<record id="2">
<account verb="add">
<id>account-1</id>
<description>account 1</description>
<allow-auth-codes>true</allow-auth-codes>
<allow-cos>true</allow-cos>
<allow-groups>true</allow-groups>
<admin-id>account-1-adm</admin-id>
<admin-password>test123</admin-password>
<admin-email>account-1-adm@hd.com</admin-email>
<phones>
<phone verb="add">
<fdn>7035550001</fdn>
</phone>
<phone verb="add">
<fdn>7035550002</fdn>
</phone>
<phone verb="add">
<fdn>7035550003</fdn>
</phone>
<phone verb="add">
<fdn>7035550004</fdn>
</phone>
</phones>
</account>
</record>
<record id="3">
<account verb="edit">
<id>account-1</id>
<phones>
<phone verb="add">
<fdn>7035563784</fdn>
</phone>
</phones>
</account>
</record>
</records>
</spa-bulk-load>
Example of an Output File
<?xml version="1.0" encoding="UTF-8"?>
<spa-bulk-load>
<results>
<result id="1" status="success"/>
<result id="2" status="success"/>
<result id="3" status="success"/>
</results>
<summary status="success">
<msgs>
<msg>File processed succesfully.</msg>
<msg>Processed 3 records. Success (3) Failed (0)</msg>
</msgs>
</summary>
</spa-bulk-load>