-
Cisco TelePresence Manager 1.9 Administration and Installation Guide
-
Preface
-
General Information About Cisco TelePresence Manager
-
Pre-install System Setup for Cisco TelePresence Manager
-
Configuring Microsoft Exchange for Cisco TelePresence Manager
-
Configuring IBM Domino for Cisco TelePresence Manager
-
Configuring Scheduling API for Cisco TelePresence Manager
-
Configuring Cisco Unified CM for Cisco TelePresence Manager
-
Installing and Configuring for Cisco PreQualification Assistant
-
Configuring UCS Server and VMware for Cisco TelePresence Manager
-
Installing or Upgrading Cisco TelePresence Manager
-
Initializing Cisco TelePresence Manager
-
Additional Installation Configurations for Cisco TelePresence Manager
-
Configuring Cisco TelePresence WebEx OneTouch for Cisco TelePresence Manager
-
Monitoring Cisco TelePresence Manager
-
Cisco TelePresence Manager Emails and Meeting Manager
-
Supported MIBS for Cisco TelePresence Manager
-
Troubleshooting Cisco TelePresence Manager
-
Cisco TelePresence Manager System Messages
-
Replacing a Cisco TelePresence System Codec
-
Reconfiguring Cisco TelePresence Manager and CTMS Addressing
-
 Feedback
Table Of Contents
Monitoring and Supporting Cisco TelePresence Manager
Post-Install Guidelines for CTS-Manager
Process/Response Times for Scheduled Meetings
Modifying Meeting Details from a Calendar Client
Calendar Scheduling Limitation
Generating Scheduled Meeting Reports
Exporting Scheduled Meeting Data
Manually Updating Schedules on the Cisco TelePresence Endpoint Phone or Control Device
Viewing Scheduled Meetings for a Specific Endpoint
Generating Bridges or Servers Reports
Monitoring and Supporting Cisco TelePresence Manager
First Published: May 29, 2012, OL-22226-02Contents
•
Post-Install Guidelines for CTS-Manager
Introduction
CTS-Manager monitoring features allow you to monitor:
•
•
•
•
•
Note
Post-Install Guidelines for CTS-Manager
The purpose of this chapter is to outline the information you will need to reference in order to configure the system after installing the CTS-Manager.
The flow of tasks you need to do for additional configurations for the CTS-Manager are provided in the following table.
If at any time you encounter problems, go to Chapter 16 "Troubleshooting Cisco TelePresence Manager" to see how to correct the problem.
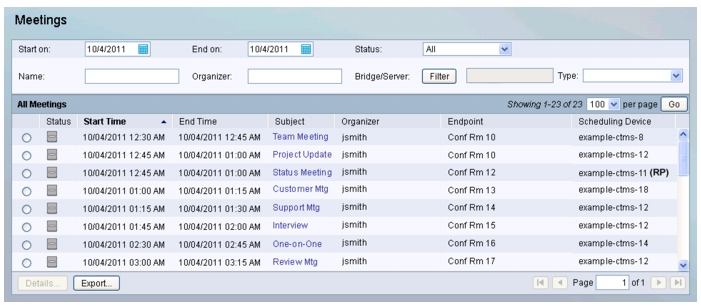
Meetings
The Monitor > Meetings window allows you to view information about the scheduled meetings, including:
•
•
•
•
•
•
•
Figure 13-1 Meetings window
When a meeting is scheduled using Microsoft Outlook or IBM Lotus Notes, an e-mail is generated to confirm the meeting and provide a link to meeting details. The CTS-Manager must be reachable from an Exchange Server for Meeting Notification to work.
The Rendezvous Point of a CTMS Network Multipoint meeting is indicated with (RP) next to the CTMS.
Note
The Meetings window provides another way to view and modify meeting details.
In the current version of CTS-Manager, it is possible to search from 1 to 15000 meeting records.
Warning
Note
Note
Note
Call Detail Record Information for Point-to-Point Meetings with C, EX and MX-series Endpoints
Call Detail Record (CDR) information is available for point-to-point meetings scheduled with C, EX and MX-series endpoints in the following ways:
•
–
–
•
–
–
The CDR limitations of C, EX and MX-series endpoints are due to the fact that Meeting ID is not provided along with meeting start event.
Process/Response Times for Scheduled Meetings
Microsoft Exchange or IBM Domino calender servers typically confirm a meeting request within one minute if all the affected rooms (endpoints) are in auto-accept mode. A room (endpoint) in proxy mode must have a delegate respond to a meeting invite. This can affect the response time for a scheduled meeting. Once all room reservations are confirmed the meeting should appear in the Scheduled Meetings window and the phone's screen within 15 minutes. If email alerts are turned on, confirmation or error emails are generated and sent within 10-15 minutes.
Modifying Meeting Details from a Calendar Client
•
•
•
•
•
•
•
•
•
Note
Calendar Scheduling Limitation
CTS-Manager only displays endpoint scheduling information for a 12 month window. If a meeting organizer schedules a recurring meeting with meeting instances that extend outside this window, those meeting instances are added to the CTS-Manager database as the calendar date moves forward. If a meeting organizer schedules a future meeting outside the present 12 month window the meeting is not displayed in CTS-Manager until the meeting falls inside the 12 month window.
Generating Scheduled Meeting Reports
You can generate a report about specific scheduled meetings or activity between specific dates by supplying any or all of the following details:
Step 1
Step 2
Step 3
Note
Step 4
Step 5
Step 6
Table 13-2 describes the Meetings information.
Table 13-2 Meetings Information
Start Time
The scheduled starting time for a meeting. Click the arrow in the header of the Start Time column to sort the time from earliest to latest or latest to earliest.
End Time
The scheduled ending time for a meeting.
Status
Meeting status: All, With Error, In Progress, Scheduled, Completed, or No Show (displayed when moving your mouse pointer over the displayed icon).
Note
Note
Note
Subject
Information (such as the meeting subject) provided by the meeting organizer about the meeting.
Note
Organizer
Login name of the person who scheduled the meeting. Click the arrow in the header of the Organizer column to sort the list in ascending or descending alphabetical order.
Endpoint
Endpoint (room) name as specified in the Microsoft Exchange or IBM Domino database.
Scheduling Device
Multipoint scheduling device used for meeting (if multipoint meeting).
Note
Details
Click this button to view detailed information about a selected meeting. See Meeting Details for more information.
Export
Click this button to export your meeting data in tab-separated value (.tsv) format.
Information includes:
•
•
•
•
•
•
•
–
–
–
–
–
Meeting Subject on Phone
Open Collaboration Manager
Click this button to open Cisco Prime Collaboration Manager (CM) for a selected meeting. Cisco Prime CM is a web-based user application for managing and troubleshooting end-to-end video collaboration, over a borderless network. It provides a real-time unified view of all Cisco TelePresence sessions that are in progress.
The Collaboration Manager button does not appear unless it is configured in CTS-Manager.
To configure Collaboration Manager, go to Configure > Bridges and Servers.
Note
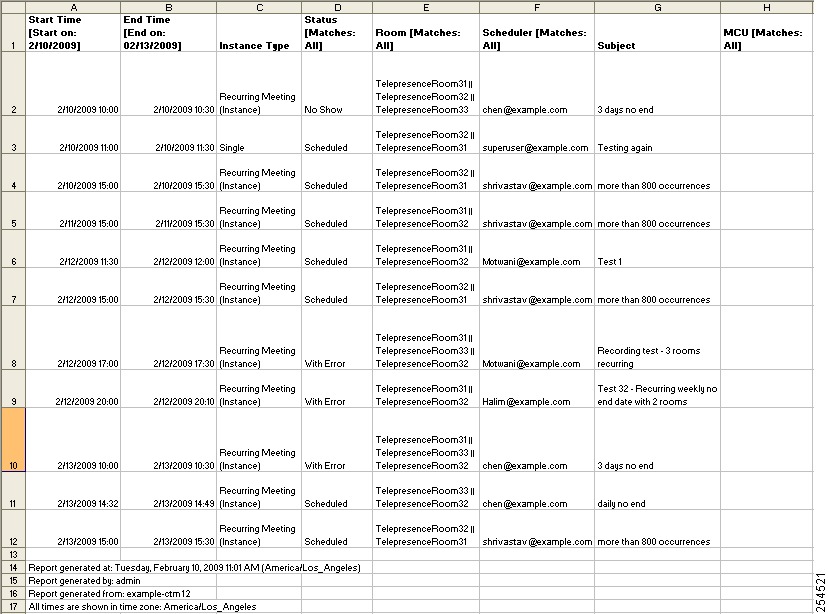
Exporting Scheduled Meeting Data
You can use the Export Data button to export your scheduled meeting data to a tab-separated values (.tsv) file. The meeting data exported includes the meetings appearing in the Scheduled Meetings window.
Use the filter to display only the scheduled meetings you want to export. You can export as many as 500 meetings. The exported data file is a tab-delimited text file.
Figure 13-2 Viewing Exported Scheduled Meeting Data
Meeting Details
The meeting details window provides detailed information about a specific meeting and allows the administrator to make changes to the meeting's settings and correct possible errors.
To access the meeting details window:
Step 1
Step 2
The meeting details window appears displaying summary information for the selected meeting.
Tip
The Meeting Details window is divided into the following tabs:
Summary
The Summary tab provides basic information about the meeting.
Bridges and Servers
The bridges and servers tab appears if the meeting is a multipoint meeting (three or more endpoints are scheduled). This window displays how many scheduling devices and endpoints are reserved for the meeting and allows the administrator to migrate the multipoint meeting from one CTMS to another and change the Cisco Media Experience Engine (MXE) assigned to the meeting, if Interoperability with Video Conferencing is enabled. If the meeting is a network multipoint meeting, two or more CTMS devices are displayed and the Rendezvous Point CTMS is noted with an `(RP)' next to it.
Note
.
Guidelines for Migrating CTMSs for Network Multipoint Meetings
When migrating CTMSs associated with a network multipoint meeting, follow these guidelines:
•
•
•
•
•
•
CTMS Network
The CTMS Network tab appears only if the meeting is a network multipoint meeting. This window displays the scheduling devices and endpoints that are reserved for the meeting, including their device group and time zone. Also displayed is the number of CTMS segments reserved for the meeting.
.
Intercompany
The Intercompany window provides the ability to schedule TelePresence meetings with other companies.
To enable this feature, click Yes and then click Apply.
Note
Recurring Intercompany Meetings
If you make changes to a recurring intercompany meeting, those chnages are applied to all future instances of the meeting. It is not possible to change a single instance only.
WebEx
The WebEx window displays WebEx information for the meeting and provides the ability to enable or disable WebEx for the meeting.
Note
Allow WebEx users to participate in this meeting
Selecting Yes enables WebEx for this meeting. Selecting No disables Webex for this meeting.
WebEx Call-In Information
This section displays the WebEx information necessary for both the host and participants to join the meeting
Usage Survey
The Usage Survey window displays the survey, as set up by the administrator in the Configure > Application Settings > Usage Survey window.
Note
Meeting Options
The meeting options window allows the meeting organizer to adjust other options for their meeting.
Note
Mark this meeting as private: Allows you to show or hide the TelePresence meeting subject on the phone of the TelePresence endpoint.
Provide a call-in number for other participants?: Allows you to provide a call-in number for TelePresence endpoints that were not originally invited to the meeting to be able dial in to the meeting.
The following two options are available only for a meeting scheduled with one endpoint (room):
Is TelePresence Needed For This Meeting?: Allows you to enable or disable TelePresence for the meeting.
Is this meeting intended for recording a video to be distributed later?: Allows you to record the meeting for distribution later.
When you are finished making changes in the Meeting Options window, click Apply to save your changes.
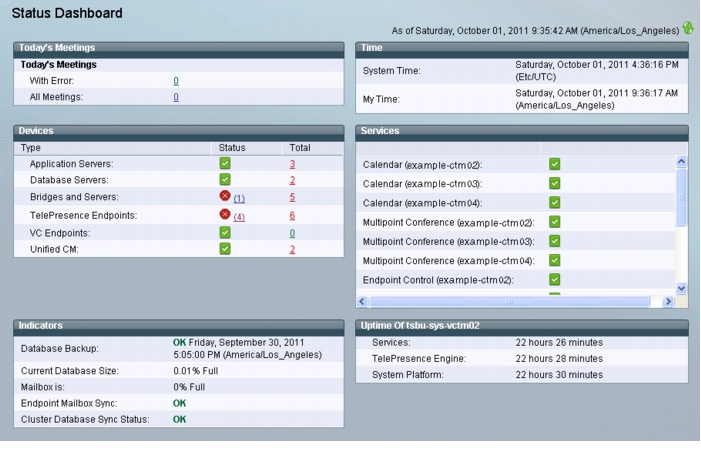
Status Dashboard
The Monitor > Status Dashboard window displays a concise list of system activity, including a snapshot of scheduled meetings for the day and the status of system services. This is a good place to monitor meetings and equipment. Click highlighted links in this window for quick access to other windows that provide meeting and endpoint-scheduling functions.
To update the Status Dashboard, click the Force refresh icon.

Figure 13-3 Monitor > Status Dashboard
Table 13-8 Status Dashboard Fields and Descriptions
Today's Meetings
Status of current and upcoming meetings:
•
•
Click the link associated with each meeting or device's information to go to the Meetings window.
Devices
Status information for the following devices:
•
•
Cisco no longer provides support for the clustering feature originally introduced in release 1.8. For questions, contact Ron Lewis: ronlewis@cisco.com.
•
Cisco no longer provides support for the clustering feature originally introduced in release 1.8. For questions, contact Ron Lewis: ronlewis@cisco.com.
•
•
•
Note
Indicators
Status Indicators for:
•
•
•
•
Time
Status of the following times:
•
•
Services
Status information for the following system services:
•
•
•
•
•
•
•
Status is either OK or is a highlighted link listing the number of errors. You can click a link to see further system log status information and troubleshoot problems. You can also roll your mouse over a highlighted link to see a brief description of the error.
Uptime
Status information about the elapsed running time since the last restart.
•
•
•
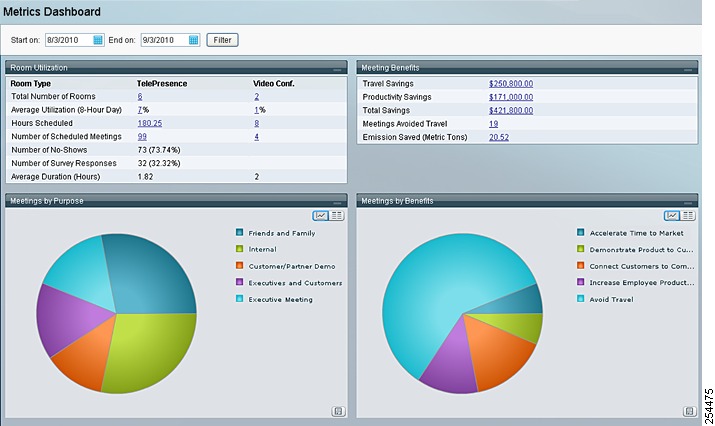
Metrics Dashboard
The Monitor > Metrics Dashboard window displays system-wide information about how TelePresence endpoints are used and the associated benefits of their usage.
Caution
To view information for a specific range of time:
•
Figure 13-4 Monitor > Metrics Dashboard
Note
Except for the Endpoint Utilization and Meeting Benefits information, the information in this window can be viewed in a graphical format. You can view the information either as a chart or a list (grid).
To view information as a chart, click the View as Chart button. This is the default view.
View as Chart
Note
To view the information as a list, click the View as Grid button.
View as Grid
To open a chart as an image in a new window, click the Show as Image button.
Show as Image
The following information is available in the Metrics Dashboard:
Note
Endpoint Utilization
The Endpoint Utilization information helps you understand how TelePresence and video conferencing endpoints are used.
This information is calculated using the Meeting Benefit Report Parameters entered in the Configure > Application Settings > Usage Survey window.
Table 13-9 Endpoint Utilization Description
Total Number of Endpoints
Total number of TelePresence and video conferencing endpoints which are currently configured in CTS-Manager.
Average Utilization
Average percentage of TelePresence and video conferencing endpoints utilization based on the work hours per day and work days per week configured in the Configure > Application Settings > Usage Survey window.
Hours Scheduled
Total number of hours that TelePresence and video conferencing endpoints were scheduled as computed by CTS-Manager based on the number of meetings scheduled.
Number of Scheduled Meetings
Total number of scheduled TelePresence and video conferencing meetings as computed by CTS-Manager based on the number of scheduled meetings the within selected timeframe.
Number of No-Shows
Total number of scheduled meetings that never took place
Number of Survey Responses
Total number and percentage of survey responses for TelePresence meetings
Average Duration (Hours)
Average duration of TelePresence meetings in hours
Note
Meeting Benefits
The Meeting Benefits information helps you understand how TelePresence meetings benefit your organization in terms of cost and productivity savings, as well as reduced environmental impact.
This information is calculated using the Meeting Benefit Report Parameters entered in the Configure > Application Settings > Usage Survey window.
Table 13-10 Meeting Benefits Description
Travel Savings
Total amount of money saved by using TelePresence instead of traveling as configured in the cost per trip and trips eliminated per meeting parameters in the Configure > Application Settings > Usage Survey window if the meeting organizer selects Avoid Travel as the response for required Benefit question in the usage survey. The meeting organizer must choose the Avoid Travel answer for the meeting to be counted as saving travel.
Productivity Savings
Total amount of money (in USD) saved through increased productivity when people avoid travel by using TelePresence based on the travel hours per trip, employee hourly cost, number of people who avoid travel per meeting and the number of meetings that avoided travel per the meeting, configured in the Configure > Application Settings > Usage Survey window. The meeting organizer must choose the Avoid Travel answer to the Benefit question for the meeting to be counted as saving travel, increasing productivity and saving emissions.
Total Savings
Total amount of money (in USD) saved by using TelePresence. This is the sum of travel savings and productivity savings.
Meetings Avoided Travel
Total number of meetings that replaced business trips, based on the number of meeting organizers who selected Avoid Travel for the Benefit question.
Emissions Saved (Metric Tons)
Total number of carbon emissions saved by using TelePresence, based on the carbon emissions per trip, the trips eliminated per meeting, as configured in the Configure > Application Settings > Usage Survey window, the number of people who avoided travel per meeting, and the number of meetings which avoided travel. The meeting organizer must choose the Avoid Travel answer to the Benefit question for the meeting to be counted as saving emissions.
Meetings by Purpose
The Meetings by Purpose information shows the percentage of survey respondents for all meetings that chose each purpose as the purpose for their meeting. This information is gathered from the meeting purpose question in the usage survey for each meeting and is displayed in a pie chart by default. In grid view, the number displayed in each row of the Value column corresponds to the number of survey respondents that provided that answer.
Meetings by Benefits
The Meetings by Benefits information shows the percentage of survey respondents for all meeting that chose each benefit as the benefit for their meeting. This information is gathered from the meeting benefit question in the usage survey for each meeting and is displayed in a pie chart by default. In grid view, the number displayed in each row of the Value column corresponds to the number of survey respondents that provided that answer.
Scheduled Meetings
The Scheduled Meetings information shows the number of daily scheduled meetings over time. The information is displayed in a line chart by default. You can view the information for the Past Week, Past Month and Past Quarter by clicking the appropriate link at the top of the chart. In grid view, the number displayed in each row of the Scheduled Meetings column corresponds to the number of scheduled meetings for that date.
Ad Hoc Meetings
The Ad Hoc Meetings information shows the number of daily ad hoc meetings over time. The information is displayed in a line chart by default. You can view the information for the Past Week, Past Month and Past Quarter by clicking the appropriate link at the top of the chart. In grid view, the number displayed in each row of the Ad Hoc Meetings column corresponds to the number of Ad Hoc meetings for that date.
Meetings Avoided Travel
The Meetings Avoided Travel information shows the number of meetings over time that replaced business trips. The information is displayed in a line chart by default. You can view the information for the Past Week, Past Month and Past Quarter by clicking the appropriate link at the top of the chart. In grid view, the number displayed in each row of the Meetings Avoided Travel column corresponds to the number of meetings that replaced business trips for that date.
Travel Savings
The Travel Savings information shows the amount of money (in USD) saved by using TelePresence instead of traveling. The information is displayed in a line chart by default. You can view the information for the Past Week, Past Month and Past Quarter by clicking the appropriate link at the top of the chart. In grid view, the number displayed in each row of the Travel Savings column corresponds to the amount of money (in USD) saved by using TelePresence instead of traveling on that date.
Emissions Savings
The Emissions Savings information shows the carbon emissions saved (in Metric Tons) by using TelePresence instead of traveling. The information is displayed in a line chart by default. You can view the information for the Past Week, Past Month and Past Quarter by clicking the appropriate link at the top of the chart. In grid view, the number displayed in each row of the Emissions Savings column corresponds to the amount of carbon emissions (in Metric Tons) saved by using TelePresence instead of traveling on that date.
Productivity Savings
The Productivity Savings information shows the amount of money (in USD) saved through increased productivity by using TelePresence. The information is displayed in a line chart by default. You can view the information for the Past Week, Past Month and Past Quarter by clicking the appropriate link at the top of the chart. In grid view, the number displayed in each row of the Productivity Savings column corresponds to the amount of money (in USD) saved in increased productivity by using TelePresence on that date.
Endpoints Added
The Endpoints Added information shows the number of endpoints added over time. The information is displayed in a line chart by default. You can view the information for the Past Week, Past Month and Past Quarter by clicking the appropriate link at the top of the chart. In grid view, the number displayed in each row of the Endpoints Added column corresponds to the number of endpoints added on that date.
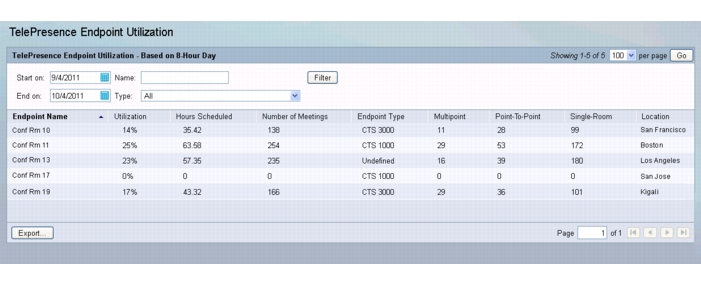
TelePresence Utilization
The Monitor > TelePresence Utilization window displays information about how each TelePresence endpoint is currently used. You can export all TelePresence utilization data to a Tab-separated values (.tsv) file, by clicking Export.
Note
Figure 13-5 Monitor > TelePresence Utilization
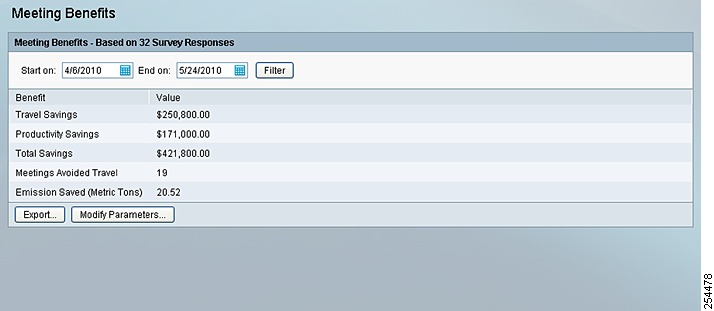
Meeting Benefits
The Monitor > Meeting Benefits window displays information about the benefits for all TelePresence meetings. From this window you can modify the benchmark parameters used to generate this information, based on your company's approved benchmarks, by clicking Modify Parameters. You can also export all meeting benefits data to a Tab-separated values (.tsv) file, by clicking Export.
Note
Figure 13-6 Monitor > Meeting Benefits
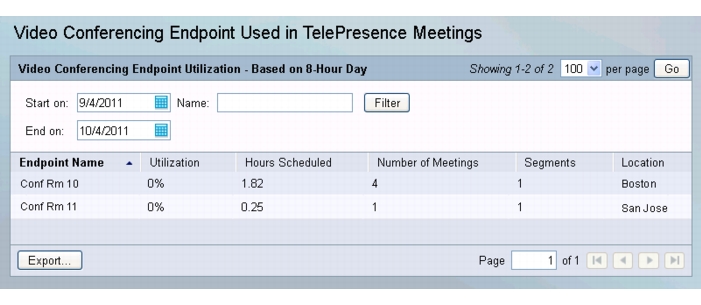
VC Utilization
The VC Utilization window displays information about how each video conferencing endpoint is currently used. You can export all video conferencing utilization data to a Tab-separated values (.tsv) file, by clicking Export.
Note
Figure 13-7 Monitor > VC Utilization
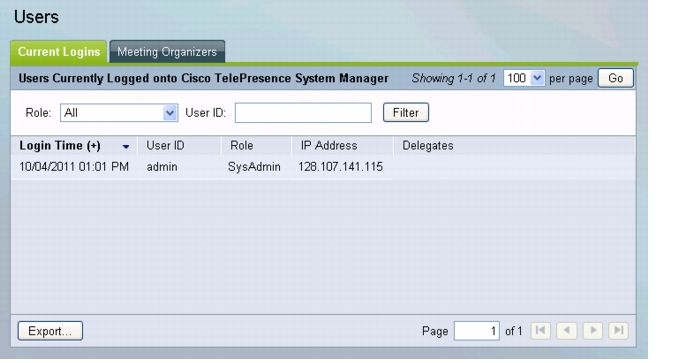
Users
The Monitor > Users window displays information about Cisco TelePresence Manager users. It is divided into two tabs:
•
•
Current Logins
Choose Support > Monitor > Current Logins to view information about who is currently logged into CTS-Manager, what their system role is and their IP address. You can filter this window to display information about the following users:
•
•
•
•
•
To further filter this list, you can enter a specific User ID. Once you've selected your filtering criteria, click Filter.
Note
Figure 13-8 Monitor > Users > Current Logins
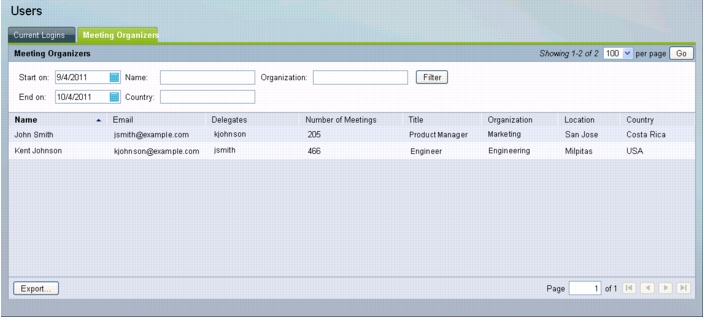
Meeting Organizers
The Monitor > Users > Meeting Organizers window displays the meeting organizers of currently scheduled meetings.
This information can be exported to create lists of organizers, and additional information about them and the number of meetings that they set up.
Note
Figure 13-9 Monitor > Users > Meeting Organizers
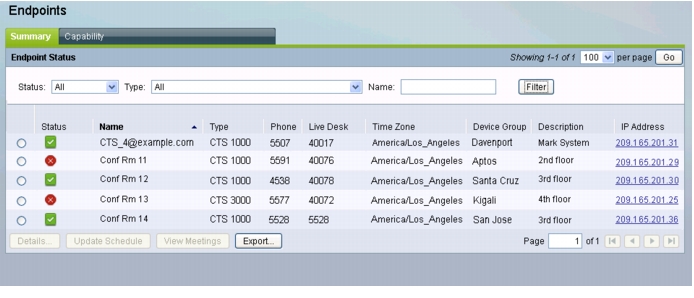
Endpoints
The Support > Endpoints window displays information about endpoints. This window is divided into three, tabbed views.
•
•
Generating Endpoint Reports
You can generate a report about specific meeting endpoints and meeting status, as follows:
Step 1
Note
Step 2
Step 3
Note
Figure 13-10 Support > Endpoints > Summary
Manually Updating Schedules on the Cisco TelePresence Endpoint Phone or Control Device
To update an endpoint's IP phone/or control device with what is currently scheduled in the Microsoft Exchange or IBM Domino database, perform the following steps:
Step 1
Step 2
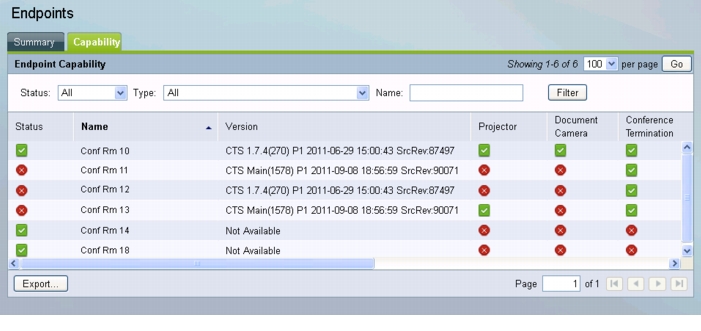
Viewing Scheduled Meetings for a Specific Endpoint
To obtain additional information about any meetings associated with an endpoint, perform the following steps:
Step 1
Step 2
Figure 13-11 Support > Endpoints > Capability
Tentative Room Reservation
The Tentative Room Reservation button allows you to enable tentative room reservations for individual TelePresence endpoints.
Note
A tentative room reservation is a meeting invitation that has been viewed by the room (endpoint) owner or a proxy room owner, but not accepted yet. A room owner refers to a person who has a TelePresence system in their office or personal conference room, rather than a TelePresence system located in a regular conference room which has no owner. A proxy room owner is a person who is assigned the proper privileges by the room owner to reserve their room (endpoint) for meetings. A CTS-Manager tentative reservation is identical to an accepted reservation.
To enable tentative room reservations for a TelePresence endpoint:
Step 1
A popup window displays each endpoint with a check box next to it.
Step 2
Note
Step 3
A message appears, asking you to confirm your changes.
Step 4
Step 5
To disable tentative room reservations for a TelePresence endpoint, click Tentative Room Reservation, uncheck the endpoint you want to disable and follow steps 3 through 5 above.
Note
Once all endpoint reservations are confirmed, the meeting appears in the Scheduled Meetings window and the phone/control device within five minutes. If email alerts are turned on, confirmation or error emails are generated and sent within approximately 10-15 minutes.
Cisco recommends enabling tentative room reservations for private (office) endpoints.
Tentative meeting not enabled
The following describes the behavior of the CTS-Manager when the tentative meeting is not enabled.
If the user creates a meeting with 1 auto-accept room (endpoint) (AAA) and 1 proxy room. The Proxy room accepts the meeting and the meeting is processed as a point-to-point meeting in CTS-Manager. Then the meeting is modified to a different time and the proxy room (endpoint) has not opened the meeting invite or clicked on the tentative or accept buttons. The meeting schedule in CTS-Manager is modified with a new time with both endpoints (rooms) shown and marked as scheduled without error. However, the proxy room calendar does not have the modified meeting time updated. To have the times sync, the proxy room must accept the modified time.
Problems can occur if public endpoints and conference room endpoints are set up with tentative enabled. if the meeting is not accepted, the proxy setting can be out-of-sync and double booking of the endpoint can occur. Thus, the best practice for public or conference endpoints is to not have this feature enabled and force a proxy confirmation acceptance.
Endpoint Subscription - Synchronization Change
As shown in the Support > Endpoints > Status window, an endpoint was successfully synchronized sometime in the past. Then the endpoint capability is changed, i.e., recording disabled. If performing a Discovery on this change, the result is the endpoint subscription shows error, but the synchronization is in "OK" state. The synchronization status has historical value as it shows the result of the last synchronization on that endpoint which was successful in this case.
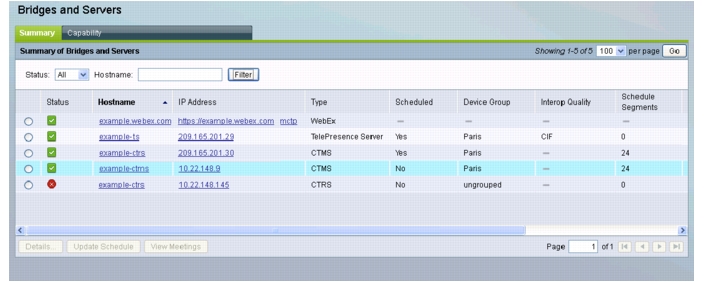
Bridges and Servers
The Support > Bridges and Servers window displays information about the bridges or servers associated with Cisco TelePresence Manager. The Bridges and Servers window is divided into two tabs:
Summary
The Summary tab lists the bridges or servers associated with CTS-Manager.
Generating Bridges or Servers Reports
You can generate a report about specific bridges or servers with the following steps:
Step 1
Step 2
Step 3
Step 4
Step 5
Note
Step 6
Figure 13-12 Support > Bridges and Servers > Summary
Figure 13-13 CTMS Details Window
Note
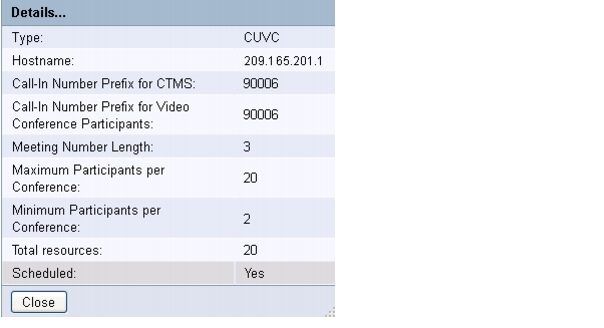
Figure 13-14 CUVC Details Window
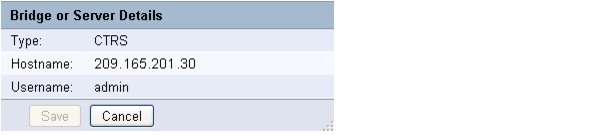
Figure 13-15 CTRS Details Window for CTRS
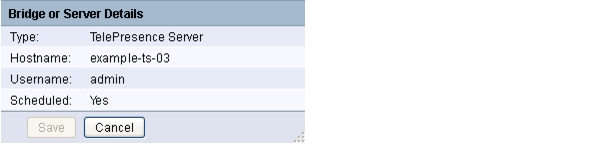
Figure 13-16 TelePresence Server Details Window
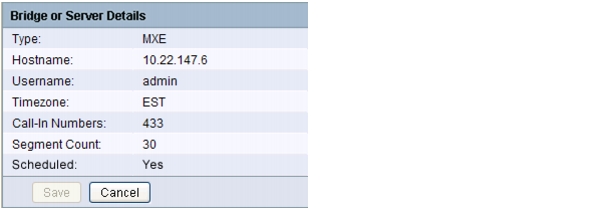
Figure 13-17 MXE Details Window
Note
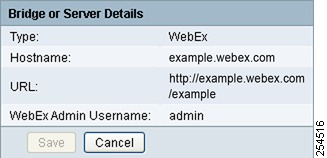
Figure 13-18 WebEx Details Window
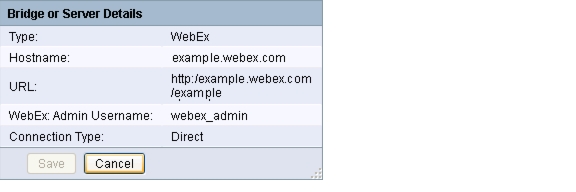
Figure 13-19 WebEx Details Window
Table 13-24 WebEx Details Window Information
Type
The bridge or server type: WebEx
Note
Hostname
A name identifying the WebEx site hostname to the administrator. This typically can be the same name as the hostname used in the site URL.
Note
URL
The address used to construct the URL that's used to access this meeting. This is the actual URL that CTS-Manager uses to communicate with WebEx. This is published in the email from CTS-Manager, and is displayed to users on the WebEx page of the CTS phone UI/display device.
WebEx Admin Username
WebEx administrator's username (provided by the WebEx team)
Connection Type
CTS-Manager connection to the WebEx site. Can be direct or via a proxy server.
Figure 13-20 Collaboration Manager Details Window
Table 13-25 Collaboration Manager Details Window
Type
Always Collaboration Manager
Hostname
The configured hostname of the collaboration manager server.
URL
The configured URL of the collaboration manager server.
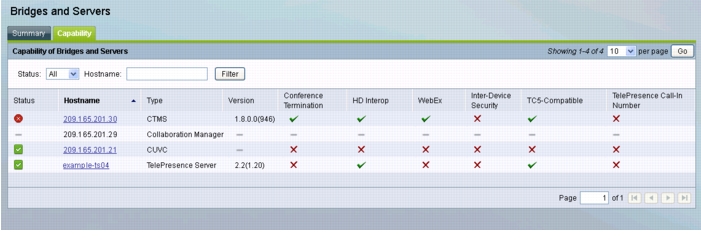
Capability
The Capability tab identifies the Cisco TelePresence features available for each bridge or server device.
Figure 13-21 Support > Bridges and Servers > Capability
Table 13-26 Support > Bridges and Servers > Capability Information
Status
Bridge or Server status: All, OK, or Error.
Error:
•
•
Note
Hostname
The configured hostname for the bridge or server device. Clicking the hostname hyperlink opens a new browser window, with the CTMS login page.
Type
The bridge or server type.
Version
Displays the software version running on the device. The version is not displayed for the CUVC device type.
Conference Termination
A check indicates the device supports conference termination. Refer to Policies in Chapter 11 "Additional Installation Configurations for Cisco TelePresence Manager"
HD Interop
A check indicates the device supports HD (720p) video quality
A check also indicates that the video quality of a scheduled meetings using this bridge or server are 720p quality. It doesn't, however, indicate the actual capability that this bridge or server can support.
CUVC always shows "No" for HD Interop since CTS-Manager does not detect the true capability of CUVC.
Note
WebEx
A check indicates the device supports WebEx.
Inter-Device Security
A check indicates that connectivity between CTS-Manager and CTMS is secured via HTTPS.
TC5-Compatible
A check indicates the device supports endpoints running TC5.0 or later software.
Call-In Number
A check indicates the device supports the TelePresence Call-In Number feature.
Network Multipoint
A check indicates that the CTMS is running a software version that supports CTMS Network Multipoint.
Note
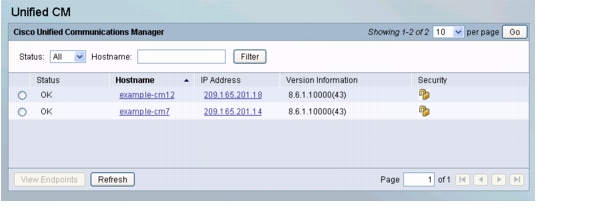
Unified CM
To display settings that associate the Cisco TelePresence Manager with Cisco Unified CM, choose Support > Unified CM.
Figure 13-22 Support > Unified CM
Table 13-27 describes fields and settings for the Cisco Unified CM.
Command Line Interface
Starting a CLI Session
The SysAdmin can access the CTS-Manager CLI remotely or locally:
•
•
Before You Begin
Ensure you have the following information that gets defined during installation:
•
•
•
Note
You will need this information to log in to the Cisco IPT Platform.
Perform the following steps to start a CLI session:
Step 1
–
ssh sysadminname@hostname
where sysadminname specifies the Administrator ID created during installation and hostname specifies the hostname that was defined during installation.
For example, ssh admin@ipt-1.
–
ipt-1 login:where ipt-1 represents the host name of the system.
Enter the SysAdmin ID.
In either case, the system prompts you for a password.
Step 2
The CLI prompt displays. The prompt represents the SysAdmin ID; for example:
admin:For all commands for the CTS-Manager, refer to the Cisco TelePresence Manager help or the CLI Book set at:
http://www.cisco.com/en/US/products/ps7074/tsd_products_support_series_home.html