-
Cisco TelePresence Manager 1.9 Administration and Installation Guide
-
Preface
-
General Information About Cisco TelePresence Manager
-
Pre-install System Setup for Cisco TelePresence Manager
-
Configuring Microsoft Exchange for Cisco TelePresence Manager
-
Configuring IBM Domino for Cisco TelePresence Manager
-
Configuring Scheduling API for Cisco TelePresence Manager
-
Configuring Cisco Unified CM for Cisco TelePresence Manager
-
Installing and Configuring for Cisco PreQualification Assistant
-
Configuring UCS Server and VMware for Cisco TelePresence Manager
-
Installing or Upgrading Cisco TelePresence Manager
-
Initializing Cisco TelePresence Manager
-
Additional Installation Configurations for Cisco TelePresence Manager
-
Configuring Cisco TelePresence WebEx OneTouch for Cisco TelePresence Manager
-
Monitoring Cisco TelePresence Manager
-
Cisco TelePresence Manager Emails and Meeting Manager
-
Supported MIBS for Cisco TelePresence Manager
-
Troubleshooting Cisco TelePresence Manager
-
Cisco TelePresence Manager System Messages
-
Replacing a Cisco TelePresence System Codec
-
Reconfiguring Cisco TelePresence Manager and CTMS Addressing
-
 Feedback
Table Of Contents
Meeting Manager and CTS-Manager Emails
TelePresence Call-In and WebEx Meeting
Video Conferencing Error Email
Intercompany Host Meeting Options
Intercompany Participant Meeting Options
Allowing Other Users to Manage Your Meetings
Meeting Manager and CTS-Manager Emails
First Published: May 29, 2012, OL-22226-02Contents
•
TelePresence Call-In and WebEx Meeting
Introduction
Cisco TelePresence meetings are scheduled between one or more endpoints. The calendar server sends an acceptance email to the meeting organizer, with the notice that the endpoints have been reserved and placed on the calendar. CTS-Manager sends either a Confirmation email or an Error email in which action is required from the meeting organizer.
The confirmation email provides additional information about the scheduled Cisco TelePresence meeting, including a link to the CTS-Manager Meeting Details window. In order to access the Meeting Details window the meeting organizer logs into CTS-Manager using their Windows logon account (account name and password). For more information about confirmation emails refer to the various meeting sections below. For more information about the CTS-Manager Meeting Details window, refer to the Meeting Manager section.
The Action Required email specifies the error that caused the email to be generated, and a link to the Meeting Details window. For more information, refer to the Meeting Manager section.
User Authentication
In order to log in to CTS-Manager, the user needs to provide their Exchange or Domino email ID for authentication. For Exchange servers using multiple LDAP forests, the user account can reside in a remote forest. This will be associated with a disabled user account in the local forest using the Windows attribute "Associate External Account to Mailbox." Only an associated user account can authenticate with CTS-Manager. User accounts which have read access to the mailbox but are not associated will not be able to authenticate with CTS-Manager.
Point-to-Point Meeting
The Point-to-Point meeting confirmation email is described in Table 14-1.
Figure 14-1 Point-to-Point Meeting Confirmation Email
Multipoint Meeting
The Multipoint meeting confirmation email is described in Table 14-2.
Figure 14-2 Multipoint Meeting Confirmation Email
Video Conferencing Meeting
The Video Conferencing meeting confirmation email is described in Table 14-3.
Figure 14-3 Video Conferencing Meeting Confirmation Email
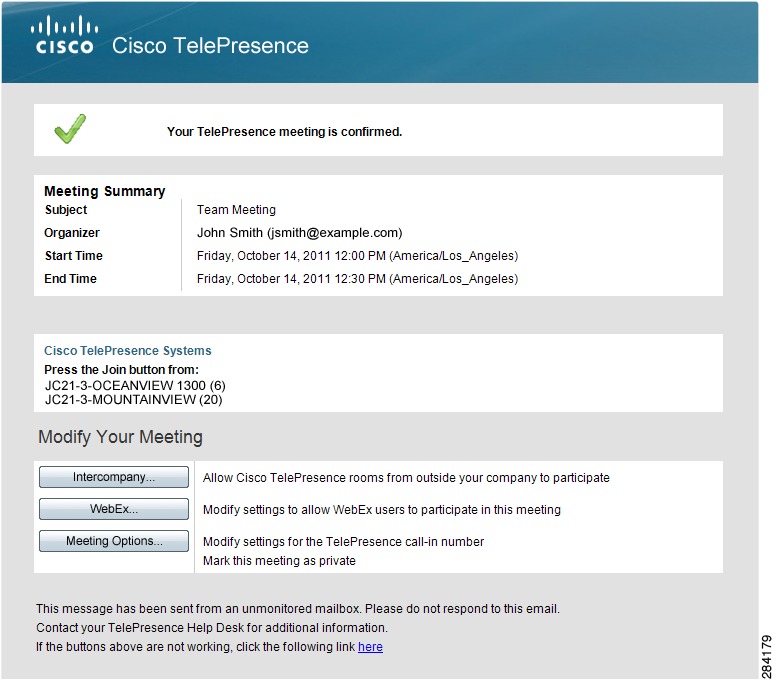
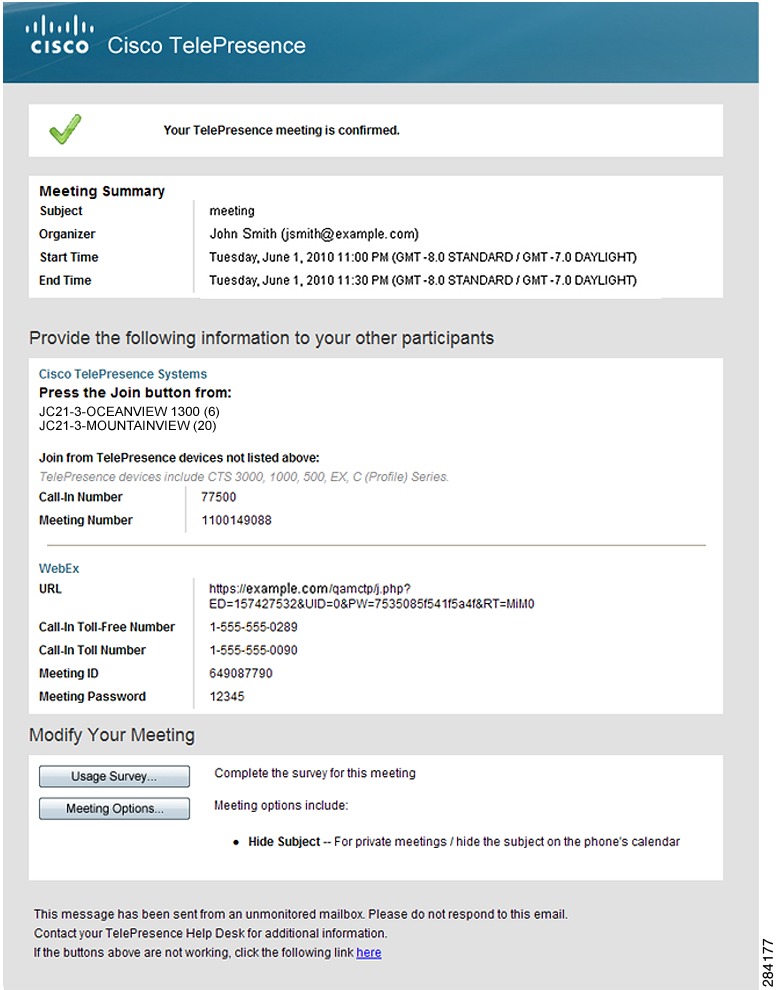
TelePresence Call-In and WebEx Meeting
A TelePresence Call-In Number and WebEx meeting confirmation email is described in Table 14-3.
Figure 14-4 TelePresence Call-In and WebEx Meeting Confirmation Email
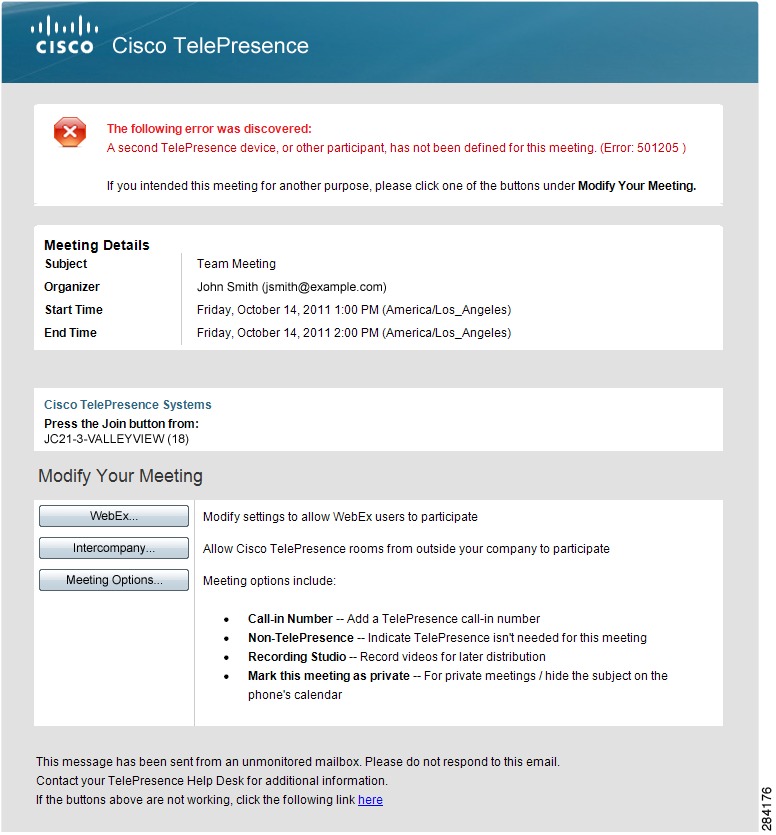
Action Required Email
Action Required emails may be sent to the Meeting Organizer to alert them of the following error conditions. The Action Required email is described in Table 14-5.
•
This is the only type of error a Meeting Organizer can correct without administrative assistance. You can see an example of this email in Figure 14-5. You or the Meeting Organizer can correct this error using the Meeting Details window, but the recommended way to resolve the error is to use the calendar client used to create the meeting.
Note
•
•
•
•
•
Figure 14-5 Action Required Email
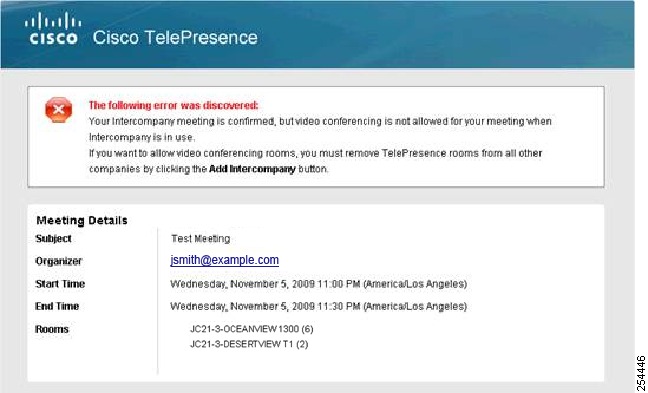
Video Conferencing Error Email
The error email is sent to the meeting organizer when the endpoint is not reserved for a meeting. Follow the instructions in the email header to schedule endpoints for a meeting.
Figure 14-6 Video Conference Meeting Error Email
System Alert Notification Emails
In addition to the emails sent to the meeting organizer, system alert emails are sent to the SysAdmin each day after the maintenance cycle providing information about:
•
•
•
For more information about these emails, see System Alert Notifications.
Meeting Manager
The meeting manager window provides detailed information about a specific meeting and allows the meeting organizer to make changes to the meeting's settings. The meeting organizer accesses the Meeting Manager by clicking on of the e "Modify Your Meeting" buttons in the confirmation email for their meeting and then logs in to the Meeting Manager.
It is divided into the following tabbed sections:
Note
In addition, the meeting organizer can specify other users to manage their meetings. For more information, refer to the Allowing Other Users to Manage Your Meetings section.
Summary
The Summary tab provides you the following fields:
Note
When you are finished making changes in the Summary window, click Apply to save your changes.
Intercompany
The Intercompany window allows you to enable the ability to schedule TelePresence meetings with other companies.
To enable this feature, click Yes and then click Apply.
If you want to remove what has been configured before you save it and set new values, click Cancel.
When you are finished making changes in the Intercompany window, click Apply to save your changes.
Recurring Intercompany Meetings
If you make changes to a recurring intercompany meeting, those chnages are applied to all future instances of the meeting. It is not possible to change a single instance only.
Intercompany Host Meeting Options
If your company is considered the Intercompany Cisco TelePresence meeting host you need to configure your side of the meeting as the host. You'll need to obtain the Call-in Number and the Meeting Number from your CTS-Manager Administrator.
Enter the information and click Apply to set the values.
Intercompany Participant Meeting Options
If another company is considered the Intercompany Cisco TelePresence meeting host you need to configure your side of the meeting as a participant. You'll need to obtain the Call-In Number and the Meeting Number from your CTS-Manager Administrator or from the Host meeting organizer
Enter the information and click Apply to set the values.
WebEx
The WebEx window allows the meeting organizer to enable WebEx for their meeting and provides them with the WebEx information for both the host and par tic pants to join the meeting. The first time they schedule a TelePresence meeting with WebEx, they must register their WebEx ID user account with CTS-Manager. For more information, see First-time WebEx Setup.
Note
Allow WebEx users to participate in this meeting
Selecting Yes and clicking Apply enables WebEx for the meeting. Selecting No and clicking Apply disables WebEx for the meeting.
WebEx Call-In Information
This section displays the WebEx information necessary for both the host and participants to join the meeting.
First-time WebEx Setup
If this is your first time setting up WebEx for a TelePresence meeting, you must register your WebEx ID user account with CTS-Manager. This makes using WebEx with future TelePresence meetings as easy as possible.
Note
To set up WebEx:
Step 1
Note
Step 2
The WebEx login window appears.
Note
Step 3
Once you log in, you are redirected back to the Meeting Manager window for your meeting.
Note
Step 4
WebEx is enabled and the following WebEx details appear:
•
•
•
•
•
•
After a few minutes, you will receive an updated confirmation email with the WebEx information listed in the "Provide the following information to your other participants" section.
Step 5
Step 6
Step 7
WebEx participants join the meeting by clicking the URL you sent in the email or copying and pasting it into their browser.
TelePresence participants join the meeting by pressing the button on their TelePresence phone.
When you are finished making changes in the WebEx window, click Apply to save your changes.
Note
Changing Your WebEx Site or Username
If you want to change your WebEx site or username, do the following:
Step 1
Step 2
Step 3
Step 4
The Meeting Manager window appears with the WebEx tab selected.
Step 5
Note
Step 6
Step 7
The WebEx login window appears.
Note
Step 8
Step 9
Once you log in, you are redirected back to the Meeting Manager window for your meeting.
Note
Reactivating Your WebEx Account
If your WebEx account is inactive, you will not be able to schedule WebEx-enabled TelePresence meetings.
To reactivate your account:
Step 1
Step 2
Step 3
Step 4
Step 5
Step 6
After successful login, you are redirected to Cisco TelePresence Manager where you can enable WebEx for your TelePresence meeting.
WebEx Roles
The CTS-Manager administrator is responsible for assigning WebEx roles to users. Until the administrator assigns a role to a meeting organizer, their role is determined by the WebEx default user type configured in the Configure > Application Settings > Bridges and Servers window.
There are three types of WebEx users:
WebEx Permitted User
If you are a WebEx Permitted user, you can request WebEx on a meeting-by-meeting basis.
Using Microsoft Outlook, you can use the WebEx Productivity Tools plug-in to add WebEx to your meeting.
Alternatively, you can enable WebEx for your meeting by doing the following:
Step 1
WebEx is enabled and the following WebEx details appear:
•
•
•
•
•
•
After a few minutes, you will receive an updated confirmation email with the WebEx information listed in the "Provide the following information to your other participants" section.
Step 2
Step 3
Step 4
WebEx participants join the meeting by clicking the URL you sent in the email or copying and pasting it into their browser.
TelePresence participants join the meeting by pressing the button on their TelePresence phone.
When you are finished making changes in the WebEx window, click Apply to save your changes.
WebEx Premium User
If the meeting organizer is a WebEx Premium user, every meeting they schedule includes WebEx.
All they have to do is provide the WebEx information to their meeting participants:
Step 1
Step 2
Step 3
WebEx participants join the meeting by clicking the URL you sent in the email or copying and pasting it into their browser.
TelePresence participants join the meeting by pressing the button on their TelePresence phone.
Note
WebEx Non-Permitted User
If the meeting organizer is a WebEx Non-Permitted user, they are not permitted to use WebEx with any of their meetings.
In this case, the WebEx button in the confirmation email and the WebEx tab in the Meeting Manager window are not available.
Usage Survey
The Usage Survey window allows you to view and fill out the survey.
To fill out the survey:
Step 1
Step 2
Meeting Options
The meeting options window allows you to adjust other options for your meeting.
Note
Mark this meeting as private: Allows you to show or hide the TelePresence meeting subject on the phone in the TelePresence endpoint.
Provide a call-in number for other participants?: Allows you to provide a call-in number for TelePresence endpoints that were not originally invited to the meeting to be able dial in to the meeting.
The following options are available only for a meeting scheduled with one endpoint:
Number to Dial: Enter a call-in number. The entire number must be 15 digits or less, and begin with a country prefix. You must enter only numbers. Other characters including dashes are not permitted.
Is this meeting intended for recording a video to be distributed later?: Allows you to record the meeting for distribution later.
Is TelePresence required for this meeting?: Allows you to disable TelePresence for the meeting. When TelePresence is disabled, Action Required emails will not be sent if any additional settings are changed.
When you are finished making changes in the Meeting Options window, click Apply to save your changes.
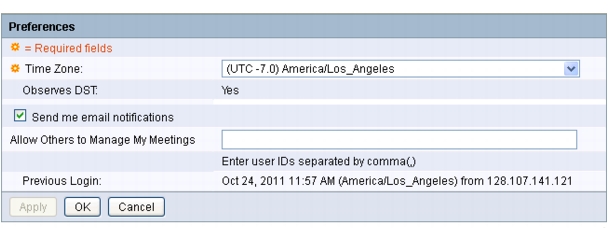
Allowing Other Users to Manage Your Meetings
The meeting organizer can select up to five other users who can also manage the meeting organizer's meetings. The user(s) will receive the email notifications and have the ability to access Meeting Manager to view meeting details, change meeting options, as well as change preferences.
Note
In the emails and in the meeting details, delegates will see the meeting information based on the organizer's time zone and locale preferences, not the delegates' own.
All feature options that are available to the meeting organizer are also available to the delegates for the organizer's meetings.
To allow other users to manage your meetings:
Step 1
The Preferences window opens.
Figure 14-7
Preferences
Step 2
example: jsmith, kjohnson, bjones
Step 3
Step 4
Step 5
System Alert Notification
Each day after the CTS-Manager maintenance cycle, the SysAdmin receives a system alert notification email if there are any meetings that were scheduled but never took place (no-show meetings), and meetings for which the survey was not completed by the meeting organizer.
This email displays the following information:
Note