Cisco TelePresence Manager Release 1.2 Administration and Installation Guide
Installing Cisco TelePresence Manager

Table Of Contents

Installing Cisco TelePresence Manager

Introduction

Overview

Important Considerations

Installing Cisco TelePresence Manager from DVD

Required Information and Equipment

Installation Tips

Installation Procedure

Installation Field Values Defined

Completing the Initialization Prerequisites Worksheet

Initializing Cisco TelePresence Manager After Installation

Required Information and Equipment

Initialization Tips

Initialization Worksheet

Initialization Procedure

Help With Problems


Installing Cisco TelePresence Manager


Revised: November 7, 2007, OL-13673-01
First Published: November 27, 2006

Introduction

This document explains how to install the Cisco TelePresence Manager software in your network. You will then be able to schedule Cisco TelePresence system meetings through existing Microsoft Outlook messaging software, receive reminders, and connect to a remote meeting site with the touch of a button.

To enable these features, you must provide Cisco TelePresence Manager with the contact and access information it requires to connect to and talk with your network. The purpose of this guide is to walk you through each step using the Cisco TelePresence Manager installation DVD and the accompanying wizard help windows.

The tasks for installing the Cisco TelePresence Manager software are described in the following sections:

Overview

Important Considerations

Installing Cisco TelePresence Manager from DVD

Completing the Initialization Prerequisites Worksheet

Initializing Cisco TelePresence Manager After Installation

Help With Problems

Overview

Setting up Cisco TelePresence Manager for the first time consists of three procedures, covered in this guide:

Installing Cisco TelePresence Manager from DVD

The first procedure consists of installing the Cisco TelePresence Manager program files from DVD. The installation requires information about your network and the rules for finding and exchanging information. You can complete the Installation Wizard Worksheet found in Table 6-1 as a convenient way to organize the required information in advance.

Completing the Initialization Prerequisites Worksheet

Following installation, you must verify that Cisco Unified Communications Manager and other resources are configured properly for Cisco TelePresence Manager. This section describes adding parameters to Cisco Unified Communications Manager and researching information from the current installation of Cisco Unified Communications Manager that will be used to initialize the Cisco TelePresence Manager installation.

Initializing Cisco TelePresence Manager After Installation

The final process is initializing Cisco TelePresence Manager to enable access to information sources such as Microsoft Exchange Server for meeting requests from Microsoft Outlook, Active Directory for accessing user and conference room information, and Cisco Unified Communications Manager for conference room availability and telephone support. You can complete the Initialization Worksheet found in Table 6-4 as a convenient way to organize the required information.

Once you have configured Cisco TelePresence Manager to communicate with these resources, you can then populate it with the conference rooms, phone numbers, and other information resources used for telepresence conferencing, as explained in the Cisco TelePresence Manager Administrator's Guide, and the Cisco TelePresence and Cisco Unified Communication Manager Installation and Configuration Guide.

Important Considerations

Before you proceed with the installation of Cisco TelePresence Manager, review the following requirements and recommendations:

Your Cisco TelePresence system should be fully installed and configured before installing Cisco TelePresence Manager.

Cisco Unified Communications Manager should already be installed and configured.

Microsoft Exchange must be version 2003 SP1 or 2003 SP2.

MCS-7835-H2-CTS1 or MCS-7835-I2-CTS1 may be used as your Cisco Media Convergence Server.

When you install Cisco TelePresence Manager, the Model 7835 Cisco Media Convergence Server hard drive is formatted, and any existing data on the drive is overwritten.

This release of Cisco TelePresence Manager is designed to work with Microsoft Internet Explorer version 6.0 or later. Cisco cannot guarantee correct system behavior using unsupported browsers.

Cisco recommends that you configure the system using static IP addressing so it will be easy to manage.

Carefully read the instructions that follow before you proceed with the installation.


Caution You must be sure to remove the DVD from the DVD drive once you have completed the installation/upgrade. Leaving the DVD in the drive may prevent Cisco TelePresence Manager from restarting properly after rebooting the server.

Installing Cisco TelePresence Manager from DVD

This section contains the following topics pertaining to installation:

Required Information and Equipment

Installation Tips

Installation Procedure

Installation Field Values Defined

Required Information and Equipment

To install the Cisco TelePresence Manager system files, you need the following equipment and information:

The Model 7835 Cisco Media Convergence Server that came with Cisco TelePresence Manager, installed and connected to a Domain Name System (DNS) server and your network.

A management console able to access the Model 7835 Cisco Media Convergence Server.

The DVD included in your Cisco TelePresence Manager documentation and installation packet. Use the Installation Wizard included on this disk.

The information, listed in Table 6-1, "Installation Wizard Worksheet", that includes your system-specific values and parameters.

Installation Tips

For the most time-efficient installation, read and follow these installation tips:

Use the "Installation Wizard Worksheet" (Table 6-1) to research and record your configuration choices before you start. Write down the necessary values in the right column, and refer to the worksheet during the installation.

You cannot change the DNS Enable/Disable and Admin ID fields after installation without reinstalling the software, so be sure to enter the values that you want for these fields.

For more information and clarification of the information required during installation, see Table 6-2, "Installation Field Definitions."

Table 6-1 Installation Wizard Worksheet 

Window Name
Task Description
Options and Descriptions
Your System Information or Action
Installation Wizard

Use the listed window conventions to navigate and enter required values into the wizard windows.

Proceed: Begin wizard.

Skip: Go to the next field.

Cancel: the Installation Cancelled window appears.

Choose an action:

Proceed
Skip
Cancel

 
Installation Cancelled

Remove the media from the drive and click OK to halt the system.

OK: Stop the installation.

Cancel: Exit this window.

Choose an action:

OK
Cancel

Autonegotiation Configuration

Choose automatic negotiation of Ethernet network interface card (NIC) speed and duplex mode, or manual entry.

Yes: Enable autonegotiation.

No: Enter required information in the NIC Speed and Duplex Configuration window.

Choose an action:

Yes
No

 
NIC Speed and Duplex Configuration

Manually set NIC speed and duplex mode. This window will appear only if No is selected for autonegotiation.

OK/Back/Help

Default is 100 mbps and full duplex.

Select NIC speed:
( ) 10 Mbps
( ) 100 Mbps
( ) 1000 Mbps

Select NIC Duplex:
( ) Full
( ) Half

   
Tip Choose the highest possible NIC speed and full duplex for best performance.
DHCP Configuration

Select to enable Dynamic Host Configuration Protocol (DHCP) or manual entry of static IP addresses.

Yes: Enable DHCP.

No: Complete Static Network Configuration window.

Back/Help

Choose an action:

Yes
No

 
Static Network Configuration

Enter static IP addresses and hostname. This window will display only if No is selected for DHCP configuration.

OK/Back/Help

hostname:

IP Address:

IP Mask:

GW = gateway

GW Address:

DNS Client Configuration

Enable DNS Server.

Yes: Complete DNS Server Configuration window.

No: Do not enable DNS.

Choose an action:

Yes
No


Caution You cannot change the DNS settings after installation without reinstalling Cisco TelePresence Manager.
DNS Server Configuration

Enter DNS server information.

See Table 6-2 for important information about these values.

OK/Back/Help

Primary DNS:

Secondary DNS*:
* optional

Domain:

Administrator Login Configuration

Enter the administrator login username for Cisco TelePresence Manager.

OK/Back/Help

Admin ID:


Caution You cannot change the admin login name after installation without reinstalling Cisco TelePresence Manager. However, the admin password can be changed at the Cisco TelePresence Manager web interface.
 

Choose an administrator login password for Cisco TelePresence Manager.


Password:

Confirm:

Certificate Signing Request Configuration

Enter identification information to create a self-signed certificate for use on the Cisco TelePresence Manager server.

OK/Back/Help

Organization:

Unit:

Location:

State:

Country:

Network Time Protocol (NTP) Client Configuration

Enter one or more NTP server IP addresses.

OK/Back/Help


NTP Server 1:

NTP Server 2*:
NTP Server 3*:
NTP Server 4*:
NTP Server 5*:
* optional

Database Access Security Configuration

Enter the access password for the Cisco TelePresence Manager database server.

OK/Back/Help

Security password:

Confirm:

Configuration Confirmation

Verify that you are ready to install the Cisco TelePresence Manager image.

OK: Finish installation.

Back: Change the configuration.

Choose an action:

OK
Back
Cancel


Installation Procedure

When you have completed the Table 6-1 worksheet, follow these steps to install Cisco TelePresence Manager.


Step 1 Insert the Cisco TelePresence Manager installation DVD .

There may be a short delay while the installer validates the integrity of the files on the DVD and configures the server for the operating system and the Cisco TelePresence Manager software.


Caution You must be sure to remove the DVD from the DVD drive once you have completed the installation/upgrade. Leaving the DVD in the drive may prevent Cisco TelePresence Manager from restarting properly after rebooting the server.

Step 2 The installer checks for a prior installation of Cisco TelePresence Manager software. Choose Yes to continue, or No to abort the installation.

Step 3 If you choose Yes to continue the installation, the Installation Wizard opens in the next window. Read and become familiar with the wizard conventions.

Step 4 Click Proceed.

Step 5 Fill in each window with the information you entered in Table 6-1, "Installation Wizard Worksheet".


Note For more information and clarification of the installation fields, see Table 6-2, "Installation Field Definitions".


Step 6 When you are satisfied that your information is correct, click OK in the Configuration Confirmation window to begin the installation process. Be patient while the process takes place.

When the installation is complete, the server reboots. The installer then checks for network connectivity and access to a DNS server. If it cannot find these connections, an error message will appear (see the "Help With Problems" section). If the installation process completes successfully, the message "The Installation of the Cisco TelePresence Manager Has Completed Successfully" appears.


Note If you have problems completing the installation, see the "Help With Problems" section.


Installation Field Values Defined

Table 6-2 explains in detail the field definitions of the Cisco TelePresence Manager installation process in detail.

Table 6-2 Installation Field Definitions 

Installation Fields
Description and Usage
Installation Wizard
 

Proceed:

The installation wizard requests necessary configuration information before installing Cisco TelePresence Manager files.

Skip:

Skip this wizard and install Cisco TelePresence Manager files without configuration information. After the files are installed and the system reboots, the installation program will request configuration information.


Cancel:

Cancel this installation.

Autonegotiation Configuration
 

NIC Speed

The speed of the server network interface card (NIC), in megabits per second.

The possible speeds are 10, 100, and 1000 mbps. Default is 100 mbps.

Note Cisco recommends a NIC speed of at least 100 mbps for best performance.

Duplex Configuration

The duplex setting of the server NIC.

The possible settings are Half and Full. Default is Full.

Note Cisco recommends full duplex for best performance.

DHCP Configuration


Host Name

A hostname is an alias that is assigned to an IP address to help identify it.

Enter a hostname that is unique to your network.

The hostname can consist of up to 64 characters and can contain alphanumeric characters and hyphens.

IP Address

The IP address uniquely identifies a server on your network.

Enter the IP address in the form ddd.ddd.ddd.ddd, where ddd can have a value from 0 to 255 (except 0.0.0.0).


IP Mask

The IP subnet mask of this machine. The subnet mask together with the IP address defines the network address and the host address.

Enter the IP mask in the form ddd.ddd.ddd.ddd, where ddd can have a value from 0 to 255 (except 0.0.0.0).

Valid example: 255.255.240.0.

Invalid example: 255.255.240.240.

GW Address

A network point that acts as an entrance to another network. Outbound packets are sent to the gateway that will forward them to their final destination.

Enter the IP address of the gateway in the format ddd.ddd.ddd.ddd, where ddd can have a value from 0 to 255 (except 0.0.0.0).

Note If you do not have a gateway, you must still fill in this field by setting it to 255.255.255.255. Not having a gateway may limit you to communicating only with devices on your subnet.

   
DNS Client Configuration

You will be prompted to enter DNS server information. A DNS server is a device that resolves a hostname into an IP address or an IP address into a hostname.

Note If you have a DNS server, Cisco requires choosing Yes to enable DNS. Disabling DNS limits the system's ability to resolve some domain names.


Caution You cannot change the DNS settings after the installation is complete. To change DNS settings, you must reinstall Cisco TelePresence Manager.
 

Primary DNS

Cisco TelePresence Manager contacts this DNS server first when attempting to resolve hostnames. This field is mandatory.

When a primary DNS server fails, Cisco TelePresence Manager will attempt to connect to the secondary DNS server.

Enter the IP address in dotted decimal format as ddd.ddd.ddd.ddd, where ddd can have a value from 0 to 255 (except 0.0.0.0).


Secondary DNS (optional)


Domain

A sequence of case-insensitive ASCII labels separated by dots (for example, "cisco.com")—defined for subtrees in the Internet Domain Name System and used in other Internet identifiers, such as hostnames, mailbox names, and URLs.

Administrative Login Configuration
 

Admin ID

The username for the Cisco TelePresence Manager Administrator.

Ensure that the name is unique. It must start with a lowercase alphanumeric character and can contain alphanumeric characters (uppercase and lowercase), hyphens, and underscores.


Caution The admin ID cannot be changed after installation without reinstalling Cisco TelePresence Manager. Record it for safekeeping.

Password / Confirm

A password that allows the administrator to log into Cisco TelePresence Manager.

The password must be at least six characters long. It must start with a lowercase alphanumeric character and can contain alphanumeric characters (upper and lower case), hyphens, and underscores.

This field can be changed at Cisco TelePresence Manager web interface. Record it for safekeeping.


Caution If this password is lost, you must reinstall Cisco TelePresence Manager to regain access.
Certificate Signing Request Configuration

A certificate signing request (CSR) is a message sent from an applicant to a certificate authority in order to apply for a digital identity certificate.

These values create a CSR for the server where the certificate will be installed.


Organization

Your company or organization name.

Unit

Your business unit, group, or organizational unit name.

Location

The physical location of the organization, most often a city.

State

The region, state, province, or other region where the organization resides.

Country

Your company or organization country of record.

Network Time Protocol Client Configuration

NTP is used to synchronize the clocks on Cisco IP telephony servers with an external network time server that uses NTP.


NTP Server 1

Enter the hostname or IP address of one or more NTP server.

NTP Server 1 value is mandatory; NTP Servers 2-5 are optional.

Tip Cisco strongly recommends that you enter the NTP server by which Cisco Call Manager synchronizes its clock as the primary NTP server. If these servers are out of synchronization, Cisco TelePresence Manager will not operate properly.

NTP Servers 2-5

Database Access Security Configuration

Cisco TelePresence Manager uses the security password to communicate with its database.


Security Password / Confirm

The password must be at least six characters long; it must start with a lowercase alphanumeric character and can contain alphanumeric characters (uppercase and lowercase), hyphens, and underscores.


Completing the Initialization Prerequisites Worksheet

Once installation is completed, you must initialize the installation. Before you proceed with initialization, the servers and applications within your telecommunications network must be configured so that the Cisco TelePresence Manager software can find the resources and information needed to initialize the installation.

When you run the Initialization wizard, network connections are tested. A test connection may fail if you install Cisco TelePresence Manager in a sub-net that does not have access to your DNS server.

If you see the test connection failure message you may need to specify IP addresses for your Cisco Unified Communications Manager server(s), as well as other network devices. You can change any server name values in Cisco Unified Communications Manager using the following procedure:


Step 1 Log into Cisco Unified Communications Manager as an Administrator.

Step 2 Choose the Server option from the System menu.

Step 3 Click Find to discover all the servers in your Cisco Unified Communications Manager cluster.

Step 4 Change any hostnames to IP addresses.


Note Be sure you specify an IP address, rather than a hostname in Cisco TelePresence Manager's System Configuration -> Cisco UCM Host field.


Use the worksheet in Table 6-3 to verify that your network is configured correctly for Cisco TelePresence Manager and to record any information needed for initialization.

For more information about these prerequisites, refer to Cisco TelePresence and Cisco Unified Communication Manager Installation and Configuration Guide, OL-11326-01.

Table 6-3 Preinitialization Worksheet 

Microsoft Exchange and Active Directory Requirements

1.

( )

A certificate request from the Microsoft Exchange Server must exist.

If a certificate was not requested when Microsoft Exchange was installed, you can follow the procedure described in the tutorial found at the following Microsoft Exchange URL:

http://www.msexchange.org/tutorials/Securing-Exchange-Server-2003
-Outlook-Web-Access-Chapter5.html

See the sections "Installing the Microsoft Certificate Service" and "Creating the Certificate Request."

Make a copy of the certificate and place it in a folder accessible to the computer with browser access to the Cisco TelePresence Manager server.

Location of Microsoft Exchange certificate copy:

2.

( )

Cisco TelePresence Manager must have a username or mailbox account in Microsoft Exchange Active Directory. The mailbox storage limits are set correctly from the Active Directory server. Uncheck the "Use mailbox store defaults" box and enter the appropriate storage quota.

3.

( )

Each Cisco TelePresence System room must have a username or mailbox account in Microsoft Exchange Active Directory. Verify that each Active Directory account corresponds to the values specified in Cisco Unified Communications Manager.

4.

( )

Cisco TelePresence Manager is granted adequate permissions for each Cisco TelePresence System room. In Active Directory, for every Cisco TelePresence System e-mail account, grant FullMailBox permissions to the Cisco TelePresence Manager mailbox user. You can also log into Microsoft Outlook Calendar as the room user, and in File properties use the permissions tab to grant read permission to the Cisco TelePresence Manager user.

5.

( )

A copy of the certificate for Active Directory exists.

To request a certificate for Active Directory, you can follow these steps:

1. By default, the certificate file is named _.crt. An enterprise certificate authority (CA) automatically publishes the root certificates, and enterprise domain controllers automatically enroll for all domain controller certificates.

2. Make sure the certificate, the CA, and the CA web interface are all installed on the same server. Using Internet Explorer, connect to https://<CA server>/certsrv.

3. Authenticate as the administrator, making sure you specify the proper domain, for example, demotest\administrator.

4. Choose Download CA Certificate, using Distinguished Encoding Rules and the encoding method.

Make a copy of the certificate and place it in a folder that is accessible to the computer that has browser access to the Cisco TelePresence Manager server.

Location of Active Directory certificate copy:

Cisco Unified Communications Manager Requirements

1.

( )

Each enterprise Cisco TelePresence system unit is fully installed and configured. A shared line with a common directory number is configured for each Cisco TelePresence unit and its associated room IP phone.

For more information, refer to the Cisco TelePresence System Administrator's Guide.

2.

( )

A user group has been created in Cisco Call Manager for, and the following roles are assigned to the user group:

Standard AXL1 API2 access

Standard CTI3 enabled

Standard serviceability

Standard Unified CM administrative users

3.

( )

An application user is added to the Cisco Call Manager user group just created. All Cisco TelePresence devices are assigned to this user. Examples of devices are the Cisco TelePresence system codec boxes and the Cisco IP phones associated with the codec boxes.

Application user name:

Password:

4.

( )

Cisco CTIManager and CiscoAXL Web Service are activated (at the Cisco Call Manager Serviceability page).

5.

( )

A Cisco Unified Communications Manager certificate is available from Internet Explorer, with the file extension .der. This certificate was generated when you first installed Cisco Unified Communications Manager.

Make a copy of the certificate and place it in a folder that is accessible to the computer that has browser access to the Cisco TelePresence Manager server.

Location of Cisco Unified CallManager certificate copy:

6.

( )

Each Cisco TelePresence room e-mail account name is provided in the Product Specific Configuration Layout section of the Cisco Call Manager Phone Configuration window. The room e-mail account name has a value that matches the corresponding value (equivalent to the user ID) for the room in Active Directory.

See the section "Configuring a Cisco TelePresence Device" in the Cisco TelePresence and Cisco Unified Communication Manager Installation and Configuration Guide.

7.

( )

A CAPF4 user profile exists for the Cisco TelePresence Manager application user.

1 AXL: Another XML Library

2 API: Application programming interface

3 CTI: Computer Telephony Integration

4 CAPF: Certification Authority Proxy Function


Initializing Cisco TelePresence Manager After Installation

This section contains the following topics pertaining to initialization:

Required Information and Equipment

Initialization Tips

Initialization Worksheet

Initialization Procedure

To initialize Cisco TelePresence Manager, you must enter contact and access information for your Microsoft Exchange Server, Lightweight Directory Access Protocol (LDAP) server, and Cisco Call Manager in a series of one-time-only, post-installation initialization windows.

Required Information and Equipment

To set up and initialize Cisco TelePresence Manager, you need the information listed in Table 6-3, "Preinitialization Worksheet" and Table 6-4, "Initialization Worksheet."

Additionally, Cisco TelePresence Manager must have network access to a computer running Windows Explorer version 6.0 (or later), the Microsoft Exchange Server, the Active Directory server, and Cisco Unified Communications Manager.

Initialization Tips

For the most time-efficient initialization, read and follow these initialization tips:

Use your completed "Preinitialization Worksheet" (Table 6-3) as a handy reference during initialization.

Use the Initialization Worksheet (Table 6-4) to research and record your configuration choices before you start. Write down the necessary values, and refer to the worksheet during the initialization process.

Before proceeding to each succeeding window, you must verify the information entered and the choices made. The wizard does not allow you to skip a window and complete it later in the process. If you are not sure, enter a "best guess" entry (in the correct format) and return to the page later to verify or change it.


Tip The system administrator can access and change the information after initialization from the Configuration tab of the Cisco TelePresence Manager web interface.


Initialization Worksheet

In the following worksheet, enter the required information in the right column for easy reference during the initialization procedure.

Table 6-4 Initialization Worksheet 

Window Name
Task
Options or Setting Description
Your System Information or Action
Welcome

Displays required information and Cisco TelePresence Manager server settings.

Next: Begin wizard.

Cancel: Cancel dialog box appears.

Choose an action:

Next
Cancel

 
Cancel dialog box

Cancel initialization.

Note Initialization windows continue to appear at next login until you complete them.

Yes: Return to the browser Cisco TelePresence Manager login window. Next time you log in, you must complete the initialization. (Previously validated information is saved.)

No: Close the alert window.

Cancel dialog box:

You must perform initial setup before Cisco TelePresence Manager can function.

Are you sure you want to cancel?


Yes
No

LDAP Access Settings

Enter host and user account information allowing Cisco TelePresence Manager to access your LDAP server.

Test Connection: Verification dialog box appears (see right).

Back: Go back one window.

Next: (Button is grayed out until window information has been filled out and verified.)

Cancel

Verification dialog box: (only one will appear):

Setting tested successfully.

Continue


or


Field is not a valid value. Correct invalid value.

OK

 
Host Name

Enter the hostname or IP address on which the LDAP server is running.

The hostname consists of up to 64 characters and can contain alphanumeric characters and hyphens.

Host:

 
Bind Method

Choose Secure or Normal radio button to select the type of security.

Secure: Secure Socket Layer (SSL) connection requires a valid Distinguished Encoding Rules (DER) certificate.

Normal: No certificate necessary.

Bind Method:

( ) Secure

( ) Normal

 
Port

Choose the port number for your LDAP server.

Normal LDAP port default for a single server is 389.
Secure LDAP port default is 636.
Normal LDAP port default for multiple servers is 3268.

Port:

 
Default Context

Enter the Distinguished Name (DN) for the default context in your configuration.

Fetch DNs: Find and choose your default DN.

Example: dc=dev, dc=com

Default Context:

 
Username

Enter the username for the account that has access to the LDAP server.

Example: cn=administrator, cn=users

User Name:

 
Append Default Context

Check this box to append the default context to the end of the specified user container string.

Checked: Default context appended to username.

Unchecked: username not appended.


( ) Append default context

 
Password

Enter the password for the account that has access to the LDAP server.

The password must contain at least six characters. It must start with a lowercase alphanumeric character.

User Password:

 
Certificate

If SSL is your binding method, choose the SSL certificate for this server.

Browse... Choose SSL certificate.

If you selected Secure bind method, this is required.

Certificate:

LDAP User Auth Setting

Enter the Relative Distinguished Name (RDN) for the container under which LDAP users exist.

Verify Container DN: Verification dialog box appears.

Back/Cancel

Choose an action:

Verify Container DN
Back
Cancel

 
User Containers

Enter the name of the LDAP container in which Cisco TelePresence Manager can find the list of users.

Example: cn=users

Default DN: displays from the last screen

User Container:

 
Append Default Context

To meet fully qualified domain name (FQDN) requirements, check this box, or append the username yourself.

Checked: Default context appended to user container.

Unchecked: User container not appended.


( ) Append default context

Field Mappings

Enter the object class and its attribute to map to the corresponding referenced object and attribute field.

View Sample Data: Verify the field mappings you've entered.

Back/Cancel

Dialog box:

Does the data look OK to you?

OK
Cancel

 
Person

For most deployments, the defaults (shown in italics) do not need to be changed. If this information is mapped to other values in the LDAP server, click the folder icon beside each entry space and choose the correct value.

Object Class—A virtual container consists of a collection of attributes that defines a database entry.

Attributes—Predefined segments of information, either required or optional, that together make up an object class.

Person
Object Class

E-mailID: User

DisplayName: User

Attribute

E-mailID: proxyAddresses

DisplayName: displayname


Enterprise Conf Room

Enterprise Conf Room
Object Class

E-mailID: User

DisplayName: User

Attribute

E-mailID: proxyAddresses

DisplayName: displayname

Cisco CallManager

Enter Cisco Unified Communications Manager resource properties.

Host: The Cisco Unified Communications Manager appliance box hostname or IP address.

Username and Password: the application username and password that were configured in Cisco Unified Communications Manager to allow access to the Cisco TelePresence System.

Test Connection: Verification dialog box appears.

Browse: Navigate to the location of the certificate file, choose it, and click Upload.

Back/Cancel


Host:

Username:

Password:

Certificate:

Microsoft Exchange Server

Enter Microsoft Exchange Server resource properties.

Host: The Microsoft Exchange Server hostname or IP address.

Username and Password: The user account that has read access to the Exchange server.

Browse... Choose SSL certificate.
If you selected Secure bind method, this is required.

Test Connection: Verification dialog box appears.

Back/Cancel


Host:

Bind Method:
( ) Secure ( ) Normal

Port:

Domain Name:

Username:

Password:

Certificate:

Database Backup Schedule

Set the database backup schedule and settings.

Finish: Initialization is complete. Cisco TelePresence Manager web interface login window appears. (Button is grayed out until window information has been filled out and verified.)

Back/Cancel

Choose an action:

Finish (when screen is complete)
Back
Cancel

 
Schedule

Schedule daily or weekly backups of the database.

Change...: Schedule backups dialog box appears.

Select to schedule backups

Change...

Schedule Backups dialog box

Schedule the frequency and time of database backup.

OK: Save schedule.

Cancel: Return to Database Backup Schedule window without saving.

Start Time (UTC):____ : ____

Frequency: ( ) Daily ( ) Weekly:

( ) Mon ( ) Tues ( ) Wed ( ) 
Thu ( ) Fri ( ) Sat ( ) Sun

       
Number of backup files to keep

Specify number of backup files to keep.

Drop-down menu: 1...14.

Number of backup
files to keep:

Backup Type

Specify where the backup information is stored.

Local: Save backup to local server.

Remote: Enter remote user variables to back up database to a remote server.


( ) Local

( ) Remote

Verify Remote Host: Grayed out unless remote backup is selected. Verification dialog box appears.

Note The storage path must exist before you enter this information in the initialization window.

Remote Storage Host (SFTP):

Port:

User Name:

User Password:

Storage Path:


Initialization Procedure

When you have completed the Table 6-4 worksheet, follow these steps to initialize the installed Cisco TelePresence Manager software:


Step 1 At the console running Microsoft Explorer, type the Cisco TelePresence Manager server name or the IP address. See the following example.

https://7835 server hostname or IP address

Step 2 At the product page that appears, click on Cisco TelePresence Manager.

Step 3 At the login page, enter the username and password that were created during installation.

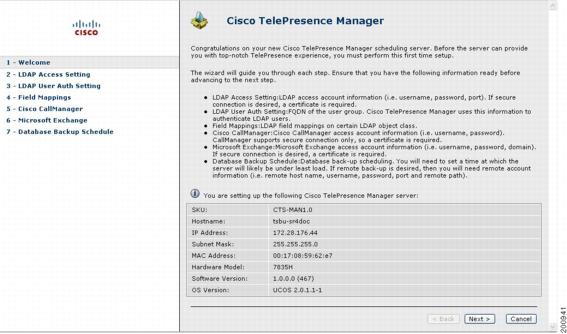
The Cisco TelePresence Manager initial window appears with several fields already populated from the installation process. See Figure 6-1.

Figure 6-1 Initial Window

Step 4 Click Next.

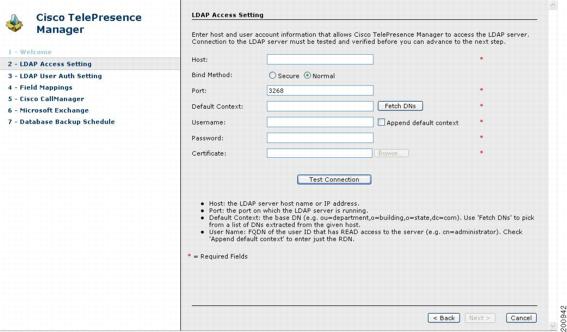
The LDAP Access Setting window opens. See Figure 6-2.

Step 5 Fill in the required information, referring as necessary to your completed "Preinitialization Worksheet" and "Initialization Worksheet".

An explanation of the fields for this window follows Figure 6-2.

Figure 6-2 LDAP Access Setting Window

Explanation of LDAP Access Setting Fields

Lightweight Directory Access Protocol (LDAP) is a protocol definition for accessing directories. The LDAP Access Settings window specifies LDAP Active Directory server settings that are used by Cisco TelePresence Manager to access the directory information. This window contains the following fields:

Host

The hostname is an alias that is assigned to an IP address for identification.

Enter a hostname that is unique to your network.

The hostname consists of up to 64 characters and can contain alphanumeric characters and hyphens.

Bind Method

The bind method is the type of security required.

Secure—Secure Socket Layer (SSL) connection requires the Distinguished Encoding Rules (DER) Certificate for the LDAP server. You must complete the Certificate field on this window before you can proceed.

Normal—The Cisco TelePresence Manager communicates with the LDAP server in cleartext using HTTP. In normal mode, you do not need to complete the Certificate field.

Port

The default port for secure SSL connection is 636.

The default port for normal SSL connection for multiple servers is 3268.

The default port for normal connection for a single server is 389.

Default Context

Default Context is the context from which the LDAP queries are performed. To change the default context, choose it in the Fetch DNs drop-down list adjacent to this field.

Username

The username provides identification of the user to the LDAP server.

The format must be in the LDAP fully qualified domain name (FQDN) format.

Examples: cn=administrator, ch=users, dc=<mydomain>, dc=com

Append default context

Check this box to avoid typing in the LDAP Access username manually, keeping the requirements of the LDAP FQDN format. If this box is not checked, you must append the information in the Default Context field.

Password

The user password allows access to the LDAP server.

The password must contain at least six characters and should be unique. It can contain lowercase, alphanumeric characters, hyphens, and underscores. It must start with a lowercase alphanumeric character.

Certificate

The certificate is a digital representation of user or device attributes, including a public key, that is signed with an authoritative private key. You entered this information in Table 6-3, "Microsoft Exchange and Active Directory Requirements" section, Item 5.

Step 6 Click Test Connection.

Step 7 The system tests the connection information. A popup window opens and displays "Connection .... Verified."


Note If the system cannot verify the connection, the popup window directs the user to re-enter the information.


Step 8 Click OK.

Step 9 Click the command button Next, located at the bottom of the window.

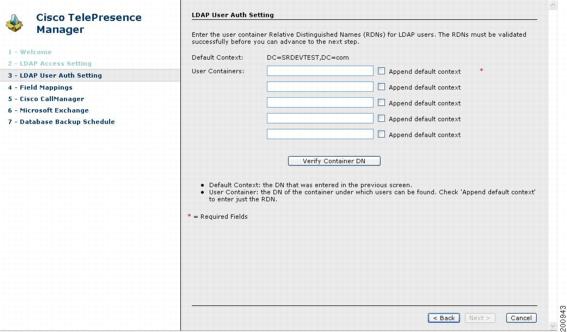
The LDAP User Auth Setting window opens. See Figure 6-3.

Step 10 Fill in the required information, referring as necessary to your completed "Preinitialization Worksheet" and "Initialization Worksheet".

An explanation of the fields for this window follows Figure 6-3.

Figure 6-3 LDAP User Authorization Settings Window

Explanation of LDAP User Auth Setting Fields

The LDAP User Auth Setting window contains the following fields:

User Containers

The FQDN format name of the LDAP container in which Cisco TelePresence Manager can find the list of users.

Append default context

Check this box to meet the requirements of the LDAP FQDN format, or type in the Default Context after the User Container name yourself.

Step 11 When all information has been entered, click Verify Container DN.

Step 12 The system tests the container information. A popup window opens and displays "User container <...> validated successfully."


Note If the system cannot verify the container information, the popup window directs the user to re-enter the information.


Step 13 Click OK.

Step 14 Click the command button Next, located at the bottom of the window.

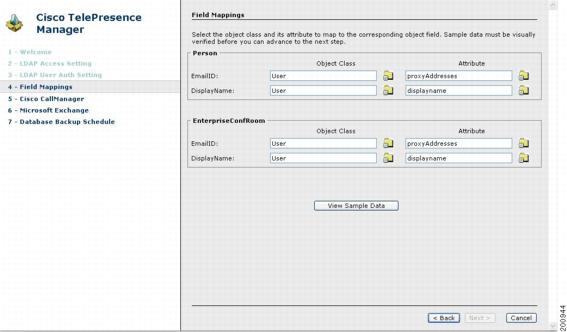
The Field Mapping window opens. See Figure 6-4.

The fields should be populated with information you have already entered. Change any information that is incorrect and add any other required information, referring as necessary to your completed "Initialization Worksheet".

An explanation of the fields for this window follows Figure 6-4.

Figure 6-4 Field Mappings Window

Explanation of Field Mappings Fields

In Field Mappings, the Cisco TelePresence Manager server uses application objects and attributes that are internally mapped to the objects and attributes in the LDAP Active Directory server. Most of these mappings are predefined and fixed. However, some of the information required for the Cisco TelePresence System might be stored in different attributes of the LDAP Active Directory server based on the enterprise deployment. The Field Mapping window provides a mechanism to map such objects and attributes used by the Cisco TelePresence Manager server to the object and attributes defined in the LDAP Active Directory schema.


Tip For most deployments, the defaults do not need to be changed. If this information is mapped to other values in the LDAP server, click the folder icon beside each entry space and choose the correct value. The objects and attributes listed in Table 6-5 are potentially changeable.

Table 6-5 Field Mappings Fields 

Application Object
Application Attribute
LDAP Object
LDAP Attribute
Person


EmailID

User

ProxyAddress


DisplayName

User

DisplayName

EnterpriseConfRoom


EmailID

User

ProxyAddress


DisplayName

User

DisplayName


Note For more information about Field Mapping, see the Cisco TelePresence Manager web interface Help files.


Step 15 When all information has been entered, click View Sample Data.

A popup window opens and displays the data that has been entered. Review the information and verify that it is correct and complete.

Step 16 Click Close.

A popup window opens and displays the message "Does the data look correct to you?."

Step 17 Click OK.

Step 18 Click the command button Next, located at the bottom of the window.

Step 19 The Cisco CallManager window opens. See Figure 6-5.

Step 20 Fill in the required information, referring as necessary to your completed "Preinitialization Worksheet" and "Initialization Worksheet".

An explanation of the fields for this window follows Figure 6-5.

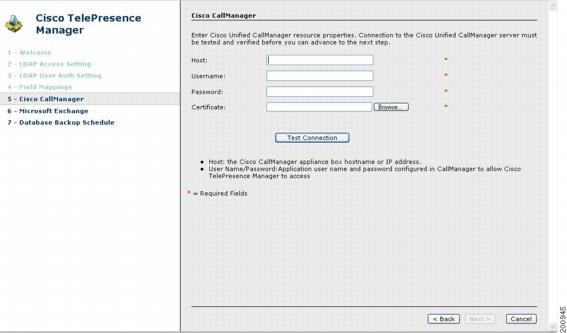
Figure 6-5 Cisco Unified Communications Manager Window

Explanation of Cisco Unified Communications Manager Fields

Host

Host is the hostname or IP address of the Cisco Unified Communications Manager server host.

Username

Username is the username for the application user for the Cisco Unified Communications Manager server. You entered this information in Table 6-3, "Cisco Unified Communications Manager Requirements" section, item 5.

Password

The password allows the user to access the Cisco Unified Communications Manager.

Certificate

The certificate is a digital representation of user or device attributes, including a public key, that is signed with an authoritative private key.

Step 21 Click Test Connection.

The system tests the connection information. A popup window opens and displays "Connection to <....> Server was Verified."


Note If the system cannot verify the connection, the popup window directs the user to reenter the information.


Step 22 Click OK.

Step 23 Click Next, located at the bottom of the window.

The Microsoft Exchange window opens. See Figure 6-6.

Step 24 Fill in the required information, referring as necessary to your completed "Preinitialization Worksheet" and "Initialization Worksheet".

An explanation of the fields for this window follows Figure 6-6.

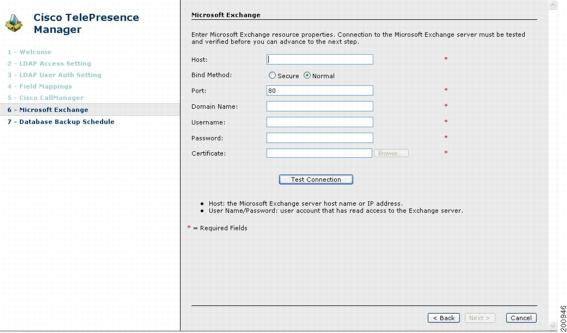
Figure 6-6 Microsoft Exchange Window

Explanation of Microsoft Exchange Fields

Host

Host is the hostname or IP address of the Microsoft Exchange Server host.

Bind Method

The bind method indicates the desired level of security.

Secure—Secure Socket Layer (SSL) connection requires the Distinguished Encoding Rules (DER) Certificate for the Microsoft Exchange Server. You must complete the Certificate field on this window before you can proceed.

Normal—The Cisco TelePresence Manager communicates with the Microsoft Exchange Server in cleartext using HTTP.

Port

The default value is 80.

Domain Name

This field requires a sequence of case-insensitive ASCII labels separated by dots (for example, "cisco.com")—defined for subtrees in the Internet Domain Name System and used in other Internet identifiers, such as hostnames, mailbox names, and URLs.

Username

The username provides login access to the Microsoft Exchange Server. You entered this information in Table 6-3, "Microsoft Exchange and Active Directory Requirements" section, Item 2.

Password

The user password allows access to the Microsoft Exchange Server.

Certificate

A certificate is a digital representation of user or device attributes, including a public key, that is signed with an authoritative private key. In a self-signature, the signature can be verified using the public key contained in the certificate. You entered this information in Table 6-3, "Microsoft Exchange and Active Directory Requirements" section, Item 1.


Note Click the Browse... button to choose the Microsoft Exchange Server SSL certificate.
If you selected Secure bind method, this value is required.


Step 25 Click Test Connection.

The system tests the connection information. A popup window opens and displays the message "Connection to <....> Server was Verified."


Note If the system cannot verify the connection, the popup window directs the user to reenter the information.


Step 26 Click OK.

Step 27 Click Next, located at the bottom of the window.

The Database Backup Schedule window opens. See Figure 6-7.


Note The default is set to a daily backup schedule with the backup information stored to the local drive. Cisco recommends that you back up your data to a different drive.


Step 28 To customize the frequency and location of the backup, click Change.

Step 29 Fill in the required information, referring as necessary to your completed "Preinitialization Worksheet" and "Initialization Worksheet".

An explanation of the fields for this window follows Figure 6-7.

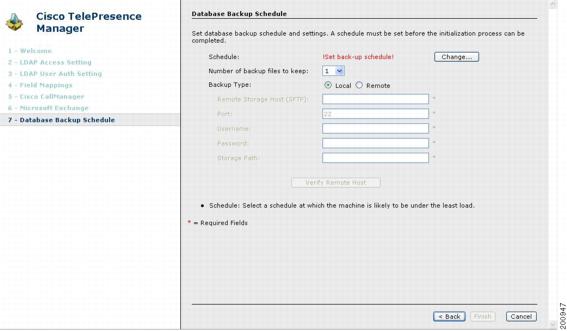
Figure 6-7 Database Backup Schedule Window

Explanation of Database Backup Schedule Fields

The Cisco Unified Communications Manager uses an Informix Database server to store information. This window allows the administrator to set up regular backup operations of the database.


Note Cisco strongly recommends scheduling regular backups of the database.


The Database Backup Schedule window contains the following fields:

Schedule

Click Change... to set the backup schedule. The following choices are available:

Start Time (UTC)

Enter the hour and minute, in UTC 24-hour format, for when you want your backup to begin. UTC is the atomic clock version of Universal Time (UT), formerly known as Greenwich Mean Time. Time zones around the world are expressed as positive and negative offsets from UT. For example, Midnight Pacific Standard Time (+8 UT) is 08:00 UT.

Frequency

Choose Daily or Weekly database backups. If you choose Weekly, select the radio button beside the day of the week on which you want your backup to occur.

Number of backup files to keep

From the drop-down menu, choose the number of backup files to keep before deleting. Choices range from 1 (default) to 14 (two week's worth of daily backups).

Backup Type

Choose Local or Remote to designate the server for backups. If you choose Remote, you must fill in the following values for the remote server:

Remote Storage Host (SFTP)

The network path to the remote Secure File Transfer Protocol (SFTP) storage host.

Port

Port number designated for the backup process. The default is port 22.

User Name

Username for login of the remote server.

User Password

Password for login to the remote server.

Storage Path

The file path to the location where you want to store the backup data.

Step 30 When you have finished entering the backup schedule information, click Verify Remote Host.

A popup window opens and displays the message "Remote host setting verified."

Step 31 Click OK.

Step 32 Click Finish, located at the bottom of the window.

The Cisco TelePresence Manager admin window appears at http://server hostname or IP address.

Refer to the Cisco TelePresence Manager Administrator's Guide for information about managing and administering Cisco TelePresence Manager.


Note If you have problems completing the initialization, see the next section, "Help With Problems" section.


Help With Problems

If you forget the admin login name you entered during the installation process, you must go through installation again and reenter the values.

During installation, if you enter information that the installer cannot use, the software will pause and ask you for the correct information and try to continue the installation. Make certain that you have all required and correct information in front of you before starting installation.

If you forget your admin password, you must contact Cisco technical support for assistance.

To change your choice to enable or disable DNS (Domain Name System), you must reinstall the software.

Most other changes to the Cisco TelePresence Manager can be made from the web interface by a Cisco TelePresence Manager administrator. See the Cisco TelePresence Manager Administrator's Guide for more information.