Table Of Contents
Using Meeting Manager
Revised: November 7, 2007, OL-13673-01
First Published: November 27, 2006
Cisco TelePresence meetings are scheduled between two or more conference rooms. Problems occur when it is detected that only one room was scheduled in Microsoft Outlook, or more than two rooms are scheduled when a MCU has not been configured. Cisco TelePresence Manager provides a Meeting Manager window where you can take steps to correct these problems. The link to the Meeting Manager window is embedded in the e-mail notification that is sent to the person who scheduled the meeting.
When the meeting starting time has passed, a single status window is displayed with the following message:
The meeting has already begun (its scheduled starting time has passed). No modification
action is allowed.
Figure 4-1 Expired Meeting Window
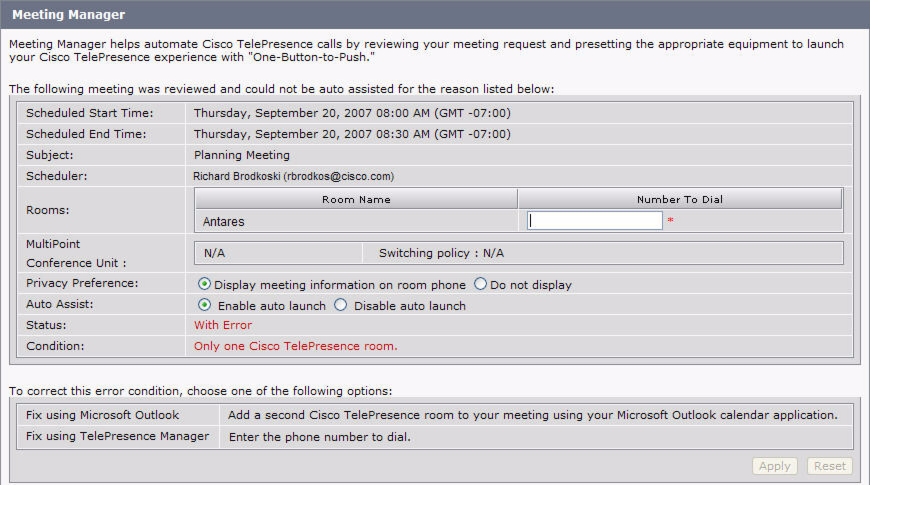
If the scheduled time for the meeting has not passed, the Meeting Manager displays an additional window that aids you in resolving the problem with the meeting.
Note
If the meeting start time has passed, the meeting organizer can still display the Resolution window shown in Figure 4-2, but may not enter a number to dial. Dialing out must be performed manually from the Cisco TelePresence room phone.
Figure 4-2 Meeting Manager Problem Resolution Windows
If the meeting was scheduled as a series, first select either the Series radio button to indicate that you want to revise the entire meeting series or the Single Occurrence radio button to revise just one occurrence of the meetings. When you click the Single Occurrence radio button, you must further select which meeting to revise by clicking Select Instance. A popup calendar appears with the scheduled meetings highlighted. Click the date to select the single-occurrence meeting you want to correct.
Table 4-1 and Table 4-2 describe the information and features available from the windows.
Table 4-1 Meeting Manager Status Window
Field
|
Description or Settings
|
Subject
|
Displays information provided about the meeting. You can hover the mouse over the Subject field to see the full description.
|
Scheduler
|
Login name of the person who scheduled the meeting.
|
Rooms
|
Meeting room name, which is also a link to the Cisco TelePresence System Administration application where information can be reviewed and revised.
A field is provided for entering the meeting room telephone number.
|
MultiPoint Conference Unit
|
This field displays the name of the MCU being used for the meeting. The Switching Policy field allows you to change the switching policy for the specific instance of the meeting.
You can change the switching policy to site or segment switching. If you choose `MCU Default' the switching policy is determined by the current setting on the MCU.
|
Privacy Preference
|
Radio buttons indicate whether information about an upcoming meeting will be displayed on the room's IP phone.
• Click the Display meeting information on room phone radio button to allow the display of information.
• Click the Do not display radio button to preserve meeting privacy.
|
Status
|
Meeting status.
|
Condition
|
Cause of the problem.
|
Table 4-2 Meeting Manager Solution Window
Field
|
Description or Settings
|
Fix using Microsoft Outlook
|
Message instructing you to open Microsoft Outlook and correct the meeting setup by adding or deleting rooms so that only two rooms are scheduled to be connected to each other in a given meeting.
|
Fix using Cisco TelePresence Manager
|
Provides a radio button that allows you to use the current meeting settings, as follows:
• Enable Auto Launch. Click this button and then enter the phone number to dial in the box provided.
• Disable Auto Launch. Click this button to select that no phone number will be associated with the meeting and no call will be made.
|
To register new or modified settings, click Apply.
Note
Before clicking the Apply button, check that the appropriate radio button is selected for a meeting scheduled as a series. Changes will be applied either to the entire series or to a selected instance of the meeting.
To restore the original settings, click Reset.