Cisco TelePresence Manager 1.1 Administration and Installation Guide
Configuring Cisco TelePresence Manager

Table Of Contents

Configuring Cisco TelePresence Manager

Contents

Introduction

System Configuration Tasks

Security Settings

Database

Settings

Backup

Restoring Backup Data

Restore

Room Phone UI

Microsoft Exchange

Re-sync Operations

LDAP Server

Settings

Field Mapping

Cisco Unified Communications Manager

MCU Devices

Concierges

Access Management

System Settings

IP Setting

NTP Setting

SNMP Setting

Remote Account

Change Password

Restart Host

Software Upgrade

Switch Version

Software Upgrade


Configuring Cisco TelePresence Manager


Revised: April 27, 2007, OL-11323-01
First Published: November 27, 2006

Contents

Introduction

System Configuration Tasks

Security Settings

Database

Room Phone UI

Microsoft Exchange

LDAP Server

Cisco Unified Communications Manager

MCU Devices

Concierges

Access Management

System Settings

Software Upgrade

Introduction

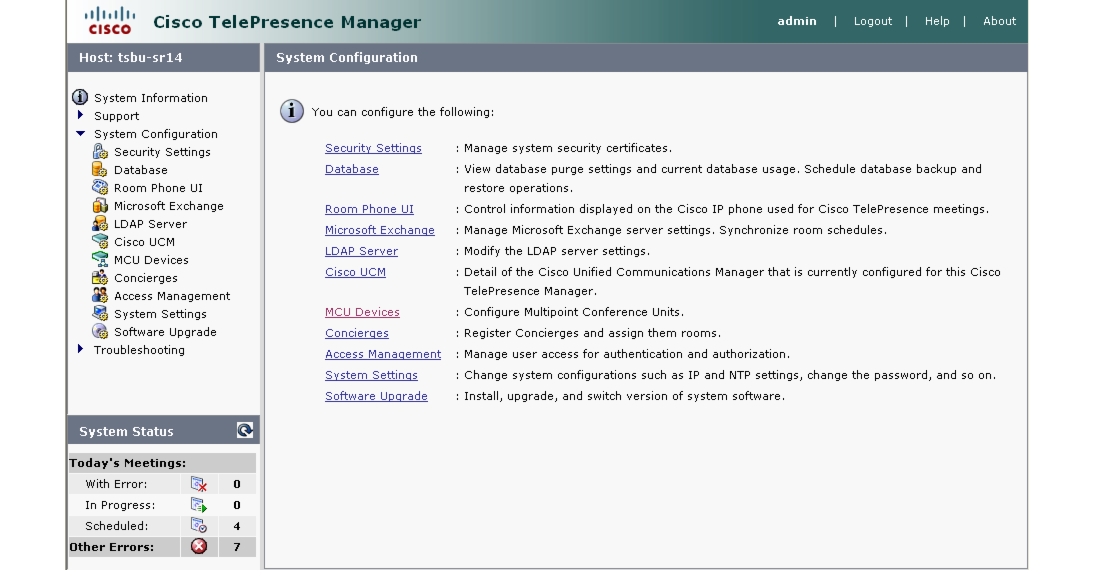
The administrator makes use of the System Configuration window to perform such tasks as upgrading system software, synchronizing system databases, managing security, and reconfiguring system settings.

Figure 3-1 shows the system configuration tasks.

Figure 3-1 System Configuration Window

System Configuration Tasks

Use Table 3-1 to locate system configuration tasks in this section.

Table 3-1 System Configuration Tasks 

Task
Location of Information
Meeting Room Phone User Interface

Define how long schedules and alerts are displayed on the phone user interface.

"Room Phone UI" section.

Cisco Unified Communications Manager

Display and modify settings that associate Cisco TelePresence Manager with Cisco Unified Communications Manager.

"Cisco Unified Communications Manager" section.

Discover new meeting rooms that have been added.

"Cisco Unified Communications Manager" section.

Concierges

Assign a meeting room to a concierge.

"Concierges" section.

System Settings (superuser only)

View and modify IP system settings.

"IP Setting" section.

View and modify NTP settings.

"NTP Setting" section.

View and modify SNMP settings.

"SNMP Setting" section.

Set up a system account for remote login.

"Remote Account" section

Change the system password.

"Change Password" section.

Restart the system.

"Restart Host" section.

Security Certificates

View system security certificates.

"Security Settings" section.

Delete system security certificates.

"Security Settings" section.

Upload new certificates.

"Security Settings" section.

Upgrade Software (superuser only)

Switch software versions stored in server partitions.

"Switch Version" section.

Install new system software.

"Software Upgrade" section.

Informix Database Maintenance

Manage the size and age of meeting information.

"Database" section.

Schedule database backups.

"Settings" section.

Back up the database.

"Backup" section.

View backup history.

"Backup" section.

Restore data from backup.

"Restore" section.

View history of restore operations.

"Restore" section.

Microsoft Exchange Server Maintenance

View server status and amount of mailbox storage allocation used for the Cisco TelePresence Manager user account in Active Directory/Exchange.

"Microsoft Exchange" section.

Modify binding method and server settings.

"Microsoft Exchange" section.

Resynchronize information between Microsoft Exchange and a meeting room, and view history of this operation.

"Re-sync Operations" section.

LDAP Server

Modify the Lightweight Directory Access Protocol (LDAP) server configuration.

"Settings" section.

Map objects and attributes used by the Cisco TelePresence Manager server to the objects and attributes defined in the LDAP Active Directory schema.

"Field Mapping" section.

Access Management

View roles for LDAP group mappings.

"Access Management" section.

MCU Conference Management

Register Multipoint Conference Units for conference scheduling.

Push meeting schedules to all registered MCUs.

"MCU Devices" section


Security Settings

The Security Settings window assists with managing system security certificates. The Cisco TelePresence Manager supports the following security certificates:

Tomcat—Security Keystore to store self-generated Apache Tomcat certificates.

CTM-trust—Cisco TelePresence Manager Security Keystore to store digital certificates for Microsoft Exchange, Active Directory, and Cisco Unified Communications Manager.

Viewing Security Certificates

You can generate a list of certificates containing a specific category and unit by supplying the following criteria:

Choose All, Own, or Trust from the Category drop-down list.

Choose All, CTM-trust, or Tomcat from the Unit menu.

Click Filter to generate the list of certificates that match the search criteria.

Click the arrow in the header of the Certificate Name column to sort the names in ascending or descending alphabetical order.

To view contents of a security certificate:

Click the radio button next to the certificate unit name and click View.

The contents of the certificate can be copied and pasted in a text file.

Deleting Security Certificates

To delete a security certificate, click the radio button next to the certificate unit name and click Delete.

Uploading Security Certificates

To display the Certificate Upload window, from which you can copy a security certificate to this Cisco TelePresence Manager, click Upload.

In the Certificate Upload window, choose the category and unit for the certificate.

Click Browse to choose a location where a certificate file is located, and add it to the Certificate field.

Click Upload to copy the file.

Click Close to close the Certificate Upload window.

Database

The Cisco TelePresence Manager uses an Informix database server to store information. The Database window allows the administrator to view the database status and run backup and restore operations. Open the Database window to see the following choices:

Settings

Backup

Restore

Settings

The Settings window allows you to manage the size and age of meeting information in the Informix database.

Click the Settings tab to view and modify database backup settings.

Table 3-2 describes the information and settings that are accessible from the Database window.

Table 3-2 Database Settings 

Field
Description or Settings

Service Status

Display-only status report of the Informix database server.

Connection Pool Size

Default pool size and recommended setting.

Current Database Size

Display-only report showing the size of the database as a percentage of the amount of total space available. The number displayed should not exceed 75%.

Automatically purge data older than (months)

Sets the number of months of storage for the information in the database.

Data older than the prescribed number of months is purged by the automatic purge scripts and will no longer be available to the application.

The purge cutoff date for this setting should be selected by balancing the number of months of data retention against the size of the database required to store the data created during that period. The default setting of 24 months is considered a reasonable midpoint.


To register the new settings, click Apply.

To return to the original settings, click Reset.

Backup

Choose the Backup tab to display fields and settings that will assist you in scheduling backups of the database.

Changing the Backup Schedule

The backup schedule currently set is displayed in the Backup window.

To change the backup schedule:

Click Change.

Choose the starting time from the Start Time drop-down list. This sets the backup time in GMT.

Choose the frequency of the backups by clicking the Daily or Weekly radio button.

If you click Weekly, check the box for the day of the week on which the backup should occur.

Click OK to register your settings, or Cancel to restore the original settings.

To register new or modified settings, click Apply.

To restore the original settings, click Reset.

Backing Up Database Files

To back up files in the database:

From the drop-down list, choose the number of backup files to keep. If you choose 3, the last three backup files will be kept, but earlier backup files will be purged.

Choose the type of backup by clicking the Local or Remote radio button.

A remote backup uses Secure FTP (SFTP) to store files remotely. You must fill in the following fields:

Remote Storage Host pathname.

Port number; default is port 22 for SFTP.

Username for login to the remote server.

Password for login to the remote server.

Storage pathname where you want the backup file stored.

Test your connection to a remote host by clicking Verify Remote Host.

Click Back-up Now to begin the operation.

Viewing Backup History

This area of the Database window provides a history of database backups.

Table 3-3 describes the Backup History fields.

Table 3-3 Backup History and Restore Fields 

Field
Description

Timestamp

Date and time of backup. Click the arrow in the header of the Timestamp column to sort the list in ascending or descending order.

Status

Status of the backup.

Type

Type of backup, either local or remote.

Hostname

Name of host for the backup files.

Location

Pathname where the files are stored.


Restoring Backup Data

To restore data from a backup:

Click the Refresh button to view the list of backups.

Click the radio button next to the backup filename that is to be used for the restore operation.

Click Restore. This action initiates a full restore of the database from the backup file.


Note When you restore from a backup file, all changes made to the database since the backup will be lost. These changes must be added by the Exchange Sync Up and Discovery functions of the Cisco TelePresence Manager server. The database Restore function should be run only as a last resort; for example, when the database is corrupted or the disk fails and has to be replaced.

The restore operation will stop the Informix database server, so some Cisco TelePresence Manager operations might be impacted during the operation. While the restore operation is in progress, all other processes are stopped. The user interface will only display progress of the restore operation. When the restore operation is complete, the Cisco Telepresence Manager is automatically restarted and the login page is displayed. You will have to login to resume use of the Cisco Telepresence Manager application.


Restore

The Restore screen displays the history of the restore operations attempted on the database. Click the arrow in the header of the Timestamp column to sort the list in ascending or descending order. See Table 3-3 for a description of the fields.

Room Phone UI

The Cisco Unified IP phone installed in a Cisco TelePresence meeting room is equipped with a touch-screen user interface (UI). The Room Phone UI window allows you control over information displayed on this interface. The UI alerts users of an upcoming meeting so they can end theirs on time. It also allows a meeting scheduler to see a list of meetings scheduled for a room.

Table 3-4 describes the information and settings seen in this window.

Table 3-4 Room Phone User Interface Settings 

Field
Description or Setting

Service status

Display-only status report of phone service.

Update Window (days)

Defines how often the meeting schedule is updated. Default is 14 days, but this period can be modified by highlighting and deleting the current value and typing in a new value.

Upcoming Alert Duration (mins)

Defines how long before the end of the in-progress meeting the message alerting meeting participants of an upcoming meeting is displayed. Default is 15 minutes, but this period can be modified by highlighting and deleting the current value and typing in a new value.

Phone Display Duration Prior to Call Launch (mins)

Defines how long the announcement of an upcoming meeting is displayed. Default is 30 minutes, but this period can be modified by highlighting and deleting the current value and typing in a new value.


To register new or modified settings, click Apply.

To restore the original settings, click Reset.

Microsoft Exchange

The Microsoft Exchange window helps you manage the database that stores meeting information.

Table 3-5 describes the information and operations accessible from this window.

Table 3-5 Microsoft Exchange Server 

Field or Button
Description or Settings

Service status

Display-only status report of system service.

Mailbox Usage

Meeting information is mailed to users. This display-only field reports the amount of storage space taken up by the e-mails as a percentage of total space available.

Host

Hostname provided for the Microsoft Exchange server account, which can be modified.

Bind Method

Choose the Secure or Normal radio button to select the binding method, as follows:

Secure—The Cisco TelePresence Manager communicates with the Microsoft Exchange server in secure mode using HTTPS. This method requires enabling Secure Socket Layer (SSL). on the Microsoft Exchange server.

Normal—The Cisco TelePresence Manager communicates with the Microsoft Exchange server in cleartext using HTTP.

Port

Communication port number.

Domain Name

Domain name provided for the Microsoft Exchange server account, which can be changed.

Username

Username provided for the Microsoft Exchange server account, which can be changed.

Password

Password used to access the Microsoft Exchange server account, which can be changed.

Certificate

Use the field to provide a trust certificate for new Microsoft Exchange server.

Number of Meetings Per Query

The maximum number of meetings that Cisco TelePresence Manager can retrieve from the Exchange server for each query.


To test the connection between this system and the Microsoft Exchange server, click Test Connection.

To register new or modified settings, click Apply.

To restore the original settings, click Reset.

Re-sync Operations

The Re-sync Operations area tells you when information in the Microsoft Exchange server database was last updated with meetings scheduled for a particular room.

When mismatched information in the databases causes meeting conflicts or there are other problems that prevent a meeting from being launched successfully, this area of the Microsoft Exchange window allows you to synchronize information between Microsoft Exchange and the Cisco TelePresence Manager database. Synchronization takes time and system resources to accomplish and should be done only when necessary.

Table 3-6 describes the information displayed in this area of the Microsoft Exchange window.

Table 3-6 Microsoft Exchange Server Synchronization Report

Field or Button
Description

Room Name

Name of the meeting room. Click the arrow in the header of the Room Name column to sort the list in ascending or descending alphabetical order.

Last Synchronization Time

Time the synchronization operation was started.

Status

Status of the synchronization operation. Click the arrow in the header of the Room Name column to sort the list in ascending or descending alphabetical order.


To synchronize information between Microsoft Exchange and the Cisco TelePresence Manager database:

Check the boxes next to the rooms to select them. To synchronize information for all meeting rooms, check the box next to Room Name in the display header.

Click Re-sync to start the operation.

Once the synchronization operation completes, click Refresh to update the display.

LDAP Server

The Cisco TelePresence Manager uses Lightweight Directory Access Protocol (LDAP) to retrieve information related to users and conference rooms from Active Directory deployments. Enterprises typically use specialized databases called directories to store information related to users, meeting rooms, and so on. LDAP is a protocol for accessing directories.

This window specifies LDAP Active Directory server settings that are used by Cisco TelePresence Manager to access the directory information. Open the LDAP Server window to see the following choices:

Settings

Field Mapping

Settings

The Settings window is where you make changes to the LDAP server after first-time installation. Table 3-7 describes the settings for this window.

Table 3-7 LDAP Server Settings 

Field or Button
Description or Settings

Service Status

Display-only status of the service.

Host

LDAP server host name.

Bind Method

Click the Secure or Normal radio button to select the binding method:

Secure—Secure SSL connection requires the Distinguished Encoding Rules (DER) Certificate for the LDAP server.

Normal—The Cisco TelePresence Manager communicates with the Microsoft Exchange server in cleartext using HTTP.

Port

The default port for secure connection is 636.

The default port for normal connection in a single LDAP server deployment is 389.

In cases where deployments consist of multiple Active Directory LDAP servers, this port should be configured with 3268, which is the Global Catalog port.

Default Context

The default context from which the LDAP queries are performed.

To change the context string:

Choose the context from the Fetch DNs drop-down list adjacent to this field.

Username

The username used to authenticate to the LDAP server. This must be in the LDAP fully qualified domain name (FQDN) format. Example: cn=administrator,cn=users,dc=<mydomain>,dc=com)

Password

Password to access the LDAP server.

Certificate

LDAP certificate.

Connection pool size

The number of concurrent connections used by the Cisco TelePresence Manager server to retrieve data from the LDAP server. This is primarily used for optimizing the server's access to the LDAP server.

User containers

The containers from which queries are performed to retrieve user objects. More than one user container or user object can be specified. The Cisco Telepresence server uses the values entered to search through the containers in sequence to retrieve user and meeting room information from the Active Directory. Additionally, these containers are used to retrieve user information for authentication.

To append the default context, check the Append box next to the user container field.


To test the connection between this system and the LDAP server, click Test Connection.

To register new or modified settings, click Apply.

To restore the original settings, click Reset.

Field Mapping

The Cisco TelePresence Manager server uses application objects and attributes that are internally mapped to the objects and attributes in the LDAP Active Directory server. Most of these mappings are predefined and fixed. However, some of the information required for the Cisco TelePresence system may be stored in different attributes of the LDAP Active Directory server, based on the enterprise deployment. The Field Mapping window provides a mechanism to map such objects and attributes used by the Cisco TelePresence Manager server to the object and attributes defined in the LDAP Active Directory schema.

The object and attribute mappings listed in Table 3-8 can be changed.

Table 3-8 LDAP Objects and Attributes 

Application Object
Application Attribute
LDAP Object
LDAP Attribute
Person
 

EmailID

User

proxyAddresses


DisplayName

User

displayname

EnterpriseConfRoom
 

EmailID

User

proxyAddresses


DisplayName

User

displayname


The attributes are used by the Exchange server to store the user's e-mail and display name information. For most of the Exchange deployments, this information does not have to be changed. If this information is stored in other attributes in the LDAP server, use the following steps to change the mapping:

Click the icon beside the Object Class column to change the LDAP object class for an application object (Person or EnterpriseConfRoom). This action displays the window containing available LDAP object classes.

Click the radio button corresponding to the LDAP object class you want to select from the popup window. Click Save.

Click the icon beside the Attribute column to change the LDAP attribute for the object. This action displays the window containing available LDAP attributes for the object class.

Click the radio button corresponding to the LDAP attribute you want to select from the popup window. Click Save.

Click View Sample Data to retrieve objects based on the mappings specified.


Note Verify that the data retrieved is as you expected. If data is incorrect, the application will not operate correctly.


Caution Setting the LDAP objects and attributes used by the Exchange server requires experience using Active Directory and Exchange software. Consult the LDAP and Exchange server administrator for your deployment before changing the default mappings in these screens.

Cisco Unified Communications Manager

To display and modify settings that associate the Cisco TelePresence Manager with Cisco Unified Communications Manager, choose Cisco UCM in Configuration.

Table 3-9 describes fields, buttons, and settings.

Table 3-9 Cisco Unified Communications Manager Settings 

Field
Description or Settings

Service Status

Display-only status report of system services.

Note You may see a progress indicator in the status field, especially if many Cisco TelePresence meeting rooms are being managed by Cisco TelePresence Manager. Each time this page is accessed, the status is updated, and the progress indicator will be seen while the system is discovering meeting rooms.

Host

Name of the Cisco Unified Communications Manager server host.

Username

Username for login to the Cisco Unified Communications Manager server.

Password

Password to access the Cisco Unified Communications Manager server.

Certificate

Use the field to provide a trust certificate for new Cisco UCM server.


To test the connection between this system and the Microsoft Exchange server, click Test Connection.

To manually start the process that is periodically performed to discover new rooms that have been added to Cisco Unified Communications Manager, click Discover Rooms.


Note This process consumes a large amount of system processor time. System operation will be noticeably slower from the time that the Discover Rooms button has been clicked until the process is completed.


To register new or modified settings, click Apply.

To restore the original settings, click Reset.

MCU Devices

Use the MCU Devices window to specify the number of days of scheduled meetings to send to the multipoint conference unit and to add MCU Devices to be scheduled through the Cisco TelePresence Manager.

The MCU Devices support screen displays several attributes for each MCU device registered with Cisco TelePresence Manager.

Cisco TelePresence Multipoint Switch (CTMS) is a multipoint conference unit that communicates with Cisco TelePresence Manager. The CTMS provides the functionality for three or more Cisco TelePresence rooms to attend a conference call. Cisco TelePresence Manager provides the scheduling information to the CTMS and the CTMS provides the multipoint switching capabilities for the conference.

Table 3-10 describes the MCU Device fields.

Table 3-10 MCU Devices

Field
Description or Settings

Hostname

The URL of the CTMS. Clicking the hostname hyperlink opens a new browser window, with the CTMS login page.

MCU Type

The MCU Type is always CTMS.

Control state

The Control state is either Scheduled or Non-Scheduled

Description

The Description field

IP Address

The IP address of the CTMS.


To register additional MCU devices, click New.

To edit MCU Device registration information, click the radio button next to the device and click Edit.

To delete a MCU Device, click the radio button next to the device and click Delete.

Concierges

The Concierges window has two areas, a list of concierges and a list of rooms that need a concierge assigned to them. Use the areas in this window to assign a concierge to a meeting room.

A phone number is associated with the concierge, which is displayed on the Cisco TelePresence meeting room phone user interface when the Concierge soft key is pressed. Meeting participants can dial the concierge and ask for help when problems occur with the Cisco TelePresence system.

To register a concierge for an assignment:

Click New to display the New Concierges window.

You must enter an identifier for the concierge in the ID field and a phone number in the Phone Number field. You can choose to supply other information identifying the concierge in the Description field.

Once concierges have been registered, assign them meeting rooms as follows:

Check the box next to a room that has not been assigned.

Select a concierge from the Assign Selected Rooms drop-down list.

Click Apply.

To edit the concierge assignment:

Select the radio button next to the concierge ID and click Edit.

In the Edit Concierges window, you can change the phone number and other information identifying the concierge.

To delete a concierge, select the radio button next to the concierge ID and click Delete.

Access Management

From the Microsoft Exchange/AD server, it is possible to create groups, such as a Concierge group and an Admin group. Use this window to view and create roles for these groups. The Cisco TelePresence Manager supports two roles—a concierge and an administrator.

The two roles have different levels of privilege and access when using the Cisco TelePresence Manager application user interface. Members in the group mapped to the Concierge role have limited privileges that allow them to view the meetings, rooms, and system error and log files. Members in the group mapped to the Admin role have the privileges of the concierge role plus additional privileges that allow them to make configuration changes.

System Settings

If you are the system administrator and know the superuser password, you can open the System Settings window to see the following choices:

IP Setting

NTP Setting

SNMP Setting

Remote Account

Change Password

Restart Host

Use the tabs in this window to modify IP settings, configure a Network Time Protocol (NTP) server, enable or disable Simple Network Management Protocol (SNMP), set up a temporary account for access, change the system password, and restart the system.

IP Setting

The IP Setting window lists information that is provided to the Cisco TelePresence Manager during first-time installation and configuration. Although it is typically not necessary to change IP settings, this window offers a place to modify some of them. Table 3-11 describes the fields and buttons.

Table 3-11 IP Settings 

Field or Button
Description or Settings

MAC Address

Display-only MAC address number supplied for this Cisco TelePresence Manager.

Hostname

Display-only hostname configured for this Cisco TelePresence Manager.

Domain Name

Domain name for this Cisco TelePresence Manager.

Primary DNS

Primary DNS server IP address supplied for this Cisco TelePresence Manager.

Secondary DNS

Secondary DNS server IP address supplied for this Cisco TelePresence Manager.

Ethernet Card

Name supplied for the system Ethernet card.

DHCP

Enable and Disable radio buttons determine whether DHCP is enabled or disabled. When the Enable radio button is chosen, information in the IP address fields cannot be modified.

To modify the IP settings for this Cisco TelePresence Manager, click the Disable radio button.

IP Address

IP address supplied for this Cisco TelePresence Manager.

Subnet Mask

Subnet mask used on the IP address.

Default Gateway

Default gateway IP address supplied for this Cisco TelePresence Manager.


To add new information, type it in the fields provided.

To change information, highlight and delete existing information and type in the new information.

To register new or modified settings, click Apply.

To restore the original settings, click Reset.

NTP Setting

Click the NTP Setting tab in the System Settings window to list the configured IP address of the Network Time Protocol (NTP) servers.

NTP is used to synchronize the clocks on Cisco IP telephony servers with an external network time server that uses NTP.

To add an NTP server to the configuration, type the IP address in an NTP Server field.

To change an NTP server in the configuration, highlight and delete the IP address in the NTP Server field and type in the new address.

To register new or modified settings, click Apply.

To restore the original settings, click Reset.

SNMP Setting

SNMP is an industry-standard interface used by network management systems to capture system status and error information, including information provided by Cisco Unified Communications Manager. Use this window to enable and disable SNMP service and change the default configuration.

By default, SNMP service is disabled. Once SNMP is enabled, the following default SNMP settings are also enabled:

One SNMP username set to "admin". This name cannot be changed.

SNMP service password set to "snmppassword". The password should be changed.

No trap receiver configured. Use the Trap Receiver Configuration fields in this window to configure a trap receiver. The fields collect trap receiver username, password, authentication algorithm, hostname or IP address, and port.

To configure SNMP, click the SNMP Setting tab in the System Settings window.

Table 3-12 describes the fields and buttons.

Table 3-12 SNMP Settings 

Field or Button
Description or Settings

Engine ID

The engine ID for the SNMP agent on this Cisco TelePresence Manager.

If you configure the trap receiver, this engine ID is used to create a trap user on the trap receiver system and to compute the security digest for authenticating and encrypting packets sent to a user on the remote host.

SNMP

To enable or disable SNMP, click the Enable or Disable radio button, as appropriate.

When SNMP is enabled, supply a password for the SNMP server in the Configuration area.

Configuration


Username

SNMP server username.

Current Password

SNMP server password. The password must be 8 characters long. Enter it twice for verification.

Trap Receiver Configuration

To select whether to use an SNMP trap receiver, click the Yes or No radio button, as appropriate.

When a trap receiver is used, supply login information for the trap receiver in the following fields.

Username

Trap receiver username.

Current Password

Trap receiver password. The password must be 8 characters long. Enter it twice for verification.

Authentication Algorithm

Choose Message Digest 5 (MD5) or Secure Hash Algorithm (SHA) for authentication.

Host

Trap receiver IP address or hostname.

Port

Trap receiver port number.


To register new or modified settings, click Apply.

To restore the original settings, click Reset.

Technical Notes

Cisco TelePresence Manager uses SNMP v3, which supports only one trap receiver. A string of trap receiver settings is added to the `/etc/snmp/snmpd.conf' file to configure the trap receiver on the Cisco TelePresence Manager server. The string must include the following information, which is collected in the fields described in Table 3-12 or is set by default:

IP address and port number of the trap receiver

Trap receiver username

Trap receiver user password

Trap sender engine ID

Authentication method, either MD5 for Message Digest 5 or SHA for Secure Hash Algorithm

Security model, which by default is authNoPriv

SNMP version, which by default is version 3

Included MIBs, which by default is ALL

The following is an example trap receiver entry:

trapsess -e 0x80001f880474657374 -v 3 -m ALL -l authNoPriv -u traper -a MD5 -A changeme 
171.71.232.113:162

These fields can be viewed and configured using get and set commands on the `/usr/sbin/snmpconfig' script. To test your configuration, run snmptrapd come with net-snmp on the trap receiver system. You can create the user in `/etc/snmp/snmptrapd.conf' on the trap receiver system before starting snmptrapd.

Remote Account

Use this window to set up limited access for remote users of this Cisco TelePresence Manager. The remote account is intended for use by Cisco technical support personnel so they can access the system remotely to troubleshoot problems. Secure Shell (SSH) is used to access the system. The remote account is typically enabled for a brief period. Disabling the account will cause whoever is logged onto the system to be logged off. Only one remote account can be set up at a time, but more than one remote account can be active at the same time.

Login to the remote account is done using the account name and a pass phrase generated by software in this Cisco TelePresence Manager. The remote user uses the account name, the pass phrase, and a utility available at an internal Cisco web site to generate a login name and password that allow access to this Cisco TelePresence Manager.

To start the remote login account process:

Type a name for the remote login account in the Account Name field.

This name can be anything you choose.

Type in the number of days that the account should be active.

Click Add.

This step generates a pass phrase.

To complete this process, the account name and pass phrase are entered into a utility at the following Cisco Internal website:
https://remotesupporttool.cisco.com/logon.php

For security reasons, if remote users fail to log off, they will be logged off automatically at the time listed in the Expires field.

Change Password

Use this window to change the password for this Cisco TelePresence Manager. You must know the current password. Supply the new password twice for verification.

To display the password fields, click Change Password.

To register the new password, click Apply.

To restore to the original password, click Reset.

It is not possible to change the username for this Cisco TelePresence Manager.

Restart Host

Use this window to restart the Cisco TelePresence Manager. You must know the system password to access the Restart button.

Software Upgrade

If you are the system administrator and know the superuser password, you can open the Software Upgrade window to monitor and maintain system software. This window reports the version number of the system software. There are also two buttons to assist you in maintaining the system software, as follows:

Switch Version—The hard drive on the server on which this Cisco TelePresence Manager is installed is partitioned into two areas. Each area can contain a system image. The Switch Version button allows you to switch the location of two stored versions of the system software.

Software Upgrade—This button loads a patch file for upgrading system software. The Cisco-supplied patch file can be stored on a CD-ROM or a Secure FTP (SFTP) host network. A wizard displays dialog boxes to prompt you through the process.

Switch Version

You may find it necessary to switch the version of the Cisco TelePresence Manager software.

To switch two software versions stored in the partitions, click the Switch Version button.

The system will swap the software versions and reboot. Screens will describe activity.

The active partition in the server hard drive contains the active system image. The software versions that are loaded will be displayed in the Active Version and Inactive Version fields.

Software Upgrade

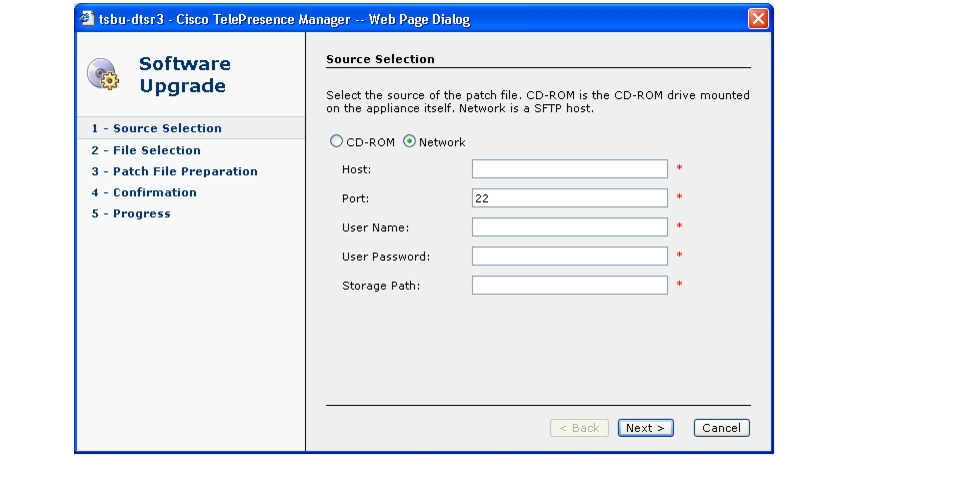
This task upgrades the Cisco TelePresence Manager software by loading a file from either a CD-ROM or an SFTP host network. Before starting this task, find out the source of the patch file.


Step 1 To start the software upgrade process, click the Upgrade Software button.

The Source Selection dialog box appears.


Note If you need to stop the software installation, click the Cancel button when the button is active.


Step 2 Click the CD-ROM or Network radio button to choose the location of the patch file.

If you chose CD-ROM, click Next to go to the File Selection window.

If you chose Network, provide the hostname, login username, password, and the path to the patch file. By default, port 22 is used to access the server; supply the correct port number, if required. Click Next to go to the File Selection window.
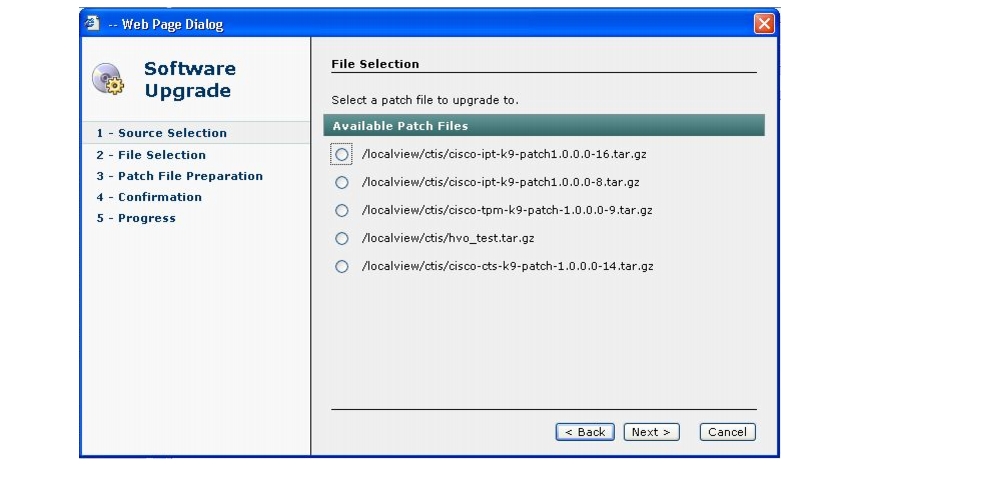
Step 3 At the File Selection window, choose the file to load by clicking its radio button. Then click Next.

Step 4 The Patch File Preparation window appears. Watch this window to monitor the progress of the file download. Buttons will be inactive until the patch file is loaded.

Once the file is loaded, the window displays a Confirmation message.

The software wizard displays the software versions that are installed and provides active Yes and No radio buttons so you can choose to switch the newly loaded software to the active partition.

Step 5 Click Yes or No to make your choice. Then click Next to finish the software upgrade task.

The install wizard displays a dialog window that logs the progress of the update.

Step 6 When the log indicates that the files have been switched, click Finish to complete this task.


Note If you selected to automatically switch to the new version, a message is displayed letting you know there is no connectivity to the server during the switch.

It takes approximately ten minutes to complete the upgrade. You can then log into the upgraded version of Cisco TelePresence Manager.