Feedback
Table Of Contents
Configuring IOA Using Fabric Manager
Assigning Interfaces to a Cluster
Removing Interfaces from a Cluster
Configuring IOA Using Fabric Manager
This chapter describes how to configure I/O Accelerator (IOA) using Fabric Manager.
This chapter contains the following sections:
IOA Manager
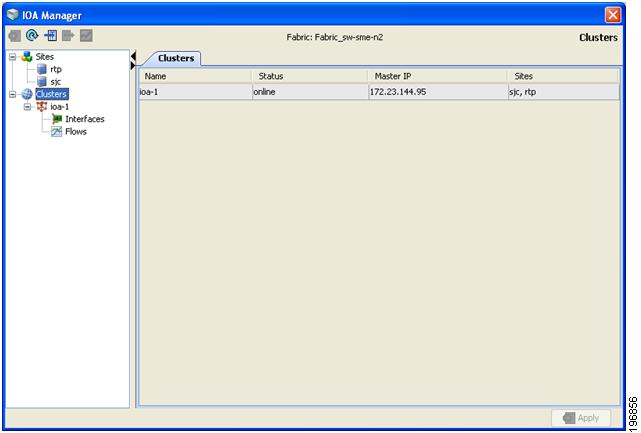
The IOA Manager is a graphical user interface (GUI) for configuring and managing IOA. The IOA Manager user interface consists of a navigation pane on the left that displays a hierarchy and an information pane on the right that displays the contents of the item that you click in the navigation pane. The hierarchy is a tree structure that contains elements that you can configure with IOA Manager. It also consists of a toolbar for quick access to the most commonly used options and a Fabric drop-down list box. The Fabric drop-down list box allows you to directly access the fabrics managed by Fabric Manager. The Fabric drop-down list box will be available only if more than one fabric is open.
Note
Fabric Manager Client standalone supports IOA Manager from Release 5.0(1a).
Note
Figure 5-1 shows the IOA Manager interface.
Figure 5-1 IOA Manager Main Window
Toolbar
The IOA Manager main toolbar provides icons for accessing the most commonly used operations as shown in Table 5-1.
Launching IOA Manager
To launch IOA Manager, follow these steps:
Step 1
You see the Fabric Manager main window as shown in Figure 5-2.
Figure 5-2 Fabric Manager Window
Note
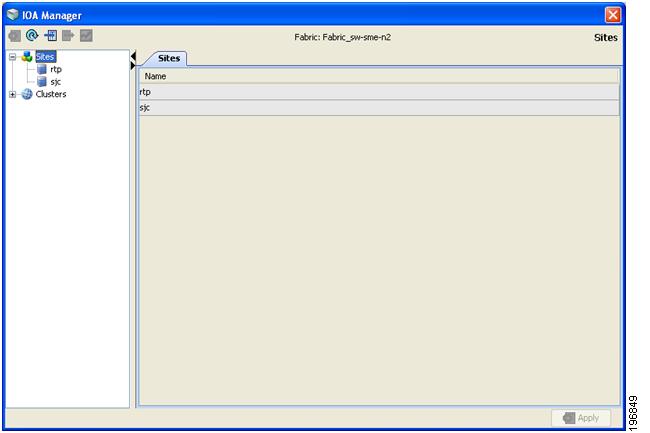
Configuring Sites
A site is described as a named set of switches. You can click the sites node to view the list of defined sites. There are two tables in the information pane: one for the assigned switches on the top and the another one for unassigned switches below the assigned switches table. You can click the name of the site to display the details in the information pane. Only active sites can be used for creating a clusters.
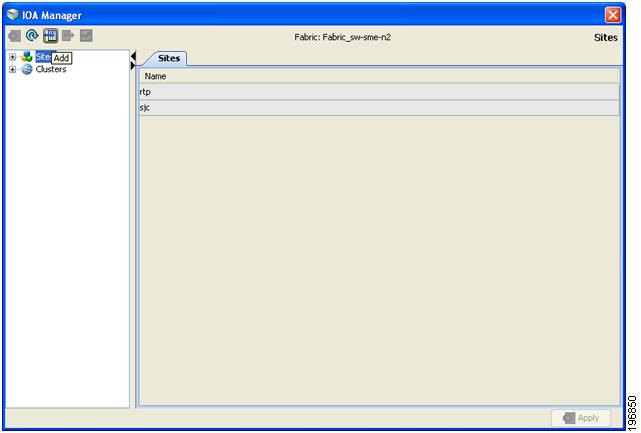
Adding a New Site
To create a new site using IOA Manager, follow these steps:
Step 1
You see the IOA Manager window as shown in Figure 5-3.
Figure 5-3 IOA Manager
Step 2
You see the site name dialog box as shown in Figure 5-4.
Figure 5-4
Site Name Dialog Box
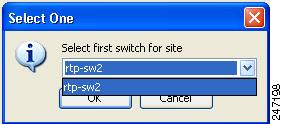
Step 3
You see the select switch dialog box as shown in Figure 5-5.
Figure 5-5
Select Switch Dialog Box
Step 4
Step 5
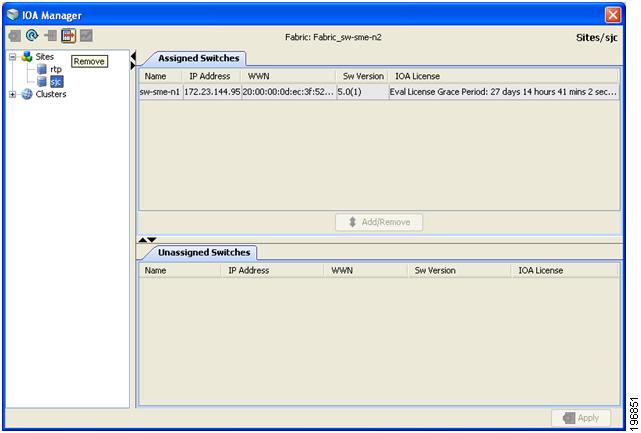
Removing a Site
To remove a site using IOA Manager, follow these steps:
Step 1
You see the IOA Manager window as shown in Figure 5-6.
Figure 5-6 IOA Manager Window
Step 2
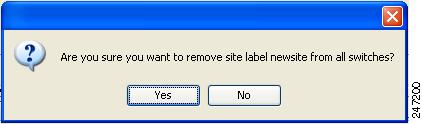
You see the confirmation dialog box in as shown in Figure 5-7.
Figure 5-7
Delete Confirmation Dialog Box
Step 3
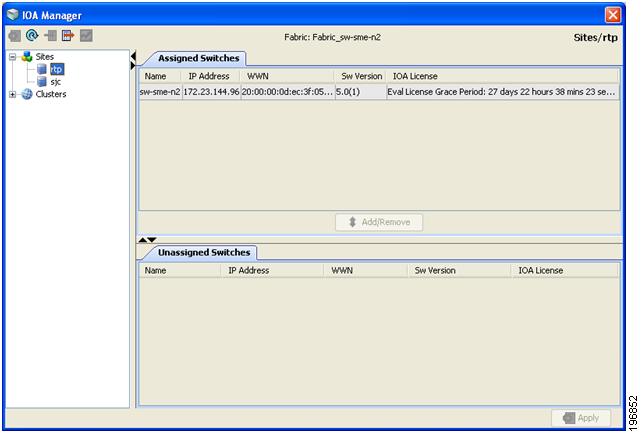
Viewing a Site
To view a site using IOA Manager, follow these steps:
Step 1
You see the IOA Manager window as shown in Figure 5-8.
Figure 5-8 Viewing Sites Using IOA Manager
Step 2
Step 3
You see the site details as shown in Figure 5-9.
Figure 5-9 Viewing Site Details Using IOA Manager
Adding Switches to a Site
To add a switch to a site, follow these steps:
Step 1
Step 2
Step 3
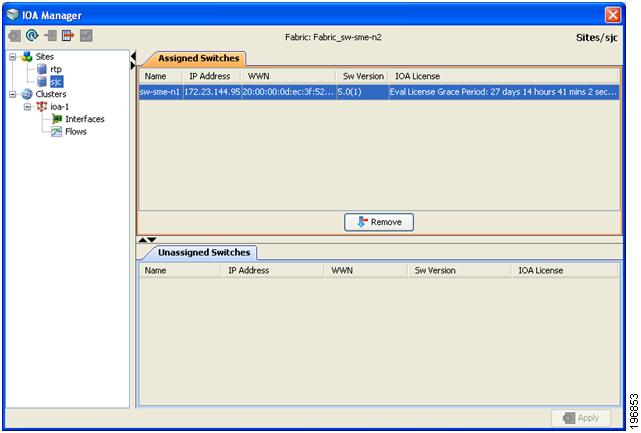
Removing Switches from a Site
To remove a switch from a site, follow these steps:
Step 1
You see the IOA Manager window as shown in Figure 5-10.
Figure 5-10 Removing Switches from a Site Using IOA Manager
Step 2
Step 3
Configuring Clusters
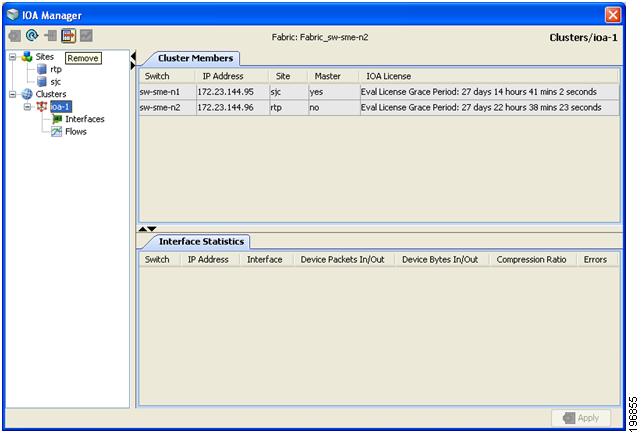
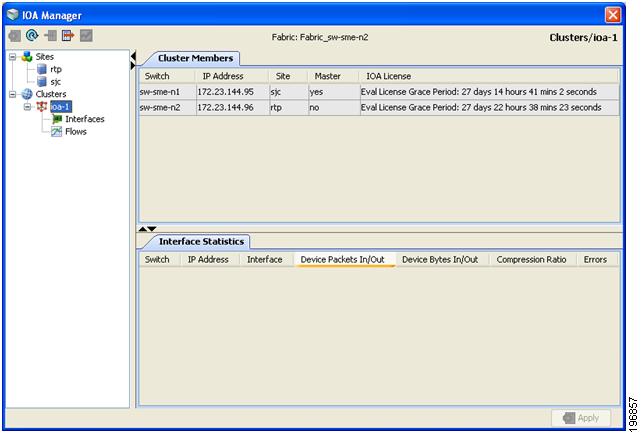
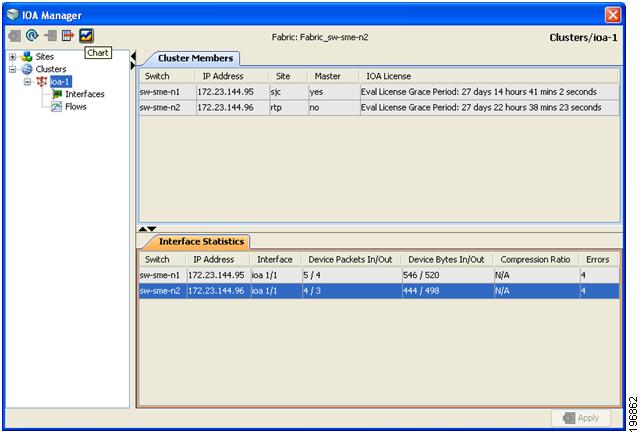
You can select a cluster to see the details in the information pane. The upper table in the information pane displays the members of a named cluster, and the table below displays the statistical information about the cluster's active IOA interfaces.
Adding a New Cluster
To create a new cluster using IOA Manager, follow these steps:
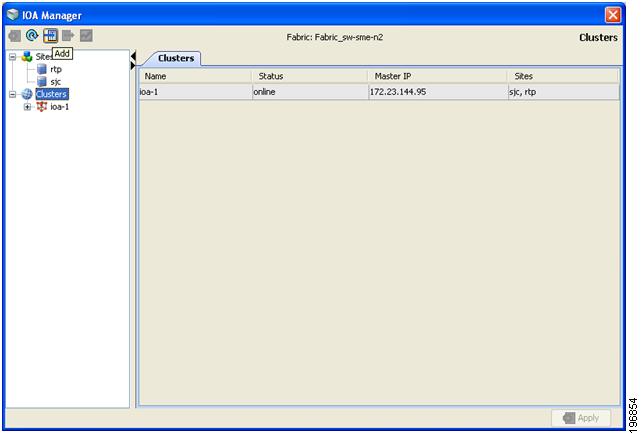
Step 1
You see the IOA Manager window as shown in Figure 5-11.
Figure 5-11 IOA Manager - Add Clusters
Step 2
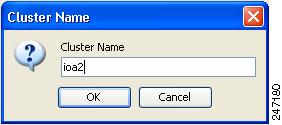
You see the add Cluster name dialog box as shown in Figure 5-12.
Figure 5-12
Add Cluster Name Dialog box
Step 3
You see the select switch dialog box as shown in Figure 5-13.
Figure 5-13
Select Switch Dialog Box
Step 4
Note
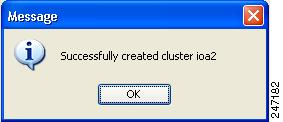
You see a message box upon successfully creating a cluster as shown in Figure 5-14.
Figure 5-14
Message Box
Step 5
Note
Removing a Cluster
To remove a site using IOA Manager, follow these steps:
Step 1
You see the IOA Manager window as shown in Figure 5-15.
Figure 5-15 Removing a Cluster Using IOA Manager
Step 2
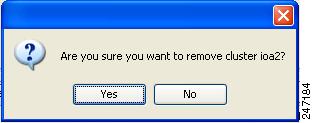
You see the Delete confirmation dialog box as shown in Figure 5-16.
Figure 5-16
Remove Confirmation Dialog Box
Step 3
Viewing Clusters
To view a cluster using IOA Manager, follow these steps:
Step 1
You see the IOA Manager window with clusters selected as shown in Figure 5-17.
Figure 5-17 Viewing Clusters Using IOA Manager
Step 2
Step 3
You see the IOA Manager window with the cluster details as shown in Figure 5-18.
Figure 5-18 Viewing Cluster Details
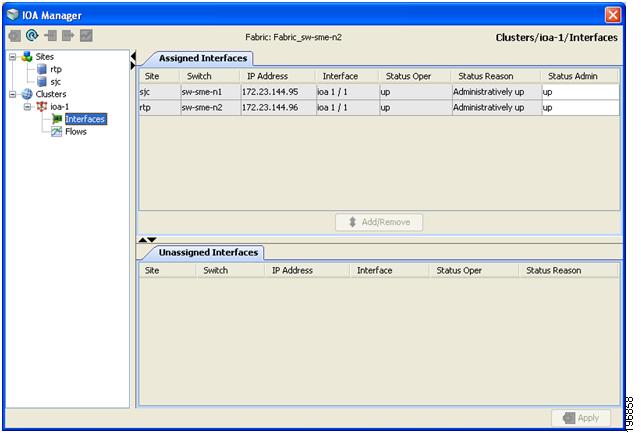
Configuring Interfaces
You can select the interfaces in a named cluster to see the details in the information pane. The upper table in the information pane displays information about active and configured IOA interface pairs associated with the cluster. The lower table in the information pane displays information about IOA interface candidates that are ready for use in the cluster.
Assigning Interfaces to a Cluster
To add a new interface to a cluster using IOA Manager, follow these steps:
Step 1
You see the IOA Manager window as shown in Figure 5-19.
Figure 5-19 Adding Interfaces Using IOA Manager
The information pane displays the Assigned Interfaces and Unassigned Interfaces tabs.
Step 2
Step 3
Note
Note
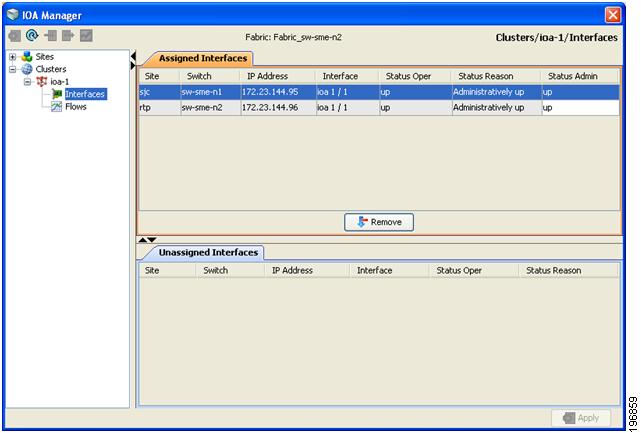
Removing Interfaces from a Cluster
To remove an interface from a cluster, follow these steps:
Step 1
You see the IOA Manager window as shown in Figure 5-20.
Figure 5-20 Removing Interfaces Using IOA Manager
Step 2
Step 3
Step 4
Configuring Flows
You can select the flows in a named cluster to see the details in the information pane. The upper table in the information pane displays information on active IOA flows. The lower table in the information pane displays information on candidate IOA flows.
Adding a Flow
To add a flow in the cluster using IOA Manager, follow these steps:
Step 1
You see the IOA Manager window displaying the Assigned Flows and Unassigned Flows as shown in Figure 5-21.
Note
Figure 5-21 Adding Flows Using IOA Manager
Step 2
Step 3
You see the Add Flows dialog box as shown in Figure 5-22.
Figure 5-22
Flow Configuration Dialog Box
Step 4
Step 5
Step 6
Note
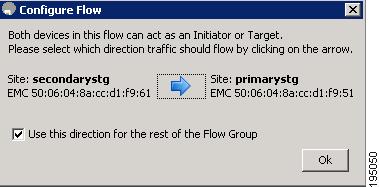
Figure 5-23
Configure Flow Dialog Box
Step 7
Step 8
Note
Step 9
Removing a Flow
To add a flow in the cluster using IOA Manager, follow these steps:
Step 1
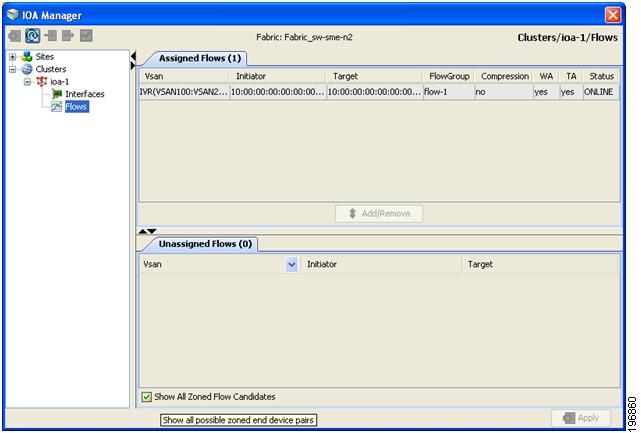
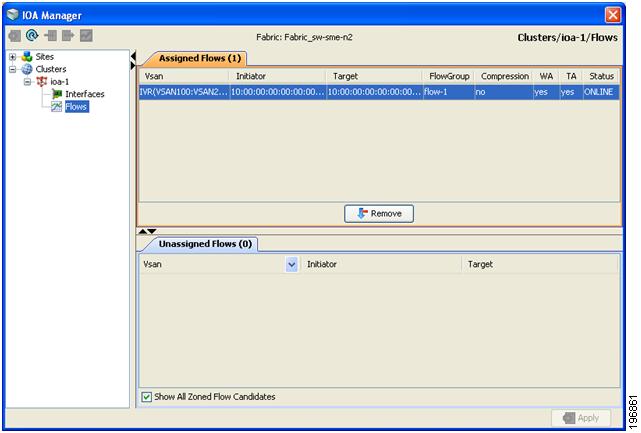
You see the IOA Manager window displaying the Assigned Flows and Unassigned Flows as shown in Figure 5-24.
Figure 5-24 Removing Flows Using IOA Manager
Step 2
Step 3
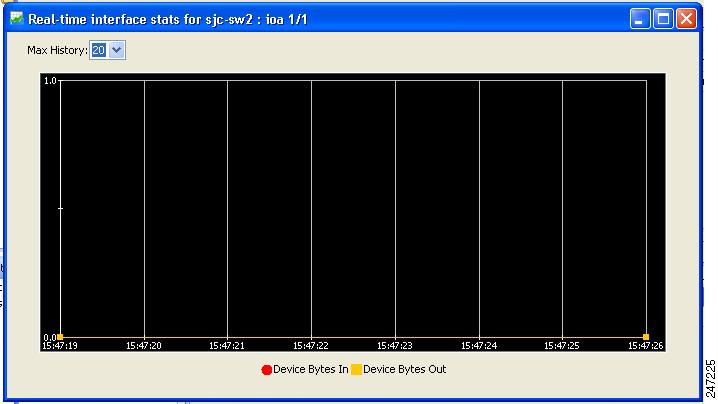
Viewing Interface Statistics
To view real-time charts using IOA Manager, follow these steps:
Step 1
Step 2
You will see the IOA Manager window as shown in Figure 5-25.
Figure 5-25 Select IOA Manager Real-time Chart
Step 3
You see the chart as shown in Figure 5-26.
Figure 5-26 IOA Manager
Real-time Chart