Cisco SFS 7000 Series Product Family Element Manager User Guide, Release 2.5.0
InfiniBand Menu Tasks

Table Of Contents

InfiniBand Menu Tasks

Understanding InfiniBand

InfiniBand Components

Protocols

IPoIB

SDP

SRP

uDAPL

Architectural Elements

RDMA

Queue Pairs

Understanding the Subnet Manager

Subnet Management Agents

Subnet Manager Hot Standby

Subnet Manager Routing

Multiple Paths

Understanding SM Routing Terms

Minimum Contention, Shortest Path and Load Balancing Algorithm

Deterministic Source Based Routing Algorithm

Configuring Your Network For Optimal Routing

Viewing Subnet Manager Properties

Configuring the Subnet Manager Priority

Configuring the Subnet Manager Sweep Interval

Configuring the Subnet Manager Response Timeout

Configuring the Subnet Manager Master Poll Interval

Configuring the Subnet Manager Master Poll Retries

Configuring the Maximum Number of Active Subnet Managers

Configuring the LID Mask Control

Configuring the Switch Lifetime

Configuring the Switch Link HoQ Life

Configuring CA Link HoQ Life

Configuring Max Hops

Viewing Database Synchronization Details

Understanding Partitions

How Partitions Work

Partition Members

Membership Types

About the Default Partition

Selecting a P_Key Value

Hexadecimal to Binary Conversions

Examples of Valid P_Key Values

Understanding how P_Keys are Saved

Viewing Partition Details

Configure Multicast Groups

Configuring IPoIB Broadcast Multicast Groups

Viewing Multicast Group Details

Viewing Multicast Member Details

Viewing InfiniBand Services

Viewing Switch Route Details

Viewing Switch Element Route Details

Adding a Subnet Manager

Removing a Subnet Manager

Configuring Subnet Manager Properties

Configuring SM Priority

Configuring Sweep Interval

Configuring Response Timeout

Configuring the Master Poll Interval

Configuring the Number of Master Poll Retries

Configuring the Maximum Number of Active Standby SMs that the Master SM Supports

Configuring LID Mask Control

Configuring Switch Life Time

Configuring Switch Link HoQ Life

Configuring Max Hops

Configuring Database Synchronization

Enabling SM Database Synchronization

Configuring the Maximum Number of Backup Subnet Managers to Synchronize

Configuring Session Timeout

Configuring the Poll Interval

Configuring the Cold Sync Timeout Value

Configuring the Cold Sync Limit Value

Configuring the Cold Sync Limit Period

Configuring the New Session Delay

Configuring the Resync Interval

Viewing the Database Synchronization State

Viewing Nodes

Viewing Partitions

Creating a Partition

Removing a Partition

Viewing Partition Details

Adding Full Members to a Partition

Adding Available Members

Adding Unavailable Members

Adding Limited Members to a Partition

Adding Available Members

Adding Unavailable Members

Viewing Multicast Groups

Viewing Multicast Group Details

Viewing Multicast Group Members

Viewing Infiniband Services

Viewing InfiniBand Routes

Viewing Subnet Managers Information

Viewing Event Subscriptions

Enabling Performance Management

Disabling Performance Management

Monitoring Connections

Defining a Connection to Monitor

Viewing Monitored Connections

Viewing Connection Counters

Viewing Connection Monitor Counters

Testing Connections

Viewing Port Counters of Connections

Viewing Port Counters

Viewing Cumulative Port Counters

Enabling Port Monitoring

Configuring Port Monitoring

Configuring Port Monitoring Thresholds

Resetting Counters

Resetting Counters on a Hop

Resetting Counters on All Ports on a Node

Resetting Counters on All Ports in a Connection

Resetting All Counters in a Subnet

Launching Topology View

Viewing Internal Server Switch Components

Viewing Subnet Details

Viewing Nodes

Viewing Ports

Viewing Switches

Viewing Neighbors

Viewing Subnet Management Agents

Nodes

Switches

Switch Cap

Ports (1)

Ports (2)

Mcast

Linear Forwarding

PKey

SLVL Map

Viewing Device Management

Viewing IOUs

Viewing IOCs

Viewing IOC Services


InfiniBand Menu Tasks


This chapter desribes the InfiniBand menu tasks for Element Manager and contains these sections:

Viewing Subnet Manager Properties

Configuring Max Hops

Understanding Partitions

Viewing Partition Details

Viewing Multicast Group Details

Viewing Multicast Member Details

Viewing InfiniBand Services

Viewing Switch Route Details

Viewing Switch Element Route Details

Adding a Subnet Manager

Configuring Subnet Manager Properties

Configuring Database Synchronization

Viewing the Database Synchronization State

Viewing Partitions

Viewing Multicast Groups

Viewing Infiniband Services

Viewing InfiniBand Routes

Enabling Performance Management

Monitoring Connections

Viewing Port Counters

Enabling Port Monitoring

Launching Topology View

Viewing Subnet Details

Viewing Subnet Management Agents

Viewing Device Management


Note This section provides information to familiarize you with the InfiniBand technology. For hardware-specific information, consult the relevant hardware documentation.


Understanding InfiniBand

InfiniBand (IB) is a high speed, high density serial interconnect that increases CPU utilization, decreases latency, and eases the management pain of data centers. The term "InfiniBand" refers to the entire hardware, communication, and management infrastructure. Use of this technology increases the communication speed between the following:

CPUs

devices within servers

subsystems located throughout a network.

InfiniBand combines high-speed hardware, specialized protocols, and Remote Data Memory Access (RDMA) techniques to increase CPU utilization and decrease latency. Operations of the InfiniBand Architecture are managed by the SM.

InfiniBand Components

One or more of the following hardware components may be used to maximize your server network.

InfiniBand switch—Passes traffic between IB-capable devices over the InfiniBand network

Host channel adapters (installed in host)—Serves an IB version of a network interface card (NIC) to connect the host to the IB network

Ethernet gateway—Provides Ethernet connectivity to an IB network

Fibre Channel gateway—Provides Fibre Channel connectivity to an IB network

Protocols

InfiniBand requires a new set of protocols. All of the necessary protocol drivers are included with the Server Switch solution.

IPoIB

The IP over IB (IPoIB) link driver provides standardized IP encapsulation over InfiniBand fabrics. IPoIB can transparently use IP over InfiniBand technology, similar to the way that IP runs over Ethernet.

The primary responsibilities of the IPoIB driver are to perform address resolution and the management of multicast membership.

SDP

The Sockets Direct Protocol (SDP) is a transparent protocol used on InfiniBand networks to allow sockets-based applications to take advantage of the RDMA performance over an InfiniBand network. SDP provides: a reduction in the amount of software running inside a process context and zero copy SDP protocol support enables databases, application servers, and CPUs to operate more efficiently because the databases spends less time waiting for work, the application servers spend less time waiting for responses, and the CPUs have more cycles free for other work.

SRP

SCSI RDMA Protocol (SRP) is an upper-layer storage protocol for InfiniBand that runs SCSI commands across RDMA-capable networks for InfiniBand hosts to communicate with Fibre Channel storage devices. This protocol allows InfiniBand hosts to natively send SCSI commands as if the storage was directly attached.

The SRP protocol operate using an RDMA communication service that provides communication between pairs of consumers; it uses messages for control information and RDMA operations for data transfers.

The SRP protocol is used only if you have a Fibre Channel Gateway installed in your InfiniBand system.

uDAPL

The user Direct Access Programming Library (uDAPL) is a standardized user mode API that natively supports InfiniBand fabrics. uDAPL performs name to address translations, establishes connections, and transfers data reliably. The primary responsibilities of uDAPL are: connection management and low latency data transfer and completion

Architectural Elements

The following structures serve as foundational elements of InfiniBand architecture:

Remote Direct Memory Access (RDMA)

Queue Pairs

Services

RDMA

InfiniBand utilizes RDMA technology. RDMA allows one computer to place information directly into the memory of another computer. RDMA is specifically characterized by two important features: allows user space applications to directly access hardware and zero-copy data movement

A combination of hardware and software allows user space applications to read and write the memory of a remote system without kernel intervention or unnecessary data copies. This results in lower CPU utilization per I/O operation and more efficient use of machine resources because applications place most of the messaging burden upon InfiniBand's high-speed network hardware.

Queue Pairs

A verb is used to define the functionality of the Host Channel Adapter (HCA). A verb consumer refers to the direct user of the verb.

A work queue provides a consumer with the ability to queue up a set of instructions that are executed by the Channel Adapter. There are two types of Work Queues: Send Work Queue (outbound) and a Receive Work Queue (inbound). Together these Work Queues create a Queue Pair.

The Queue Pair (QP) is one of the primary architectural elements of InfiniBand. In InfiniBand, communication occurs between QPs, instead of between ports.

A QP is an addressable entity that consists of two Work Queues: a Send Work Queue and a Receive Work Queue. (A work queue provides a verb consumer with the ability to queue up a set of instructions that are executed by the Channel Adapter.) The Channel Adapter hardware takes over the task of arbitrating communication by multiplexing access to the send queue or demultiplexing messages on the receive queue.

A connection is made by linking a local queue pair to a remote queue pair. Applications do not share QPs; once you set them up, you can manage them at the application level without incurring the overhead of system calls.

Send and Receive work queues have these characteristics:

Always created as a pair

Always remain a pair

Known as QPs

Identified by a QP number, which is within the Channel Adapter.

Queue pairs have:

A region of memory to be used as buffers (numbers of QPs are only limited by memory).

A key that must match on each incoming packet (the Q_Key) to verify the validity of the packet,

(Potentially) a partition key, which specifies the portion of the fabric that this queue pair may access.

The QP is the mechanism by which you define quality of service, system protection, error detection and response, and allowable services.

Each QP is independently configured for a particular type of service. These service types provide different levels of service and different error-recovery characteristics as folows:

Reliable connection

Unreliable connection

Reliable Datagram

Unreliable Datagram

Once the fabric connections are discovered, QPs and protection domains are established, and the type and quality of service are defined for each queue pair, the fabric operates reliably and securely at full performance without impact on system hardware or software resources.

Understanding the Subnet Manager

The Subnet Manager (SM) configures and maintains fabric operations. There can be multiple SMs, but only one master. The SM is the central repository of all information that is required to set up and bring up the InfiniBand fabric.

The master SM does the following:

Discovers the fabric topology.

Discovers end nodes.

Configures switches and end nodes with their parameters, such as the following:

Local Identifiers (LIDs)

Global Unique Identifier (GIDs)

Partition Key (P_Keys)

Configures switch forwarding tables.

Receives traps from Subnet Management Agents (SMAs).

Sweeps the subnet, discovering topology changes and managing changes as nodes are added and deleted.

Subnet Management Agents

SMAs are part of the SM. An SMA is provided with each node and process packets from the SM.

If a SM is elected master, all of its components, including SA, are implicitly elected master. If a SM ceases to be master, all of its components cease responding to messages from clients.

Subnet Manager Hot Standby

The master and slave SMs can be synchronized so the information in the master is carried over to the slave in the event of a fail-over. Refer to the "Enabling SM Database Synchronization" section to configure SM hot standby.

The hot standby/database sync feature is used to synchronize the databases between SMs running on separate chassis.

The SM maintains a database in the volatile memory of the master SM containing all required information. The database synchronization is accomplished in two stages:

Cold Synchronization—This stage is initiated by the master SM when it is ready to start a synchronization session with a standby SM. In this stage, all out of sync tables are copied from the master SM to the standby SM.

Transactional Synchronization—This stage is entered following successful completion of the cold synchronization stage. In this stage, all database update transaction requests that are processed by the master, are replicated to the standby.

A standby SM can become the master in this situation.

A crash of the node running the current master SM.

Partitioning of the subnet (such as due to link failure).

Graceful shutdown of the master ( such as for maintenance purposes).

The following occurs in the event of a failure:

The standby SM becomes the new master.

The new master rebuilds the database from information retrieved during the subnet discovery phase.

Existing LID assignments are retained, where possible.

All ports are reset to force them to rejoin multicast groups, readvertise services, rerequest event forwarding, and re-establish connections.

A "SlaveToMaster" event trap is generated to trigger any necessary processing by external management applications.

Subnet Manager Routing

There are two different concepts associated with InfiniBand routing:

Routing internally within a switch (hops between switch chips)

Routing between whole switches (hops between nodes). This is also referred to as routing between "switch elements."

Internal switch routing can be configured to provide the highest performance in passing traffic and to minimize the threat of congestion within the switch.

The routing process proceeds as follows:


Step 1 The SM first discovers all the InfiniBand switch chips in the network.

Step 2 The SM groups the internal switch chips within each chassis into a "switch element."

Step 3 The SM process continues until all the InfiniBand switches are grouped into switch elements.

Step 4 After all the switch chips are grouped, the SM will route the switch elements according to the routing algorithm discussed in the "Minimum Contention, Shortest Path and Load Balancing Algorithm" section.

Step 5 The internal network of each InfiniBand switch is then routed based on the best algorithm for each switch element.


Multiple Paths

The SM allows you to define the Local Identifier Mask Control (LMC) value per subnet. The default value of the LMC is 0. By default, only one Local Identifier (LID) is assigned to each host port.

Once the LMC value has been assigned, the SM will route different paths for each LID associated with the same host port. The result of these paths is based on the routing algorithm applied.

Understanding SM Routing Terms

The following terms are important to understand before distinguishing the various types of algorithms that the SM uses for routing:

Distance is defined as the number of hops (InfiniBand switches or switch elements) between source and destination.

Tolerance is used when deciding if a particular path is better in distance than the already selected path. You can choosethe tolerance to be used for shortest path calculation as follows:

If the tolerance is set to 0, a path has equal distance in calculating the route as the shortest path route only if it has an equal number of hops.

If the tolerance is set to 1, a path has equal distance in calculating the route as the shortest path route only if the path has a number of hops equal to either the shortest path or the shortest path plus 1.

Contention is declared for every switch port on the path that is already used for routing another LID associated with the same host port.

Minimum Contention, Shortest Path and Load Balancing Algorithm

Minimum Contention, Shortest Path and Load Balancing is the algorithm that is used by default to route between the switch elements and for routing between the internal InfiniBand switch chips within each switch element.

The following algorithm is used for the calculation:


Step 1 The shortest path for each of the host ports is calculated.

Step 2 Contention is calculated for all the available paths that are within the (shortest path + tolerance) distance.

a. The path with the least contention is selected.

b. If two paths have the same contention, the path with less distance is selected.

c. If two paths have the same contention and the same distance, the port usage count is used to provide load balancing over the two paths. The usage count is a measure of how many LIDs have been configured to use that particular port.


Deterministic Source Based Routing Algorithm

The Deterministic Source Based Routing is used in some HPC environments where the requirements may need to be more stringently defined. An administrator can identify the exact route that a given port and LID takes for traversing through the network.

Currently, only the internal routing for the Cisco SFS 7008 (a 96 port switch) supports this routing scheme. Refer to the Cisco SFS 7008 Hardware Guide, or contact technical support for more information.

Configuring Your Network For Optimal Routing

For optimal routing, we recommend that you do the following:

Create equal paths between switch elements

Determine the first path that will be discovered

We recommend that InfiniBand switch elements be connected so that all paths between any pair of switch elements are the same distance (i.e. same number of hops), if possible. This enables you to obtain the optimal paths using the default tolerance of 0. If the paths are of different lengths, then the tolerance value will need to be determined.

The SM Routing Algorithm selects the first best path that it finds. If multiple paths with the same properties are available, then the first of these paths found is the one that is selected. Therefore, it is possible to set up the cabling between switch elements to force the algorithm to prioritize certain paths. Depending on the network requirements, the prioritized paths can either be concentrated on a particular switch element or spread across multiple switch elements to improve fault tolerance.

Viewing Subnet Manager Properties

To view SM properties, perform the following steps:


Step 1 Click the InfiniBand menu and choose Subnet Management (tabular format). The Subnet Manager window opens.

Step 2 Click the Subnet Manager tab. A table of SM properties appears. Table 8-1 lists and describes the elements in this window.

Table 8-1 Subnet Manager Properties Window Fields 

Element
Description

Subnet Prefix field

Displays the subnet prefix of the Subnet Manager.

GUID field

Displays the GUID of the networking device on which the SM runs.

Status field

Status of the Subnet Manager. It may appear as master, standby, inactive, or discovery.

Activity Count field

Activity counter that increments each time the SM issues an subnet management packet (SMP) or performs other management activities.

SM Key field

64-bit subnet management key assigned to the Subnet Manager. The SM key serves as the prefix of all GIDs and "brands" nodes as members of this subnet.

Priority field

Priority of the SM relative to other SMs in the IB network. The higher the number, the greater the priority.

Sweep Interval field

Specifies how frequently the SM queries the InfiniBand fabric for network changes.

Response Timeout field

Maximum amount of time that the SM waits for a response after it sends a packet to a port. If the SM does not receive a response in time, the SM identifies the port as unresponsive.

Master Poll Interval field

Interval at which the slave SM polls the master to see if it still runs.

Master Poll Retries field

Number of unanswered polls that cause the slave to identify the master as dead.

Max Active SMs field

Maximum number of standby SMs that the master supports. A value of 0 indicates unlimited SMs.

LID Mask Control field

Number of path bits present in the base LID to each channel adapter port. Increasing the LMC value increases the number of LIDs assigned to each port to increase the number of potential paths to reach each port.

Switch Life Time field

The life time of a packet inside a Server Switch. This value defaults to 20.

Switch Link HoQ Life field

The life time of a packet at the head-of-queue of a switch port. This value defaults to 20.

CA Link HoQ Life field

The life time of a packet at the head-of-queue of the host port. This value defaults to 20.

Note Element Manager does not currently support this field.

Max Hops field

Specifies the maximum hops.


Configuring the Subnet Manager Priority

To configure the SM priority, perform the following steps:


Step 1 Click the InfiniBand menu and choose Subnet Management (tabular format). The Subnet Manager window opens.

Step 2 Click the Subnet Manager tab. A table of Subnet Manager properties appears.

Step 3 Highlight the value in the Priority column and replace it with the value that you want to apply.

Step 4 Click the Apply button.


Configuring the Subnet Manager Sweep Interval

To configure the SM sweep interval, perform the following steps:


Step 1 Click the InfiniBand menu and choose Subnet Management (tabular format). The Subnet Manager window opens.

Step 2 Click the Subnet Manager tab. A table of SM properties appears.

Step 3 Highlight the value in the Sweep Interval column and replace it with the value that you want to apply.

Step 4 Click the Apply button.


Configuring the Subnet Manager Response Timeout

To configure the SM response timeout, perform the following steps:


Step 1 Click the InfiniBand menu and choose Subnet Management (tabular format). The Subnet Manager window opens.

Step 2 Click the Subnet Manager tab. A table of Subnet Manager properties appears.

Step 3 Highlight the value in the Response Timeout column and replace it with the value that you want to apply.

Step 4 Click the Apply button.


Configuring the Subnet Manager Master Poll Interval

To configure the interval at which the switch polls the master switch, perform the following steps:


Step 1 Click the InfiniBand menu and choose Subnet Management (tabular format). The Subnet Manager window opens.

Step 2 Click the Subnet Manager tab. A table of SM properties appears.

Step 3 Highlight the value in the Master Poll Interval column and replace it with the value that you want to apply.

Step 4 Click the Apply button.


Configuring the Subnet Manager Master Poll Retries

To configure the number of failed polls that prompts the slave to identify the master as "down," perform the following steps:


Step 1 Click the InfiniBand menu and choose Subnet Management (tabular format). The Subnet Manager window opens.

Step 2 Click the Subnet Manager tab. A table of SM properties appears.

Step 3 Highlight the value in the Master Poll Retries column and replace it with the value that you want to apply.

Step 4 Click the Apply button.


Configuring the Maximum Number of Active Subnet Managers

To configure the maximum number of active SMs on the IB network, perform the following steps:


Step 1 Click the InfiniBand menu and choose Subnet Management (tabular format). The Subnet Manager window opens.

Step 2 Click the Subnet Manager tab. A table of SM properties appears.

Step 3 Highlight the value in the Max Active SMs column and replace it with the value that you want to apply.

Step 4 Click the Apply button.


Configuring the LID Mask Control

To configure LID mask control, perform the following steps:


Step 1 Click the InfiniBand menu and choose Subnet Management (tabular format). The Subnet Manager window opens.

Step 2 Click the Subnet Manager tab. A table of SM properties appears.

Step 3 Highlight the value in the LID Mask Control column and replace it with the value that you want to apply.

Step 4 Click the Apply button.


Configuring the Switch Lifetime

To configure the switch life time, perform the following steps:


Step 1 Click the InfiniBand menu and choose Subnet Management (tabular format). The Subnet Manager window opens.

Step 2 Click the Subnet Manager tab. A table of SM properties appears.

Step 3 Highlight the value in the Switch Life Time column and replace it with the value that you want to apply.

Step 4 Click the Apply button.


Configuring the Switch Link HoQ Life

To configure the switch link HoQ life, perform the following steps:


Step 1 Click the InfiniBand menu and choose Subnet Management (tabular format). The Subnet Manager window opens.

Step 2 Click the Subnet Manager tab. A table of SM properties appears.

Step 3 Highlight the value in the Switch Link HoQ Life column and replace it with the value that you want to apply.

Step 4 Click the Apply button.


Configuring CA Link HoQ Life

To configure the CA link HoQ life, perform the following steps:


Step 1 Click the InfiniBand menu and choose Subnet Management (tabular format). The Subnet Manager window opens.

Step 2 Click the Subnet Manager tab. A table of SM properties appears.

Step 3 Highlight the value in the CA Link HoQ Life column and replace it with the value that you want to apply.

Step 4 Click the Apply button.


Configuring Max Hops

To configure the maximum hops, perform the following steps:


Step 1 Click the InfiniBand menu and choose Subnet Management (tabular format). The Subnet Manager window opens.

Step 2 Click the Subnet Manager tab. A table of SM properties appears.

Step 3 Highlight the value in the Max-Hops column and replace it with the value that you want to apply.

Step 4 Click the Apply button.


Viewing Database Synchronization Details

Element Manager provides multiple screens that you can use to configure database synchronization. Configuration details and field descriptions appear in the "Configuring Database Synchronization" section.


Step 1 Click the InfiniBand menu and choose Subnet Management (tabular format). The Subnet Manager window opens.

Step 2 Click the Database Sync tab. Details appear in the table below the tab.


Note Database synchronization is enabled by default.


Understanding Partitions

A partition defines a set of InfiniBand nodes that are permitted to communicate with one another. Partitions provide the following:

Security

Allows a large cluster to be divided and isolated into small sub-clusters.

Maps IB nodes to selected VLANs


Note With database sync enabled on all chassis, only the chassis running the master SM will accept partition configuration from the user. For more information, see the "Configuring Database Synchronization" section.


How Partitions Work

A partition defines a set of InfiniBand nodes that are permitted to communicate with one another. Each node may be part of multiple partitions so that a system administrator can define overlapping partitions as the situation requires. Normal data packets carry a 16-bit P_Key, or partition key, that defines a unique partition. The Subnet Manager (SM) configures each node's channel adapter with its set of P_Keys. When a packet arrives at a node, the channel adapter checks that the packet's P_Key is valid based on the Subnet Manager's configuration. Packets with invalid P_Keys are discarded. P_Key validation prevents a server from communicating with another server outside of its partition.

InfiniBand partitions are comparable to hardware-enforced security features of conventional I/O networking technologies, such as Ethernet VLANs and Fibre-Channel zones.

Partition Members

Without members, a partition does not have meaning to the system. Ports are added to the partition, and become members of that partition. Each port may be part of multiple partitions so that the system administrator can define overlapping partitions as the situation requires.

At the time a port member is added to the partition, the administrator must decide whether that particular port will have full or limited membership.

Membership Types

A partition contains a group of members, but different types of members can exist within a single partition. Partition memberships allows even further control because it defines communication within the members of that group, and not just outside of it.

There are two types of partition memberships: full membership, and limited membership. A full-membership partition member can communicate with all other partition members, including other full members, as well as limited members. A limited-membership partition member cannot communicate with other limited-membership partition members. However, a limited partition member can communicate with a full member.

About the Default Partition

The SM automatically configures a default partition, which is always p_key ff:ff.

The default partition controls all connected ports, and by default, everything is a full member of the default partition. The default p_key cannot be altered or deleted as it is the controlling mechanism that manages the configuration of all the partitions.

Selecting a P_Key Value

For a list of acceptable P_Key values, refer to Table 8-3.

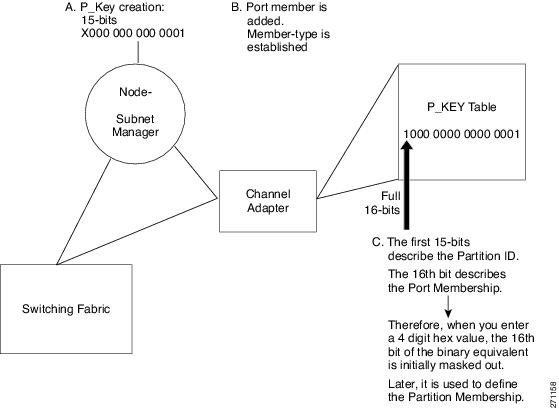
Upon creation, the p_key value, see Figure 8-1 is technically a 15-bit number. However, after the p_key is created and the port(s) membership type has been established, the entire value becomes 16 bits. The most significant bit (MSB) displays the type of membership (0 = Limited member, 1 = Full member).

When assigning a p_key value, you need to choose four hexadecimal numbers. However, because of the way that the 16th bit is used, only certain numbers can be used for the left-most variable (the MSB). For example, do not create two p_keys:

0 #:# # and 8#:# #, as they will be viewed as the same number by the system.

Figure 8-1 Partition Keys

Hexadecimal to Binary Conversions

Table 8-2 is provided to assist in the creation of P_keys.

When creating the partition p_key, enter a hexadecimal value that is the equivalent of 16 bits in binary. For example, enter 80:00 (hex) to be 10000000000000000 (binary).

The default partition (which cannot be altered) is 7f:ff.

Table 8-2 Binary Conversions 

Hexadecimal
Binary

0

0000

1

0001

2

0010

3

0011

4

0100

5

0101

6

0110

7

0111

8

1000

9

1001

A

1010

B

1011

C

1100

D

1101

E

1110

F

1111


Examples of Valid P_Key Values

You can choose your own p_key values, or you can choose your values from the list in Table 8-3.

Table 8-3 Valid P_Key Numbers

00:01

00:11

00:02

00:12

00:03

00:13

00:04

00:14

00:05

00:15

00:06

00:16

00:07

00:17

00:08

00:18

00:09

00:19

00:10

00:20


Understanding how P_Keys are Saved

Partition information is saved persistently by the master Subnet Manager. P_key information can be synchronized between the master SM and a slave Subnet Manager. The synchronization of the subnet managers means that the partition configuration (and other information) is exchanged between the active and standby SMs. The partition configuration will be transferred if an InfiniBand switch fails.

The partition configuration is not saved persistently on a slave SM.

If you have more than one InfiniBand switch in your fabric, refer to the "Enabling SM Database Synchronization" section.

If you are configuring one InfiniBand switch, it will automatically be the master, and the partition configuration is saved persistently on the switch.

Viewing Partition Details

To view the attributes of the partitions on your Server Switch, perform the following steps:


Step 1 Click the InfiniBand menu and choose Subnet Management (tabular format). The Subnet Manager window opens.

Step 2 Click the Partitions tab. Details appear in the table below the tab. Table 8-4 lists and describes the fields in the table.

Table 8-4 Partition Field Descriptions

Field
Description

SubnetPrefix

Subnet prefix of the subnet whose partitions you want to view.

Key

Partition key of the partition whose members the display prints below.

VectorIndex

Index identifier of the vector of the partition. This value is available for application purposes.

Vector

Vector of the partition table in which the partition resides. This value is available for application purposes.

VectorSize

Size, in bytes, of the current vector. This value is available for application purposes.

VectorElementSize

Size, in bytes, of each element of the vector. This value is available for application purposes.

LastChange

Indicates the time stamp when the partition table was last changed.


Configure Multicast Groups

To configure multicast groups, perform the following steps:


Step 1 Click the InfiniBand menu and choose Subnet Management (tabular format). The Subnet Manager window opens.

Step 2 Click the Multicast Group Config tab.

Step 3 Click the CreateMulticastGroup radio button in the Action field.

Step 4 Enter a MGID in the Multicast Group ID field.

Step 5 (Optional) Enter a queue key in the QKey field.

Step 6 Click a radio button in the MTU field to configure the maximum transmission unit of the group.

Step 7 Enter a Traffic Class integer value (between 0 and 255) in the TClass field.

Step 8 Enter a partition key in the PKey field.

Step 9 Click a data rate radio button in the Rate field.

Step 10 Enter an integer value (between 0 and 63) in the Packet Life Time field.

Step 11 Enter an integer value (between 0 and 15) in the Service Level field.

Step 12 Enter a 16-bit label in the Flow Label field.

Step 13 Enter an integer value (between 0 and 255) in the Hop Limit field.

Step 14 Click a scope radio button in the Scope field.

Step 15 Click the Apply button.


Note The TClass, Packet Lifetime, Flow Label, and Hop Limit attributes are not supported in this release.


Configuring IPoIB Broadcast Multicast Groups

To configure IPoIB broadcast multicast groups, perform the following steps:


Step 1 Click the InfiniBand menu and choose Subnet Management (tabular format). The Subnet Manager window opens.

Step 2 Click the Multicast Group Config tab.

Step 3 Click the CreateIPoIBbroadcastMulticastGroup radio button in the Action field.

Step 4 Enter a MGID in the Multicast Group ID field.

Step 5 (Optional) Enter a queue key in the QKey field.

Step 6 Click a radio button in the MTU field to configure the maximum transmission unit of the group.

Step 7 Enter a Traffic Class integer value (between 0 and 255) in the TClass field.

Step 8 Enter a partition key in the PKey field.

Step 9 Click a data rate radio button in the Rate field.

Step 10 Enter an integer value (between 0 and 63) in the Packet Life Time field.

Step 11 Enter an integer value (between 0 and 15) in the Service Level field.

Step 12 Enter a 16-bit label in the Flow Label field.

Step 13 Enter an integer value (between 0 and 255) in the Hop Limit field.

Step 14 Click a scope radio button in the Scope field.

Step 15 Click the Apply button.


Note The TClass, Packet Lifetime, Flow Label, and Hop Limit attributes are not relevant as of this release.


Viewing Multicast Group Details

To view the attributes of the multicast groups on your Server Switch, perform the following steps:


Step 1 Click the InfiniBand menu and choose Subnet Management (tabular format). The Subnet Manager window opens.

Step 2 Click the Multicast Group tab. Details appear in the table below the tab. Table 8-5 lists and describes the fields in the table.

Table 8-5 Multicast Group Field Descriptions 

Field
Description

SubnetPrefix

Subnet prefix of the Subnet Manager.

MGID

The 128-bit multicast GID address for this multicast group.

QKey

The 16-bit Q-Key of this multicast group.

MLID

The 16-bit LID of this multicast group.

MTU

Maximum transmission unit

TClass

The Tclass to be used in the GRH if GRH is used.

PKey

The 16-bit Partition Key for this multicast group.

Rate

Traffic rate of this multicast group.

PacketLifeTime

Packet life time of this multicast group.

SL

Service level of this multicast group.

FlowLabel

Flow label to be used on this multicast group if GRH Is used.

HopLimit

Hop limit to be used on this multicast group if GRH Is used.

Scope

Scope of this multicast group.

UserConfigured

Displays "true" if a user configured the entry; otherwise displays "false."


Viewing Multicast Member Details

To view the attributes of the multicast members on your Server Switch, perform the following steps:


Step 1 Click the InfiniBand menu and choose Subnet Management (tabular format). The Subnet Manager window opens.

Step 2 Click the Multicast Member tab. Details appear in the table below the tab. Table 8-5 lists and describes the fields in the table.

Table 8-6 Multicast Member Field Descriptions 

Field
Description

SubnetPrefix

Subnet prefix of this IB subnet.

MGID

The 128-bit multicast GID address for this multicast group.

VectorIndex

Index identifier of the particular vector of the multicast member table that contains the multicast member. This value is available for application purposes.

Vector

Vector of the multicast member table that contains the multicast member. This value is available for application purposes.

VectorSize

Size of the vector, in bytes, of the multicast member table that contains the multicast member. This value is available for application purposes.

VectorElementSize

Size of the multicast member entry (element) in the multicast member table. This value is available for application purposes.

LastChange

Indicates the time stamp when the multicast member table was last changed.


Viewing InfiniBand Services

Subnet services provide your IB fabric with various features, such as the ability to run particular protocols. To view the subnet services on your IB fabric, perform the following steps:


Step 1 Click the InfiniBand menu and choose Subnet Management (tabular format). The Subnet Manager window opens.

Step 2 Click the Services tab. Details appear in the table below the tab. Table 8-7 lists and describes the fields in the Subnet Managers table.

Table 8-7 Services Table Fields 

Field
Description

Subnet Prefix

Subnet prefix of the subnet service.

ID

Unique identifier that the SM assigns to the service.

GID

Services use the same GID as the IB controller (node) on which they run.

PKey

Partition key of the node on which the service runs.

Lease

Lease period remaining (in seconds) for this service. A value of 4294967295 means the lease is indefinite.

Key

The 64-bit service key.

Name

Name of the subnet service.

Data

Data associated with this service.


Viewing Switch Route Details

Switch routes represent the complete path that traffic takes through the IB fabric from the source LID to the destination LID. To view the attributes of the switch routes on your Server Switch, perform the following steps:


Step 1 Click the InfiniBand menu and choose Subnet Management (tabular format). The Subnet Manager window opens.

Step 2 Click the SwitchRoute tab. Details appear in the table below the tab. Table 8-8 lists and describes the fields in the table.

Table 8-8 Switch Route Fields

Field
Description

SubnetPrefix

Subnet prefix of the route.

SourceLID

Source LID of the route.

DestLID

Destination LID of the route.

VectorIndex

Index identifier of the particular vector of the route table that contains the route. This value is available for application purposes.

Vector

Vector of the route table that contains the route. This value is available for application purposes.

VectorSize

Size of the vector, in bytes, of the route table that contains the route. This value is available for application purposes.

VectorElementSize

Size of the route entry (element) in the route table. This value is available for application purposes.

LastChange

Indicates the time stamp when the route table was last changed.


Viewing Switch Element Route Details

To view the attributes of the switch element routes on your Server Switch, perform the following steps:


Step 1 Click the InfiniBand menu and choose Subnet Management (tabular format). The Subnet Manager window opens.

Step 2 Click the SwitchElementRoute tab. Details appear in the table below the tab. Table 8-9 lists and describes the fields in the table.

Table 8-9 Switch Element Route Fields

Field
Description

SubnetPrefix

Subnet prefix of this IB subnet.

SourceLID

Source LID of the route.

DestLID

Destination LID of the route.

VectorIndex

Index identifier of the particular vector of the route table that contains the route. This value is available for application purposes.

Vector

Vector of the route table that contains the route. This value is available for application purposes.

VectorSize

Size of the vector, in bytes, of the route table that contains the route. This value is available for application purposes.

VectorElementSize

Size of the route entry (element) in the route table. This value is available for application purposes.

LastChange

Indicates the time stamp when the route table was last changed.


Adding a Subnet Manager

To add a Subnet Manager to your Server Switch, perform the following steps:


Step 1 Click the InfiniBand menu and choose Subnet Management. The Subnet Management window opens.

Step 2 In the left-hand navigation bar, click Subnet Managers. The Subnet Managers display appears in the right-hand portion of the window.

Step 3 Click the Add button in the bottom-right-hand section of the window. The Add Subnet Manager window opens.

Step 4 Enter a subnet prefix in the Subnet Prefix field.

Step 5 Enter a subnet priority level in the Priority field.

Step 6 (Optional) Enter a subnet management key in the smKey field.

Step 7 (Optional) Enter a value in the LID Mask Control field to increase the number of LIDs assigned to each port to increase the number of potential paths to reach each port.

Step 8 Click the Add button. The new SM appears in the Summary table in the Subnet Managers display.


Removing a Subnet Manager

To add a Subnet Manager to your Server Switch, perform the following steps:


Step 1 Click the InfiniBand menu and choose Subnet Management. The Subnet Management window opens.

Step 2 In the left-hand navigation bar, click Subnet Managers. The Subnet Managers display appears in the right-hand portion of the window.

Step 3 In the Summary table in the Subnet Managers display, click the SM that you want to remove.

Step 4 Click the Remove button. The entry disappears from the display and the Server Switch configuration.


Configuring Subnet Manager Properties

SMs provide a number of user-configurable attributes. The sections that follow explain each attribute and describe how to configure it.

Configuring SM Priority

Every Subnet Manager in the InfiniBand network carries a priority value, and at any given time the Subnet Manager with the highest integer value priority becomes the master Subnet Manager. To configure the Subnet Manager priority on your Server Switch, perform the following steps:


Step 1 Click the InfiniBand menu and choose Subnet Management. The Subnet Management window opens.

Step 2 Click the Subnet Manager that you want to configure. Each Subnet Manager appears in the left-hand navigation window with a Subnet Manager icon.

Step 3 Enter an integer value in the Priority field. The higher the integer value, the higher the priority.

Step 4 Click the Apply button.


Configuring Sweep Interval

The sweep interval specifies how frequently the SM queries the InfiniBand fabric for network changes. To configure the sweep interval on your Server Switch, perform the following steps:


Step 1 Click the InfiniBand menu and choose Subnet Management. The Subnet Management window opens.

Step 2 Click the Subnet Manager that you want to configure. Each Subnet Manager appears in the left-hand navigation window with a Subnet Manager icon.

Step 3 Enter an integer value in the Sweep Interval field. This interval represents the number of seconds between sweeps.

Step 4 Click the Apply button.


Configuring Response Timeout

The response timeout of a SM specifies the maximum amount of time that the SM waits for a response after it sends a packet to a port. If the SM does not receive a response in the response-time interval, the SM identifies the port as unresponsive. To configure the response timeout, perform the following steps:


Step 1 Click the InfiniBand menu and choose Subnet Management. The Subnet Management window opens.

Step 2 Click the Subnet Manager that you want to configure. Each Subnet Manager appears in the left-hand navigation window with a Subnet Manager icon.

Step 3 Enter an integer value in the Response Timeout field. The SM measures response timeout in milliseconds.

Step 4 Click the Apply button.


Configuring the Master Poll Interval

The master poll interval determines the interval at which the slave SM polls the master to see if the master still runs. To configure the master poll interval, perform the following steps:


Step 1 Click the InfiniBand menu and choose Subnet Management. The Subnet Management window opens.

Step 2 Click the Subnet Manager that you want to configure. Each Subnet Manager appears in the left-hand navigation window with a Subnet Manager icon.

Step 3 Enter an integer value in the Master Poll Interval field. The value represents the interval, in seconds.

Step 4 Click the Apply button.


Configuring the Number of Master Poll Retries

The master poll retries value specifies the number of unanswered polls that cause the slave to identify the master as dead. To configure this value, perform the following steps:


Step 1 Click the InfiniBand menu and choose Subnet Management. The Subnet Management window opens.

Step 2 Click the Subnet Manager that you want to configure. Each Subnet Manager appears in the left-hand navigation window with a Subnet Manager icon.

Step 3 Enter an integer value in the Master Poll Retries field.

Step 4 Click the Apply button.


Configuring the Maximum Number of Active Standby SMs that the Master SM Supports


Note As of this release, the master SM supports sync with only one standby.


To configure an unlimited number of active standby (slave) SMs, enter a value of 0. To configure this value, perform the following steps:


Step 1 Click the InfiniBand menu and choose Subnet Management. The Subnet Management window opens.

Step 2 Click the Subnet Manager that you want to configure. Each Subnet Manager appears in the left-hand navigation window with a Subnet Manager icon.

Step 3 Enter an integer value in the Max active SMs field.

Step 4 Click the Apply button.


Configuring LID Mask Control

LID mask control assigns the number of path bits present in the base LID to each channel adapter port. Increasing the LMC value increases the number of LIDs assigned to each port to increase the number of potential paths to reach each port. To configure LID mask control, perform the following steps:


Step 1 Click the InfiniBand menu and choose Subnet Management. The Subnet Management window opens.

Step 2 Click the Subnet Manager that you want to configure. Each Subnet Manager appears in the left-hand navigation window with a Subnet Manager icon.

Step 3 Enter an integer value in the LID Mask Control field.

Step 4 Click the Apply button.


Configuring Switch Life Time


Step 1 Click the InfiniBand menu and choose Subnet Management. The Subnet Management window opens.

Step 2 Click the Subnet Manager that you want to configure. Each Subnet Manager appears in the left-hand navigation window with a Subnet Manager icon.

Step 3 Enter an integer value in the Switch Life Time field.

Step 4 Click the Apply button.


Configuring Switch Link HoQ Life


Step 1 Click the InfiniBand menu and choose Subnet Management. The Subnet Management window opens.

Step 2 Click the Subnet Manager that you want to configure. Each Subnet Manager appears in the left-hand navigation window with a Subnet Manager icon.

Step 3 Enter an integer value in the Switch Link HoQ Life field.

Step 4 Click the Apply button.


Configuring Max Hops


Step 1 Click the InfiniBand menu and choose Subnet Management (tabular format). The Subnet Manager window opens.

Step 2 Click the Subnet Manager that you want to configure. Each Subnet Manager appears in the left-hand navigation window with a Subnet Manager icon.

Step 3 Enter an integer value in the Max-Hops field.

Step 4 Click the Apply button.


Configuring Database Synchronization

The database synchronization feature propagates information from the database of the master SM to the standby SMs. The sections that follow describe how to configure this feature.


Note With database sync enabled on all chassis, only the chassis running the master SM will accept partition configuration from the user. For more information, see <Link>"How Partitions Work" on page 12<Link>.


Enabling SM Database Synchronization

If you are configuring more than one InfiniBand chassis in your fabric, it is likely that you will want to enable database synchronization of the SMs.


Note This features is enabled by default.


Enable Subnet Manager database synchronization to update standby SMs with information in the master SM.


Step 1 Click the InfiniBand menu and choose Subnet Management. The Subnet Management window opens.

Step 2 Click the Subnet Manager that you want to configure. Each Subnet Manager appears in the left-hand navigation window with a Subnet Manager icon.

Step 3 Click the Database Sync tab in the right-hand panel of the display.

Step 4 Check the Enable checkbox in the SM Database Synchronization field.

Step 5 Click the Apply button.


Configuring the Maximum Number of Backup Subnet Managers to Synchronize

To configure the maximum number of backup SMs that will synchronize with the master SM, perform the following steps:


Step 1 Click the InfiniBand menu and choose Subnet Management. The Subnet Management window opens.

Step 2 Click the SM that you want to configure. Each SM appears in the left-hand navigation window with a SM icon.

Step 3 Click the Database Sync tab in the right-hand panel of the display.

Step 4 Enter an integer value in the Max Backup SMs field.

Step 5 Click the Apply button.


Configuring Session Timeout

To configure the interval, in seconds, during which a synchronization session status MAD packet must arrive at the master SM to maintain synchronization, perform the following steps:


Step 1 Click the InfiniBand menu and choose Subnet Management. The Subnet Management window opens.

Step 2 Click the SM that you want to configure. Each SM appears in the left-hand navigation window with a SM icon.

Step 3 Click the Database Sync tab in the right-hand panel of the display.

Step 4 Enter an integer value in the Session Timeout field. This value determines the timeout duration, in seconds.

Step 5 Click the Apply button.


Configuring the Poll Interval

To configure the interval, in seconds, at which the master SM polls an active slave SM to verify synchronization, perform the following steps:


Step 1 Click the InfiniBand menu and choose Subnet Management. The Subnet Management window opens.

Step 2 Click the SM that you want to configure. Each SM appears in the left-hand navigation window with a SM icon.

Step 3 Click the Database Sync tab in the right-hand panel of the display.

Step 4 Enter an integer value in the Poll Interval field. This value sets the poll interval, in seconds.

Step 5 Click the Apply button.


Configuring the Cold Sync Timeout Value

To configure the amount of time, in seconds, that a cold synchronization tries to initiate before it times out, perform the following steps:


Step 1 Click the InfiniBand menu and choose Subnet Management. The Subnet Management window opens.

Step 2 Click the SM that you want to configure. Each SM appears in the left-hand navigation window with a SM icon.

Step 3 Click the Database Sync tab in the right-hand panel of the display.

Step 4 Enter an integer value in the Cold Sync Timeout field. This value sets the timeout interval, in seconds.

Step 5 Click the Apply button.


Configuring the Cold Sync Limit Value

To configure the maximum number of cold syncs to perform during a given cold sync period, perform the following steps:


Step 1 Click the InfiniBand menu and choose Subnet Management. The Subnet Management window opens.

Step 2 Click the SM that you want to configure. Each SM appears in the left-hand navigation window with a SM icon.

Step 3 Click the Database Sync tab in the right-hand panel of the display.

Step 4 Enter an integer value in the Cold Sync Limit field. This value sets the maximum number of syncs that can occur during the sync period ("Configuring the Cold Sync Limit Period" section).

Step 5 Click the Apply button.


Configuring the Cold Sync Limit Period

To specify the length of the interval during which cold syncs may occur, perform the following steps:


Step 1 Click the InfiniBand menu and choose Subnet Management. The Subnet Management window opens.

Step 2 Click the SM that you want to configure. Each SM appears in the left-hand navigation window with a SM icon.

Step 3 Click the Database Sync tab in the right-hand panel of the display.

Step 4 Enter an integer value in the Cold Sync Limit Period field. This value sets the length of the interval during which cold syncs may occur.

Step 5 Click the Apply button.


Configuring the New Session Delay

To specify the amount of time that the master SM waits before it attempts to initiate a synchronization session with a new SM, perform the following steps:


Step 1 Click the InfiniBand menu and choose Subnet Management. The Subnet Management window opens.

Step 2 Click the SM that you want to configure. Each SM appears in the left-hand navigation window with a SM icon.

Step 3 Click the Database Sync tab in the right-hand panel of the display.

Step 4 Enter an integer value in the New Session Delay field. This value determines the amount of time, in seconds, that the master SM waits before it attempts to initiate a synchronization session with a new SM.

Step 5 Click the Apply button.


Configuring the Resync Interval

To specify the interval at which the master SM sends a resynchronization request to all active sync sessions, perform the following steps:


Step 1 Click the InfiniBand menu and choose Subnet Management. The Subnet Management window opens.

Step 2 Click the SM that you want to configure. Each SM appears in the left-hand navigation window with a SM icon.

Step 3 Click the Database Sync tab in the right-hand panel of the display.

Step 4 Enter an integer value in the Resync Interval field. This value specifies the interval, in seconds, at which the master SM sends a resynchronization request to all active sync sessions.

Step 5 Click the Apply button.


Viewing the Database Synchronization State

To verify that the master SM and slave SM(s) are in sync, perform the following steps:


Step 1 Click the InfiniBand menu and choose Subnet Management. The Subnet Management window opens.

Step 2 Click the SM that you want to configure. Each SM appears in the left-hand navigation window with a SM icon.

Step 3 Click the Database Sync tab in the right-hand panel of the display.

Step 4 View the State field.


Viewing Nodes


Step 1 Click the InfiniBand menu and choose Subnet Management. The Subnet Management window opens.

Step 2 Click the SM that you want to configure. Each SM appears in the left-hand navigation window with a SM icon.

Step 3 Click the Nodes icon.

Step 4 Click the Nodes in Subnet tab to display the Node GUID, Type, Description, Number of Ports, System Image GUID, and the Vendor ID information.


Viewing Partitions

To view the partitions on your IB network, perform the following steps:


Step 1 Click the InfiniBand menu and choose Subnet Management. The Subnet Management window opens.

Step 2 Click the plus-sign (+) next to the SM whose partitions you want to view. The left-hand navigation menu expands.

Step 3 Click the Partitions branch. The partitions summary appears in the right-hand display. <Link>Table 8-10 lists and describes the fields in this display.

Table 8-10 Partitions Summary Field Descriptions 

Field
Description

Partition Key

Partition key (numeric identifier) of the partition.

Full Member Count

Number of full partition members.

Limited Member Count

Number of limited partition members.


Creating a Partition

To create an IB partition, perform the following steps:


Step 1 Click the InfiniBand menu and choose Subnet Management. The Subnet Management window opens.

Step 2 Click the plus-sign (+) next to the SM whose partitions you want to view. The left-hand navigation menu expands.

Step 3 Click the Partitions branch.

Step 4 Click the Add button. The Add Partition window opens.

Step 5 Enter a partition key for the new partition in the PKey field, then click the Add button.


Removing a Partition

To delete a partition, perform the following steps:


Step 1 Click the InfiniBand menu and choose Subnet Management. The Subnet Management window opens.

Step 2 Click the plus-sign (+) next to the SM whose partitions you want to view. The left-hand navigation menu expands.

Step 3 Click the Partitions branch.

Step 4 Click the partition, in the Summary display, that you want to remove, then click the Remove button.


Viewing Partition Details

To view partition details, perform the following steps:


Step 1 Click the InfiniBand menu and choose Subnet Management. The Subnet Management window opens.

Step 2 Click the plus-sign (+) next to the SM whose partitions you want to view. The left-hand navigation menu expands.

Step 3 Click the plus-sign (+) next to the Partitions branch to display all partitions in the left-hand navigation menu.

Step 4 Click the partition key of the partition whose details you want to view. The members (full and limited) of the partition appear in the display.


Note To view the GUIDs of the Server Switch management ports in the display, click the Show Switch Mgmt Ports button. Click the Hide Switch Mgmt Ports button to remove these GUIDs from the display.


Adding Full Members to a Partition

Full members of a partition can communicate to other full members and to limited members.

Adding Available Members

To add a port from the Available Members pool to a partition as a full member, perform the following steps:


Step 1 Click the InfiniBand menu and choose Subnet Management. The Subnet Management window opens.

Step 2 Click the plus-sign (+) next to the SM whose partitions you want to view. The left-hand navigation menu expands.

Step 3 Click the plus-sign (+) next to the Partitions branch to display all partitions in the left-hand navigation menu.

Step 4 Click the partition key of the partition to which you want to add members. The members (full and limited) of the partition appear in the display.

Step 5 Click the port, in the Available Members field, that you want to add to the partition, then click the right-pointing arrow next to the Full Members field.


Adding Unavailable Members

To add a partition member that does not appear in the Available Members pool, perform the following steps:


Step 1 Click the InfiniBand menu and choose Subnet Management. The Subnet Management window opens.

Step 2 Click the plus-sign (+) next to the SM whose partitions you want to view. The left-hand navigation menu expands.

Step 3 Click the plus-sign (+) next to the Partitions branch to display all partitions in the left-hand navigation menu.

Step 4 Click the partition key of the partition to which you want to add members. The members (full and limited) of the partition appear in the display.

Step 5 Click the Add Other button. The Add Other Partition Member window opens.

Step 6 Enter the GUID of the host that includes the port(s) that you want to add to the partition in the Node GUID field.

Step 7 Specify the port(s) that you want to add to the partition in the Port field.

Step 8 Click the Full radio button, then click the Add button.


Adding Limited Members to a Partition

Limited members of a partition can communicate with full members of the partition, but not with other limited members.

Adding Available Members

To add a port from the Available Members pool to a partition as a limited member, perform the following steps:


Step 1 Click the InfiniBand menu and choose Subnet Management. The Subnet Management window opens.

Step 2 Click the plus-sign (+) next to the SM whose partitions you want to view. The left-hand navigation menu expands.

Step 3 Click the plus-sign (+) next to the Partitions branch to display all partitions in the left-hand navigation menu.

Step 4 Click the partition key of the partition to which you want to add members. The members (full and limited) of the partition appear in the display.

Step 5 Click the port, in the Available Members field, that you want to add to the partition, then click the right-pointing arrow next to the Limited Members field.


Adding Unavailable Members

To add a partition member that does not appear in the Available Members pool, perform the following steps:


Step 1 Click the InfiniBand menu and choose Subnet Management. The Subnet Management window opens.

Step 2 Click the plus-sign (+) next to the SM whose partitions you want to view. The left-hand navigation menu expands.

Step 3 Click the plus-sign (+) next to the Partitions branch to display all partitions in the left-hand navigation menu.

Step 4 Click the partition key of the partition to which you want to add members. The members (full and limited) of the partition appear in the display.

Step 5 Click the Add Other button. The Add Other Partition Member window opens.

Step 6 Enter the GUID of the node that includes the port(s) that you want to add to the partition in the Node GUID field.

Step 7 Specify the port(s) that you want to add to the partition in the Port field.

Step 8 Click the Limited radio button, then click the Add button.


Viewing Multicast Groups

To view the multicast groups on your IB network, perform the following steps:


Step 1 Click the InfiniBand menu and choose Subnet Management. The Subnet Management window opens.

Step 2 Click the plus-sign (+) next to the SM whose partitions you want to view. The left-hand navigation menu expands.

Step 3 Click the Multicast Groups branch. The multicast groups summary appears in the right-hand display. Table 8-11 lists and describes the fields in this display.

Table 8-11 Multicast Group Summary Field Descriptions 

Field
Description

MGID

Numeric multicast group identifier of each multicast group on the IB fabric.

QKey

The 16-bit Q-Key of this multicast group.

MTU

Maximum transmission unit of the multicast group.

PKey

Partition key of the multicast group.


Viewing Multicast Group Details

To view multicast group details, perform the following steps:


Step 1 Click the InfiniBand menu and choose Subnet Management. The Subnet Management window opens.

Step 2 Click the plus-sign (+) next to the SM whose multicast groups you want to view. The left-hand navigation menu expands.

Step 3 Click the plus-sign (+) next to the Multicast Groups branch to display all groups in the left-hand navigation menu.

Step 4 Click the MGID of the multicast group whose details you want to view, then click the General tab. MC group details appear in the display. Table 8-12 lists and describes the fields in this display.

Table 8-12 Multicast Group General Details Field Descriptions 

Field
Description

QKey

The 16-bit Q-Key of this multicast group.

MLID

The 16-bit LID of this multicast group

MTU

Maximum transmission unit of the multicast group.

TClass

The Tclass to be used in the GRH if GRH is used.

PKey

Partition key of the multicast group.

Rate

Traffic rate of this multicast group.

Packet Life Time

Packet life time of this multicast group.

SL

Service level of this multicast group.

Flow Label

Flow label to be used on this multicast group if GRH Is used.

Hop Limit

Hop limit to be used on this multicast group if GRH Is used.

Scope

Scope of this multicast group.

User Configured

Displays true if a user configured the entry; otherwise displays false.


Viewing Multicast Group Members


Step 1 Click the InfiniBand menu and choose Subnet Management. The Subnet Management window opens.

Step 2 Click the plus-sign (+) next to the SM whose multicast groups you want to view. The left-hand navigation menu expands.

Step 3 Click the plus-sign (+) next to the Multicast Groups branch to display all groups in the left-hand navigation menu.

Step 4 Click the MGID of the multicast group whose details you want to view, then click the Members tab. MC group members appear in the display. Table 8-13 lists and describes the fields in this display.

Table 8-13 Multicast Group Members Field Descriptions

Field
Description

Port GID

Global identifier of the member port.

Join State

Displays whether the port is a full member or limited member of the group.

Proxy Join Status

Displays true or false.


Viewing Infiniband Services

To view the IB services that run on your Server Switch, perform the following steps:


Step 1 Click the InfiniBand menu and choose Subnet Management. The Subnet Management window opens.

Step 2 Click the plus-sign (+) next to the SM whose services you want to view. The left-hand navigation menu expands.

Step 3 Click the Services branch. Details of IB services appear in the right-hand display. Table 8-14 lists and describes the fields in the Summary section of the display.

Table 8-14 Services Summary Field Descriptions 

Field
Description

Name

ASCII identifier of the service

Service Id

Numeric identifier that nodes use to call the service.

Service GID

64-bit ID of the service.

PKey

16-bit multicast GID address.


Table 8-15 lists and describes the fields in the Details section of the display.

Table 8-15 Services Details Field Descriptions 

Field
Description

Service Name

ASCII identifier of the service

Service Id

Numeric identifier that nodes use to call the service.

Service GID

GID of the node that provides the service.

Service PKey

16-bit P-Key.

Lease

Lease period remaining (in seconds) for this service. A value of 4294967295 means the lease is indefinite.

Key

128-bit service key.

Data (8 bit)

Header of the data type 8

Data (16 bit)

Header of the data type 16

Data (32 bit)

Header of the data type 32

Data (64 bit)

Header of the data type 64


Viewing InfiniBand Routes

To view the IB routes that run on your Server Switch, perform the following steps:


Step 1 Click the InfiniBand menu and choose Subnet Management. The Subnet Management window opens.

Step 2 Click the plus-sign (+) next to the SM whose services you want to view. The left-hand navigation menu expands.

Step 3 Click the Routes branch. IB routes fields appear in the right-hand display.

Step 4 Enter the source LID of the route in the Source LID field.

Step 5 Enter the destination lid of the route in the Destination LID field.

Step 6 Click the Show Route button.

Step 7 Click the Switch Route tab. Table 8-16 lists and displays the fields in the display.

Table 8-16 Switch Route Field Descriptions 

Field
Description

Node GUID

Global unique ID of the node.

In Port

Port of ingress.

Out Port

Port of egress


Step 8 Click the Switch Element Route tab. Table 8-17 lists and displays the fields in the display.

Table 8-17 Switch Element Route Field Descriptions 

Field
Description

Chassis GUID

Global unique ID of the node.

In Port

Port of ingress.

Out Port

Port of egress


Viewing Subnet Managers Information

To view the SM information, perform the following steps:


Step 1 Click the InfiniBand menu and choose Subnet Management. The Subnet Management window opens.

Step 2 Click the plus-sign (+) next to the SM whose services you want to view. The left-hand navigation menu expands.

Step 3 Click the Subnet Managers Info icon and the Port GUID, Priority, and SM state information appears in the right-hand display.


Viewing Event Subscriptions

To view the SM information, perform the following steps:


Step 1 Click the InfiniBand menu and choose Subnet Management. The Subnet Management window opens.

Step 2 Click the plus-sign (+) next to the SM whose services you want to view. The left-hand navigation menu expands.

Step 3 Click the Event Subscriptions icon and the LID, Node GUID, and Port Number information appears in the right-hand display.


Enabling Performance Management

To enable InfiniBand-port performance management, perform the following steps:


Step 1 Click the InfiniBand menu and choosePerformance Management. The Performance Management window opens.

Step 2 Click the subnet of the ports that you want to manage (for instance, fe:80:00:00:00:00:00:00). The Port Counter Configuration display appears in the right-hand pane of the window.

Step 3 Click the Enable radio button.


Disabling Performance Management

To disable performance management, perform the following steps:


Step 1 Click the InfiniBand menu and choosePerformance Management. The Performance Management window opens.

Step 2 Click the subnet of the ports that you want to manage (for instance, fe:80:00:00:00:00:00:00). The Port Counter Configuration display appears in the right-hand pane of the window.

Step 3 Click the Disable radio button.


Monitoring Connections

To monitor connections, you must

"Defining a Connection to Monitor" section

"Viewing Monitored Connections" section

"Viewing Connection Counters" section

"Viewing Connection Monitor Counters" section

"Testing Connections" section

"Viewing Port Counters of Connections" section

Defining a Connection to Monitor

To create a connection to monitor, perform the following steps:


Step 1 Click the InfiniBand menu and choosePerformance Management. The Performance Management window opens.

Step 2 Click the plus-sign (+) next to the subnet of the connections that you want to monitor. The navigation tree expands.

Step 3 Click the Connection Counters branch. The Monitored Connection tab appears in the right-hand pane of the window.

Step 4 Click the Add button. The Add Connection window opens.

Step 5 Enter a source LID in the Source LID field.


Note To view available source and destination LIDs, return to the main Element Manager display, click the InfiniBand menu, choose Subnet Management (tabular format), then click the SwitchRoute tab. For more details, see "Viewing Switch Route Details" section.


Step 6 Enter a destination LID in the Destination LID field.

Step 7 Check the Enable Connection Monitoring checkbox.


Note If this checkbox is not selected, you an view only counter information and cannot view monitoring information.


Step 8 Click the Add button. The connection entry appears under the Monitored Connections tab.


Viewing Monitored Connections

These instructions assume that you have already defined connections to monitor. To view monitored connections, perform the following steps:


Step 1 Click the InfiniBand menu and choosePerformance Management. The Performance Management window opens.

Step 2 Click the plus-sign (+) next to the subnet of the connections that you want to monitor. The navigation tree expands.

Step 3 Click the Connection Counters branch. The Monitored Connection tab appears in the right-hand pane of the window. Table 8-18 lists and describes the fields in this display.

Table 8-18 Monitored Connections Field Descriptions 

Field
Description

Subnet Prefix

Subnet prefix of the monitored connection.

Source LID

16-bit source Local ID of the connection.

Destination LID

16-bit destination Local ID of the connection.

Error Status

Displays unknown, exceeded, or notExceeded to indicate if the error value has exceeded the threshold that you configured. To configure thresholds, refer to "Configuring Port Monitoring Thresholds" section.

Util Status

Displays unknown, exceeded, or notExceeded to indicate if the utilization value has exceeded the threshold that you configured. To configure thresholds, refer to "Configuring Port Monitoring Thresholds" section.


Viewing Connection Counters

To view connection counters, perform the following steps:


Step 1 Click the InfiniBand menu and choosePerformance Management. The Performance Management window opens.

Step 2 Click the plus-sign (+) next to the subnet of the connections that you want to monitor. The navigation tree expands.

Step 3 Click the plus-sign next to the Connection Counters branch. The navigation tree expands.

Step 4 Click the icon of the connection whose counters you want to view.

Step 5 Click the Connection Counters tab. Table 8-19 lists and describes the fields in the display.


Note Each hop in the display is a port on a node. When connections move through nodes, they enter the node in one hop (GUID A, port a), and exit in another hop (GUID A, port b). Though the GUIDs of subsequent hops may match, the ports do not match.


Table 8-19 Connection Counters Field Descriptions 

Field
Description

Subnet Prefix

Subnet prefix of the subnet on which each hop resides.

Node Guid

Global unique ID of the node (switch chip, HCA, or TCA) of the next-hop port.

Port Number

Port number (on the appropriate node) of the hop.

Chassis Guid

Global Unique ID (GUID) of the chassis.

Slot Number

Slot of the port.

Ext Port Number

External port number of the port.

Data Is Valid

Displays true or false.

Symbol Errors

Number of symbol errors on the port.

Link Recovery Errors

Number of link recovery errors on the port.

Link Downs

Number of link-down errors on the port.

Received Errors

Number of received errors that the port experienced.

Received Remote Physical Errors

Number of physical errors the the port experienced.

Received Switch Relay Errors

Number of switch relay errors that the port experienced.

Transmitted Discards

Number of transmitted discards that occurred on the port.

Transmitted Constraint Errors

Number of Transmitted Constraint errors that the port experienced.

Received Constraint Errors

Number of Received Constraint errors that the port experienced.

Local Link Integrity Errors

Number of logical link integrity errors on the port.

Excessive Buffer Overrun Errors

Number of excessive buffer overrun errors on the port.

VL15 Droppeds

Number of VL15 drops on the port.

Transmitted Data

Volume of transmitted data on the port.

Received Data

Volume of received data on the port.

Transmitted Packets

Volume of transmitted packets on the port.

Received Packets

Volume of received packets on the port.


Viewing Connection Monitor Counters

To view connection monitor counters, perform the following steps:


Step 1 Click the InfiniBand menu and choosePerformance Management. The Performance Management window opens.

Step 2 Click the plus-sign (+) next to the subnet of the connections that you want to monitor. The navigation tree expands.

Step 3 Click the plus-sign next to the Connection Counters branch. The navigation tree expands.

Step 4 Click the icon of the connection whose counters you want to view.

Step 5 Click the Connection Monitor Counters tab. Table 8-20 lists and describes the fields in the display.

Table 8-20 Connection Monitor Counters Field Descriptions 

Field
Description

Node Guid

Global unique ID of the IB node of the hop port.

Port Number

Port number of the hop.

Chassis Guid

GUID of the chassis that includes the connection.

Slot Number

Slot number of the port(s) in the connection.

Ext Port Number

External port number of the connection port.

Error Type

Type of error that occurred.


Testing Connections

To test connections, perform the following steps:


Step 1 Click the InfiniBand menu and choosePerformance Management. The Performance Management window opens.

Step 2 Click the plus-sign (+) next to the subnet of the connections that you want to monitor. The navigation tree expands.

Step 3 Click the plus-sign next to the Connection Counters branch. The navigation tree expands.

Step 4 Click the icon of the connection whose counters you want to view.

Step 5 Click the Test Connection tab.

Step 6 Click the Test button.


Viewing Port Counters of Connections

To view port counters, perform the following steps:


Step 1 Click the InfiniBand menu and choosePerformance Management. The Performance Management window opens.

Step 2 Click the plus-sign (+) next to the subnet of the connections that you want to monitor. The navigation tree expands.

Step 3 Click the plus-sign next to the Connection Counters branch. The navigation tree expands.

Step 4 Click the plus-sign next to the icon of the connection whose port counters you want to view. The navigation tree expands.

Step 5 Click the port (in GUID - port-number format) whose counters you want to view. Table 8-21 lists and describes the fields in this display.

Table 8-21 Port Counters Field Descriptions 

Field
Description

Subnet Prefix

Subnet prefix of the subnet on which each hop resides.

Node Guid

Global unique ID of the node (switch chip, HCA, or TCA) of the next-hop port.

Port Number

Port number (on the appropriate node) of the hop.

Chassis Guid

GUID of the chassis that includes the connection.

Slot Number

Slot number of the port(s) in the connection.

Ext Port Number

External port number of the connection port.

Symbol Errors

Total number of symbol errors detected on one or more lanes.

Link Recovery Errors

Total number of times the port training state machine has successfully completed the link error recovery process.

Link Downs

Total number of times the port training state machine has failed the link error recovery process and downed the link.

Received Errors

Total number of packets containing an error that were received on the port. These errors include:

Local physical errors (ICRC, VCRC, FCCRC, and all physical errors that cause entry into bad)

Malformed data packet errors (Lver, length, VL)

Malformed link packet errors (operand, length, VL)

Packets discarded due to buffer overrun

Received Remote Physical Errors

Total number of packets marked with the EBP delimiter received on the port.

Received Switch Relay Errors

Total number of packets received on the port that were discarded because they could be forwarded by the switch relay. Reasons for this include:

DLID mapping

VL mapping

Looping (output port = input port).

Transmitted Discards

Total number of outbound packets discarded by the port because the port is down or congested. Reasons for this include:

Output port is in the inactive state

Packet length exceeded neighbor MTU

Switch lifetime limit exceeds

Switch HOQ limit exceeds

Transmitted Constraint Errors

Total number of packets not transmitted from the port for the following reasons:

FilterRawOutbound is true and packet is raw

PatitionEnforcementOutbound is true and packet fails partition key check, IP version check, or transport header version check.

Received Constraint Errors

Total number of packets received on the port that are discarded for the following reasons:

FilterRawInbound is true and packet is raw

PartitionEnforcementInbound is true and packet fails partition key check, IP version check, or transport header version check.

Local Link Integrity Errors

The number of times that the frequency of packets containing local physical errors exceeded local_phy_errors.

Excessive Buffer Overrun Errors

The number of times that overrun errors' consecutive flow control update periods occurred with at least one overrun error in each period.

VL15 Droppeds

Number of incoming VL15 packets dropped due to resource limitations on port selected by PortSelect.

Transmitted Data

Optional; shall be zero if not implemented. Total number of data octets, divided by 4, transmitted on all VLs from the port selected by PortSelect. This includes all octets between (and not including) the start of packet delimiter and VCRC. It excludes all link packets.

Implementers may choose to count data octets in groups larger than four but are encouraged to choose the smallest group possible. Results are still reported as a multiple of four octets.

Received Data

Optional; shall be zero if not implemented. Total number of data octets, divided by 4, received on all VLs from the port selected by PortSelect. This includes all octets between (and not including) the start of packet delimiter and VCRC. It excludes all link packets.

Implementers may choose to count data octets in groups larger than four but are encouraged to choose the smallest group possible. Results are still reported as a multiple of four octets.

Transmitted Packets

Optional; shall be zero if not implemented. Total number of data packets, excluding link packets, transmitted on all VLs from the port selected by PortSelect.

Received Packets

Optional; shall be zero if not implemented. Total number of data packets, excluding link packets, received on all VLs from the port selected by PortSelect.


Viewing Port Counters

To view port counters, perform the following steps:


Step 1 Click the InfiniBand menu and choosePerformance Management. The Performance Management window opens.

Step 2 Click the plus-sign (+) next to the subnet of the connections that you want to monitor. The navigation tree expands.

Step 3 Click the plus-sign next to the Port Counters branch. The navigation tree expands.

Step 4 View port counters with one of the following methods:

Click the GUID whose port counters you want to view; all available port counters appear.

Click the plus-sign next to the GUID of the node whose port counters you want to view, then click the port whose counters you want to view; counters appear for that individual port.

Table 8-22 lists and describes the fields in the port counters display.

Table 8-22 Port Counters Field Descriptions 

Field
Description

Subnet Prefix

Subnet prefix of the subnet on which each hop resides.

Node Guid

Global unique ID of the node (switch chip, HCA, or TCA) of the next-hop port.

Port Number

Port number (on the appropriate node) of the hop.

Chassis Guid

GUID of the chassis that includes the connection.

Slot Number

Slot number of the port(s) in the connection.

Ext Port Number

External port number of the connection port.

Symbol Errors

Total number of symbol errors detected on one or more lanes.

Link Recovery Errors

Total number of times the port training state machine has successfully completed the link error recovery process.

Link Downs

Total number of times the port training state machine has failed the link error recovery process and downed the link.

Received Errors

Total number of packets containing an error that were received on the port. These errors include:

Local physical errors (ICRC, VCRC, FCCRC, and all physical errors that cause entry into the "bad" state)

Malformed data packet errors (Lver, length, VL)

Malformed link packet errors (operand, length, VL)

Packets discarded due to buffer overrun

Received Remote Physical Errors

Total number of packets marked with the EBP delimiter received on the port.

Received Switch Relay Errors

Total number of packets received on the port that were discarded because they could be forwarded by the switch relay. Reasons for this include:

DLID mapping

VL mapping

Looping (output port = input port).

Transmitted Discards

Total number of outbound packets discarded by the port because the port is down or congested. Reasons for this include:

Output port is in the inactive state

Packet length exceeded neighbor MTU

Switch lifetime limit exceeds

Switch HOQ limit exceeds.

Transmitted Constraint Errors

Total number of packets not transmitted from the port for the following reasons:

FilterRawOutbound is true and packet is raw

PatitionEnforcementOutbound is true and packet fails partition key check, IP version check, or transport header version check.

Received Constraint Errors

Total number of packets received on the port that are discarded for the following reasons:

FilterRawInbound is true and packet is raw

PartitionEnforcementInbound is true and packet fails partition key check, IP version check, or transport header version check.

Logical Link Integrity Errors

The number of times that the frequency of packets containing local physical errors exceeded local_phy_errors.

Excessive Buffer Overrun Errors

The number of times that overrun errors consecutive flow control update periods occurred with at least one overrun error in each period.

VL15 Droppeds

Number of incoming VL15 packets dropped due to resource limitations on port selected by PortSelect.

Transmitted Data

Optional; shall be zero if not implemented. Total number of data octets, divided by 4, transmitted on all VLs from the port selected by PortSelect. This includes all octets between (and not including) the start of packet delimiter and VCRC. It excludes all link packets.

Implementers may choose to count data octets in groups larger than four but are encouraged to choose the smallest group possible. Results are still reported as a multiple of four octets.

Received Data

Optional; shall be zero if not implemented. Total number of data octets, divided by 4, received on all VLs from the port selected by PortSelect. This includes all octets between (and not including) the start of packet delimiter and VCRC. It excludes all link packets.

Implementers may choose to count data octets in groups larger than four but are encouraged to choose the smallest group possible. Results are still reported as a multiple of four octets.

Transmitted Packets

Optional; shall be zero if not implemented. Total number of data packets, excluding link packets, transmitted on all VLs from the port selected by PortSelect.

Received Packets

Optional; shall be zero if not implemented. Total number of data packets, excluding link packets, received on all VLs from the port selected by PortSelect.


Viewing Cumulative Port Counters

To view cumulative port counters, perform the following steps:


Step 1 Click the InfiniBand menu and choosePerformance Management. The Performance Management window opens.

Step 2 Click the plus-sign (+) next to the subnet of the connections that you want to monitor. The navigation tree expands.

Step 3 Click the plus-sign next to the Port Counters branch. The navigation tree expands.

Step 4 Click the plus-sign next to the node of the port whose cumulative counters you want to view. The navigation tree expands.

Step 5 Click the port whose navigation counters you want to view.

Step 6 Click the Port Cumulative Counters tab. Table 8-23 lists and describes the fields in the display.

Table 8-23 Cumulative Port Counters Field Descriptions 

Field
Description

Subnet Prefix

Subnet prefix of the subnet on which each hop resides.

Node Guid

Global unique ID of the node (switch chip, HCA, or TCA) of the next-hop port.

Port Number

Port number (on the appropriate node) of the hop.

Chassis Guid

Global Unique ID (GUID) of the chassis.

Slot Number

Slot of the port.

Ext Port Number

External port number of the port.

Error Status

Displays true or false.

Util Status

Number of symbol errors on the port.

Symbol Errors

Number of link recovery errors on the port.

Link Recovery Errors

Number of link-down errors on the port.

Link Downs

Number of received errors that the port experienced.

Received Errors

Number of physical errors the the port experienced.

Received Remote Physical Errors

Number of switch relay errors that the port experienced.

Received Switch Relay Errors

Number of transmitted discards that occurred on the port.

Transmit Discards

Number of Transmit Constraint errors that the port experienced.

Transmit Constraint Errors

Number of Received Constraint errors that the port experienced.

Received Constraint Errors

Number of logical link integrity errors on the port.

Logical Link Integrity Errors

Number of excessive buffer overrun errors on the port.

Excessive Buffer Overrun Errors

Number of VL15 drops on the port.

VL15 Droppeds

Volume of transmitted data on the port.

Transmit Data

Volume of received data on the port.

Received Data

Volume of transmitted packets on the port.

Transmit Packets

Volume of received packets on the port.

Received Packets

Subnet prefix of the subnet on which each hop resides.

Transmit Rate

Global unique ID of the node (switch chip, HCA, or TCA) of the next-hop port.

Received Rate

Port number (on the appropriate node) of the hop.


Enabling Port Monitoring

To enable port monitoring, perform the following steps:


Step 1 Click the InfiniBand menu and choosePerformance Management. The Performance Management window opens.

Step 2 Click the plus-sign (+) next to the subnet of the connections that you want to monitor. The navigation tree expands.

Step 3 Click the Port Monitor branch.

Step 4 Click the General tab.

Step 5 Select Enable from the State pulldown menu.


Note Enable will enable the port monitoring for only the ports that are configured in the Monitor Port Config table, where as enableAll will enable the port monitoring for all ports regardless of whether the port is configured in the Monitor Port Config table or not.


Step 6 Click the Apply button.


Configuring Port Monitoring


Step 1 Click the InfiniBand menu and choosePerformance Management. The Performance Management window opens.

Step 2 Click the plus-sign (+) next to the subnet of the connections that you want to monitor. The navigation tree expands.

Step 3 Click the Port Monitor branch.

Step 4 Click the General tab.

Step 5 Enter an integer value, between 1 and 600, in the Polling Period field to configure the number of seconds between polls.

Step 6 Enter an integer value, between 1 and 600, in the Start Delay field to configure the delay between startup and polling.


Configuring Port Monitoring Thresholds

To configure port monitoring thresholds, perform the following steps:


Step 1 Click the InfiniBand menu and choosePerformance Management. The Performance Management window opens.

Step 2 Click the plus-sign (+) next to the subnet of the connections that you want to monitor. The navigation tree expands.

Step 3 Click the Port Monitor branch.

Step 4 Click the Threshold tab.

Step 5 Enter an integer value in the fields where you want to apply a threshold. Enter none in the fields to which you do not want to apply a threshold.

Step 6 Click the Apply button.


Resetting Counters

You can reset counters for

A hop.

All ports on a node.

All ports in a connection.

All ports in a subnet.

Resetting Counters on a Hop

To reset counters on a hop, perform the following steps:


Step 1 Click the InfiniBand menu and choosePerformance Management. The Performance Management window opens.

Step 2 Click the plus-sign (+) next to the subnet of the connections that you want to monitor. The navigation tree expands.

Step 3 Click the plus-sign next to the Connection Counters branch. The navigation tree expands and connections appear.

Step 4 Click the plus-sign next to the connection that includes the hop that you want to clear. The navigation tree expands and hops appear.

Step 5 Right-click the hop whose counters you want to clear and chooseClear counters on this Hop from the right-click menu.


Resetting Counters on All Ports on a Node

To reset counters on a node, perform the following steps:


Step 1 Click the InfiniBand menu and choosePerformance Management. The Performance Management window opens.

Step 2 Click the plus-sign (+) next to the subnet of the connections that you want to monitor. The navigation tree expands.

Step 3 Click the plus-sign next to the Connection Counters branch. The navigation tree expands and connections appear.

Step 4 Click the plus-sign next to the connection that includes the node that you want to clear. The navigation tree expands and nodes appear.

Step 5 Right-click the node whose counters you want to clear and chooseClear counters on this Node from the right-click menu.


Resetting Counters on All Ports in a Connection

To reset counters on a hop, perform the following steps:


Step 1 Click the InfiniBand menu and choosePerformance Management. The Performance Management window opens.

Step 2 Click the plus-sign (+) next to the subnet of the connections that you want to monitor. The navigation tree expands.

Step 3 Click the plus-sign next to the Connection Counters branch. The navigation tree expands and connections appear.

Step 4 Right-click the connection whose counters you want to clear and chooseClear counters on this Connection from the right-click menu.


Resetting All Counters in a Subnet

To reset all counters in a subnet, perform the following steps:


Step 1 Click the InfiniBand menu and choosePerformance Management. The Performance Management window opens.

Step 2 Click the plus-sign (+) next to the subnet of the connections that you want to monitor. The navigation tree expands.

Step 3 Right-click the Connection Counters branch and chooseClear Counters for All Connections.


Launching Topology View

To launch topology view, perform the following steps:


Step 1 Click the InfiniBand menu and chooseTopology View. The Specify Topspin Devices dialog box opens.

Step 2 (Optional) Click the checkbox, in the Enabled column, of any additional IB devices that you want to add to the Topology View display.

Step 3 Click the OK button. The InfiniBand Topology appears.


Note Navigation buttons appear at the top of the InfiniBand Topology window. Table 8-24 lists and describes these buttons.


Table 8-24 InfiniBand Topology Navigation Buttons 

Button
Description

Refresh

Refreshes the topology display.

Layout

Evenly arranges the switch and HCA icons.

Zoom In

Enlarges the display.

Zoom Out

Condenses the display.

Fit to Screen

Zooms in or out to fit the topology in the window.

Specify Topspin Devices

Opens the Specify Cisco Devices dialog box to add Server Switches to the display.

Legend

Displays the different colors that represent different types of links.

Subnet Details

Displays subnet details. For more information, refer to <Link>"Viewing Subnet Details" on page 51<Link>.

Help

Launches on-line help.


Viewing Internal Server Switch Components

To view the switches and target channel adapters (TCAs) inside a server switch, perform the following steps:


Step 1 Click the InfiniBand menu and chooseTopology View. The Specify Topspin Devices dialog box opens.

Step 2 (Optional) Click the checkbox, in the Enabled column, of any additional IB devices that you want to add to the Topology View display.

Step 3 Click the OK button. The InfiniBand Topology window appears.

Step 4 Double-click a server switch icon. The Internal InfiniBand Topology window opens.


Note Navigation buttons appear at the top of the InfiniBand Topology window. Table 8-25 lists and describes these buttons.


Table 8-25 Internal InfiniBand Topology Navigation Buttons 

Button
Description

Layout

Evenly arranges the switch and HCA icons.

Zoom In

Enlarges the display.

Zoom Out

Condenses the display.

Fit to Screen

Zooms in or out to fit the topology in the window.

Layout

Evenly arranges the switch and HCA icons.

Subnet Management Agents

Displays SM agent details. For information, refer to <Link>"Viewing Subnet Management Agents" on page 54<Link>.

Help

Launches on-line help.


Viewing Subnet Details

You can view any of the following subnet details:

nodes

ports

switches

neighbors

Viewing Nodes

To view the nodes in the topology view, perform the following steps:


Step 1 Click the InfiniBand menu and chooseTopology View. The Specify Topspin Devices dialog box opens.

Step 2 (Optional) Click the checkbox, in the Enabled column, of any additional IB devices that you want to add to the Topology View display.

Step 3 Click the OK button. The InfiniBand Topology window appears.

Step 4 Click the Details button. The InfiniBand Subnet Details window opens.

Step 5 Click the Nodes tab. Table 8-26 lists and describes the fields in this tab.

Table 8-26 Nodes Tab Field Descriptions 

Field
Description

SubnetPrefix

The subnet prefix of the node.

GUID

The global unique ID (GUID) of the node.

Description

An optional text string describing this node.

Type

Type of node being managed.

NumPorts

Number of physical ports on this node.

SystemImageGUID

The system image GUID of this node. All nodes within a particular system (chassis) are assigned the same system image GUID.


Viewing Ports

To view the ports in the topology view, perform the following steps:


Step 1 Click the InfiniBand menu and chooseTopology View. The Specify Topspin Devices dialog box opens.

Step 2 (Optional) Click the checkbox, in the Enabled column, of any additional IB devices that you want to add to the Topology View display.

Step 3 Click the OK button. The InfiniBand Topology window appears.

Step 4 Click the Details button. The InfiniBand Subnet Details window opens.

Step 5 Click the Ports tab. Table 8-27 lists and describes the fields in this tab.

Table 8-27 Ports Tab Field Descriptions 

Field
Description

SubnetPrefix

The subnet prefix of the node.

NodeGUID

The global unique ID (GUID) of the node that includes the port.

Port

Local port number for this port.

LID

16-bit base LID of this port.

State

State of the port:

noStateChange

sleep

polling

disabled

portConfigurationTraining

linkup

linkErrorRecovery

reserved

active

down

LinkWidthActive

Currently active link width. Indicated as follows:

1: 1x

2: 4x

8: 12x

0, 3, 4-7, 9-255 reserved.


Viewing Switches

To view the switches in the topology view, perform the following steps:


Step 1 Click the InfiniBand menu and chooseTopology View. The Specify Topspin Devices dialog box opens.

Step 2 (Optional) Click the checkbox, in the Enabled column, of any additional IB devices that you want to add to the Topology View display.

Step 3 Click the OK button. The InfiniBand Topology window appears.

Step 4 Click the Details button. The InfiniBand Subnet Details window opens.

Step 5 Click the Switches tab. Table 8-28 lists and describes the fields in this tab.

Table 8-28 Switches Tab Field Descriptions 

Field
Description

SubnetPrefix

The subnet prefix of the node.

NodeGUID

The global unique ID (GUID) of the node that includes the switch.

LinearFdbCap

Number of entries supported in the Linear Unicast Forwarding table. Zero indicates that there is no Linear Forwarding Database.

RandomFdbCap

Number of entries supported in the Random Unicast Forwarding table. Zero indicates that there is no Random Forwarding Database.

McastFdbCap

Number of entries supported in the Multicast Forwarding table.

LinearFdbTop

Indicates the top of the linear forwarding table. Packets received with unicast DLIDs greater than this value are discarded by the switch. This component applies only to switches that implement linear forwarding tables and is ignored by switches that implement random forwarding tables.

DefaultPort

Forward to this port all the unicast packets from the other ports whose DLID does not exist in the random forwarding table.

DefPriMcastPort

Forward to this port all the multicast packets from the other ports whose DLID does not exist in the forwarding table.

DefNonPriMcastPort

Forward to this port all the multicast packets from the smDefPriMcastPort port whose DLID does not exist in the forwarding table.

LifeTimeValue

The time a packet can live in the switch.

PortStateChange

Identifies whether or not the port is in transition.

LIDPerPort

Number of LID/LMC combinations that may be assigned to a given external port for switches that support the random forwarding table.

PartitionEnfCap

The number of entries in this partition enforcement table per physical port. Zero indicates that partition enforcement is not supported by the switch.

InEnfCap

Indicates switch is capable of partition enforcement on received packets.

OutEnfCap

Indicates switch is capable of partition enforcement on transmitted packets.

InFilterRawPktCap

Indicates switch is capable of raw packet enforcement on received packets.

OutFilterRawPktCap

Indicates switch is capable of raw packet enforcement on transmitted packets.


Viewing Neighbors

To view the ports in the topology view, perform the following steps:


Step 1 Click the InfiniBand menu and chooseTopology View. The Specify Topspin Devices dialog box opens.

Step 2 (Optional) Click the checkbox, in the Enabled column, of any additional IB devices that you want to add to the Topology View display.

Step 3 Click the OK button. The InfiniBand Topology window appears.

Step 4 Click the Details button. The InfiniBand Subnet Details window opens.

Step 5 Click the Neighbors tab. Table 8-29 lists and describes the fields in this tab.

Table 8-29 Neighbors Tab Field Descriptions 

Field
Description

SubnetPrefix

Used to identify IB subnet this IB node is located in.

LocalNodeGuid

The global unique ID (GUID) of the IB node.

LocalPortId

Identifies the port id of the IB node.

LocalNodeType

Identifies the IB node's node-type.

channelAdapter

switch

RemoteNodeGuid

The global unique ID (GUID) of the remote IB node.

RemotePortId

Identifies the port id of the remote IB node.

RemoteNodeType

Identifies the remote IB node's node-type.

channelAdapter

switch

LinkState

Used to identify the state of the link connecting the neighbors.

noStateChange

down

initialize

active

LinkWidthActive

Used to identify the width of the link connecting the neighbors.


Viewing Subnet Management Agents

You can view any of the following SMA details:

Nodes

Switches

Switch Cap

Ports (1)

Ports (2)

Mcast

Linear Forwarding

PKey

SLVL Map

Nodes

To view SMA node details, perform the following steps:


Step 1 Click the InfiniBand menu and chooseTopology View. The Specify Topspin Devices dialog box opens.

Step 2 (Optional) Click the checkbox, in the Enabled column, of any additional IB devices that you want to add to the Topology View display.

Step 3 Click the OK button. The InfiniBand Topology window appears.

Step 4 Double-click a server switch icon. The Internal InfiniBand Topology window opens.

Step 5 Click the SMAs button. The Subnet Manager Agents window opens.

Step 6 Click the Nodes tab. Table 8-30 lists and describes the fields in this tab.

Table 8-30 Nodes Tab Field Descriptions 

Field
Description

Guid

Subnet prefix of this IB subnet.

BaseVersion

Supported base management datagram version.

ClassVersion

Supported subnet management class.

Type

Type of node being managed.

channelAdapter

switch

PortGuid

GUID of this port. One port within a node can return the nodeGUID as its PortGUID if the port is an integral part of the node and is not field-replaceable.

PartitionCap

Number of entries in the partition table for CA, router, and the switch management port. This is at a minimum set to 1 for all nodes including switch.

DeviceId

Device ID information as assigned by device manufacturer.

Revision

Device revision, assigned by manufacturer.

LocalPortNum

The link port number this SNMP packet came in on.

VendorId

Device vendor ID, per IEEE.

TrapBuffer

Special purpose string buffer for InfiniBand Trap Data.

String

Description of the node.

NumPorts

Number of physical ports on this node.


Switches

To view SMA switch details, perform the following steps:


Step 1 Click the InfiniBand menu and chooseTopology View. The Specify Topspin Devices dialog box opens.

Step 2 (Optional) Click the checkbox, in the Enabled column, of any additional IB devices that you want to add to the Topology View display.

Step 3 Click the OK button. The InfiniBand Topology window appears.

Step 4 Double-click a server switch icon. The Internal InfiniBand Topology window opens.

Step 5 Click the SMAs button. The Subnet Manager Agents window opens.

Step 6 Click the Switches tab. Table 8-31 lists and describes the fields in this tab.

Table 8-31 Switches Tab Field Descriptions 

Field
Description

Guid

Global unique ID of the switch.

LftTop

Indicates the top of the linear forwarding table. Packets received with unicast DLids greater than this value are discarded by the switch. This component applies only to switches that implement linear forwarding tables and is ignored by switches that implement random forwarding tables.

DefaultPort

Forward to this port all the unicast packets from the other ports whose DLID does not exist in the random forwarding table

DefMcastPriPort

Forward to this port all the multicast packets from the other ports whose DLID does not exist in the forwarding table.

DefMcastNPPort

Forward to this port all the multicast packets from the Default Primary port whose DLID does not exist in the forwarding table.

LifeTimeValue

Time a packet can live in the switch.

PortStateChange

It is set to one anytime the PortState component in the PortInfo of any ports transitions from Down to Initialize, Initialize to Down, Armed to Down, or Active to Down as a result of link state machine logic. Changes in Portstate resulting from SubnSet do no change this bit. This bit is cleared by writing one, writing zero is ignored.

LidsPerPort

Specifies the number of LID/LMC combinations that may be assigned to a given external port for switches that support the Random Forwarding table.


Switch Cap

To view SMA switch cap details, perform the following steps:


Step 1 Click the InfiniBand menu and chooseTopology View. The Specify Topspin Devices dialog box opens.

Step 2 (Optional) Click the checkbox, in the Enabled column, of any additional IB devices that you want to add to the Topology View display.

Step 3 Click the OK button. The InfiniBand Topology window appears.

Step 4 Double-click a server switch icon. The Internal InfiniBand Topology window opens.

Step 5 Click the SMAs button. The Subnet Manager Agents window opens.

Step 6 Click the Switch Cap. tab. Table 8-32 lists and describes the fields in this tab.

Table 8-32 Switch Cap Tab Field Descriptions 

Field
Description

LftCap

Number of entries supported in the Linear Unicast Forwarding Table.

RftCap

Number of entries supported in the Random Unicast Forwarding Table. RandomFDBCap = 0 indicates that there is no Random Forwarding Database.

MftCap

Number of entries supported in the Multicast Forwarding Table.

PartitionEnfCap

Specifies the number of entries in the partition enforcement table per physical port. Zero indicates that partition enforcement is not supported by the switch.

InboundEnfCap

Indicates switch is capable of partition enforcement on received packets.

OutboundEnfCap

Indicates switch is capable of partition enforcement on transmitted packets.

FilterRawPktInCap

Indicates switch is capable of raw packet enforcement on received packets.

FilterRawPktOutCap

Indicates switch is capable of raw enforcement on transmitted packets.


Ports (1)

To view SMA port details, perform the following steps:


Step 1 Click the InfiniBand menu and chooseTopology View. The Specify Topspin Devices dialog box opens.

Step 2 (Optional) Click the checkbox, in the Enabled column, of any additional IB devices that you want to add to the Topology View display.

Step 3 Click the OK button. The InfiniBand Topology window appears.

Step 4 Double-click a server switch icon. The Internal InfiniBand Topology window opens.

Step 5 Click the SMAs button. The Subnet Manager Agents window opens.

Step 6 Click the Ports (1) tab. Table 8-33 lists and describes the fields in this tab.

Table 8-33 Ports (1) Tab Field Descriptions 

Field
Description

NodeGuid

64-bit GUID of the node that contains this port.

IbPort

The local port number of this port (relative to a particular node).

MKey

64-bit management Key for this port.

GidPrefix

64-bit global ID prefix for this port.

Lid

16-bit base LID of this port.

MasterSMLid

16-bit base LID of the master SM that is managing this port.

CapabilityMask

Supported capabilities of this node.

0: Reserved, shall be zero

1: IsSM

2: IsNoticeSupported

3: IsTrapSupported

4: IsResetSupported

5: IsAutomaticMigrationSupported

6: IsSLMappingSupported

7: IsMKeyNVRAM

8: IsPKeyNVRAM

9: IsLEDInfoSupported

10: IsSMDisabled

11-15: Reserved, shall be zero

16: IsConnectionManagerSupported

17: IsSNMPTunnelingSupported

18: Reserved, shall be zero

19: IsDeviceManagementSupported

20: IsVendorClassSupported

21-31: Reserved, shall be zero

DiagCode

Port diagnostic code.

MKeyLeasePeriod

Timer value used to indicate how long the M_Key protection bits are to be remain non-zero after a SubnSet(PortInfo) fails a M Key check. The value of the timer indicates the number of seconds for the lease period.

LocalPortNum

Local port number.

LinkWidthEnabled

Enabled link width (1x, 4x, or 12x).

LinkWidthSupported

Supported link width.

LinkWidthActive

Currently active link width.

LinkSpeedSupported

Supported link speed (in Gbps).

State

State of the port:

noStateChagne

down

initialize

armed

active

PortPhys

State of the physical port:

noStateChange(0),

sleep

polling

disabled

portConfigurationTraining

linkup

linkErrorRecovery

reserved

linkDownDef

LinkDownDef

Port physical state "link down."

MKeyProtectBits

Determines MADheader behavior.

LMC

LID mask for multipath support.

LSActive

Current active link speed.

LSActiveEnabled

Enabled link speed.

NeighborMTU

Active maximum MTU enabled on this port for transmission.

MasterSMSL

The administrative SL of the master SM that is managing this port.


Ports (2)

To view extended SMA port details, perform the following steps:


Step 1 Click the InfiniBand menu and chooseTopology View. The Specify Topspin Devices dialog box opens.

Step 2 (Optional) Click the checkbox, in the Enabled column, of any additional IB devices that you want to add to the Topology View display.

Step 3 Click the OK button. The InfiniBand Topology window appears.

Step 4 Double-click a server switch icon. The Internal InfiniBand Topology window opens.

Step 5 Click the SMAs button. The Subnet Manager Agents window opens.

Step 6 Click the Ports (2) tab. Table 8-34 lists and describes the fields in this tab.

Table 8-34 Ports (2) Tab Field Descriptions 

Field
Description

NodeGuid

64-bit GUID of the node that contains this port.

IbPort

The local port number of this port (relative to a particular node).

VLCap

Virtual lanes supported on this port.

VLHighLimit

Limit of high priority component of VL arbitration table.

VLArbitrationHighCap

VL/Weight pairs supported on this port in the smVLArbTable for high priority.

VLArbitrationLowCap

VL/Weight pairs supported on this port in the smVLArbTable for low priority.

MTUCap

Maximum MTU supported by this port.

VLStallCount

Specifies the number of sequential packets dropped that causes the port to enter the VLStalled state.

HOQLife

Time a packet can live at the head of a VL queue.

OpVLs

Virtual Lanes operational on this port.

PkeyEnfIn

Indicates support of optional partition enforcement on packets received from this port.

PkeyEnfOut

Indicates support of optional partition enforcement on packets transmitted from this port.

FilterRawPktIn

Indicates support of optional raw packet enforcement on raw packets received from this port.

FilterRawPktOut

Indicates support of optional raw packet enforcement on raw packets transmitted from this port.

MKeyViolations

Number of SMP packets that have been received on the port that have had invalid M_Key, since power on or reset.

PKeyViolations

Number of packets that have been received on the port that have had invalid P_Key, since power on or reset.

QKeyViolations

Number of packets that have been received on the port that have had invalid Q_Key, since power on or reset

GuidCap

Number of GUID entries supported in the GUIDInfo attribute for this port.

SubnetTimeout

Maximum expected subnet propagation delay.

RespTimeValue

Expected maximum time between the port reception of a SMP and the transmission of the associated response.

LocalPhysErr

Threshold value. When the count of marginal link errors exceeds this threshold, the local link integrity error is detected.

OverrunErr

Overrun threshold value. When the count of buffer overruns exceeds the threshold, an excessive buffer overrun error occurs.


Mcast

To view SMA multicast details, perform the following steps:


Step 1 Click the InfiniBand menu and chooseTopology View. The Specify Topspin Devices dialog box opens.

Step 2 (Optional) Click the checkbox, in the Enabled column, of any additional IB devices that you want to add to the Topology View display.

Step 3 Click the OK button. The InfiniBand Topology window appears.

Step 4 Double-click a server switch icon. The Internal InfiniBand Topology window opens.

Step 5 Click the SMAs button. The Subnet Manager Agents window opens.

Step 6 Click the Mcast tab. Table 8-35 lists and describes the fields in this tab.

Table 8-35 Mcast Tab Field Descriptions 

Field
Description

NodeGuid

Global unique ID of the node.

TableBlockIndex

Index into the multicast block table, this index starts from 1 rather than 0.

TableBlock

List of 32 PortMask Block Elements. 16 bits starting at position 16*p of the port mask associated with the particular LID. An incoming packet with this LID is forwarded to all ports for which the bit in the port mask is set to 1. Note that an invalid LID is indicated with an all zero PortMask.


Linear Forwarding

To view SMA linear forwarding table details, perform the following steps:


Step 1 Click the InfiniBand menu and chooseTopology View. The Specify Topspin Devices dialog box opens.

Step 2 (Optional) Click the checkbox, in the Enabled column, of any additional IB devices that you want to add to the Topology View display.

Step 3 Click the OK button. The InfiniBand Topology window appears.

Step 4 Double-click a server switch icon. The Internal InfiniBand Topology window opens.

Step 5 Click the SMAs button. The Subnet Manager Agents window opens.

Step 6 Click the Linear Forwarding tab. Table 8-36 lists and describes the fields in this tab.

Table 8-36 Linear Forwarding Tab Field Descriptions 

Field
Description

NodeGuid

Global unique ID of the node.

BlockIndex

Index into the linear forwarding table, this index starts from 1 rather than 0.

Block

Linear forwarding table block.


PKey

To view SMA partition details, perform the following steps:


Step 1 Click the InfiniBand menu and chooseTopology View. The Specify Topspin Devices dialog box opens.

Step 2 (Optional) Click the checkbox, in the Enabled column, of any additional IB devices that you want to add to the Topology View display.

Step 3 Click the OK button. The InfiniBand Topology window appears.

Step 4 Double-click a server switch icon. The Internal InfiniBand Topology window opens.

Step 5 Click the SMAs button. The Subnet Manager Agents window opens.

Step 6 Click the PKey tab. Table 8-37 lists and describes the fields in this tab.

Table 8-37 PKey Tab Field Descriptions 

Field
Description

NodeGuid

Global unique ID of the node.

IbPort

Port number.

Index

PKEY table index.

TableVector

GUID assigned by the SM on the subnet.


SLVL Map

To view SMA SLVL details, perform the following steps:


Step 1 Click the InfiniBand menu and chooseTopology View. The Specify Topspin Devices dialog box opens.

Step 2 (Optional) Click the checkbox, in the Enabled column, of any additional IB devices that you want to add to the Topology View display.

Step 3 Click the OK button. The InfiniBand Topology window appears.

Step 4 Double-click a server switch icon. The Internal InfiniBand Topology window opens.

Step 5 Click the SMAs button. The Subnet Manager Agents window opens.

Step 6 Click the SLVL Map tab. Table 8-38 lists and describes the fields in this tab.

Table 8-38 SLVL Map Tab Field Descriptions 

Field
Description

NodeGuid

Global unique ID of the node.

InIbPort

Ingress port number.

OutIbPort

Egress port number.

Sl#toVI

SL# to VL mapping.


Viewing Device Management


Note Device Management (DM) features are only available on I/O chassis (Cisco SFS 3001, Cisco SFS 3012).


With Device Management, you can

View IOUs.

View IOCs.

View IOC Services.

Viewing IOUs

To view the I/O Units (IOUs) on your device, perform the following steps:


Step 1 Click the InfiniBand menu and chooseDM. The Device Manager window opens.

Step 2 Click the IOU tab. IOU details appear. Table 8-39 lists and describes the fields in this display.

Table 8-39 IOU Display Field Descriptions 

Field
Description

Change ID

Cumulative number of changes to the controller list since the device last booted.

Max Controllers

Maximum number of controllers that your device can support.

Diag Device ID

All device IDs appear as 1.

Option ROM

Indicates the presence or absence of Option ROM.

Controllers

Lists each slot on your device that can potentially contain a controller and identifies whether or not a controller resides in that slot.


Viewing IOCs

To view the I/O controllers (IOCs) on your device, perform the following steps:


Step 1 Click the InfiniBand menu and chooseDM. The Device Manager window opens.

Step 2 Click the IOC tab. A table of IOC details appears. Table 8-40 lists and describes the fields in this display.

Table 8-40 IOCs Display Field Descriptions 

Field
Description

GUID

GUID of the controller.

Vendor ID

Organization Unique Identifier (OUI) of the vendor.

Device ID

Vendor-assigned device identifier.

Device Version

Vendor-assigned device version.

Subsystem Vendor ID

Vendor-assigned subsystem vendor identifier

Subsystem ID

Vendor-assigned subsystem identifier.

IOClass

I/O class that the IOC supports.

IOSubclass

Subclass of the I/O class protocol of the IOC.

Protocol

Standard protocol definition that the IOC supports.

Protocol Version

Protocol version that the IOC supports.

Send Msg Queue Depth

Maximum number of messages that the send message queue supports.

RDMA Read Queue Depth

Maximum depth of the per-channel RDMA Read Queue.

Send Msg Size

Maximum size, in bytes, of send messages.

RDMA transfer size

Maximum size, in bytes, of outbound RDMA transfers that the IOC initiates.

Controller Op Cap

Integer value (from 8 cumulative bits) between 1 and 255 that represents the operation type(s) that the IOC supports.

bit 0: ST; Send Messages To IOCs

bit 1: SF; Send Messages From IOCs

bit 2: RT; RDMA Read Requests To IOCs

bit 3: RF; RDMA Read Requests From IOCs

bit 4: WT; RDMA Write Requests To IOCs

bit 5: WF; RDMA Write Requests From IOCs

bit 6: AT; Atomic Operations To IOCs

bit 7: AF; Atomic Operations From IOCs

Service Entries

Number of services that the IOC provides.


Viewing IOC Services

To view the IOC services on your device, perform the following steps:


Step 1 Click the InfiniBand menu and chooseDM. The Device Manager window opens.

Step 2 Click the IOC Services tab. A table of IOC Services details appears. <Link>Table 8-41 lists and describes the fields in this table.

Table 8-41 IOC Services Table Field Descriptions 

Field
Description

IOC GUID

GUID of the node that provides the service.

Service Name

ASCII identifier of the service.

Service ID

Numeric identifier that nodes use to call the service.