-
Administrator Guide for Cisco Trust Agent, Release 2.1, With Bundled Supplicant
-
Title page
-
Table of Contents
-
Preface
-
Cisco Trust Agent Overview
-
Installing the Cisco Trust Agent on Linux Operating Systems
-
Installing the Cisco Trust Agent on Macintosh Operating Systems
-
Installing the Cisco Trust Agent on Windows Operating Systems
-
Configuring Cisco Trust Agent
-
Cisco Trust Agent Event Logging
-
Posture Plugins
-
Cisco Trust Agent's Use of Certificates
-
Cisco Trust Agent 802.1x Wired Client
-
Cisco Trust Agent 802.1x Wired Client Logging
-
Using the Scripting Interface
-
ctastat Diagnostic Tool
-
Altnerative Methods of Installing CTA
-
Open Source License Acknowledgement
-
Index
-
 Feedback
Table Of Contents
Cisco Trust Agent 802.1x Wired Client
802.1x Wired Client Administrative and Client Versions
802.1x Wired Client User Interface
Administrative 802.1x Wired Client Automatic Startup
Disabling the 802.1x Wired Client System Tray Icon
802.1x Wired Client System Tray Shortcut Menu
Access Device Connection Status
Basic 802.1x Wired Client Procedures
Opening the 802.1x Wired Client
Manually Connecting To the Network
Manually Disconnecting From the Network
Getting Started with 802.1x Wired Client Functions
Administrative 802.1x Wired Client Overview
Authentication Methods Overview
Overview of FAST Connections in a User Logon Context
Initial User Connections - Before the PAC Has Been Provisioned
Subsequent User Connections - After the PAC Has Been Provisioned
Overview of FAST Connections in a Machine Credentials Context
Initial Machine Connections - Before the PAC Has Been Provisioned
Subsequent Machine Connections - After the PAC Has Been Provisioned
Initial Credential Provisioning
Pre-PAC or no-PAC Provisioning
Server-Initiated Credential Revalidation
User-Initiated Credential Revalidation
Understanding Policies and Profiles
802.1x Wired Client Policy File
802.1x Wired Client Network Policy File
Create Deployment Package Wizard
Automatically Establishing Machine Connection
Allow Unprotected Client Cert Area
Configuring Unprotected Client Cert Area Settings
Trusted Server Validation Area
Authentication Retries Wired / Ethernet Settings
Deploying End-User 802.1x Wired Clients
Creating a User Authentication Deployment Package
Create a Machine and User Authentication Deployment Package
Creating a Machine Authentication Only Deployment Package
Installing Server Certificates on the Host
Installing Deployment Packages on Hosts
Changing Deployment Packages on Hosts
Replacing a Deployment Package on a Host
Cisco Trust Agent 802.1x Wired Client
The Cisco Trust Agent 802.1x Wired Client (802.1x Wired Client) is an authentication supplicant for creating secure user connections with an Ethernet switch. The 802.1x Wired Client provides a graphical user interface for monitoring authentication status and managing authorized network access that is protected by the IEEE 802.1x protocol.
The 802.1x Wired Client implementation allows end-user connectivity to the network only after successful client-server authentication via port access control on the 802.1x-enabled access device.
The 802.1x Wired Client is an integral part of the Cisco Network Admission Control (NAC) security environment. In this environment, the Cisco Secure Access Control Server (ACS) requests posture information about NAC-compliant applications running on the system from the Cisco Trust Agent (CTA). The 802.1x Wired Client returns that posture information for CTA.
The Cisco Trust Agent 802.1x Wired Client is available for Windows systems only.
This chapter contains the following sections:
•
802.1x Wired Client Administrative and Client Versions
•
–
–
–
•
–
–
–
•
–
–
–
–
–
–
–
–
•
•
–
–
–
–
•
–
–
•
–
802.1x Wired Client Features
The Cisco Trust Agent 802.1x Wired Client (802.1x Wired Client) has the following features:
•
•
•
•
•
•
•
•
•
802.1x Wired Client Administrative and Client Versions
The administrative version of the 802.1x Wired Client is the "out-of-the-box" version of the product. By default, the Administrative 802.1x Wired Client will authenticate its local network using both machine and user authentication. It is intended for use by the IT organization responsible for configuring and deploying the end-user versions of the 802.1x Wired Client.
Once the administrator defines connection policies and those policies are installed along with the 802.1x Wired Client on a user's workstation, the 802.1x Wired Client becomes the end-user version of the product.
Note
802.1x Wired Client User Interface
This section describes the elements of the 802.1x Wired Client interface that are visible to the administrative user.
Administrative 802.1x Wired Client Automatic Startup
After installation, the Cisco Trust Agent 802.1x Wired Client service starts automatically on startup of the Windows operating system. By default, the administrative 802.1x Wired Client is configured to automatically attempt to authentication the host using machine and user credentials. Confirmation that the 802.1x Wired Client has been successfully started is indicated by the presence of its icon in the Windows task bar icon tray.
Figure 9-1 802.1x Wired Client Icon
Network Connection Status
The 802.1x Wired Client icon in the Windows system tray changes color to reflect the state of the network connection.
Icon colors and their associated status indications are detailed in Table 9-1:
Mousing-over the 802.1x Wired Client icon displays a summary connection status message.
Disabling the 802.1x Wired Client System Tray Icon
Step 1
Step 2
This configuration is made on individual clients and cannot be defined in a custom installation package.
802.1x Wired Client System Tray Shortcut Menu
By right-clicking the 802.1x Wired Client status icon in the Windows system try you see a menu with three menu options.
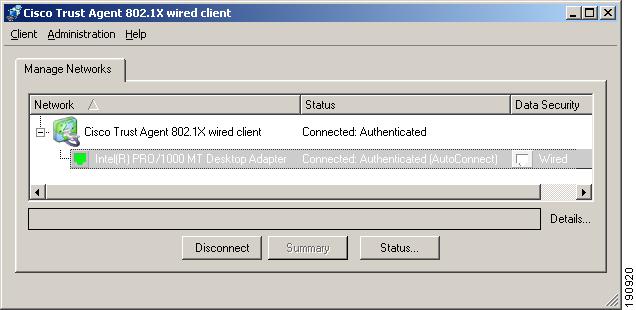
802.1x Wired Client Window
The 802.1x Wired Client's main window contains a list of controlled networks. The single, pre-named, network connection expands to display all access devices configured within the network connection. In Figure 9-2 the network is named, "Cisco Trust Agent 802.1x wired client."
Figure 9-2 802.1x Wired Client Administrator's main window
Network Connection Status
The color of the network connection's icon reflects the best connection status of all of the access device connections. The network connection icon in Figure 9-2 is named Cisco Trust Agent 802.1x Wired Client.
Access Device Connection Status
The main window contains a list of access devices, which includes network adapters and network interfaces. In figure Figure 9-2 there are two access devices in the network:
•
•
The assigned access device name is taken from the name of the network adapter associated with the access device. If all the members of the ethernet group are 'Not Available,' the name changes to its group `<ethernet>' name.
The color of the icon indicates the connection status of the access device.
Table 9-3 Access Device Icon Status Information
None
Disconnected
•
•
–
–
Yellow
Connecting
The network adapter is attempting to make a network connection.
Green
Connected: Authenticated
The network adapter is connected to the network. The host has been authenticated.
Blue
Connected: Unauthenticated
The network adapter is connected to the network and does require authentication.
Red
Failed (retrying)
This is a temporary state while attempting to authenticate the host and create a connection. The last attempt to authenticate failed.
Red
Failed
Authentication attempts have failed.
Selecting the access device will display the reason for the failure in the Message Status bar.
X Overlays gray icon
Not Available
Access device is not available
The Data Security field is used only for access devices. It indicates that the security is based on a wired port.
A single Status Message display line is located below the Access Port List and adds clarification to the current access status. Often used to clarify the reason for a failure, for example, why a connect attempt might have failed.
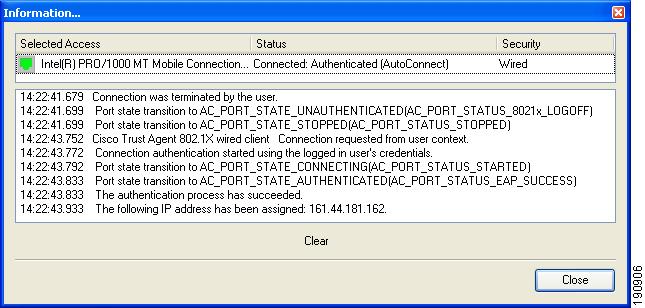
To the right of the Status Message display line is the Details... hot spot. Clicking the Details... hot spot launches the Information window. The Information window displays a real-time feedback of the individual steps of any (manual or auto) connection or disconnection process.
Selecting another access device, or using the "Clear" control clears the current display.
Note
Figure 9-3 Network Adapter Information box
Basic 802.1x Wired Client Procedures
This section describes the tasks administrators perform from the main window of the 802.1x Wired Client.
Opening the 802.1x Wired Client
Use one of the following methods to launch the 802.1x Wired Client main window:
•
•
•
Manually Connecting To the Network
Step 1
Step 2
Manually Disconnecting From the Network
Step 1
Step 2
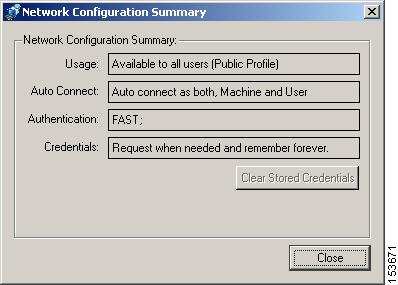
Viewing Network Summary
A summary of the policy that governs the connection and authentication of the host to the network can be viewed but it cannot be modified.
Step 1
Step 2
Figure 9-4 Network Configuration Summary dialog
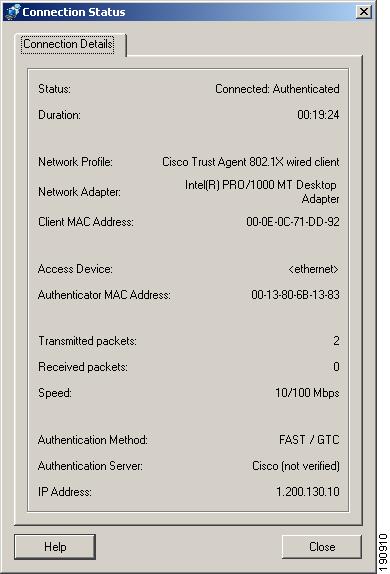
Viewing Access Device Status
This option displays the Connection Details window, which contains specific information about the access device's network connectivity.
Step 1
Step 2
Figure 9-5 Connection Details Window
Status
State of the connection. This is derived from the Main Screen Access Port list
Duration
Defines how long the connection has been operational
Network Profile
Fixed generic name
Network Adapter
Identifies the port's adapter name
Client MAC Address
Displays the MAC address of the associated network adapter.
Access Device
Fixed generic name
Authenticator MAC Address
MAC address of the switch.
Transmitted packets
Actual number of layer 2 frames transmitted
Received packets
Actual number of layer 2 frames received
Speed
Indication of connection maximum data rate
Authentication Method
The authentication method may be EAP-FAST, EAP-GTC, or EAP-TLS.
If the field is blank then authentication is not required because the host is not connected to a 802.1x configured port.
Authentication Server
The field shows either the server certificate's name or the server's FAST A-ID - augmented with an indication of either 'not verified' or 'trusted'.
'Not verified' only exists for the case of an empty Trusted Server List. (See the "Trusted Server Validation Area" section for more information on trusted servers.)
IP Address
IP Address of host
Getting Started with 802.1x Wired Client Functions
Administrative 802.1x Wired Client Overview
This administrative version of the client has one pre-defined enterprise network when initially started. A Network is defined by its Network Profile. (See "Understanding Policies and Profiles" section for more information on network profiles.)
The 802.1x Wired Client utilizes EAP-FAST (the Flexible Authentication via Secure Tunneling method of the Extensible Authentication Protocol). EAP-FAST establishes a protected TLS (Transport LAN Service) tunnel using a pre-shared secret. The pre-shared secret is referred to as the Protected Access Credential, or PAC. (A master key that is kept by the authentication server is used to generate a unique PAC for each user.) The PAC also serves to establish the server's identity to the client. The tunnel is then used to protect weaker authentication methods, typically based on a password such as EAP-GTC or EAP-MSCHAPv2, in which the client authenticates itself to the server. In this way, mutual authentication is achieved. It is also possible that mutual authentication can also be achieved during the tunnel creation if the client provides a client certificate via the TLS protocol.
Authentication Methods Overview
The 802.1x Wired Client authenticates machines and users so that they may connect to the network. Successful user authentication establishes a network connection after a user logs onto the machine. Successful machine authentication connects the machine to the network once the machine's credentials have been authenticated. User and machine authentication may also be used together.
Note
In this case, machine authentication could fail, not because of a security problem but because the application was not available to provide its posture credentials in time.
•
•
Each deployed end-user 802.1x Wired Client is configured to support one of the following methods of authentication for network access:
•
•
•
The administrative 802.1x Wired Client is pre-configured to connect the host to the network only after authenticating machine and user credentials.
Overview of FAST Connections in a User Logon Context
Initial User Connections - Before the PAC Has Been Provisioned
During the initial authentication session, the FAST protocol provides for the automatic provisioning of the administrative user's unique PAC.
There are two methods of automatically provisioning a user's PAC. The first is a basic automatic provisioning feature that does not require a server certificate to be installed on the host. The second is a more secure automatic provisioning feature that uses a server certificate for providing initial authentication.
Note
The basic automatic provisioning feature prompts users for their user credentials only.
The automatic provisioning feature that uses a certificate also requires user credentials and the CA certificate used to trust the server certificate must be stored in the proper Windows Certificate Store (User-Trusted Root Store) of the host.
For both the basic or certificate-based automatic provisioning, the FAST authentication server must be configured for auto creation of the administrator's unique user PAC information.
The user credentials needed for the basic and certificate-based automatic provisioning are requested on an as-needed basis. See the "User Credentials" section for more information.
These are the user credentials that may be required:
•
•
•
Subsequent User Connections - After the PAC Has Been Provisioned
Once the user (tunnel) PAC has been provisioned and the user's credentials saved, subsequent connections are autonomously made using the PAC data to create the secure tunnel used for passing the user's credentials for authentication. No user intervention is required and authentication is automatic.
Overview of FAST Connections in a Machine Credentials Context
Initial Machine Connections - Before the PAC Has Been Provisioned
The provisioning of the Machine PAC, which is needed for machine context connections, is accomplished using the server certificate or machine security identity (SID). Machine PACs are only supported in newer versions of authentication servers (ACS 4.0 or later) which have been upgraded to support EAP-FAST v1a.
To make a make a machine connection before the PAC has been provisioned, the CA certificate used to trust the server certificate must be placed in the proper Windows Certificate Store (Local Computer-Trusted Root Store).
The host must also provide these machine credentials:
•
•
Finally, the FAST authentication server must be configured for auto creation of administrator's unique machine PAC information.
Note
Note
Note
Subsequent Machine Connections - After the PAC Has Been Provisioned
Once the machine PAC has been provisioned, subsequent connections are autonomously made using the PAC data exclusively and authentication is automatic.
User Credentials
The EAP-FAST method used by the 802.1x Wired Client supports the following types of user credentials:
•
•
The single Network Profile of the 802.1x Wired Client is pre-configured to accommodate both types, as needed. The type of credential required for a specific authentication session is determined by the settings of the authentication server and is automatically processed by the 802.1x Wired Client.
Initial Credential Provisioning
After the 802.1x Wired Client is deployed to an individual end-user, specific user credential information may be required to be provisioned. However, there is no pre-provisioning of this information. Rather it is requested, on-demand, by the client at the appropriated time during its first connection attempt after initial startup. A series of appropriate Credential Request Pop-up Dialogs are progressively displayed to the user with prompts and mechanisms for entering the desired information.
Identity Credentials
One of the following identity credential methods has been pre-configured:
•
•
An Identity has a Network Access Identifier (NAI) format and takes the following generalized form: UserName@Domain, where the use of the domain, also referred to as a "realm," is optional. The identity specified may contain up to 63 ASCII characters and is case sensitive.
Password Credentials
One of the following password credential methods has been pre-configured:
•
•
Certificate Credentials
The request and store configuration method for certificates credentials has been pre-configured:
•
The identifying information for the selected certificate in the selection pull-down list is obtained from the various fields of the certificate as follows:
–
–
–
–
Note
Note
Machine Credentials
Depending on the EAP method you use, there are two types of machine credentials.
Pre-PAC or no-PAC Provisioning
•
A machine certificate must be in the appropriate Windows Certificate Store (Personal Certificate Store for the Local Computer).
There are two restrictions to this method:
–
–
Note
Note
•
Note
Post-PAC Provisioning
A Machine PAC is only used with EAP-FAST and only supported in newer versions of authentication servers (e.g., ACS 4 or later) which have been upgraded to support EAP-FAST v1a.
Credential Revalidation
Credentials may expire in which case the server may initiate a revalidation of the credentials or the user may clear the credentials and force a revalidation.
Server-Initiated Credential Revalidation
In addition to cases where the credentials fail to be accepted by the server, the server may employ policies such as password aging that automatically re-prompts the user for their credentials using the appropriate "Enter Your Credentials" pop-up.
User-Initiated Credential Revalidation
The user can manually force a re-prompting for authentication credentials. The re-prompting clears any stored user credentials which causes a new sequence of credential request pop-up dialogs to appear during the next authentication attempt.
Note
Note
To clear existing credentials, follow this procedure:
Step 1
Step 2
Step 3
Step 4
Understanding Policies and Profiles
The 802.1x Wired Client is part of a family of 802.1x connection clients. An End-user 802.1x Wired Client creates network connections based on its base features and its operational environment, which is defined by a set of configuration documents.
The 802.1x Wired Client's base feature is that it is limited to a wired (802.3) network media type.
The authentication policies used by the 802.1x Wired Client are based on two configuration documents:
•
•
802.1x Wired Client Policy File
The 802.1x Wired client policy file, policy.xml, which is installed in the \Program Files\Cisco Systems\Cisco Trust Agent 802_1x Wired Client\profiles\policies directory defines these aspects of the operational environment:
•
•
•
Note
802.1x Wired Client Network Policy File
The network policy file, networks.xml, which is installed in the Program Files\Cisco Systems\Cisco Trust Agent 802_1x Wired Client\profiles\networks directory defines these aspects of the operational environment:
•
Note
•
•
•
Note
•
Note
Using the Administrative 802.1x Wired Client, a system administrator uses the Deployment Package Wizard to create the 802.1x Wired Client policy.xml file and network.xml policy file based on the administrator's input.
The names for the policy.xml and network.xml files are standardized so that they may be easily recognized and distributed to the appropriate hosts.
Create Deployment Package Wizard
The Create Deployment Package wizard provides an interface which allows you to configure the network connection context. The deployment package you create using the wizard consists of a policy.xml and a networks.xml file which contain the connection context information. See "Understanding Policies and Profiles" section for more information about these files and their roles.
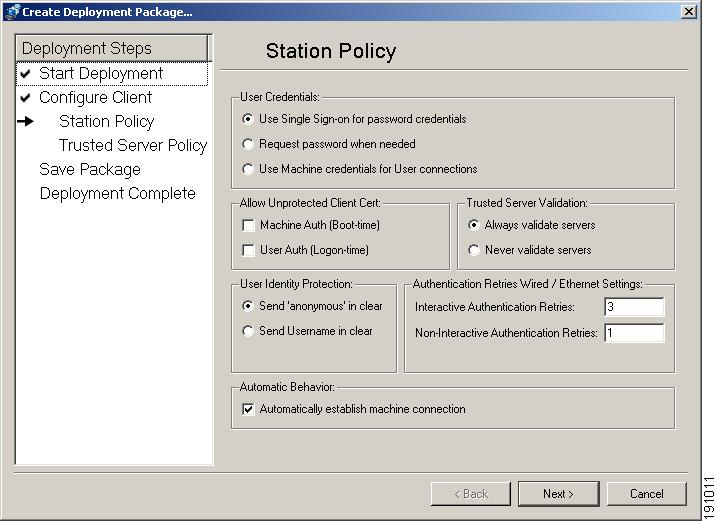
The Station Policy window of the Create Deployment Package wizard displays the settings which are configured to create the policy.xml and networks.xml file.
Figure 9-6 Station Policy Window
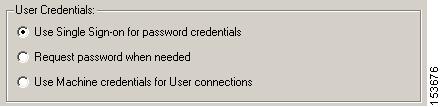
User Credentials Area
The User Credentials area of the Station Policy window defines which user credentials are used to authenticate the host to the ACS server. Radio buttons provide three options.
Figure 9-7 User Credentials area
Automatically Establishing Machine Connection
The Automatically establish machine connection check box should be checked when you are performing machine authentication or machine and user authentication.
If the box is checked, the client automatically attempts to authenticate itself during boot up. If the box is not checked, machine authentication does not occur until after the GINA (Graphical Identification and Authentication) login.
Figure 9-8 Automatically establish machine connection check box.
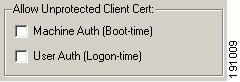
Allow Unprotected Client Cert Area
This area allows you to enable the use of client credentials during the unprotected phase of FAST PAC provisioning. The use of client credentials is optional.
These settings refer to whether or not the 802.1x Wired Client should send a certificate unprotected and not necessarily, whether or not to ever send a certificate.
Figure 9-9 Allow Unprotected Client Cert Area
•
•
Configuring Unprotected Client Cert Area Settings
Checking Machine Auth (Boot-time) or User Auth (Login-time)
Checking either checkbox disables protection for the specific connection time. When requested by the server for a client certificate during the unprotected portion of FAST PAC provisioning:
•
•
Not Checking Machine Auth (Boot-time) or User Auth (Login-time) checkboxes
Leaving these checkboxes unchecked enables protection for the specific connection time.
When the server requests a client certificate during the unprotected portion of FAST PAC provisioning, the client refuses to send any certificate. The client may do this because it is waiting for the protected phase of the protocol.
However, before the second phase of the protocol starts, a tunnel is established based on the server's certificate. The 802.1x Wired Client will send its certificate through this tunnel before phase 2 authentication begins.
Note
Trusted Server Validation Area
The Trusted Server Validation area allows you to specify the authentication servers the End-user 802.1x Wired Client can trust with their user and machine credentials.
Figure 9-10 Trusted Server Validation area
•
Note
•
Warning
Note
The administrative version of the 802.1x Wired Client is the "out-of-the-box" version of the product. By default, the Administrative 802.1x Wired Client will authenticate itself to the local network using both machine and user authentication. It is intended for use by the IT organization responsible for configuring and deploying the end-user versions of the 802.1x Wired Client.
In order to specify a Trusted Server for a client, you need to create a deployment package and install it on the client. Once you install a deployment package on the client running the Administrative 802.1x Wired Client, the 802.1x Wired Client looses its Administrative capabilities and becomes and ordinary 802.1x Wired Client. That is, after the deployment package is installed, the 802.1x Wired Client will no longer be able to create authentication profiles or other deployment packages.
For that reason, the administrative version of the 802.1x Wired Client is pre-configured to support Never validate servers only.
Deploying Trusted Servers
Before you begin deploying trusted servers, the identification of the trusted server(s) that support the initial FAST PAC provisioning of the host needs to be configured. Two server validation methods are supported:
•
•
Initially the Trusted Servers list will be empty.
Note
Step 1
Step 2
Step 3
Step 4
Note
Step 5
a.
•
•
–
Note
–
b.
•
•
c.
•
•
Step 6
Step 7
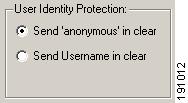
User Identity Protection Area
The User Identity Protection area defines what information is sent during an EAP Identity request.
Figure 9-11 User Identity Protection
Note
Note
Authentication Retries Wired / Ethernet Settings
Some network access devices have the ability to open a port but switch the user into a special vlan after a failed connection attempt. In order to support these access devices, the client provides the administrator with the capability of adjusting the number of connection retries before disconnecting, allowing the access device to make intelligent decisions based on multiple authentication failures.
Figure 9-12 Authentication Retries Wired / Ethernet Settings Area
Interactive Authentication Retries: Applies for cases in which a user intervention might correct the failed authentication attempt. In general, this applies to connection attempts involving user text entry or user list selection associated with an "Enter Your Credentials" pop-up window, to allow for user corrections. The default setting is four attempts.
Non-interactive Authentication Retries: Applies for cases in which a user intervention would not help to correct the failed authentication attempt. In general, this applies to connection attempts not involving an "Enter Your Credentials" pop-up window, such as, single-sign-on, or all failures associated with a server certificate validation. The default setting is four attempts.
Note
•
•
When you decide on the proper settings for these fields, the values of these fields must be at least one greater than the value of the max-attempts value for the "auth fail vlan" feature on your switch. For example, if max-attempts value for "auth fail vlan" is 3 on the switch, both values must be set to 4.
Deploying End-User 802.1x Wired Clients
Deploying the End-user 802.1x Wired Clients requires that you perform three procedures:
Step 1
•
•
•
See "Creating Deployment Packages" section for these procedures.
Step 2
Step 3
Creating Deployment Packages
This section describes creating these different authentication packages:
•
•
•
Creating a User Authentication Deployment Package
If you want to provide network access only after a user has logged on to a machine, authenticate user credentials only.
Step 1
Step 2
Step 3
Step 4
Step 5
•
•
See the "User Credentials Area" section, for more information on these radio buttons.
Step 6
Step 7
Step 8
Step 9
•
•
See the "Trusted Server Validation Area" section for more information about these radio buttons.
Step 10
Step 11
•
•
Step 12
Step 13
Step 14
•
common-auth-policy.xml•
common-auth-networks.xml•
common-auth-credentials.xmlStep 15
Step 16
Create a Machine and User Authentication Deployment Package
This configuration provides network access only after both the user and the machine credentials have been authenticated.
Step 1
Step 2
Step 3
Step 4
Step 5
•
•
See the "User Credentials Area" section, for more information on these radio buttons.
Step 6
Step 7
Step 8
Step 9
•
•
See, "Trusted Server Validation Area" section for more information.
Step 10
Step 11
•
•
Step 12
Step 13
Step 14
•
common-auth-policy.xml•
common-auth-networks.xml•
common-auth-credentials.xml
Note
Step 15
Step 16
Creating a Machine Authentication Only Deployment Package
This procedure creates a policy for machine authentication only. For machine authentication, the machine credentials are substituted for user credentials. The machine connection to the network may be made automatically or manually.
During an automatic machine authentication, the host boots and the machine credentials are immediately submitted for authentication.
During a manual machine authentication, the host boots but its machine credentials are not submitted for authentication. Machine credentials are sent after the user logs on.
Step 1
Step 2
Step 3
Step 4
Step 5
•
•
Step 6
Step 7
Step 8
Step 9
•
•
See, "Trusted Server Validation Area" section for more information.
Step 10
Step 11
•
•
Step 12
Step 13
Step 14
•
common-auth-policy.xml•
common-auth-networks.xml•
common-auth-credentials.xml
Note
Step 15
Step 16
Installing Server Certificates on the Host
Install server certificates on the host in order to support machine connections or user connections.
After the server certificate have been installed on the host, continue with the "Installing Deployment Packages on Hosts" section.
Machine Connection Support
If the 802.1x Wired Client for the end-user is using the Server Certificate method of initially provisioning the machine PAC, then perform these two steps:
Step 1
Step 2
Note
User Connection Support
If the end-user client is using the Server Certificate method of initially provisioning the end-user's PAC, then the CA certificate used to trust the server certificate must be deployed and placed in the proper Windows Certificate Store (User-Trusted Root Store).
Installing Deployment Packages on Hosts
Before you begin, test the deployment package before distributing it to the end-users. It is recommended to load the deployment package on an alternate machine so as to maintain the administrator version of the client on the current machine.
Note
Step 1
Step 2
Step 3
Step 4
Step 5
Step 6
Changing Deployment Packages on Hosts
Changing the deployment package on an End-user 802.1x Wired Clients is very similar to deploying the original package.
Step 1
•
•
•
Step 2
Replacing a Deployment Package on a Host
Using this procedure you can change the way a host authenticates itself to the network.
Step 1
Step 2
Step 3
Step 4
Step 5
Step 6
Step 7
Step 8