-
Administrator Guide for Cisco Trust Agent, Release 2.1, With Bundled Supplicant
-
Title page
-
Table of Contents
-
Preface
-
Cisco Trust Agent Overview
-
Installing the Cisco Trust Agent on Linux Operating Systems
-
Installing the Cisco Trust Agent on Macintosh Operating Systems
-
Installing the Cisco Trust Agent on Windows Operating Systems
-
Configuring Cisco Trust Agent
-
Cisco Trust Agent Event Logging
-
Posture Plugins
-
Cisco Trust Agent's Use of Certificates
-
Cisco Trust Agent 802.1x Wired Client
-
Cisco Trust Agent 802.1x Wired Client Logging
-
Using the Scripting Interface
-
ctastat Diagnostic Tool
-
Altnerative Methods of Installing CTA
-
Open Source License Acknowledgement
-
Index
-
 Feedback
Table Of Contents
Installing the Cisco Trust Agent on Macintosh Operating Systems
System Requirements for Mac OS X
CTA Scripting Interface Feature
General Installation Instructions
Extracting the Installation Image and Accepting the EULA
Installing CTA from the Command Line
Installing CTA Using an Installation Wizard
Installing CTA Using a Custom Installation Package
Creating a Custom Installation Package
Repairing or Upgrading an Existing CTA Installation
Verifying Cisco Trust Agent Installation
Uninstalling Cisco Trust Agent
Uninstalling CTA and the CTA Scripting Interface
Uninstalling Only the CTA Scripting Interface
Installing the Cisco Trust Agent on Macintosh Operating Systems
This chapter provides system requirement and installation information for installing Cisco Trust Agent (CTA) on Macintosh operating systems. Read this entire chapter before beginning the installation. There are advanced installation options detailed later in this chapter that you may want to use. For example, before deploying CTA on your network, you can create a custom installation package which allows you to set CTA configuration parameters and install certificates and plug-ins. Proceeding in this manner could save you configuration time during the CTA deployment process.
See these other chapters for installation instructions for different operating systems:
•
Chapter 2, "Installing the Cisco Trust Agent on Linux Operating Systems"
•
This chapter contains the following sections:
•
•
–
–
–
–
–
•
•
•
–
–
System Requirements for Mac OS X
Before installing Cisco Trust Agent on a Mac OS X Operating system, verify that the target system meets the following requirements:
System
•
•
Free Hard Disk Space
20 MB minimum
Memory
256 MB RAM
Listening Port
By default, Cisco Trust Agent listens on UDP port 21862.
You can change this port number, if necessary. See "The ctad.ini Configuration File" section on page 5-2.
Operating System and Language Support
All available internationalized versions of Mac OS X 10.3.9 and 10.4 operating systems support CTA 2.1.
Note
CTA Scripting Interface Feature
The Scripting Interface feature allows software developers to write their own scripts to relay posture information, collected on the system, to CTA. The scripts would perform the equivalent function of a posture plugin. Users will not need this feature unless they intend to write posture scripts.
The Scripting Interface is an optional Feature of CTA.
Installation Files
The installation files for CTA for Mac are contained in the ctaadminex-darwin-2.1.103.0.tar.gz file. That file may be downloaded from Cisco.com. Follow the procedures in "Installing Cisco Trust Agent" for descriptions of the files contained in the ctaadminex-darwin-2.1.103.0.tar.gz file and their uses.
Installing Cisco Trust Agent
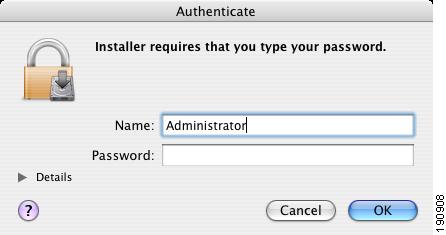
In order to install Cisco Trust Agent you log in as the administrative user on the machine.
General Installation Instructions
Step 1
Step 2
•
•
•
Step 3
Step 4
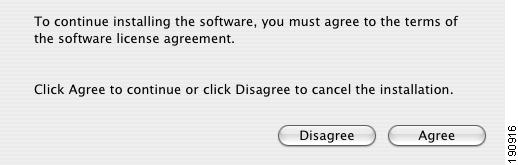
Extracting the Installation Image and Accepting the EULA
After downloading the ctaadminex-darwin-2.1.103.0.tar.gz file from Cisco.com, use this procedure to extract the CTA installation files and accept the end-user license agreement (EULA).
Step 1
Step 2
Step 3
tar zxvf ctaadminex-darwin-2.1.103.0.tar.gz
and press <Return>. The ctaadminex.sh file is extracted and placed in the same directory as the ctaadminex-darwin-2.1.103.0.tar.gz file.
Step 4
Step 5
Step 6
Installing CTA from the Command Line
Step 1
Step 2
Step 3
Step 4
sudo installer -verbose -pkg /Volumes/CiscoTrustAgent/CiscoTrustAgent.mpkg/ -target /Volumes/Macintosh\ /HD
and press <Return>.
Step 5
Step 6
sudo installer -verbose -pkg /Volumes/CiscoTrustAgent/CiscoTrustAgent.mpkg/CiscoTrustAgentSI.pkg/ -target /Volumes/Macintosh\ /HD
and press <Return>. At the end of a successful installation you will see the message, "The install was successful."
Step 7
Step 8
Step 9
Step 10
Installing CTA Using an Installation Wizard
Step 1
Step 2
Step 3
Step 4
Step 5
Step 6
Step 7
Note
Step 8
Step 9
Step 10
Step 11
Step 12
Step 13
Step 14
Step 15
Installing CTA Using a Custom Installation Package
Use this section as an example of how to create a customized CTA installation on Macintosh systems.
The cta-darwin-2.1.103.0.dmg disk image contains the CiscoTrustAgent.mpkg package which you use to install Cisco Trust Agent. The cta-darwin-2.1.103.0.dmg disk image can be modified by adding configuration .ini files, posture plugins, and certificate files to it. This customized Cisco Trust Agent package can be distributed by a software deployment mechanism, such as a script or a software deployment tool.
After the software deployment mechanism distributes the customized cta-darwin-2.1.103.0.dmg disk image to the remote network clients, it runs the CiscoTrustAgent.mpkg package. The CTA installation file copies the contents of the disk image to the proper locations on the remote network client. The software deployment mechanism does not need to recompile the CTA installation file to create a custom installation.
The customization choices in this procedure are optional. However, you will find that including some of these customizations is worthwhile. CTA is not a centrally managed product. If you do not plan to use the product defaults, it is to your benefit to pre-configure all available product settings before deploying CTA.
Please read this entire procedure before beginning. There are options detailed later in the instructions that you should be aware of before beginning.
Creating a Custom Installation Package
Step 1
Step 2
Step 3
Step 4
If your Cisco Secure ACS server uses self-signed certificates, see the Cisco Secure ACS documentation for information about obtaining the certificate; if you use a CA server, refer to your CA server documentation.
Note
Step 5
Step 6
Step 7
Step 8
Step 9
Repairing or Upgrading an Existing CTA Installation
Use this procedure to reinstall CTA or to add the CTA Scripting Interface to an existing CTA installation.
Step 1
Step 2
Step 3
Step 4
Step 5
Step 6
Step 7
Step 8
Step 9
Step 10
Step 11
Step 12
Step 13
Step 14
Step 15
Step 16
Step 17
Verifying Cisco Trust Agent Installation
After Cisco Trust Agent has been installed you will find the following directory structures containing CTA's executable files:
•
•
To verify that the Cisco Trust Agent is running, follow this procedure:
Step 1
Step 2
Step 3
•
•
•
•
If these daemons are not running, try rebooting the system. If the daemons still do not run, try reinstalling the application.
Uninstalling Cisco Trust Agent
There are two uninstallation procedures for CTA. You may uninstall CTA and the Scripting Interface or you may uninstall the Scripting Interface alone.
Uninstalling CTA and the CTA Scripting Interface
Step 1
Step 2
Step 3
sudo ./cta_uninstall.sh
Step 4
Step 5
After Cisco Trust Agent has been successfully uninstalled, you receive the message, "Cisco Trust Agent has been successfully uninstalled."
Note
Uninstalling Only the CTA Scripting Interface
Step 1
Step 2
Step 3
sudo ./cta_uninstall.sh --SI
Step 4
Step 5
Step 6