-
Administrator Guide for Cisco Trust Agent, Release 2.1, With Bundled Supplicant
-
Title page
-
Table of Contents
-
Preface
-
Cisco Trust Agent Overview
-
Installing the Cisco Trust Agent on Linux Operating Systems
-
Installing the Cisco Trust Agent on Macintosh Operating Systems
-
Installing the Cisco Trust Agent on Windows Operating Systems
-
Configuring Cisco Trust Agent
-
Cisco Trust Agent Event Logging
-
Posture Plugins
-
Cisco Trust Agent's Use of Certificates
-
Cisco Trust Agent 802.1x Wired Client
-
Cisco Trust Agent 802.1x Wired Client Logging
-
Using the Scripting Interface
-
ctastat Diagnostic Tool
-
Altnerative Methods of Installing CTA
-
Open Source License Acknowledgement
-
Index
-
 Feedback
Table Of Contents
Installing the Cisco Trust Agent on Windows Operating Systems
System Requirements for Installation
Optional Features You Can Install with CTA
General Installation Instructions
Installing CTA Using MSI Commands
Creating a Log File While Installing CTA
Installing Optional Features During CTA Installation
Specifying Installation Directory
Installing CTA Using an Installation Wizard
Installing CTA Using a Custom Installation Package
Install CTA and 802.1x Wired Client on the Administrator's Client
Create the Custom Installation Directory Structure
Customize the Installation Directory
Run the CTA Installation File to Install the Custom Package
Upgrading to Cisco Trust Agent, Release 2.1
Upgrading from Cisco Trust Agent, Release 1.0
Upgrading from Cisco Trust Agent, Release 2.0.0.30
Upgrading from Cisco Trust Agent, Release 2.0.1
Upgrading from CTA 2.1 Selective Availability and Beta Releases to CTA 2.1.103.0
Verifying the Cisco Trust Agent Installation
Uninstalling Cisco Trust Agent on Windows
Installing the Cisco Trust Agent on Windows Operating Systems
This chapter provides system requirement and installation information for installing Cisco Trust Agent (CTA) on Windows operating systems. Read this entire chapter before beginning the installation. There are advanced installation options detailed later in this chapter that you may want to use. For example, before deploying CTA on your network, you can create a custom installation package which allows you to set CTA configuration parameters and provision certificates, and posture plug-ins. Proceeding in this manner could save you configuration time during the CTA deployment process.
See these other chapters for installation instructions for different operating systems:
•
Chapter 2, "Installing the Cisco Trust Agent on Linux Operating Systems."
•
This chapter contains the following sections:
•
•
–
–
–
–
•
–
–
–
–
•
•
System Requirements for Installation
Before installing Cisco Trust Agent on a Windows operating system, verify that the target system meets the requirements in Table 4-1.
Note
Table 4-1 CTA System Requirements
System
•
•
Windows Installer (MSI)
Version 2.0 or later.
Free Hard Disk Space
20 MB minimum
Memory
256 MB of RAM
Listening Port
By default, Cisco Trust Agent listens on UDP port 21862.
You can change this port number, if necessary. See the "Configuring EAP over UDP Communication" section on page 5-12.
Windows Operating Systems on which CTA 2.1 and the CTA 802.1x Wired Client Run
•
•
•
Additional Windows operating systems on which CTA 2.1 runs but that do not support CTA 802.1x Wired Client
Windows XP Home, SP1, SP2, and SP3
Language Support for localized operating systems
All available localized versions of these operating systems support this release of CTA.
Note
•
•
•
•
Optional Features You Can Install with CTA
Windows provides several options for packaging and deploying Cisco Trust Agent. CTA may be packaged with or without the Cisco Trust Agent 802.1x Wired Client (802.1x Wired Client) and Scripting Interface features.
CTA 802.1x Wired Client
CTA can be installed with or without the CTA 802.1x Wired Client feature. The 802.1x Wired Client is CTA's "supplicant." The 802.1x Wired Client sends posture and authentication information, collected by CTA, over the IEEE 802.1x transport protocol through 802.1x-enabled access devices (the Ethernet switch) to the Cisco Secure Access Control Server (ACS). Only after successful client-server authentication will the port access control on the Ethernet switch allow the end-user to connect to the network.
If the NAC deployment in your enterprise uses network routers, or if your network switches communicate with CTA using the EAPoverUDP protocol, you do not need to install CTA with the 802.1x Wired Client.
Note
For more information about the CTA 802.1x Wired client, see Chapter 9, "Cisco Trust Agent 802.1x Wired Client".
CTA Scripting Interface
The Scripting Interface feature allows software developers to write their own scripts to relay posture information, collected on the system, to CTA. The scripts would perform the equivalent function of a posture plugin. Users will not need this feature unless they intend to write posture scripts.
The Scripting Interface is an optional Feature of CTA.
Installation Files
These are the two installation files for the CTA 2.1.103.0 release for Windows:
•
•
Note
•
•
CtaAdminEx-win-2.1.103.0.exe contains the CTA end-user license agreement (EULA) and the ctasetup-win-2.1.103.0.msi installation file. By running the CtaAdminEx-win-2.1.103.0.exe file, you accept the EULA for all users and extract the ctasetup-win-2.1.103.0.msi installation file. You use the ctasetup-win-2.1.103.0.msi file to install CTA using standard MSI commands. You can use the ctasetup-win-2.1.103.0.msi file to install the CTA Scripting Interface feature, however, you can not use the file to install the 802.1x Wired Client feature.
CtaAdminex-supplicant-win-2.1.103.0.exe contains the EULA and the ctasetup-supplicant-win-2.1.103.0.msi installation file. By running the CtaAdminEx-supplicant-win-2.1.103.0.exe file, you accept the EULA for all users and extract the ctasetup-supplicant-win-2.1.103.0.msi installation file. By default, the ctasetup-supplicant-win-2.1.103.0.msi file installs Cisco Trust Agent with the CTA 802.1x Wired Client and provides an option to install Scripting Interface feature. If you do not intend to install the CTA 802.1x Wired Client on some end-points, that feature may also be suppressed using standard MSI commands.
Installing Cisco Trust Agent
Cisco Trust Agent installation files are standard Microsoft Windows Installation (MSI) files. Once deployed to the end-point, you can use standard MSI commands to install CTA silently, without user-interaction, or allow users to perform the installation using an installation wizard.
Note
General Installation Instructions
This is the outline of tasks required to install Cisco Trust Agent.
Step 1
Step 2
Step 3
See the "Installing CTA Using MSI Commands" section and "Installing CTA Using an Installation Wizard" section for descriptions of the different installation methods.
Step 4
Step 5
Installing CTA Using MSI Commands
Standard MSI commands can be passed to the Microsoft Windows Installer through command-line options. These commands determine what features to install as well as the level of user interaction.
This section describes the most common MSI commands.
Note
•
•
•
•
Installation Command
To install CTA using MSI command line options, you must know the name and path of the ctasetup-2.1.103.0.msi installation file and use the "/I" option with the Msiexec.exe command. The command can be entered from any prompt. See the following example:
Msiexec.exe /I "C:\Path_To_MSI\ctasetup-2.1.103.0.msi"
This command installs CTA using an installation wizard. Users accept the EULA, choose what features to install, and the installation directory.
Uninstallation Command
To uninstall the CTA using MSI command line options, you must know CTA's ProductCode or "GUID."
To find the GUID, follow this procedure:
Step 1
Step 2
The value of the ProductCode registry key, including the curly brackets, is the GUID.
To uninstall Cisco Trust Agent, use the /X option with Msiexec.exe command. The command can be entered from any prompt. See the following example:
Msiexec.exe /X {GUID}Reinstalling or Repairing CTA
To reinstall or repair CTA from using MSI command line options, run the MSI installation file using the MSI "/F" option. The full command can be run from any prompt. See the following example:
Msiexec.exe /fmosu "C:\Path_To_MSI\ctasetup-2.1.103.0.msi"The /fmosu argument performs these actions:
f - Reinstalls package
m - Rewrites all required computer-specific registry entries.
o - Reinstalls if file is missing or if an older version is installed.
s - Overwrites all existing shortcuts.
u - Rewrites all required user specific registry entries
Using this command users see messages asking them to wait while CTA is being configured.
Creating a Log File While Installing CTA
To create a log file during installation, run the MSI installation file using the MSI "/L" option. The full command can be entered from any prompt. This logging option requires that the log directory exist and is writable. The log file itself may not exist but the file name must be specified in the command.
See the following example:
Msiexec.exe /I "C:\Path_To_MSI\ctasetup-win-2.1.103.0.msi" /L*V
"C:\ctalogfile.txt"
The /L*V option performs these actions:
L - Creates a log file
*V - Specifies verbose logging.
Installing Optional Features During CTA Installation
The ADDLOCAL option allows you to specify which features will be installed along with CTA.
The ctasetup-win-2.1.103.0.msi installs CTA by default. Using the ADDLOCAL command you can install the CTA Scripting Interface as well.
The ctasetup-supplicant-win-2.1.103.0.msi installs CTA and the CTA 802.1x Wired Client by default. However, when using the ADDLOCAL command, CTA is installed but the CTA 802.1x Wired Client interface is not installed by default. When using the ADDLOCAL command you must specify if you are installing either or both the CTA 802.1x Wired Client feature or CTA Scripting Interface feature.
When using the ADDLOCAL command the Scripting Interface features is referred to as "Scripting_Interface" and the CTA 802.1x Wired Client feature is referred to as "8021x_Wired_Client."
This example shows using the ADDLOCAL option to install only the Scripting Interface feature and not the CTA 802.1x Wired Client feature:
Msiexec.exe /I "C:\Path_To_MSI\ctasetup-supplicant-win-2.1.103.0.msi"
ADDLOCAL=Scripting_Interface
This example shows using the ADDLOCAL command to install only the CTA 802.1x Wired Client feature and not the Scripting Interface feature:
Msiexec.exe /I "C:\Path_To_MSI\ctasetup-supplicant-win-2.1.103.0.msi"
ADDLOCAL=8021x_Wired_Client
These examples show using the ADDLOCAL command to install both features. These examples would be entered on one line.
Note
Msiexec.exe /I "C:\Path_To_MSI\ctasetup-supplicant-win-2.1.103.0.msi"
ADDLOCAL=Scripting_Interface,8021x_Wired_Client
Msiexec.exe /i "C:\Path_To_MSI\ctasetup-supplicant-win-2.1.103.0.msi" ADDLOCAL=ALL
Note
Specifying Installation Directory
By default, ctasetup-2.1.103.0.msi installation files install CTA in the "\ProgramFiles\Cisco Systems\" directory of the local drive. You can use the "INSTALLDIR" MSI command to specify a different directory. The directory does not have to exist before you issue the command. See the following example:
Msiexec.exe /I "C:\Path_To_MSI\ctasetup-2.1.103.0.msi"
INSTALLDIR="D:\NewDirectory"
This command shows users the installation wizard. During the installation, users will still have an opportunity to change the destination directory.
Specifying Reboot Options
By default the Microsoft Windows Installer determines when a reboot of the system is necessary and automatically prompts the user to reboot at the end of the installation. You can customize this action by using the Microsoft Windows Installer property called "REBOOT." This property forces or suppresses certain system prompts for a reboot. The behavior of the REBOOT option also depends on whether the end-user is following an installation wizard or the installation is being performed silently.
The REBOOT property has three options:
•
•
•
This is an example of using the REBOOT property with the Force option:
Msiexec.exe /I "C:\ctasetup-supplicant-win-2.1.103.0.msi" REBOOT=Force
Setting User Interface Mode
By default, CTA's MSI files provide the users with an installation wizard. Using various MSI commands, you can control how much the user is involved in the CTA's installation.
For a full description of how the installation wizard works, see the "Installing CTA Using an Installation Wizard" section.
These command options specify the amount of end-user interaction with the CTA installation:
Table 4-2 User Interface MSI Command Line Options
Tip
Msiexec.exe /I "C:\ctasetup-2.1.103.0.msi" ADDLOCAL=Scripting_Interface /L*V "C:\logfile.txt" /qb+
Installing CTA Using an Installation Wizard
This section describes installing CTA and its other features by following an installation wizard. The You must have administrator privileges on the network client to install CTA.
Note
Step 1
Step 2
Step 3
Figure 4-1 The Cisco Trust Agent Installation Wizard
Step 4
Figure 4-2 The License Agreement on Windows
Step 5
Figure 4-3 The Destination Window
Step 6
a.
b.
Step 7
Figure 4-4 Selecting an Installation Type
Selecting Typical will install the default features included in the installation file. If you are running a ctasetup file which includes the 802.1x Wired Client, that feature will be installed. The Scripting Interface is an optional feature and it is not installed during a Typical installation.
Selecting Complete installation will install all features available in the installation file. If you are running a ctasetup file which includes the 802.1x Wired Client, that feature will be installed. The Scripting Interface will also be installed during a Complete installation.
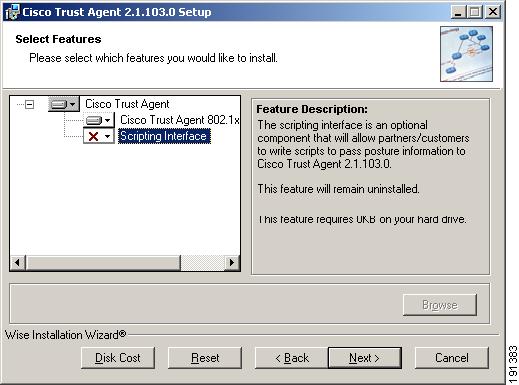
Selecting Custom installation will allow you to include or exclude any features available with the installation file. Figure 4-5 shows how you can select the features to install during a Custom installation. You can see that the Scripting Interface is not installed by default when you click Custom.
Figure 4-5 Choose Application Features
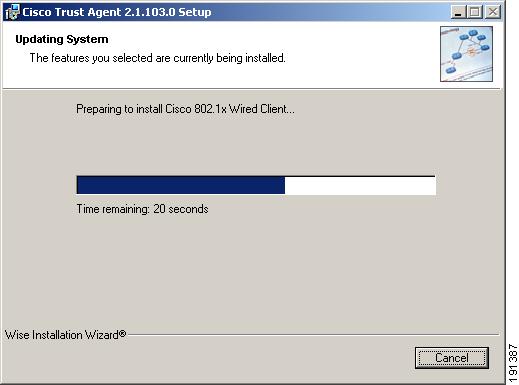
After choosing an installation type and selecting CTA features, click Next. The Installing the Application window opens as shown in Figure 4-6.
Figure 4-6 Installing the Application
Step 8
Figure 4-7 The System is Being Updated
When the installation is completed, the installer displays the Installation Completed window as shown in Figure 4-8.
Figure 4-8 The Installation is Complete
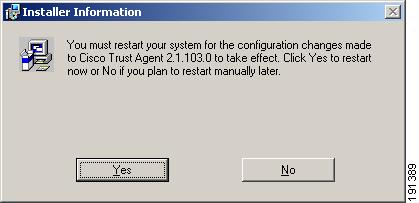
Step 9
•
Figure 4-9 Restart after Installation
•
Step 10
Installing CTA Using a Custom Installation Package
Use this section as an example of how to create a customized CTA installation on a Windows operating system.
The CTA install application is a single executable file. To create a custom installation package, you create a directory structure which includes the desired CTA installation file, .ini files, plugin subdirectories and certificate subdirectories. This directory structure can then be distributed by a software deployment mechanism, such as a script or a software deployment tool.
After the software deployment mechanism distributes the directory structure to the remote network clients, it runs the CTA installation file with the desired MSI command line options. The CTA installation file copies the contents of the directory structure to the proper locations on the remote network client. The software deployment mechanism does not need to recompile the CTA installation file to create a custom installation.
Please read this entire procedure before beginning. There are options detailed later in the instructions that you should be aware of before beginning.
There are three procedures you need to follow to create a custom installation package:
Step 1
Step 2
Step 3
Step 4
Install CTA and 802.1x Wired Client on the Administrator's Client
Before you create the custom installation package, install CTA and the 802.1x Wired client on the client you will use to create the custom installation package. This will install the template ctad.ini file, give you ready-access to the 802.1x Wired Client for when you create the authentication policies, and familiarize you with CTA's installation process. Use the "Installing CTA Using an Installation Wizard" section to install CTA and the 802.1x Wired Client.
Create the Custom Installation Directory Structure
For the sake of this and the following two procedures, we describe installing CTA along with the 802.1x Wired Client (the supplicant). To create a custom installation of CTA without the 802.1x Wired Client, the instructions would be the same except that you would start with the CtaAdminEx-win-2.1.103.0.exe file.
Step 1
Step 2
Step 3
Step 4
D:\CTA>CtaAdminEx-supplicant-win-2.1.103.0.exe -p D:\CTA\Custom_Package
Note
Note
Step 5
Step 6
Customize the Installation Directory
The customization choices in this procedure are optional. However, you will find that including some of these customizations is worthwhile. CTA is not a centrally managed product. If you do not plan to use the product defaults, it is to your benefit to pre-configure all available product settings before deploying CTA.
Step 1
Copy the root certificate for your Cisco Secure ACS server to this directory. During installation, any certificates in this directory are added to the systems root certificate store.
If your Cisco Secure ACS server uses self-signed certificates, see the Cisco Secure ACS documentation for information about obtaining the certificate; if you use a CA server, refer to your CA server documentation.
Note
Step 2
Copy any third-party plugins that you want to provision at installation time into this directory.
Step 3
Step 4
Step 5
a.
b.
Step 6
Run the CTA Installation File to Install the Custom Package
For the sake of this procedure, we assume that the custom package is deployed to the appropriate network clients by a software deployment mechanism such as a software deployment tool or script.
Note
Step 1
Step 2
Here are two different examples of the CTA installation:
Run the CTA installation file as it is. This installs CTA, the 802.1x Wired Client, and your customizations. To do so, the software deployment mechanism would run the following commands:
a.
b.
C:\Temp\Custom_Package>ctasetup-supplicant-win-2.1.103.0.msiRun the CTA installation file with MSI command line options. The command in the procedure installs CTA with the Scripting Interface and CTA 802.1x Wired Client features, it logs the installation and stores the log file in "C:\Custom_Package\logfile.txt, and it is silent installation.
a.
b.
C:\Temp\Custom_Package>Msiexec.exe /I ctasetup-supplicant-win-2.1.103.0.msi
ADDLOCAL=Scripting_Interface,8021x_Wired_Client /L*V "C:\Custom_Package\logfile.txt" /qn
Note
Upgrading to Cisco Trust Agent, Release 2.1
Cisco Trust Agent supports upgrade installations from versions 1.0, 2.0, 2.0.1, and Selective Availability and Beta 2.1 releases to CTA 2.1.103.
The behavior of an upgrade reflects the kind of installation being used. If the upgrade is performed using an installation wizard, CTA 2.1.103.0 recognizes the previous installation of CTA and prompts users to upgrade. In the case of a silent installation, it is assumed that the user intends to perform an upgrade and the installation proceeds without prompting the user.
Note
In the case of a silent upgrade, administrators should use MSI commands which limit interruptions to users but still prompt users to reboot their computers at the end of the software upgrade.
When upgrading a version of CTA without the CTA 802.1x Wired Client to the latest version of CTA without the CTA 802.1x Wired Client, you are not required to reboot the computer for the upgrade to take affect. There is no loss of network connectivity during the upgrade process.
Upgrading from Cisco Trust Agent, Release 1.0
During an upgrade installation of CTA from 1.0 to CTA 2.1, existing certificates remain in the certificate store in which they were installed during the CTA 1.0 installation. Posture plugins and the ctalogd.ini file are moved to their new location in the CTA 2.1.103.0 directory structure. The ctad.ini file used in CTA 1.0 remains in the directory in which it was originally installed and CTA 2.1.103.0 recognizes the file in its original location.
Upgrading from Cisco Trust Agent, Release 2.0.0.30
During an upgrade installation of CTA from 2.0.0.30 to CTA 2.1.103.0, certificates, third-party posture plugins, ctad.ini, ctalogd.ini, and log files remain in the directories in which they were installed and they are used by CTA 2.1.103.0.
During an upgrade installation of CTA from 2.0.0.30 to CTA 2.1.103.0, where the 802.1x Wired Supplicant is also being upgraded, certificates, third-party posture plugins, ctad.ini, ctalogd.ini, and log files remain in the directories in which they were installed and they are used by CTA 2.1.103.0
Deployment profile files used by the 802.1x Wired Client in CTA 2.0.0.30 are not compatible with those used by the 802.1x Wired Client in CTA 2.1.103.0. The deployment profile files that define user and machine authentication requirements will need to be recreated and reinstalled after an upgrade from CTA 2.0 with the 802.1x Wired Client to CTA 2.1 with the 802.1x Wired Client.
During an upgrade from CTA 2.0 with the 802.1x Wired Client to CTA 2.1 with the 802.1x Wired Client the \Program Files\Cisco Systems\Cisco Trust Agent 802_1x Wired Client directory and all of its contents are deleted and replaced with the upgraded CTA 802.1x Wired Client software.
Note
For instructions on how to deploy end-user 802.1x Wired Clients which are compatible with Cisco Trust Agent 2.1.103.0, see "Deploying End-User 802.1x Wired Clients" section on page 9-35.
Upgrading from Cisco Trust Agent, Release 2.0.1
Cisco Trust Agent 2.0.1 was a release supported on Windows XP platforms only. During an upgrade installation of CTA from 2.0.1 to CTA 2.1, certificates, third-party posture plugins, ctad.ini, ctalogd.ini, and log files remain in the directories in which they were installed and they are used by CTA 2.1.
During an upgrade installation of CTA from 2.0.1 to CTA 2.1, where the 802.1x Wired Supplicant is also being upgraded, certificates, third-party posture plugins, ctad.ini, ctalogd.ini, log files, and the deployment profile files remain in the directories in which they were installed and they are used by CTA 2.1. These deployment profile files are stored here:
•
•
For more information about the deployment profile files see, "Understanding Policies and Profiles" section on page 9-24.
Upgrading from CTA 2.1 Selective Availability and Beta Releases to CTA 2.1.103.0
Some customers of Cisco's Network Admission Control program participated in testing "selective availability" or "limited availability" releases and Beta releases of CTA 2.1 to test its functionality in their NAC environments.
These builds, numbered 2.1.18.0, 2.1.100.0, 2.1.101.0, and 2.1.102.0 may be upgraded to CTA 2.1.103.0 without being uninstalled first. The certificates, third-party posture plugins, ctad.ini, ctalogd.ini, log files, and the deployment profile files remain in the directories in which they were installed and they are used by CTA 2.1.103.0.
Verifying the Cisco Trust Agent Installation
After Cisco Trust Agent has been installed you will find the following directory structures containing CTA's executable files:
•
•
If you installed the CTA 802.1x Wired Client along with CTA you will also find the \Program Files\Cisco Systems\Cisco Trust Agent 802_1x Wired Client directory.
After installing CTA, to verify that CTA is running, follow this procedure:
Step 1
Step 2
Step 3
Current Service Names:
•
•
•
•
If you installed the CTA 802.1x Wired Client (the supplicant) then you should also see these services running.
•
•
If these services are not running, try rebooting the system and checking again. If the services still do not run, try reinstalling the application.
Uninstalling Cisco Trust Agent on Windows
To uninstall Cisco Trust agent, follow these steps:
Step 1
Step 2
Step 3
A confirmation dialog box appears.
Step 4
Note