-
Cisco Prime Access Registrar 6.1 User Guide
-
Preface
-
Overview
-
Using the aregcmd Commands
-
Using the Graphical User Interface
-
Cisco Prime Access Registrar Server Objects
-
Using the radclient Command
-
Configuring Local Authentication and Authorization
-
RADIUS Accounting
-
Diameter
-
Extensible Authentication Protocols
-
Using WiMAX in Cisco Prime Access Registrar
-
Using Extension Points
-
Using Replication
-
Using On-Demand Address Pools
-
Using Identity Caching
-
Using Trusted ID Authorization with SESM
-
Using Prepaid Billing
-
Using Cisco Prime Access Registrar Server Features
-
Directing RADIUS Requests
-
Using FastRules to Process Packet Flow
-
Wireless Support
-
Using LDAP
-
Using Open Database Connectivity
-
SIGTRAN-M3UA
-
Using SNMP
-
Enforcement of Licensing Models
-
Backing Up the Database
-
Using the REX Accounting Script
-
Logging Syslog Messages
-
Troubleshooting Cisco Prime Access Registrar
-
Cisco Prime Access Registrar Tcl, REX and Java Dictionaries
-
Environment Dictionary
-
RADIUS Attributes
-
Glossary
-
Index
-
 Feedback
Table Of Contents
Advertising Application Support
Diameter EAP Conversation Flow
Terminating Diameter User Session
Configuring Authentication and Authorization for Diameter
Configuring Local Authentication and Authorization
Configuring a Local Service and UserList
Configuring External Authentication Service
Configuring Diameter Accounting
Understanding Diameter Accounting
Diameter Accounting Log Examples
Trace of Successful Accounting
Configuring the Diameter Application in Prime Access Registrar
Configuring the Transport Management Properties
Configuring the Diameter Peers
Configure the Diameter Service
Writing Diameter Application in Prime Access Registrar
Configuring rex script/service for Diameter
Diameter Environment Variables
Translation Framework for Diameter
Support for SCTP including Multihoming
Diameter
Diameter is a networking protocol which is derived from RADIUS protocol. It is considered to be the next generation Authentication, Authorization, and Accounting (AAA) protocol. This is the other core protocol used in the IP Multimedia Subsystem (IMS) architecture for IMS Entities to exchange AAA related information. Cisco Prime Access Registrar (Prime Access Registrar) supports Diameter Applications based on the Diameter Base Protocol defined in RFC 6733.
Diameter is composed of a base protocol and a set of applications which allows it to extend its services to new access technologies. The base protocol provides basic mechanisms for reliable transport, message delivery, and error handling. Each application is defined by an application identifier and associated with commands. Each command is defined with mandatory Attribute Value Pairs (AVPs) and non-mandatory AVPs including vendor-specific AVPs.
The base protocol must be used in conjunction with a Diameter application. Each application relies on the services of the base protocol to support a specific type of network access.
The following is the list of applications supported by Prime Access Registrar:
•
Diameter Network Access Server Application (NASREQ, RFC 4005)
•
•
This chapter contains the following sections:
•
•
•
•
•
•
Diameter with EAP Support
The Extensible Authentication Protocol (EAP), is an authentication framework which supports multiple authentication mechanisms. EAP may be used on dedicated links, switched circuits, and wired as well as wireless links. For more information on EAP support in Prime Access Registrar, see Chapter 9 "Extensible Authentication Protocols."
Prime Access Registrar supports Diameter EAP application that carries EAP packets between a Network Access Server (NAS) working as an EAP Authenticator and a back-end authentication server. The Diameter EAP application is based on the Diameter Network Access Server Application [NASREQ] and is intended for environments similar to NASREQ.
In the Diameter EAP application, authentication occurs between the EAP client and its home Diameter server. This end-to-end authentication reduces the possibility for fraudulent authentication, such as replay and man-in-the-middle attacks. End-to-end authentication also provides a possibility for mutual authentication, which is not possible with PAP and CHAP in a roaming PPP environment.
This topic contains the following sections:
•
•
Advertising Application Support
Diameter nodes conforming to this specification must advertise support by including the Diameter EAP Application ID value of 5 in the Auth-Application-Id AVP of the Capabilities-Exchange-Request and Capabilities-Exchange-Answer command [BASE].
If the NAS receives a response with the Result-Code set to DIAMETER_APPLICATION_UNSUPPORTED [BASE], it indicates that the Diameter server in the home realm does not support EAP. If possible, the access device may attempt to negotiate another authentication protocol, such as PAP or CHAP. An access device must be cautious when determining whether a less secure authentication protocol will be used, since this could result from a downgrade attack.
Diameter EAP Conversation Flow
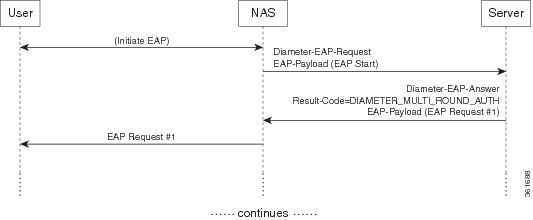
The EAP conversation between the authenticating peer and the access device begins with the initiation of EAP within a link layer, such as PPP [RFC1661] or IEEE 802.11i [IEEE-802.11i]. Once EAP has been initiated, the access device will typically send a Diameter-EAP- Request message with an empty EAP-Payload AVP to the Diameter server, signifying an EAP-Start. Prime Access Registrar routes the message to the Diameter EAP service through the rules and policy engine (and/or client, server and vendor scripting point) through which the packet is processed. The Diameter EAP Service forms a Diameter-EAP-Answer message containing an EAP-Payload AVP that includes an encapsulated EAP packet. The Result-Code AVP in the message will be set to DIAMETER_MULTI_ROUND_AUTH, signifying that a subsequent request is expected.
Figure 8-1 describes the Diameter EAP request flow.
Figure 8-1 Diameter EAP Request Flow
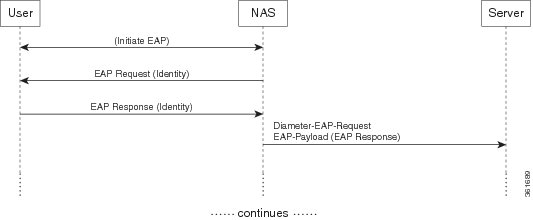
The access device issues the EAP-Request/Identity message to the EAP client, and forwards the EAP-Response/Identity packet, encapsulated within the EAP-Payload AVP, as a Diameter-EAP-Request to Prime Access Registrar as shown in Figure 8-2. This reduces the number of Diameter message round trips.
Figure 8-2 Diameter EAP Response Flow
The conversation continues until the Diameter server sends a Diameter-EAP-Answer with a Result-Code AVP indicating success or failure, and an optional EAP-Payload. The Result-Code AVP is used by the access device to determine whether service is to be provided to the EAP client or not. The access device must not rely on the contents of the optional EAP-Payload to determine whether service is to be provided or not.
Diameter Server Startup Log
When Prime Access Registrar starts, Diameter server also starts.
The log file shows the following:
09/30/2013 6:38:47.419 name/radius/1 Info Server 0 Diameter Server Started09/30/2013 6:38:47.437 name/radius/1 Info Protocol 0 Starting diameter core09/30/2013 6:38:47.447 name/radius/1 Info Protocol 0 Product : Cisco Prime Access Registrar09/30/2013 6:38:47.447 name/radius/1 Info Protocol 0 Version : 609/30/2013 6:38:47.447 name/radius/1 Info Protocol 0 Vendor Id : 009/30/2013 6:38:47.447 name/radius/1 Info Protocol 0 Auth Application : 009/30/2013 6:38:47.447 name/radius/1 Info Protocol 0 Auth Application : 109/30/2013 6:38:47.447 name/radius/1 Info Protocol 0 Acct Application : 309/30/2013 6:38:47.447 name/radius/1 Info Protocol 0 Dictionary : /cisco-ar/conf/diadictionary.xml09/30/2013 6:38:47.447 name/radius/1 Info Protocol 0 Identity : 10.81.79.4309/30/2013 6:38:47.447 name/radius/1 Info Protocol 0 Realm : abc.com09/30/2013 6:38:47.447 name/radius/1 Info Protocol 0 TCP Listen : 386809/30/2013 6:38:47.447 name/radius/1 Info Protocol 0 SCTP Listen : 386809/30/2013 6:38:47.447 name/radius/1 Info Protocol 0 Watch-Dog timeout : 50009/30/2013 6:38:47.447 name/radius/1 Info Protocol 0 Use IPv6 : 009/30/2013 6:38:47.447 name/radius/1 Info Protocol 0 Re-transmission Int : 809/30/2013 6:38:47.447 name/radius/1 Info Protocol 0 Max Re-trans Int : 309/30/2013 6:38:47.447 name/radius/1 Info Protocol 0 Recv Buffer Size : 2048009/30/2013 6:38:47.448 name/radius/1 Info Protocol 0 Hostnames Used : 10.81.79.4309/30/2013 6:38:47.448 name/radius/1 Info Protocol 0 Dumping Peer Table09/30/2013 6:38:47.448 name/radius/1 Info Protocol 0 Expire Time 109/30/2013 6:38:47.448 name/radius/1 Info Protocol 0 Peer : Host = 10.77.240.54, Port = 3868, AdvertiseHostName = , AdvertisedRealm = , TLS = 009/30/2013 6:38:47.448 name/radius/1 Info Protocol 0 Peer : Host = 10.77.240.53, Port = 3868, AdvertiseHostName = , AdvertisedRealm= , TLS = 009/30/2013 6:38:47.448 name/radius/1 Info Protocol 0 Dumping Route Table09/30/2013 6:38:47.448 name/radius/1 Info Protocol 0 Exp Time : 009/30/2013 6:38:47.448 name/radius/1 Info Protocol 0 Route : Realm = dia.com, Action = 2, Redirect-Usage = 009/30/2013 6:38:47.448 name/radius/1 Info Protocol 0 Application Id=1, Vendor=009/30/2013 6:38:47.449 name/radius/1 Info Protocol 0 Server = 10.77.240.53, metric = 209/30/2013 6:38:47.449 name/radius/1 Info Protocol 0 Auth Stateful Auth : stateful09/30/2013 6:38:47.449 name/radius/1 Info Protocol 0 Auth Session(T) : 3009/30/2013 6:38:47.449 name/radius/1 Info Protocol 0 Auth Lifetime(T) : 36009/30/2013 6:38:47.449 name/radius/1 Info Protocol 0 Auth Grace(T) : 3009/30/2013 6:38:47.450 name/radius/1 Info Protocol 0 Auth Abort(T) : 2009/30/2013 6:38:47.450 name/radius/1 Info Protocol 0 Acct Session(T) : 3009/30/2013 6:38:47.450 name/radius/1 Info Protocol 0 Acct Interim Int : 509/30/2013 6:38:47.450 name/radius/1 Info Protocol 0 Acct Real-Time : 009/30/2013 6:38:47.450 name/radius/1 Info Protocol 0 Debug Log : enabled09/30/2013 6:38:47.450 name/radius/1 Info Protocol 0 Trace Log : enabled09/30/2013 6:38:47.450 name/radius/1 Info Protocol 0 Info Log : enabled09/30/2013 6:38:47.450 name/radius/1 Info Protocol 0 Console Log : enabled09/30/2013 6:38:47.450 name/radius/1 Info Protocol 0 Syslog Log : disabledDiameter Stack Level Messages
The following are the stack level messages that are exchanged between the diameter peers:
•
Capabilities Exchange Message
When Diameter peers establish a transport connection to Prime Access Registrar, they will exchange the Capabilities Exchange messages. This message allows the discovery of a peer's identity and its capabilities (protocol version number, supported Diameter applications, security mechanisms, etc.)
The log file shows the following:
12/03/2013 7:16:07.117 name/radius/1 Info Server 0 Starting Server12/03/2013 7:16:07.308 name/radius/1 Info Server 0 RollingEncryption using new key 2712/03/2013 7:16:07.329 name/radius/1 Info Server 0 Sticky Sessions BGwrite thread activated12/03/2013 7:16:07.491 name/radius/1 Info Server 0 RollingEncryption using new key 2712/03/2013 7:16:07.535 name/radius/1 Info Server 0 Sticky Session Count BG thread activated.12/03/2013 7:16:07.564 name/radius/1 Info Server 0 Starting Interface 127.0.0.1, port 1812 (RADIUS Access)12/03/2013 7:16:07.564 name/radius/1 Info Server 0 Starting Interface 127.0.0.1, port 1813 (RADIUS Accounting)12/03/2013 7:16:07.564 name/radius/1 Info Server 0 Starting Interface 127.0.0.1, port 49 (TACACS+)12/03/2013 7:16:07.564 name/radius/1 Info Server 0 Starting Interface 127.0.0.1, port 3868 (Diameter-TCP)12/03/2013 7:16:07.564 name/radius/1 Info Server 0 Starting Interface 127.0.0.1, port 3868 (Diameter-SCTP)12/03/2013 7:16:07.564 name/radius/1 Info Server 0 Starting Interface 10.77.247.110, port 1812 (RADIUS Access)12/03/2013 7:16:07.565 name/radius/1 Info Server 0 Starting Interface 10.77.247.110, port 1813 (RADIUS Accounting)12/03/2013 7:16:07.565 name/radius/1 Info Server 0 Starting Interface 10.77.247.110, port 49 (TACACS+)12/03/2013 7:16:07.565 name/radius/1 Info Server 0 Starting Interface 10.77.247.110, port 3868 (Diameter-TCP)12/03/2013 7:16:07.565 name/radius/1 Info Server 0 Starting Interface 10.77.247.110, port 3868 (Diameter-SCTP)12/03/2013 7:16:07.565 name/radius/1 Info Server 0 Starting IPv6 Interface ::1, port 1812 (RADIUS Access)12/03/2013 7:16:07.565 name/radius/1 Info Server 0 Starting IPv6 Interface ::1, port 1813 (RADIUS Accounting)12/03/2013 7:16:07.565 name/radius/1 Info Server 0 Starting IPv6 Interface ::1, port 49 (TACACS+)12/03/2013 7:16:07.565 name/radius/1 Error Configuration 0 Interface fe80::20c:29ff:fe0b:6ed0: af_bind() to port 1812 failed with -214741809012/03/2013 7:16:07.565 name/radius/1 Error Server 0 Failed to start IPv6 Interface fe80::20c:29ff:fe0b:6ed0, port 1812 (RADIUS Access)12/03/2013 7:16:07.565 name/radius/1 Info Server 0 Starting Replication Manager12/03/2013 7:16:07.565 name/radius/1 Info Server 0 Replication Disabled12/03/2013 7:16:07.566 name/radius/1 Info Server 0 SNMP is disabled12/03/2013 7:16:07.567 name/radius/1 Info Server 0 Memory limit for Radius process is activated12/03/2013 7:16:07.567 name/radius/1 Info Server 0 Server Started Successfully (pid: 5889)12/03/2013 7:16:50.235 name/radius/1 Info System 0 Trace level set to 512/03/2013 7:16:58.572 name/radius/1 Info Server 0 Received CER from 10.77.240.5412/03/2013 7:16:58.572 name/radius/1 Info Server 0 CER is succeeded and CEA is sent to 10.77.240.54Watchdog Message
The Device-Watchdog-Request and Device-Watchdog-Answer messages are used to proactively detect transport failures. Device Watchdog message time interval is configurable in Prime Access Registrar.
The log file shows the following:
10/07/2013 10:44:15.143: Log: Watchdog msg from [thomas.cisco.com.cisco1.com],
state=1254936955, time=1254937455.
Terminating Diameter User Session
In Prime Access Registrar, Diameter Session management is independent of Diameter accounting. Session termination is conveyed by a specific Session-Termination message rather than an Accounting Stop message.
The log file shows the following:
10/07/2013 10:37:39.299: Log: *** Session termination request received ***10/07/2013 10:37:39.299: Log: Session id=thomas.cisco.com.cisco1.com;{;H;10/07/2013 10:37:39.299: Log: From Host: thomas.cisco.com10/07/2013 10:37:39.299: Log: From Realm: cisco1.com10/07/2013 10:37:39.299: Log: From User: invaliduser10/07/2013 10:37:39.299: Log: Termination Cause: 500310/07/2013 10:37:39.299: Log: Auth Application Id: 110/07/2013 10:37:39.300: Log: Session disconnect for Session-Id: thomas.cisco.com.cisco1.com;1254936955;124122
Note
Configuring Authentication and Authorization for Diameter
This section describes how to configure Prime Access Registrar to perform authentication and authorization and how to configure a local service and userlist.
See Table 4-7 for more information on Diameter client properties.
This section contains the following topics:
•
•
Configuring Local Authentication and Authorization
In Diameter, an AA-Request packet is a request for authentication and authorization. Authentication checks username and password credentials, while authorization typically involves returning the correct information to allow the service a user is authorized to have. Prime Access Registrar performs AA and returns the appropriate Diameter attributes in an AA-Answer packet.
For adding a Diameter peer in Prime Access Registrar, configure a new entry in the clients (including Policy and Charging Rules Functions (PCRF), Home Subscriber Servers (HSS), Mobility Management Entities (MME), Online Charging Systems (OCS), and others) and remote server object.
The following shows an example configuration for adding a Diameter peer (NAS/Client) in Prime Access Registrar.
[ //localhost/Radius/Clients/51dia ]Name = 51diaDescription =Protocol = diameterHostName = 10.81.79.241PeerPort = 3868Vendor =IncomingScript~ =OutgoingScript~ =AdvertisedHostName =AdvertisedRealm =WatchDogTimeout = 500000SCTP-Enabled = FALSESCTPAdvertisedHostName/[//localhost/Radius/Services/diaservice]Name = diaserviceDescription =Type = diameterIncomingScript~ =OutgoingScript~ =EnableSticky = FALSEMultiplePeersPolicy = FailoverPeerTimeOutPolicy = FailOverDiaRemoteServers/Entries 1 to 1 from 1 total entriesCurrent filter:65/Name = 65Metric = 2Weight = 0IsActive = TRUE
Note
See Table 4-7 and Table 4-21 for more details.
Configuring a Local Service and UserList
See "Configuring a Local Service and UserList" section for more information on how to configure a local service and user list.
The following messages are logged in the trace file at the time of authenticating a valid user:
12/03/2013 7:32:42.395: P825: Packet received from 10.77.240.5412/03/2013 7:32:42.395: P825: Application id: 1, Cmd code: 265, Flag: 0x8012/03/2013 7:32:42.395: P825: Using Client: NAS12/03/2013 7:32:42.395: P825: Trace of Diameter Packet12/03/2013 7:32:42.395: P825: Destination-Realm = cisco.com12/03/2013 7:32:42.395: P825: User-Name = bob12/03/2013 7:32:42.395: P825: User-Password = <encrypted>12/03/2013 7:32:42.395: P825: Auth-Request-Type = 312/03/2013 7:32:42.395: P825: Origin-Host = 10.77.240.5412/03/2013 7:32:42.395: P825: Session-Id = .;2096298391;712/03/2013 7:32:42.395: P825: Auth-Application-Id = 112/03/2013 7:32:42.395: P825: Origin-Realm = xyz.com12/03/2013 7:32:42.395: P825: Tracing the packet after running the rules and policies12/03/2013 7:32:42.395: P825: Using Client: NAS12/03/2013 7:32:42.395: P825: FastRule Engine called for packet12/03/2013 7:32:42.395: P825: Fastrule return = 012/03/2013 7:32:42.395: P825: Authenticating and Authorizing with Service local-users12/03/2013 7:32:42.395: P825: Getting User bob's UserRecord from UserList Default12/03/2013 7:32:42.396: P825: user list user bob's password matches12/03/2013 7:32:42.396: P825: Processing UserGroup PPP-users's check items12/03/2013 7:32:42.396: P825: User bob is part of UserGroup PPP-users12/03/2013 7:32:42.396: P825: Merging UserGroup PPP-users's BaseProfiles into response dictionary12/03/2013 7:32:42.396: P825: Merging BaseProfile default-PPP-users into response dictionary12/03/2013 7:32:42.396: P825: Merging attributes into the Response Dictionary:12/03/2013 7:32:42.396: P825: Merging attributes into the InnerRadius Dictionary:12/03/2013 7:32:42.396: P825: Adding attribute Service-Type, value = Framed12/03/2013 7:32:42.396: P825: Adding attribute Framed-Protocol, value = PPP12/03/2013 7:32:42.396: P825: Adding attribute Framed-Routing, value = None12/03/2013 7:32:42.396: P825: Adding attribute Framed-MTU, value = 150012/03/2013 7:32:42.396: P825: Adding attribute Framed-Compression, value = VJ TCP/IP header compression12/03/2013 7:32:42.396: P825: Adding attribute Ascend-Idle-Limit, value = 180012/03/2013 7:32:42.396: P825: Merging UserGroup PPP-users's Attributes into response Dictionary12/03/2013 7:32:42.396: P825: Merging attributes into the Response Dictionary:12/03/2013 7:32:42.396: P825: Merging attributes into the InnerRadius Dictionary:12/03/2013 7:32:42.396: P825: Trace of Diameter Packet12/03/2013 7:32:42.396: P825: User-Name = bob12/03/2013 7:32:42.396: P825: Result-Code = 200112/03/2013 7:32:42.396: P825: Auth-Request-Type = 312/03/2013 7:32:42.396: P825: Origin-Host = 10.77.247.11012/03/2013 7:32:42.396: P825: Session-Id = .;2096298391;712/03/2013 7:32:42.396: P825: Auth-Application-Id = 112/03/2013 7:32:42.396: P825: Origin-Realm = abc.com12/03/2013 7:32:42.396: P825: Sending response to 10.77.240.54The following messages are logged in the trace file at the time of authenticating an invalid user:
12/03/2013 7:17:00.625: P76: Packet received from 10.77.240.5412/03/2013 7:17:00.625: P76: Application id: 1, Cmd code: 265, Flag: 0x8012/03/2013 7:17:00.625: P76: Using Client: NAS12/03/2013 7:17:00.625: P76: Trace of Diameter Packet12/03/2013 7:17:00.625: P76: Destination-Realm = cisco.com12/03/2013 7:17:00.625: P76: User-Name = user.112/03/2013 7:17:00.626: P76: User-Password = <encrypted>12/03/2013 7:17:00.626: P76: Auth-Request-Type = 312/03/2013 7:17:00.626: P76: Origin-Host = 10.77.240.5412/03/2013 7:17:00.626: P76: Session-Id = .;2096298391;212/03/2013 7:17:00.626: P76: Auth-Application-Id = 112/03/2013 7:17:00.626: P76: Origin-Realm = xyz.com12/03/2013 7:17:00.626: P76: Tracing the packet after running the rules and policies12/03/2013 7:17:00.626: P76: Using Client: NAS12/03/2013 7:17:00.626: P76: FastRule Engine called for packet12/03/2013 7:17:00.626: P76: Fastrule return = 012/03/2013 7:17:00.626: P76: Authenticating and Authorizing with Service local-users12/03/2013 7:17:00.626: P76: Getting User user.1's UserRecord from UserList Default12/03/2013 7:17:00.626: P76: Failed to get User user.1's UserRecord from UserList Default12/03/2013 7:17:00.626: P76: Trace of Diameter Packet12/03/2013 7:17:00.626: P76: User-Name = user.112/03/2013 7:17:00.626: P76: Result-Code = 400112/03/2013 7:17:00.626: P76: Auth-Request-Type = 312/03/2013 7:17:00.626: P76: Origin-Host = 10.77.247.11012/03/2013 7:17:00.626: P76: Session-Id = .;2096298391;212/03/2013 7:17:00.626: P76: Auth-Application-Id = 112/03/2013 7:17:00.626: P76: Origin-Realm = abc.com12/03/2013 7:17:00.626: P76: Sending response to 10.77.240.54Configuring External Authentication Service
See Table 4-17 for more information on how to configure external authentication service.
Configuring Diameter Accounting
This section describes Diameter Accounting in Prime Access Registrar as defined in Internet RFC 6733. This section explains the following:
•
•
Understanding Diameter Accounting
Diameter Accounting is the process of collecting and storing the information contained in Accounting-Event, Accounting-Start, and Accounting-Interim and Accounting-Stop messages. Internet RFC 6733 describes the protocol for sending accounting information between a Network Access Server (NAS) and a DIAMETER server.
Note
Setting Up Local Accounting
See Chapter 6 "RADIUS Accounting" for more information.
Note
Setting Up Oracle Accounting
See Chapter 6 "RADIUS Accounting" for more information.
Diameter Accounting Log Examples
This section provides examples of Diameter accounting information recorded in an accounting log file.
Accounting Event Packet
Tue, 20 Oct 2013 15:27:18.340Session-Id = thomas.cisco.com.cisco1.com;1256052431;900083Origin-Host = thomas.cisco.comOrigin-Realm = cisco1.comDestination-Realm = cisco.comAccounting-Record-Type = 1Accounting-Record-Number = 1Acct-Application-Id = 3Accounting-Sub-Session-Id = 1Acct-Interim-Interval = 5Accounting-Realtime-Required = 0Origin-State-Id = 1256052431Accounting Start Packet
Tue, 20 Oct 2013 15:49:57.086Session-Id = thomas.cisco.com.cisco1.com;1256053789;847161Origin-Host = thomas.cisco.comOrigin-Realm = cisco1.comDestination-Realm = cisco.comAccounting-Record-Type = 2Accounting-Record-Number = 1Acct-Application-Id = 3Accounting-Sub-Session-Id = 1Acct-Interim-Interval = 5Accounting-Realtime-Required = 0Origin-State-Id = 1256053789Account Interim Packet
Tue, 20 Oct 2013 15:50:12.338Session-Id = thomas.cisco.com.cisco1.com;1256053789;847161Origin-Host = thomas.cisco.comOrigin-Realm = cisco1.comDestination-Realm = cisco.comAccounting-Record-Type = 3Accounting-Record-Number = 4Acct-Application-Id = 3Accounting-Sub-Session-Id = 1Acct-Interim-Interval = 5Accounting-Realtime-Required = 1Origin-State-Id = 1256053789Accounting Stop Packet
Tue, 20 Oct 2013 15:50:18.116Session-Id = thomas.cisco.com.cisco1.com;1256053789;847161Origin-Host = thomas.cisco.comOrigin-Realm = cisco1.comDestination-Realm = cisco.comAccounting-Record-Type = 4Accounting-Record-Number = 6Acct-Application-Id = 3Accounting-Sub-Session-Id = 1Acct-Interim-Interval = 5Accounting-Realtime-Required = 1Origin-State-Id = 1256053789Trace of Successful Accounting
The following is a trace example of a successful accounting sequence:
10/02/2013 12:05:03.146: P161: Trace of Diameter-Accounting-Request packet10/02/2013 12:05:03.146: P161: Session-Id = 10.81.79.42.cisco5.com;1317577008;89833610/02/2013 12:05:03.146: P161: Accounting-Record-Number = 110/02/2013 12:05:03.146: P161: Accounting-Record-Type = 210/02/2013 12:05:03.146: P161: Destination-Realm = abc.com10/02/2013 12:05:03.146: P161: Origin-Host = 10.81.79.4210/02/2013 12:05:03.146: P161: Origin-Realm = cisco5.com10/02/2013 12:05:03.146: P161: Accounting-Realtime-Required = 010/02/2013 12:05:03.146: P161: Accounting-Sub-Session-Id = 110/02/2013 12:05:03.146: P161: Acct-Application-Id = 310/02/2013 12:05:03.146: P161: Acct-Interim-Interval = 510/02/2013 12:05:03.146: P161: Origin-State-Id = 131757700810/02/2013 12:05:03.146: P161: Tracing the packet after running the rules and policies10/02/2013 12:05:03.146: P161: Trace of Diameter-Accounting-Request packet10/02/2013 12:05:03.146: P161: Session-Id = 10.81.79.42.cisco5.com;1317577008;89833610/02/2013 12:05:03.146: P161: Accounting-Record-Number = 110/02/2013 12:05:03.146: P161: Accounting-Record-Type = 210/02/2013 12:05:03.146: P161: Destination-Realm = abc.com10/02/2013 12:05:03.147: P161: Origin-Host = 10.81.79.4210/02/2013 12:05:03.147: P161: Origin-Realm = cisco5.com10/02/2013 12:05:03.147: P161: Accounting-Realtime-Required = 010/02/2013 12:05:03.147: P161: Accounting-Sub-Session-Id = 110/02/2013 12:05:03.147: P161: Acct-Application-Id = 310/02/2013 12:05:03.147: P161: Acct-Interim-Interval = 510/02/2013 12:05:03.147: P161: Origin-State-Id = 131757700810/02/2013 12:05:03.147: P161: Using Client: murdoch10/02/2013 12:05:03.147: P161: Accounting with Service dia-local10/02/2013 12:05:03.147: P161: Calling Service local-file for accounting10/02/2013 12:05:03.123: P161: Trace of Diameter-Accounting-Response packet10/02/2013 12:05:03.123: P161: Session-Id = 10.81.79.42.cisco5.com;1317577008;89833610/02/2013 12:05:03.123: P161: Result-Code = 200110/02/2013 12:05:03.123: P161: Origin-Host = 10.77.247.11710/02/2013 12:05:03.123: P161: Origin-Realm = abc.com10/02/2013 12:05:03.123: P161: Accounting-Record-Type = 210/02/2013 12:05:03.123: P161: Accounting-Record-Number = 110/02/2013 12:05:03.123: P161: Acct-Application-Id = 310/02/2013 12:05:03.123: P161: Accounting-Sub-Session-Id = 110/02/2013 12:05:03.123: P161: Error-Reporting-Host = 10.77.247.11710/02/2013 12:05:03.123: P161: Accounting-Realtime-Required = 110/02/2013 12:05:03.123: P161: Acct-Interim-Interval = 510/02/2013 12:05:03.123: P161: Origin-State-Id = 1317576779Configuring the Diameter Application in Prime Access Registrar
For proxying a diameter application message in Prime Access Registrar, ensure that you do the following:
•
•
•
Configuring the Transport Management Properties
You need to log into the aregcmd using the CLI interface and configure the Transport Management properties in the Radius/Advanced/Diameter/.
/opt/CSCOar/bin/./aregcmd -sCisco Prime Access Registrar Configuration UtilityCopyright (C) 1995-2013 by Cisco Systems, Inc. All rights reserved. Logging in to localhost[ //localhost ]LicenseInfo = AR-DRN-2000TPS 5.1(2000TPS:expires on 1-Feb-2013) Radius/Administrators/Server 'Radius' is Running, its health is 10 out of 10--> cd Radius/Advanced/Diameter/[ //localhost/Radius/Advanced/Diameter ]IsDiameterEnabled = TRUEGeneral/Product = CPARVersion = 6.1AuthApplicationIdList = 1AcctApplicationIdList =TransportManagement/Identity = localhostRealm = abc.comWatchdogTimeout = 500ValidateIncomingMessages = FALSEValidateOutgoingMessages = falseMaximumNumberofDiameterPackets = 8194DiameterPacketSize = 1024AdvertisedHostName/SCTPOptions/MaxInitRetry = 3MaxInboundStream = 4MaxOutboundstream = 5EnableHeartbeat = FALSEHeartbeatInterval = 500You need to set the Identity and AdvertisedHostName properties to IP Address or hostname of the machine in which Prime Access Registrar is installed.
--> set Identity 10.77.240.69Set Identity 10.77.240.69--> cd AdvertisedHostNameset 1 10.77.240.69Set 1 10.77.240.69Set the Realm in which Cisco Prime Access Registrar server is present.--> set Realm cisco.comSet Realm cisco.comSave the configuration--> saveValidating //localhost...Saving //localhost...lsIdentity = 10.77.240.69Realm = cisco.comTCPListenPort = 3868SCTPListenPort = 3868EnableIPV6 = FALSEWatchdogTimeout = 500ReconnectInterval = 500MaxReconnections = 3RequestRetransmissionInterval = 100MaxRequestRetransmissionCount = 3ReceiveBufferSize = 2048AdvertisedHostName/1. 10.77.240.69The description for these properties is available at:
http://www.cisco.com/en/US/docs/net_mgmt/access_registrar/5.1/user/guide/objects.html#wp1145662
Note
Registering Applications IDs
You need to register the applications IDs for which Prime Access Registrar needs to route the Diameter Messages.
Registering the Gy application to a diameter stack
To register the Gy application to a diameter stack,
Step 1
[ //localhost/Radius/Advanced/Diameter ]IsDiameterEnabled = TRUEGeneral/TransportManagement/SessionManagement/Applications/Commands/Diameter Dictionary/--> cd General/[ //localhost/Radius/Advanced/Diameter/General ]Product = Cisco Prime Access RegistrarVersion = 6.1AuthApplicationIdList = 1AcctApplicationIdList =For description of these properties, see Diameter Service Properties.
Step 2
--> set AuthApplicationIdList "4"Set AuthApplicationIdList 4
Configuring the Diameter Peers
You need to configure the Diameter Peers such as clients and servers in the /radius/clients and /radius/remoteservers directories. The following is an example for configuring a Diameter client:
[ //localhost/Radius/Clients/51dia ]Name = 51diaDescription =Protocol = diameterHostName = 10.81.79.241PeerPort = 3868Vendor =IncomingScript~ =OutgoingScript~ =AdvertisedHostName =AdvertisedRealm =WatchDogTimeout = 500000SCTP-Enabled = FALSESCTPAdvertisedHostName/Local/Remote/The following is an example for configuring a Diameter remote server:
[ //localhost/Radius/RemoteServers/lap ]Name = lapDescription =Protocol = diameterHostName = 10.77.144.34Port = 3868DestinationRealm = cisco.comReactivateTimerInterval = 300000Vendor =IncomingScript~ =OutgoingScript~ =MaxTries = 3InitialTimeout = 500000LimitOutstandingRequests = FALSEMaxOutstandingRequests = 0DWatchDogTimeout = 500000SCTP-Enabled = FALSEAdvertiseHostName =AdvertiseRealm =SCTPAdvertisedHostName/Local/Remote/For description of these properties, see Diameter Service Properties.
Note
# Do not remove the following line, or various programs
# that require network functionality will fail.
127.0.0.1 Prime Access Registrar localhost.localdomain localhost
172.16.29.7 GGSN-Gy
::1 localhost6.localdomain6 localhost6
Configure the Diameter Service
To configure the Diameter Service to route the Diameter Messages based on the Realm,
Step 1
--> cd /Radius/Services/--> add dia-proxyAdded dia-proxy--> cd dia-proxy[ //localhost/Radius/Services/dia-proxy ]Name = dia-proxyDescription =Type =--> set Type diameterSet Type diameterStep 2
--> ls[ //localhost/Radius/Services/dia-proxy ]Name = dia-proxyDescription =Type = diameterRealm = abc.comRole = LocalIncomingScript~ =OutgoingScript~ =AuthenticationService =AccountingService =DiaRemoteServers/Set the Role as proxy--> set Role ProxySet Role Proxy--> set Realm mcprealm.comSet Realm mcprealm.comStep 3
--> ls[ //localhost/Radius/Services/dia-proxy ]Name = dia-proxyDescription =Type = diameterRealm = mcprealm.comRole = ProxyIncomingScript~ =OutgoingScript~ =Applications/--> cd Applications/[ //localhost/Radius/Services/dia-proxy/Applications ]Entries 0 to 0 from 0 total entriesCurrent filter: <all>--> add GyAdded Gy--> cd Gy/[ //localhost/Radius/Services/dia-proxy/Applications/Gy ]Name = GyDescription =ApplicationID =DeMultiplexCCTerminateRequest = FALSEEnableSticky = FALSEMultiplePeersPolicy = FailoverDiaRemoteServers/Step 4
--> set ApplicationID 4Set ApplicationID 4--> set EnableSticky TRUESet EnableSticky TRUE--> ls[ //localhost/Radius/Services/dia-proxy/Applications/Gy ]Name = GyDescription =ApplicationID = 4DeMultiplexCCTerminateRequest = FALSEEnableSticky = TRUEStickySessionKey =StickyCreationCmdList =StickyDeletionCmdList =MultiplePeersPolicy = FailoverDiaRemoteServers/--> set StickySessionKey Session-Id#1Set StickySessionKey Session-Id#1--> set StickyCreationCmdList 272Set StickyCreationCmdList 272--> set StickyDeletionCmdList 272::CC-Request-Type=3Set StickyDeletionCmdList 272::CC-Request-Type=3--> set MultiplePeersPolicy RoundRobinSet MultiplePeersPolicy RoundRobin--> ls[ //localhost/Radius/Services/dia-proxy/Applications/Gy ]Name = GyDescription =ApplicationID = 4DeMultiplexCCTerminateRequest = FALSEEnableSticky = TRUEStickySessionKey = Session-Id#1StickyCreationCmdList = 272StickyDeletionCmdList = 272::CC-Request-Type=3MultiplePeersPolicy = RoundRobinDiaRemoteServers/Step 5
--> cd Peers/[ //localhost/Radius/Services/dia-proxy/Applications/Gy/Peers ]Entries 0 to 0 from 0 total entriesCurrent filter: <all>--> add ocs1Added ocs1--> cd ocs1/[ //localhost/Radius/Services/dia-proxy/Applications/Gy/Peers/ocs1 ]Name = ocs1HostName =Metric = 2Weight = 0IMSIRanges =--> set HostName 192.168.30.88Set HostName 192.168.30.88--> cd ..[ //localhost/Radius/Services/dia-proxy/Applications/Gy/Peers ]Entries 1 to 1 from 1 total entriesCurrent filter: <all>ocs1/--> add ocs2Added ocs2--> cd ocs2/[ //localhost/Radius/Services/dia-proxy/Applications/Gy/Peers/ocs2 ]Name = ocs2HostName =Metric = 2Weight = 0IMSIRanges =--> set HostName 192.168.30.86Set HostName 192.168.30.86Step 6
--> saveValidating //localhost...Saving //localhost...Step 7
--> set DefaultAuthenticationService dia-proxySet DefaultAuthenticationService dia-proxy--> set DefaultAuthorizationService dia-proxySet DefaultAuthorizationService dia-proxy--> saveValidating //localhost...Saving //localhost...--> exit--> exitLogging out of localhost...Step 8
/cisco-ar/bin/arserver restartThe following illustrates the diameter proxy service configuration for Gy application which load balances the diameter Gy (App ID =4) messages to the remote peers ocs1(192.168.30.88) and ocs2(192.168.30.86).
[ //localhost/Radius/Services/dia-proxy ]Name = dia-proxyDescription =Type = diameterRealm = mcprealm.comRole = proxyIncomingScript~ =OutgoingScript~ =Applications/Entries 1 to 1 from 1 total entriesCurrent filter: <all>Gy/Name = GyDescription =ApplicationID = 4DeMultiplexCCTerminateRequest = FALSEEnableSticky = TRUEStickySessionKey = Session-Id#1StickyCreationCmdList = 272StickyDeletionCmdList = 272::CC-Request-Type=3MultiplePeersPolicy = RoundRobinDiaRemoteServers/Entries 1 to 2 from 2 total entriesCurrent filter: <all>ocs1/Name = ocsHostName = 192.168.30.88Metric = 2Weight = 0IMSIRanges =ocs2/Name = ocs2HostName = 192.168.30.86Metric = 3Weight = 0IMSIRanges =For description of these properties, see Diameter Service Properties.
Writing Diameter Application in Prime Access Registrar
Prime Access Registrar supports extensibility by allowing users to create new:
•
•
•
•
This section contains the following topics:
•
•
Configuring rex script/service for Diameter
To configure script/service for diameter using aregcmd:
Step 1
[ //localhost/Radius/Advanced/Diameter/Diameter Dictionary/CiscoAVPS ]Name = CiscoAVPSDescription =IsVendorSpecific = FALSEApplicationID =AVPs/Step 2
[ //localhost/Radius/Services/diaservice ]Name = diaserviceDescription =Type = rexIncomingScript~ =OutgoingScript~ =OutagePolicy~ = RejectAllOutageScript~ =Filename = librexscript.soEntryPoint = DiaServiceInitEntryPoint =InitEntryPointArgs =Refer to Sample rex script/service.
Scripting in Diameter
Prime Access Registrar supports 'rex' scripts for Diameter protocol. The script can be configured only as the server incoming script. The commands available for scripting are restricted to 'get' and 'put' on the dictionaries. While setting a value to an attribute, the following convention needs to be followed "<type number>,<value>". For example, if a 'Class' attribute needs to be added to the response dictionary with value as "classvalue", then set it as follows in the script:
pResponse->put( pResponse, "Class", "1,classvalue", REX_REPLACE );The following is the list of supported scripting types with the respective type numbers:
AVP_STRING_TYPE = 1AVP_ADDRESS_TYPE = 2AVP_INTEGER32_TYPE = 3AVP_UINTEGER32_TYPE = 4AVP_UTF8_STRING_TYPE = 6AVP_ENUM_TYPE = 7AVP_TIME_TYPE = 11Setting response attributes via a script is the only mechanism to add authorization attributes for Diameter requests.
Diameter Environment Variables
This section lists the environment variables that you can use in scripts for Diameter messages.
Table 8-1 lists the Diameter Environment variables and descriptions.
Sample rex script/service
int REXAPI DiaService( int iScriptingPoint,rex_AttributeDictionary_t* pRequest,rex_AttributeDictionary_t* pResponse,rex_EnvironmentDictionary_t* pEnviron ){if( iScriptingPoint == REX_START_SERVICE || iScriptingPoint == REX_STOP_SERVICE )return REX_OK;int iRetVal = REX_ERROR;const char* pszRequestType = pEnviron->get( pEnviron, "Request-Type");const char* pszAppId = pEnviron->get( pEnviron, "Diameter-Application-Id" );const char* pszCmdCode= pEnviron->get( pEnviron, "Diameter-Command-Code" );if(!( pszRequestType && pszAppId && pszCmdCode ))return iRetVal;// check the request type, Application id and command code/*Request / Response typesDiameter-Access-RequestDiameter-Access-AcceptDiameter-Access-RejectDiameter-Accounting-RequestDiameter-Accounting-Response*/if( (strcmp( pszRequestType, "Diameter-Access-Request") == 0) && (strcmp( pszAppId,"1") ==0 ) && (strcmp( pszCmdCode,"265\" )== 0 ) ){// our application// example how to get DiaAttrib from the packet.const char* pszSessionId = pRequest ->get( pRequest,"Session-Id",0,0 );// print in traceif( pszSessionId )pEnviron->trace( pEnviron, 5, "Diameter Session Id: %s", pszSessionId );// example: how to add dia attrib in response packetpResponse->put( pResponse, "Calling-Station-Id", "1,00-01-02-03-05", REX_APPEND );pEnviron->put( pEnviron, "Response-Type", "Diameter-Access-Accept");iRetVal = REX_OK;}return iRetVal;}Traces/Logs
09/30/2013 11:13:46.830: P88: Diameter Packet received from 10.81.79.5909/30/2013 11:13:46.830: P88: Trace of Diameter-Access-Request packet09/30/2013 11:13:46.830: P88: Session-Id = .;1096298391;1509/30/2013 11:13:46.830: P88: Auth-Application-Id = 109/30/2013 11:13:46.830: P88: Origin-Host = 10.81.79.5909/30/2013 11:13:46.830: P88: Origin-Realm = xyz.com09/30/2013 11:13:46.830: P88: Destination-Realm = abc.com09/30/2013 11:13:46.830: P88: Auth-Request-Type = 109/30/2013 11:13:46.830: P88: User-Name = bob09/30/2013 11:13:46.830: P88: Tracing the packet after running the rules and policies09/30/2013 11:13:46.830: P88: Trace of Diameter-Access-Request packet09/30/2013 11:13:46.830: P88: Session-Id = .;1096298391;1509/30/2013 11:13:46.830: P88: Auth-Application-Id = 109/30/2013 11:13:46.830: P88: Origin-Host = 10.81.79.5909/30/2013 11:13:46.830: P88: Origin-Realm = xyz.com09/30/2013 11:13:46.830: P88: Destination-Realm = abc.com09/30/2013 11:13:46.830: P88: Auth-Request-Type = 109/30/2013 11:13:46.830: P88: User-Name = bob09/30/2013 11:13:46.830: P88: Using Client: molly09/30/2013 11:13:46.830: P88: Authenticating and Authorizing with Service dia-rex-service09/30/2013 11:13:46.830: P88: Rex: environ->get( "Request-Type" ) -> "Diameter-Access-Request"09/30/2013 11:13:46.830: P88: Rex: environ->get( "Diameter-Application-Id" ) -> "1"09/30/2013 11:13:46.830: P88: Rex: environ->get( "Diameter-Command-Code" ) -> "265"09/30/2013 11:13:46.830: P88: Rex: request->get( "Session-Id", 0 ) -> ".;1096298391;15"09/30/2013 11:13:46.830: P88: Diameter Session Id: .;1096298391;1509/30/2013 11:13:46.830: P88: Rex: response->put( "Calling-Station-Id", "1,00-01-02-03-05", 0 ) -> TRUE09/30/2013 11:13:46.831: P88: Rex: environ->put( "Response-Type", "Diameter-Access-Accept" ) -> TRUE09/30/2013 11:13:46.831: P88: Trace of Diameter-Access-Accept09/30/2013 11:13:46.831: P88: Calling-Station-Id = 00-01-02-03-0509/30/2013 11:13:46.831: P88: Auth-Application-Id = 109/30/2013 11:13:46.831: P88: User-Name = bob09/30/2013 11:13:46.831: P88: Auth-Request-Type = 309/30/2013 11:13:46.831: P88: Result-Code = 2001Translation Framework for Diameter
Prime Access Registrar supports translation of an incoming RADIUS request to a Diameter request and vice versa.
The following services are created to set up the translation framework:
•
•
For RADIUS to Diameter translation, Prime Access Registrar provides scripting points PreRequestTranslationScript and PostRequestTranslationScript, which operate on the original packet and on the newly translated packet based on request and response mapping. This gives an option to modify the AVPs before and after the translation. RADIUS to Diameter translation comes with 3GPP reverse authorization, if the property is set as True. In that case, the request command mapping must not be defined because the new diameter request is created from the radius request by the 3GPP reverse authorization service. When the diameter response is received from the diameter proxy service, it translates the Diameter response to RADIUS response based on the response mapping configuration and sends radius response to the client.
Similarly, for Diameter to RADIUS translation (on the response), Prime Access Registrar provides scripting points PreResponseTranslationScript and PostResponseTranslationScript, which are called on the incoming Diameter message and the corresponding RADIUS response message respectively.
Both these translation services create and maintain appropriate states (with the necessary identifiers, packet pointers, etc) to correlate Request to Response. The states will be cleared if present beyond the `Timeout' property value and all the retries have been exhausted. You can configure the number of retries under Diameter-RemoteServers.
For more information about the translation parameters, see Simple Services.
CLI for RADIUS-Diameter Translation
Following is the CLI for RADIUS to Diameter translation:
[ /Radius/Services/rad-dia ]Name = rad-diaDescription =Type = radius-diameterDiameterApplicationId = 1ProxyServiceName = dia-proxyEnableCommandMappings = TruePreRequestTranslationScript~ =PostRequestTranslationScript~ =PreResponseTranslationScript~ =PostResponseTranslationScript~ =RequestMapping/CommandMappings/Radius-Access-Request = AAAVPMappings/NAS-Identifier = Origin-HostUser-Name = User-NameAVPsToBeAdded/Origin-Realm = cisco.comEnvironmentMappings/ResponseMapping/ResultCodeMappings/Diameter-Success = Radius-Access-AcceptDiameter-Unable-To-Deliver = Radius-Access-RejectAVPMappings/AVPsToBeAdded/EnvironmentMappings/CLI for Diameter-RADIUS Translation
Following is the CLI for Diameter to RADIUS translation:
[ /Radius/Services/dia-rad ]Name = dia-radDescription =Type = diameter-radiusProxyServiceName = rad-proxyPreRequestTranslationScript~ =PostRequestTranslationScript~ = dia-rad-addpasswordPreResponseTranslationScript~ =PostResponseTranslationScript~ = diareadwritetestRequestMapping/CommandMappings/AA = Radius-Access-RequestAVPMappings/Origin-Host = NAS-IdentifierUser-Name = User-NameAVPsToBeAdded/NAS-Port = 1EnvironmentMappings/ResponseMapping/ResultCodeMappings/Radius-Access-Accept = Diameter-SuccessRadius-Access-Reject = Diameter-Unable-To-DeliverAVPMappings/AVPsToBeAdded/EnvironmentMappings/Managing Diameter Sessions
Diameter provides two kinds of services namely authentication/authorization and accounting only (optional). Diameter sessions can be created when an authentication/authorization request comes from an access point or when an accounting start comes from an access point. When a Diameter client issues an authentication request, Prime Access Registrar sends the packet with a Session-Id AVP, which can be used to correlate a Diameter message with a user-session. When a Session Termination Request (STR) message is received from the Diameter client, Prime Access Registrar releases the sessions. Also Re-authentication requests must be mapped to the corresponding user session. In case of accounting packets, the session is created when the accounting start is received from the Diameter client. The session is deleted when the accounting stop message is received.
Prime Access Registrar creates a new session when it receives an authentication or accounting request packet from a Diameter client and when a user session is not already present. It allocates the resources for the particular session from the resource manager and stores the session in a session backing store. This session backing store is a file where session information is written. When a session termination message or an accounting stop message comes from the Diameter client, the session data is deleted from the backing store. Apart from this, Prime Access Registrar maintains the session state for every session it creates. Session cache will be supported for grouped AVPs.
For more information on session manager and its support for Diameter client, see SessionManagers.
Support for SCTP including Multihoming
Prime Access Registrar release enhances the diameter support to the more reliable transport mechanism such as SCTP with multi-homing.
In a SCTP connection, each of the two endpoints during an SCTP association setup can specify multiple points of attachment. Having multiple interfaces allows the data to be automatically sent to alternate addresses when failures occur. Using this support, the Prime Access Registrar runs successfully even when a failure occurs in any of the multiple interfaces.
[ //localhost/Radius/advanced/diameter/transportManagement ]
Identity = localhost
Realm = abc.com
TCPListenPort = 3868
SCTPListenPort = 3868
EnableIPV6 = FALSE
WatchdogTimeout = 500
ReconnectInterval = 500
MaxReconnections = 3
RequestRetransmissionInterval = 100
MaxRequestRetransmissionCount = 3
ReceiveBufferSize = 2048
AdvertisedHostName/
--> cd AdvertisedHostName
--> add 1 10.77.240.135
--> add 2 10.77.240.136
--> add 3 10.77.240.137
--> ls
[ //localhost/Radius/advanced/diameter/transportManagement/AdvertisedHostName ]
1. 10.77.240.135
2. 10.77.240.136
3. 10.77.240.137
Note