Feedback
Table Of Contents
Installing, Launching, and Connecting Network Assistant
Connecting Network Assistant to a Community or a Cluster
Access Modes in Network Assistant
Installing, Launching, and Connecting Network Assistant
This chapter describes what you need to install Network Assistant, how to install it, how to launch it, and how to connect it to a device or an existing community.
Installation Requirements
The PC on which you install Network Assistant must meet these minimum requirements:
•
Processor speed: 1 GHz
•
•
•
•
•
Network Assistant is supported on these operating systems:
•
•
•
•
Note
Installing Network Assistant
To install Network Assistant on your PC, follow these steps:
1.
You must be a registered Cisco.com user, but you need no other access privileges.
2.
3.
Network Assistant is free—there is no charge to download, install, or use it.
When you run the installer, follow the displayed instructions. In the final panel, click Finish to complete the Network Assistant installation.
Launching Network Assistant
After Network Assistant is installed, you see its icon on your desktop, a Network Assistant entry under Start > Programs, and a Network Assistant executable file in the installation directory. When you click any of these, you see a partial Network Assistant GUI and the Connect window.
In disconnect mode, Network Assistant is not connected to a device or a community; it cannot manage a standalone device, a community, or the command device of a cluster. Its menu bar and toolbar support only the tasks that customize Network Assistant itself. The feature bar, which usually lists device features, is empty.
Connecting Network Assistant to a Community or a Cluster
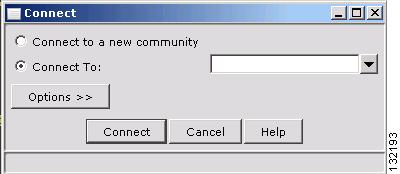
To connect Network Assistant to a device, use the Connect window shown in Figure 3-1. In it, enter the IP address of the device to which you want to connect. For an existing community, select its name from the pull-down menu. For an existing cluster, you select the IP address. Click Options if you want to
•
Note
•
•
For instructions on how to use the Connect to a new community option to create a community, see the "Creating a Community" section on page 4-4. When you click Connect, you are either connected to the community directly, or you are prompted for a username and password and then connected. When you connect to a cluster, Network Assistant asks if you want to convert the cluster to a community. For more information on converting a cluster to a community, see the "Converting a Cluster to a Community" section on page 4-5.
Figure 3-1 Connect Window
When the connection occurs, the Network Assistant window is in connect mode. The toolbar adds icons that represent device features. Similarly, the feature bar fills with menus that list the device features that Network Assistant manages.
Access Modes in Network Assistant
When you select a community to manage, you can set the access mode and access level. If you do not set the access mode before connecting to the community, Network Assistant applies the read-write default access mode to all of the devices in the community.