Feedback
Table Of Contents
Menu Bar, Toolbar, and Feature Bar
Searching for a Network Assistant Update
Network Assistant Features
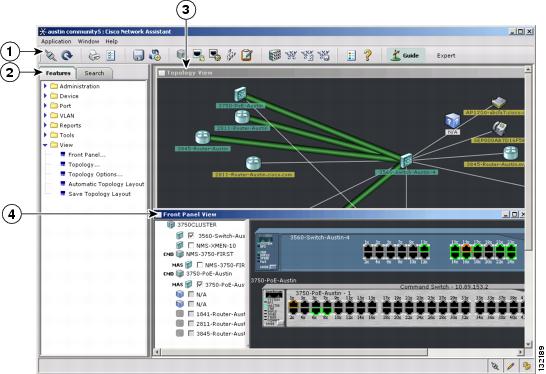
Network Assistant simplifies device group management using communities or clusters by offering a GUI, alternative modes for configuring network devices, two levels of access, and comprehensive online help. Figure 2-1 shows the main features of the user interface.
Figure 2-1 Network Assistant GUI
The sections that follow describe the Network Assistant features.
Front Panel View
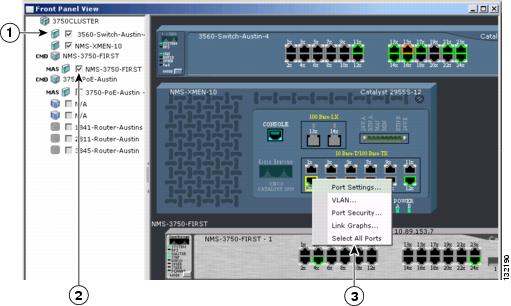
When Network Assistant connects to a community or a cluster, you can display the Front Panel view by clicking the Front Panel icon on the toolbar or by choosing View > Front Panel from the feature bar. You see the front-panel image of the device. If the device belongs to a community, you see all of the devices that were selected the last time that the front panel view was displayed for that community. If the device commands a cluster, you see the cluster members that were selected the last time that the view was displayed.
By using the Front Panel view, you can
•
Drag and re-arrange the devices that appear.
•
•
•
Figure 2-2 shows a community with Catalyst 3560, 2955, 2924, and 3750 switches as member devices.
Figure 2-2 Front Panel View and Port Popup Window
Topology View
When Network Assistant connects to a community or a cluster, the Topology view appears by default. If you change this default, you can see the Topology view when Network Assistant connects to a device by clicking the Topology view icon on the toolbar or by choosing View > Topology.
Note
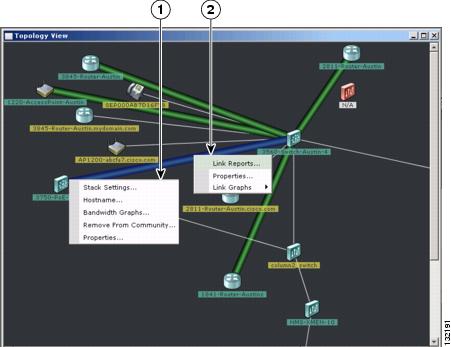
As shown in Figure 2-3, the Topology view example displays the devices that comprise a community, along with nonmember devices that have been discovered by Network Assistant. When you right-click a device or link icon, a popup window appears.
Figure 2-3 Topology View and Device Popup Windows
The Topology view shows how the devices within a community or a cluster are connected. The view also shows how a cluster is connected to other clusters and devices. You can add and remove device members from this view.
Note
When managing a cluster, the Topology view displays only the cluster and network neighborhood of the specific command or member device that you access. To display a different cluster, you must access the command device or a member device of that cluster.
Menu Bar, Toolbar, and Feature Bar
Configuration and monitoring options are available from the menu bar, the toolbar, and the feature bar. The menu bar provides options for configuring communities and Network Assistant itself. The options on the feature bar are for configuring devices, ports, VLANs, monitoring, and getting reports. The toolbar icons are the most used features in Network Assistant.
Menu Bar
The menu bar provides these options for managing Network Assistant, navigating among windows, and accessing online help:
•
•
•
Toolbar
The toolbar has icons for commonly used configuration options and for information windows like the legend and online help. Table 2-1 lists the toolbar options from left to right on the toolbar.
Table 2-1 Toolbar Icons
Connect
Connect Network Assistant to a community or a cluster.
Refresh
Update the views with the latest status.
Print a Network Assistant window or help topic.
Preferences1
Set Network Assistant display properties, choose the views to open when Network Assistant is connected, and choose how often Network Assistant searches for an update.
Save Configuration2
Save the configuration of the devices to your PC.
Software Upgrade2
Upgrade the software on one or more devices.
Smartports Device Setup
Display or configure Smartports setup on a device.
Smartports Port Setup
Display or configure Smartports setup on a port.
Port Settings1
Display and configure port parameters on a device.
VLAN1
Display VLAN membership, assign ports to VLANs, and change the administration mode.
Inventory
Display the device type, the software version, the IP address, and other information about a device.
Front Panel
Display the Front Panel view.
Topology
Display the Topology view.
Topology Options
Select the information to be displayed in the Topology view.
Save Topology Layout 2
Save your arrangement of the community or cluster icons in the Topology view to your PC.
Legend
Display the legend, which describes the icons, labels, and links.
Help for Active Window
Display the help topic for the active, open window. You can also click Help from the active window or press the F1 key.
1 Not available in read-only mode. For more information about the read-only and read-write access modes, see the "Privilege Levels" section.
2 Some options from this menu option are not available in read-only mode.
Feature Bar
The feature bar shows the networking features that are available for the devices in your community or cluster. By default, the feature bar is in standard mode. In this mode, it is always visible, and you can reduce or increase its width. In autohide mode, the feature bar appears only when you move the cursor to the left edge of the Network Assistant workspace.
•
•
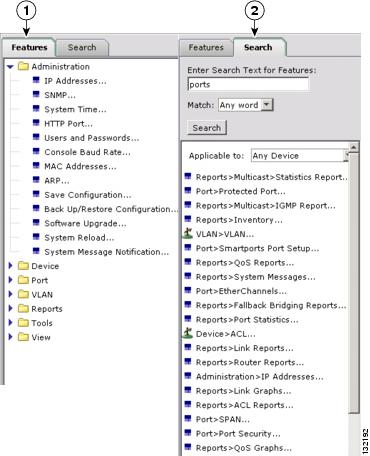
Figure 2-4 shows a feature bar.
Figure 2-4 Feature Bar
On the Features tab, the features are grouped under menus. When you click a menu item, the configuration window for the feature appears. On the Search tab, you can launch a configuration window by entering search text, clicking Search, and selecting from the search results.
Access modes affect the availability of features; some are not available in read-only mode. For more information about how access modes affect Network Assistant, see the "Privilege Levels" section.
Interaction Modes
There are two modes for interacting with the Network Assistant GUI, guide mode and expert mode. Guide mode presents feature options one step at a time, with accompanying help information. Expert mode presents all the options for configuring a feature in a single window; to get help, you click Help in the window.
Guide Mode
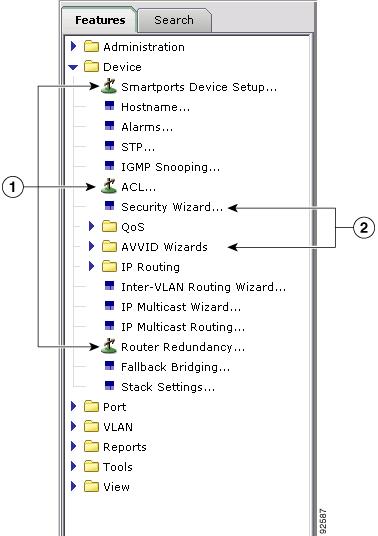
Network Assistant is in guide mode by default. When you choose a feature on the feature bar with a signpost icon (see Figure 2-5), you see a series of configuration steps—guide mode. If you choose a feature without this icon, you see a configuration window—expert mode.
Figure 2-5 Guide Mode and Wizards
Guide mode is not available if your switch access level is read-only. For more information about the read-only access mode, see the "Privilege Levels" section.
Expert Mode
If you prefer to see a configuration window for every feature, choose Expert in the Application menu, or click Expert on the toolbar. Even the features that are shown with a signpost on the feature bar will appear in expert mode. If you want to see guide mode again, choose Guide in the Application menu, or click Guide on the toolbar.
To launch a guide-mode feature in Expert mode, you must choose Expert before selecting the feature.
Wizards
Like guide mode, wizards provide a step-by-step approach for completing a specific configuration task. Unlike guide mode, a wizard does not prompt you to provide information for all of the feature options. Instead, it prompts you to provide minimal information and then uses the default settings of the remaining options to set up default configurations.
When you select a feature that has Wizard in its name, as shown in Figure 2-5, the wizard launches.
Wizards are not available for read-only access levels. For more information about the read-only access mode, see the "Privilege Levels" section.
Smartports Advisor
Smartports Advisor launches when you connect to a device, a community, or a cluster that contains any ports that have not yet been configured by using Smartports. It asks whether you want to use Smartports to apply Cisco-recommended configurations, or macros, to configure a port to optimize communication with the linked device.
Device connections are optimized wherever Smartports macros have been applied. Applying a macro helps you configure the essential security, availability, quality of service (QoS), and manageability features on a device.
Smartports Advisor displays the front panels of devices to which you are connected. On the front panels, Smartports Advisor displays the ports to which Smartports macros have already been applied, as well as the ports to which Smartports macros can be applied.
You apply macros to the port connections that have not been optimized by accepting the macro suggestion that Smartports Advisor makes, and then you enter the VLAN information. See the online help for more information on Smartports Advisor.
Privilege Levels
Network Assistant provides two types of access to configuration options: read-write and read-only. Your access type is determined by your privilege level, a number from 1 to 15. Privilege levels correspond to access types as follows:
•
•
If your privilege level is not 15, you must specify it in the Connect window that appears when you launch Network Assistant. If you do not specify it, you are denied access to Network Assistant.
Note
Searching for a Network Assistant Update
Network Assistant can search Cisco.com to see whether new packages are available. Take either of these actions to request a search:
•
•
If an update is found, you can install it through Network Assistant.
Online Help
Network Assistant provides comprehensive online help that explains configuration and monitoring tasks.
Sometimes the information in a help topic differs for different devices. In these cases, the right pane of the Help window contains all the versions of the topic, each labeled with the hostnames of the devices it applies to.
Online help includes these features:
•
•
•
•
You can send us feedback about the online help. Click Feedback on the Help window to display an online form. After completing the form, click Submit to send your comments to Cisco Systems Inc. We appreciate and value your comments.