-
Cisco Active Network Abstraction Administrators Guide Version 3.5.1
-
Introducing Cisco ANA
-
Getting Started with Cisco ANA Manage
-
Deploying Cisco ANA
-
General Cisco ANA Manage Tables
-
Managing Cisco ANA Units
-
Managing AVMs and VNEs
-
Managing Global Settings
-
Managing Links
-
Managing Workflows
-
Managing Cisco ANA Security
-
Database Backup and Restore Procedure
-
Utility Scripts
-
Golden Source Registry
-
Ports Used by Cisco ANA
-
Drools Rules Engine
-
 Feedback
Table Of Contents
Deploying Cisco ANA
About this chapter:
This chapter describes the steps that must be performed to deploy Cisco ANA and provides cross-references to the relevant sections in this Administrator's Guide.
System Setup Flow
The flow below describes the steps required to deploy Cisco ANA using Cisco ANA Manage and the order in which they must be performed.
Figure 3-1 System Setup
Step 1—Prepare a deployment plan—The user must decide the following:
•
How many Cisco ANA Unit servers are going to be deployed and allocate AVMs (Autonomous Virtual Machines) to each server.
•
•
–
–
–
–
Note
•
•
•
•
Step 2—Set up and manage ANA Servers—This includes the following:
•
In addition, the administrator can configure Cisco ANA Units for high availability and assign the Cisco ANA Units to protection groups. The standby Cisco ANA Units can be configured and assigned to protection groups (optional). For more information, refer to the Cisco Active Network Abstraction High Availability User's Guide.
•
•
Note
Step 3—Customize protection groups—Enables the administrator to change the default setup of Cisco ANA Units by customizing protection groups (clusters) and then assigning Cisco ANA Units to these groups. For more information, refer to Cisco Active Network Abstraction High Availability User's Guide.
Note
Step 4—Customize polling groups—Enables the administrator to customize new polling groups and rates. For more information, see the Customizing a Polling Group section.
Note
Step 5—Define static links—Enables the administrator to add a static link between two ports of two Network Elements in the network (optional). For more information, see the Creating a Static Link section.
Step 6—Manage and run workflows—Enables the administrator to manage workflow templates and running workflows in runtime using the Workflow Engine branch (optional). For more information, see the Managing Workflows section.
User and View Setup Flow
The flow below describes the steps required to setup Cisco ANA users and the view using Cisco ANA Manage and the order in which they should be performed.
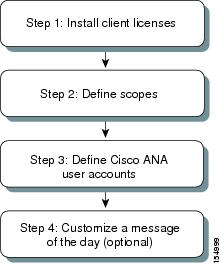
Figure 3-2 User and View Setup
Step 1—Install client license(s)—Enables the administrator to install and uninstall the client license provided by Cisco. For more information, see the Managing Client Licenses section.
Step 2—Define scope(s)—Enables the administrator to define and manage scopes. For more information, see the Creating Scopes section.
Step 3—Define Cisco ANA user accounts—Enables the administrator to define and manage Cisco ANA user accounts. For more information, see the Creating New Cisco ANA User Accounts section.
Step 4—Customize a message of the day—Enables the administrator to define a message (service disclaimer) that will be displayed when the user logs in to the Cisco Client applications. For more information, see the Customizing a Message of the Day section.
For a detailed description about how Cisco ANA implements a role-based security mechanism with scopes (groups of Network Elements) that are granted to users and managing users in the Cisco ANA platform, see the Managing Cisco ANA Security section.