This deployment guide provides information on how to set up the Cisco® Secure Access Control Server (ACS) Version 5 for the Cisco Virtual Office solution. This guide uses screenshots taken from Cisco Secure ACS 5.2, but steps for deployment, as well as the interface, are similar for any Cisco Secure ACS Version 5.x. This guide will refer to Cisco Secure ACS Version 5 or Cisco Secure ACS 5.x to include all releases within Version 5.
The new Cisco Secure Access Control Server is an improved way to perform authentication, authorization, and accounting (AAA). The Cisco Secure ACS Version 5 is more granular to allow greater flexibility in authentication. Users authenticate against rules created by administrators. These rules contain conditions such as time and date, group the user is in, and even the group the device is in.
Cisco offers two installation options for Cisco Secure ACS Version 5: a dedicated standalone appliance and a VMware ESX image. Their requirements follow:
Standalone Appliance
• ACS 1121 Appliance: Intel Xeon @ 2.66 GHz, (Quad Core), 4-GB memory, 500-GB hard drive (2 x 250 GB)
• VMware Requirements: VMware ESX 3.5 or 4.0; Intel Core 2 @ 2.13 GHz; 4-GB memory, Minimum 512-GB hard drive
Cisco Secure ACS Version 5 Graphical User Interface
This section discusses the Cisco Secure ACS Version 5 GUI.
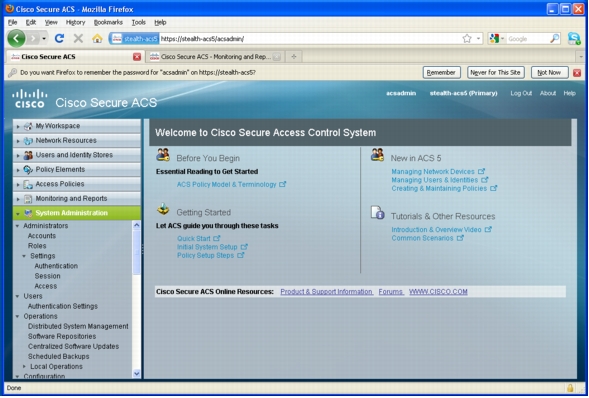
Figure 1 shows the My Workplace tab of Cisco Secure ACS Version 5. This window is displayed after you log into the Cisco Secure ACS GUI. The content of the My Workplace tab is shown in the main window of the ACS GUI. The tabs on the left are for configuration.
Figure 1. My Workspace Tab
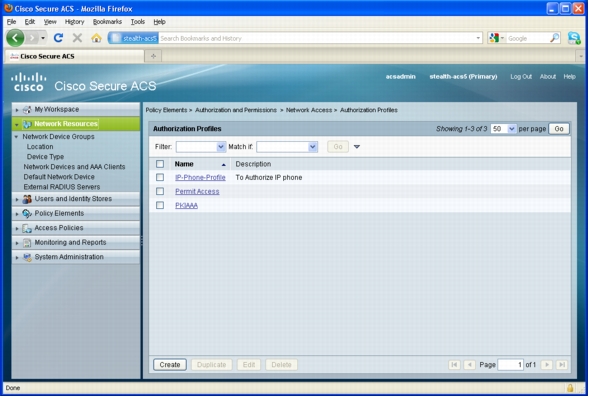
Figure 2 shows the Network Resources tab, which includes the Network Device Groups, where devices that are allowed to use the AAA for authentication of users are listed.
Figure 2. Network Resources
Figure 3 shows the Users and Identity Stores tab, where users and devices can be created. Users can also be imported from LDAP or Microsoft Active Directory.
Figure 3. Users and Identity Store
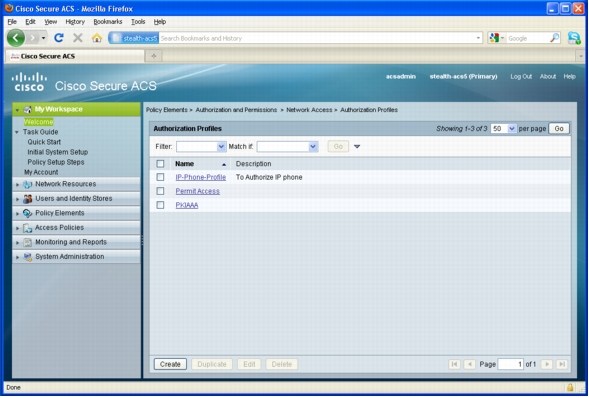
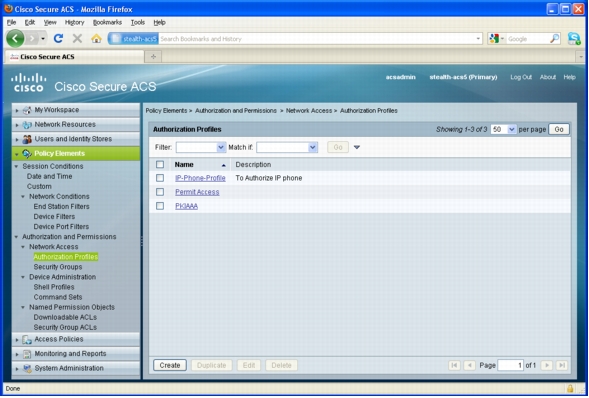
Figure 4 shows the Policy Elements tab; policy elements are used to create conditions that users have to meet in order to be given privileges.
Figure 4. Policy Elements
Figure 5 shows the Access Policies tab; access policies are used to create rules. The rules are created using the condition in the Policy Elements tab.
Figure 5. Access Policies
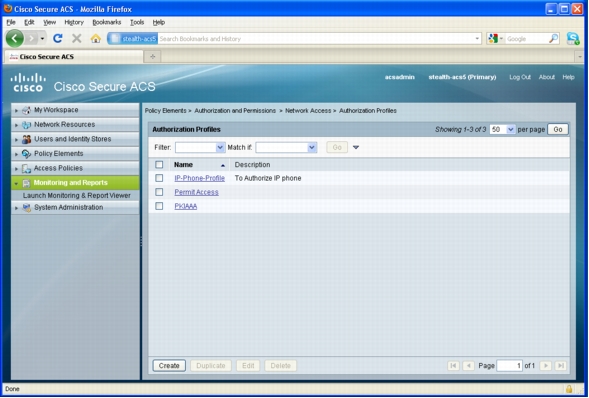
Figure 6 shows the Monitoring and Reports tab. Click the Launch Monitoring & Report Viewer tab to open a new window that has logging and monitoring capabilities.
Figure 6. Monitoring and Reports
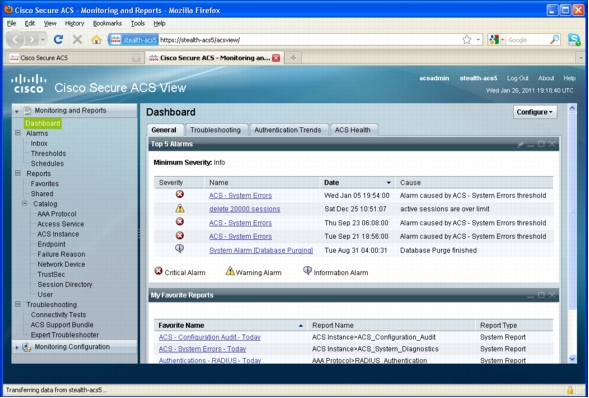
Figure 7 shows the Monitoring window, which gives information on alarms, reports, and pass/failed authentication attempts.
Figure 7. Monitor and Reports Window
Figure 8 shows the System Administration tab. This tab contains configuration options to manage the system, operation configurations, logging configuration, and licensing.
Figure 8. System Administration
Cisco Secure ACS Version 5 Configuration for Cisco Virtual Office
The Cisco Secure Access Control Server (ACS) requires configuration upon installation for proper functioning. The following section details the configuration required to interoperate with Cisco Virtual Office. If ManageExpress Virtual Office (MEVO) software is used, this ACS configuration should be done before configuration of MEVO.
Installing a Certificate
Most of the EAP protocols require the use of a certificate to authenticate the ACS server. In Cisco Virtual Office, 802.1x and wireless authentication use EAP protocols, and installation of a certificate on the ACS is required.
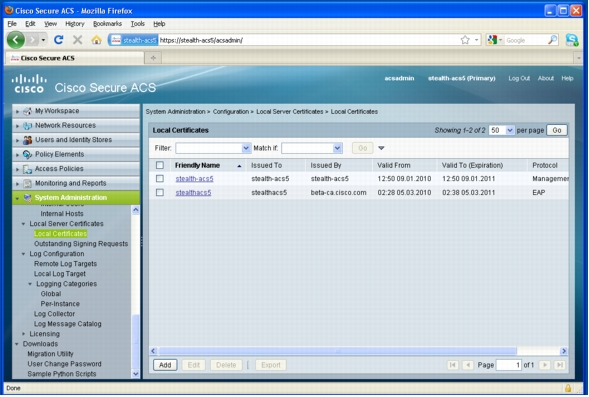
Multiple certificates can be installed in Cisco Secure ACS Version 5. Figure 9 shows where to install the certificate: Go to System AdministrationàLocal Server CertificatesàLocal Certificates and click Add.
Figure 9. System Administration Local Certificates
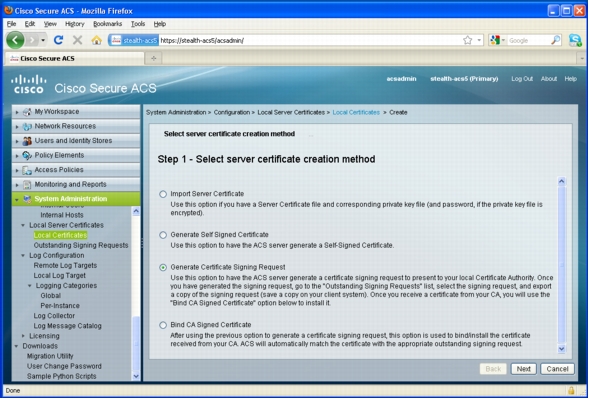
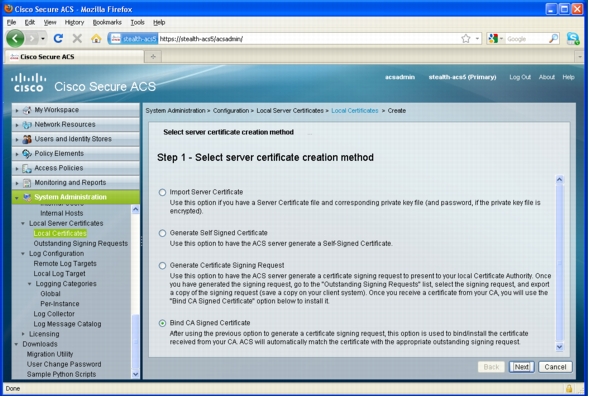
Select Generate a Certificate Signing Request, and click Next, as shown in Figure 10.
Figure 10. Generate Certificate Request
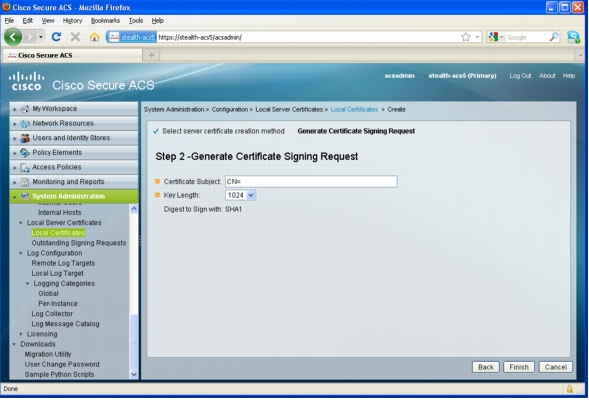
Fill in the Certificate Subject box and select the key length, as shown in Figure 11. The Certificate Subject should contain at least the parameter "CN", which is the common name or hostname of the ACS server.
The Key Length should be at least 1024 bits long.
Click Finish.
A window will pop up to download a text file with the certificate request. Use this certificate request to generate a new certificate.
If you are using Microsoft Certificate Authority, go to http://IP_Certificate_Authority/certsrv and go to Request a CertificateàAdvanced Certificate Request. Copy and paste the certificate request and click Submit. Then download the certificate.
For other certificate authorities, please refer to the specific documentation for that certificate authority.
Figure 11. Certificate Parameters
Retrieve the certificate from the certificate authority.
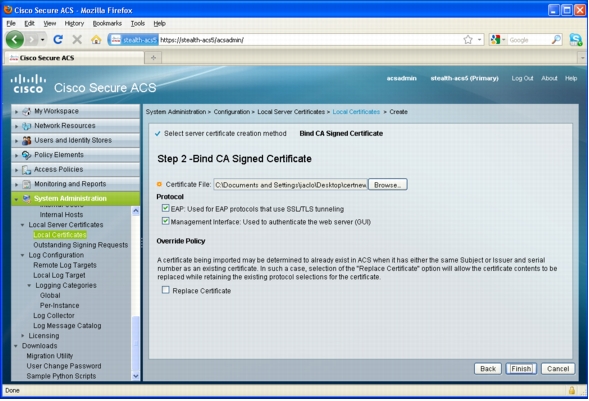
After the certificate is downloaded, go to System AdministrationàLocal CertificatesàBind CA Signed Certificate, and select Next, as shown in Figure 12.
Figure 12. Bind CA Signed Certificate
Select Browse and choose the certificate that was downloaded.
Check the appropriate protocols in the Protocol section; the certificate will be used for those protocols selected.
As shown in Figure 13, for certificate-based user authentication, select the EAP option.
Figure 13. Upload Certificate
Click Finish to complete the certificate installation. Click Local Certificates on the left again, and make sure the certificate appears under Local Certificates and is in a valid state.
Migration from Cisco Secure ACS 4.x to 5.x (Optional)
This section discusses the migration from Cisco Secure ACS Version 4 to Cisco Secure ACS Version 5.
Migration can be done only if the original Cisco Secure ACS Version 4 is installed on a Microsoft Windows server. If the original ACS is purchased as an appliance, then the database must first be replicated to an ACS running on a Microsoft Windows server. The ACS installed on the Microsoft Windows Server must also match the ACS version installed on the appliance.
To begin migration, you need the migration tool. From the Microsoft Windows server installed with the original Cisco Secure ACS Version 4, open a browser and log into the Cisco Secure ACS Version 5 GUI; e.g., https://acs5.
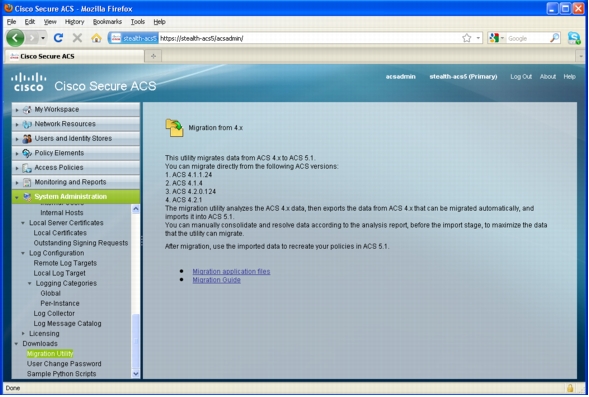
Go to System AdministrationàDownloadsàMigration Utility, as shown in Figure 14.
Click Migration application files.
Figure 14. Migration Utility Download
The file will be downloaded as a zip file. After the download, extract the content in the zip file to a local directory.
When the file is unzipped, the folder named Migration will be created. Within the Migration folder are four folders: bin, config, jre, and lib. Inside the folder bin is a file called migration.bat, which is the tool you use for migration from 4.x to 5.x.
Note: Do not use remote desktop. Migration tool will fail.
Use VNC or, while directly using the Windows server, open a Windows command prompt. From the command prompt, change directories to the bin folder. When you are inside the bin folder, type "migration.bat" (without the quotes) and click Enter to execute the migration tool.
Following are the steps to use the Migration Utility.
First, export the data from the Cisco Secure ACS 4.0:
This utility migrates data from ACS 4.x to ACS 5. You can migrate directly from the following ACS versions:
- ACS 4.1.1.24
- ACS 4.1.4
- ACS 4.2.0.124
- ACS 4.2.1
Data migration involves the following:
a. The migration utility analyzes the ACS 4.x data, exports any data from ACS 4.x that can be migrated automatically, and imports the data into ACS 5.
b. Before the import stage, you can manually consolidate and resolve data according to the analysis report, to maximize the amount of data that the utility can migrate.
c. After migration, use the imported data to recreate your policies in ACS 5.
1. Name: Real Name Comment: Attribute cannot be added.4-37 Migration Guide for the Cisco Secure Access Control System 5.1 OL-19125-01 Chapter 4 Migrating Data from ACS 4.x to ACS 5.1 Migrating Multiple Instances
2. Name: Description Comment: Attribute cannot be added.
The following Network Device Groups were not imported:
After you finish this process, the database should be migrated from Cisco Secure ACS 4.0 to Cisco Secure ACS Version 5.
Setting Up Network Devices
The Network Resources section is used to categorize and group network devices that will be sending authentication, authorization, and accounting (AAA) requests to the ACS.
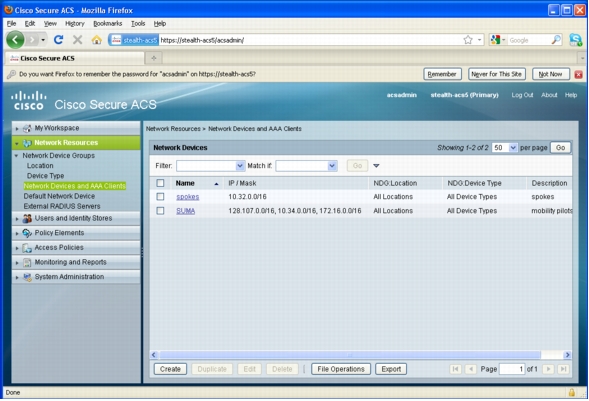
The Network Resources tab is where network devices and AAA clients are added, as shown in Figure 15. To add a network device or an AAA client, click Create.
Figure 15. Network Resources Tab
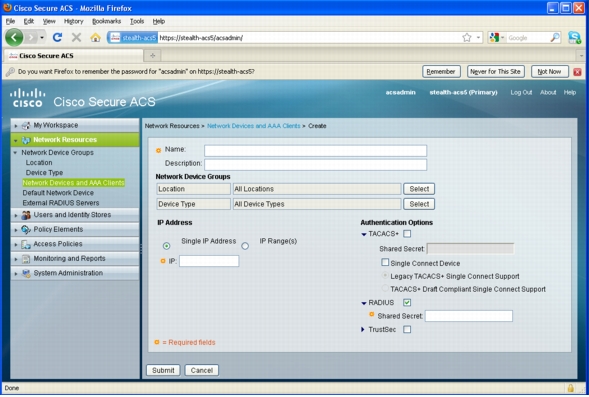
To add a network device, go to the Network Resources tab and select Network Devices and AAA clients. Figure 16 shows what is required to add a new Network Device. After entering the name of the Device/AAA client, select an option under Authentication options. Cisco Virtual Office is configured for RADIUS; select that option and enter the shared secret.
Figure 16. Adding Network Resources Single IP Address
You can add either a single IP address or IP range(s) as network devices. The IP addresses included under the IP Address section are allowed as originating IP addresses for AAA. Adding an IP range will allow all devices within that IP range to submit an AAA request to the ACS. You can configure multiple subnets; you also can combine a single IP address and multiple subnets. Devices with IP addresses not specified in this section will be denied if they attempt to send an AAA request to the ACS.
You should add the IP address range that Cisco Virtual Office routers use and then click Submit.
Adding User Groups
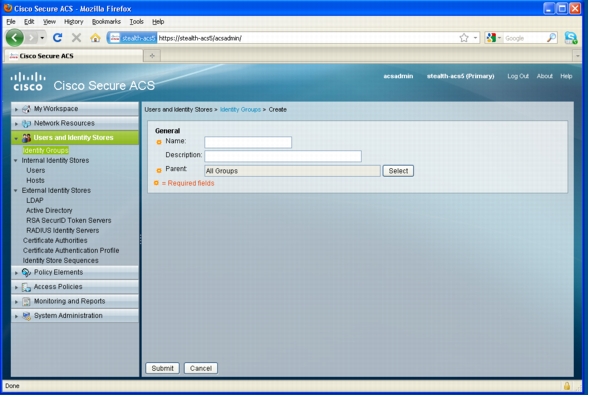
Groups are logical divisions of Cisco Virtual Office users. Each group carries only three attributes: Name, Description, and Parent group, as shown in Figure 17.
Cisco Virtual Office supports two web authentication methods: Authentication Proxy and User Group Firewall.
First, go to Users and Identity StoresàIdentity Groups.
For example, to create a group for Authentication Proxy, click Create and fill in the Name field with Authentication Proxy.
Fill in a Description as desired.
Leave the Parent field as All Groups.
Click Submit.
The name of the group has no effect on the function of the group, although descriptive names do help with monitoring. Repeat the process to create a group for User Group Firewall. Users will be added to the group later.
Figure 17. Creating a Group
Adding New Users
Cisco Secure ACS supports both internal and external databases. In the internal database, user credentials are stored locally on the ACS server. In the external database, user credentials can be stored on other supported servers; e.g., Microsoft Active Directory.
For the authentication mechanism to function properly, each Cisco Virtual Office user must be added to the ACS, either using the internal database or linked from an external database.
To set up an internal user, go to Users and Identity Stores, as shown in Figure 18. Click Create to create a user.
Figure 18. Adding a New User
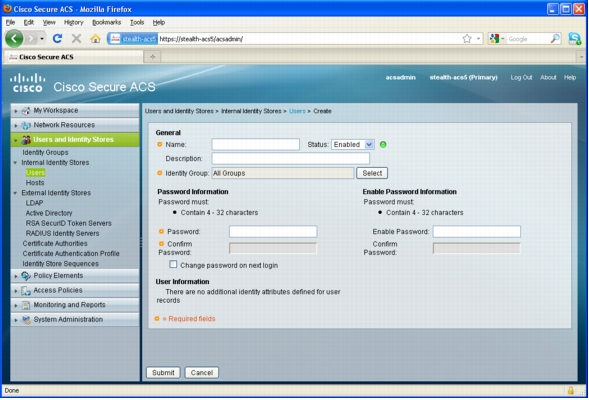
Figure 19 shows the window to add a new user. In the General section are four fields: Name, Status, Description, and Identity Group.
Fill in the Name field as the username of the employee.
Check the Enabled status field to enable this account.
Check the appropriate Identity Group to associate the user with the group desired.
The Password Information section has five fields: Change password on next login, Password and a confirmation, and Enable Password and a confirmation.
Do not check the Change password on login check box; checking this box forces a change of password. The RADIUS/TACACS authentication request will be rejected.
Fill in the Password and Confirm Password fields for authentication.
The Enable Password and Confirm Password fields are used to authenticate the user when logging into a router. Leave these fields blank, because users do not usually have "enable" access to Cisco Virtual Office routers. Filling in an Enable Password field will not automatically allow access to the network device. An access policy will need to be created to specify if any user needs access to a network device.
To add a user as part of the Authentication Proxy group, fill in the username, leave the status as enable, and for Identity Group, click Select and choose Authentication Proxy from the pop-up window. Fill in the Password the user will be using in the authentication proxy. When all appropriate fields are filled in, click Submit.
Figure 19. New User Attributes
You can also link the ACS to an external database for user credentials. LDAP, Active Directory, RSA SecurID Token Servers, and RADIUS Identity Servers are supported. Click each option and configure the connection appropriately to activate the external database.
Note: Only one Active Directory domain can be connected from the ACS.
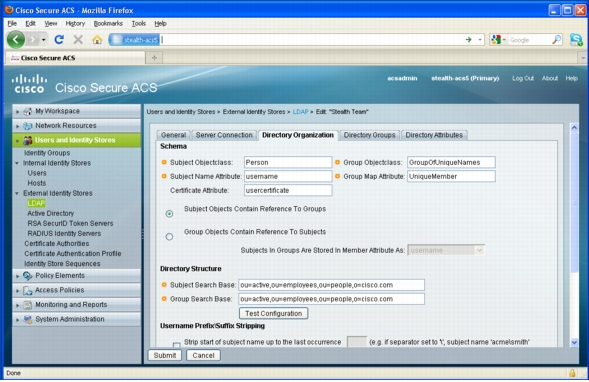
Figure 20 shows an example of LDAP configuration.
Figure 20. LDAP External Identity Store
Creating Authorization Policies
This step is required if you are using authentication proxy, user group firewall, or PKIAAA.
After creating the user in the group, you must create an authorization profile. This profile ensure proper authorization parameters are passed back to the Cisco Virtual Office routers for the user to obtain proper authorization. Without proper authorization, any of the previously mentioned features will return a rejection.
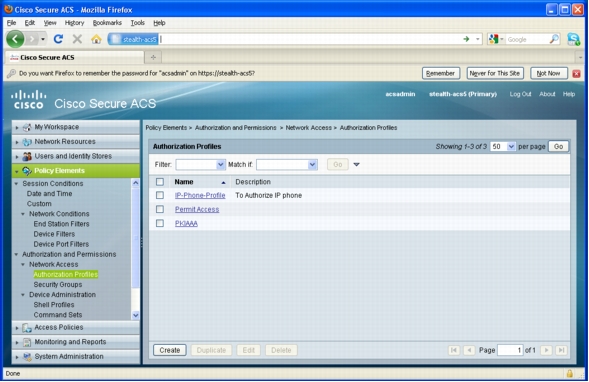
Figure 21 shows the Policy Elements window. To create a new Authorization Profile, go to Policy ElementsàAuthentication and PermissionsàNetwork AccessàAuthorization Profiles and click Create.
Figure 21. Policy Elements
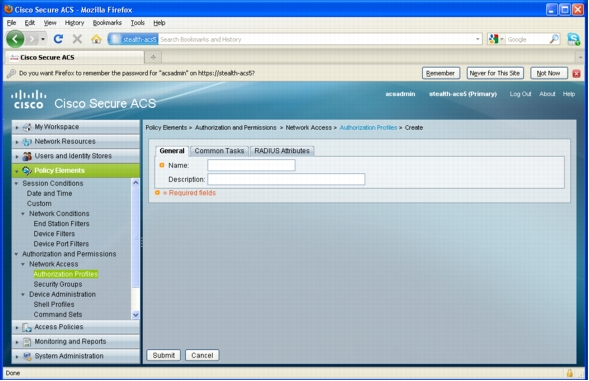
Figure 22 shows the Create window. Give an appropriate name to the profile; e.g. authentication proxy, PKIAAA, or user group firewall.
Figure 22. Authorization Profiles
The Common Tasks tab is not important for the Cisco Virtual Office deployment.
For a Cisco Virtual Office deployment, the most relevant tab is the RADIUS Attributes. All the features rely on RADIUS attributes return to function properly.
For PKI-AAA, the RADIUS attribute required is: RADIUS-Cisco; cisco-av-pair; pki:cert-application=all.
The configuration is also shown for PKIAAA in Figure 23.
Figure 23. Authentication Profiles Common Tasks
For authentication proxy, the RADIUS attributes required follow:
• RADIUS-Cisco; cisco-av-pair; auth-proxy:proxyacl#1=permit ip any any
Access Policies
This section ties the previously defined user group to the authorization policies to allow the association between a group of users and a particular authorization policy. The group of users can then be properly authorized for their activity within the boundary of the associated policy (e.g., authentication proxy, etc.)
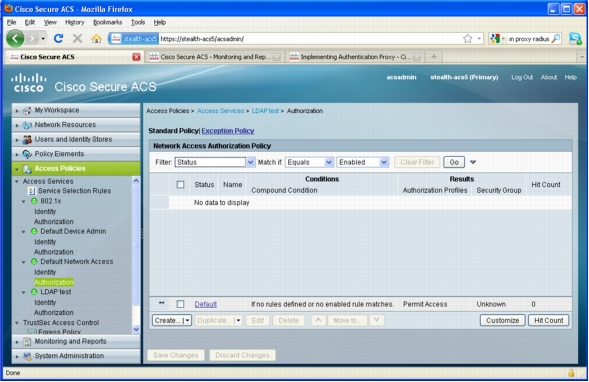
To achieve authorization an authorization policy must be created for each group of users. Go to Access PoliciesàAccess ServicesàDefault Network AccessàAuthorization, as shown in Figure 24.
Figure 24. Access Policies
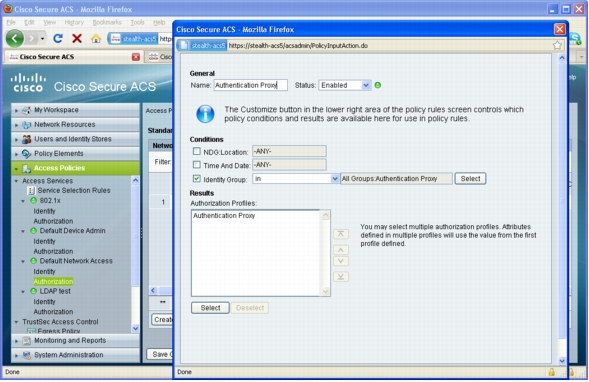
Click Create at the bottom left. A pop-up window will appear, as shown in Figure 25.
Create a meaningful name under the section General; e.g. Authentication Proxy.
For the Cisco Virtual Office, check Identity Group under Conditions.
Click Select to the right and pick the policy that matches the user group, e.g. Authentication Proxy created earlier in this document. Then click OK to confirm.
Under Results, click Select and pick the appropriate Authorization Profiles. Click OK to confirm.
Finally click OK to close the pop-up window.
Figure 25. Creating Authorization Rule
After the confirmation, you should have a rule that associates the user group to an appropriate authorization profile. Figure 26 shows an example of authentication proxy. The rule named Authentication Proxy associates the Authentication Proxy user group to the Authentication Proxy authorization profile.
Figure 26. Final Access Polices
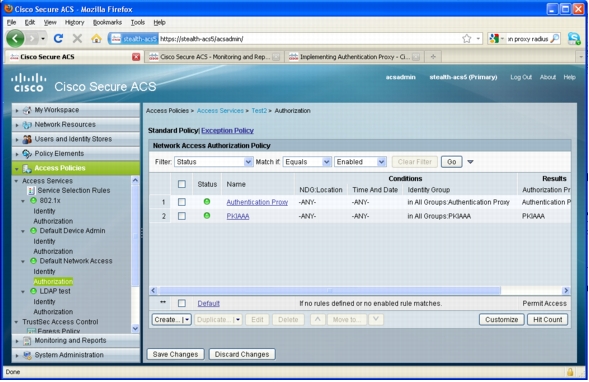
If multiple features are used, create more rules as appropriate. Figure 27 shows the case with both Authentication Proxy and PKIAAA in use. The order of the rules does not matter.
Figure 27. Final Access Polices
802.1x Configuration for EAP-TLS (Certificate Authentications)
Simple 802.1x implementation produces an authentication request only. Because no authorization is taking place, it is not required for 802.1x users to be part of a specific group, or be assigned to a specific rule if rules and groups are already configured. The server accepts authentication requests by default.
802.1x allows two types of authentication: certificate or username/password.
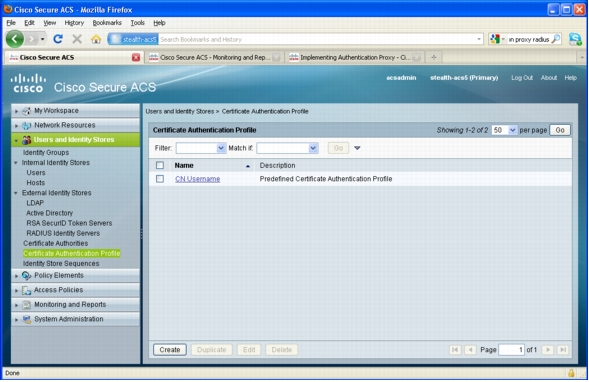
To allow certificate authentication, first go to Users and Identity StoresàCertification Authentication Profile. Make sure the attribute that stores the username in the X.509 certificate is present in the profile. For example, the common name (CN) is present as the username-storing attribute shown in Figure 28.
Note: This section is required only if you use 802.1x with EAP-TLS (certificate authentications). If you use only 802.1x username/password credentials authentication, skip this section.
Figure 28. Attribute in the X.509 Certificate that Stores the Username
Now add the newly defined authentication profile into the Default Access Service, so that both 802.1x certificate-based authentication and other standard authentication can function at the same time.
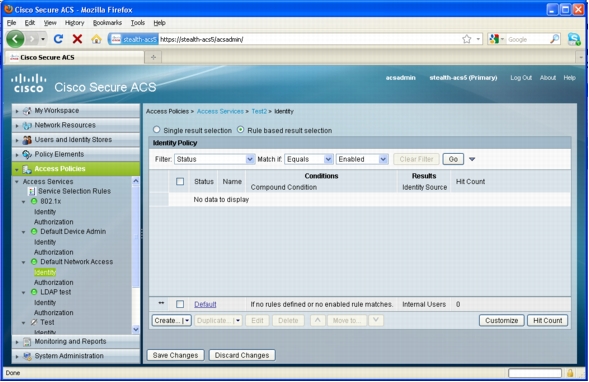
Go to Access PoliciesàAccess ServicesàDefault Network AccessàIdentity. Single result selection should be checked on the right; change it to Rule-based result selection.
Your screen should look like Figure 29 after the change.
Figure 29. Access Policies Identity
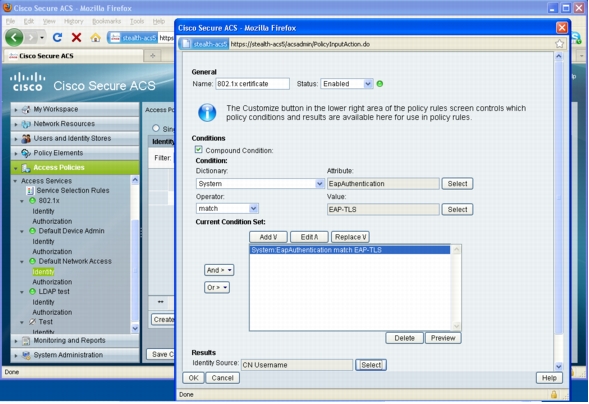
You must create two rules in Identity to sufficiently serve both 802.1x certificate authentication and standard authentication methods. The first rule is shown in Figure 30.
The rule is triggered when an EAP-TLS (802.1x certificate) authentication request comes in, and the identity source is set to CN Username (the identity profile created earlier to match the attribute from the certificate to the user credentials store).
Figure 30. Rule to Allow 802.1x Certificate Authentications
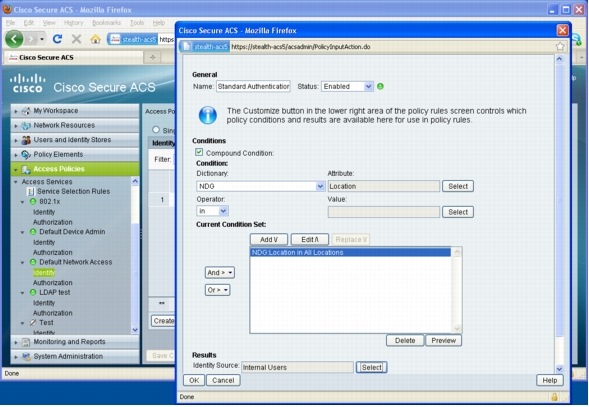
Then also create a second rule for the standard authentication (Figure 31).
Figure 31. Rule for Standard Authentication
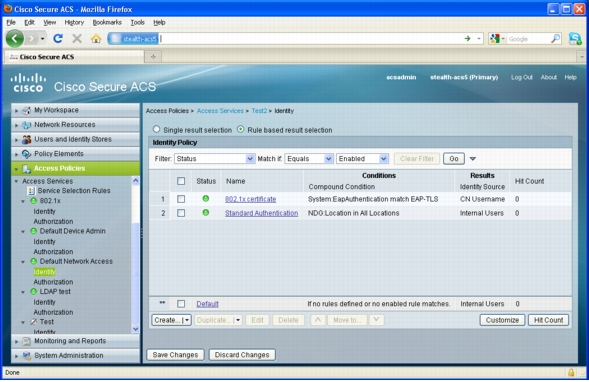
Your rule table should now look like Figure 32.
Figure 32. Rule-Based Result Selection
You have now finished the configuration for 802.1x with EAP-TLS (certificate authentications).
Wireless and SDP Profiles
Wireless and SDP authentications do not require separate configuration on the Cisco Secure ACS. If wireless EAP-TLS is used, the configuration from 802.1x with EAP-TLS in the previous section would satisfy the configuration requirements.
Please make sure the users are present in the selected identity store.
You have finished the configuration for Cisco Access Control Server Version 5 for Cisco Virtual Office.
Resources
For more information about Authentication Proxy, click here: