Most enterprises understand the power of video-based information delivered at precisely the time when that information can be most effectively absorbed and used. They also understand that the technical quality of that video presentation, in addition to content quality, has a significant effect on the video's ability to engage the viewer and impart the message. Previous efforts to deliver high-quality video messaging, either live or on video tape or DVD, have been expensive, time consuming, difficult to control, and difficult to maintain. Network-based delivery of live video and video on demand (VoD) require significant bandwidth and dedicated content distribution networks.
The Value of Business Video
• Executive communications about corporate goals, achievements, changes in direction, and new campaigns: Employees appreciate getting a sense of the person making the announcement, and the executive's urgency, pride, and priorities come across naturally.
• Sales force and product training: Viewers can return to parts of the video they need to watch again, training can be delivered no matter where the employee is, and the content can be updated frequently. This feature is especially valuable for technology, pharmaceutical, financial, and other industries where products change frequently.
• Employee regulatory compliance training: Viewers can repeat certain sections to make sure they understand them, and the video can display documents along with a person talking to clarify the information. In addition, the delivery system can monitor which employees have seen the material.
The Problem with Business Video
A Simple Solution
• Creating a file server file share to store Windows Media video content
• Creating a web server to serve web content other than Windows Media video content
• Creating an FTP server to upload content to the web and file server
• Setting the Windows Media access mechanism specified in Cisco DMS to a file-based URL
• Setting up Cisco WAAS prepositioning policy directives
• Managing file server access authorization
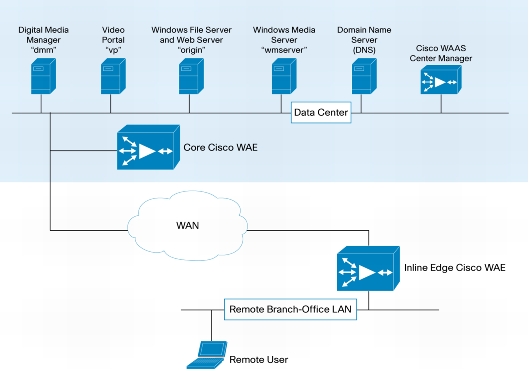
Figure 1. Conceptual Network Diagram for waaslab.local
Configuring Live Events with Cisco WAAS and Cisco DMS
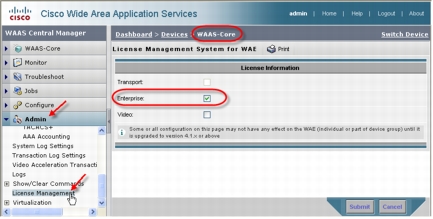
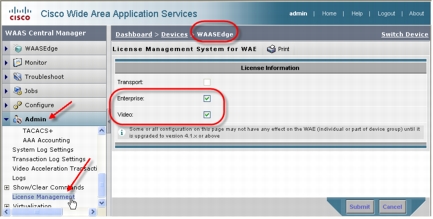
1. From the Cisco WAAS Central Manager GUI, select the edge device that will perform the stream split to serve the requesting users and, under the Admin group, click License Management.
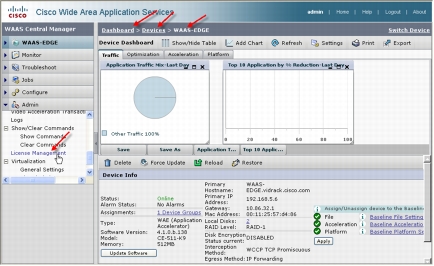
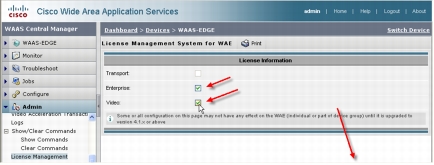
2. Verify that the Enterprise and Video licenses have been enabled. Click Submit (button not shown) to complete the transaction.
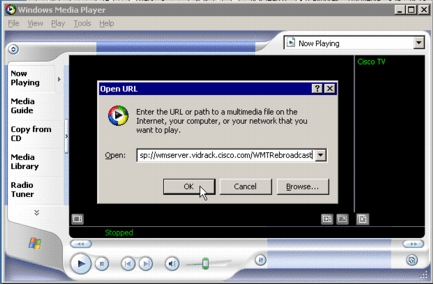
3. Configure Cisco DMS for a live event in the standard way using a Windows Media Server as the live publishing point. The screen shot shown here and the following discussion and illustrations assume that the publishing point is rtsp://wmserver.vidrack.cisco.com/WMTRebroadcast. This particular publishing point is a rebroadcast of a previous live event. Define the type of this video part in Cisco DMM as Non-DME Live Event. Then start the live event and deploy the program to the Cisco Video Portal.

4. On the Video Portal tab, verify that the live event has been properly deployed.
5. Open a Telnet session for the edge Cisco WAE and clear the video counters:
6. On the Video Portal tab, click the video link and then click Play Video.
7. Open Windows Media Player and enter the URL specified during program setup in the Cisco DMM: in this case, rtsp://wmserver.vidrack.cisco.com/WMTRebroadcast. When you click OK, two requests for the same live video stream will be sent to the origin Windows Media Server at wmserver.vidrack.cisco.com.
8. In the edge Cisco WAE telnet session, again show the video statistics:
Note: The Windows Media live accelerated count and the number of incoming and outgoing sessions. One stream is incoming from the origin server, and two streams are outgoing from the Cisco WAAS WAE to the requesting clients. In fact, any number of Cisco Video Portal clients can view the live event without incurring additional overhead on the WAN connection to the origin server.
Configuring Video On Demand with Cisco WAAS and Cisco DMS
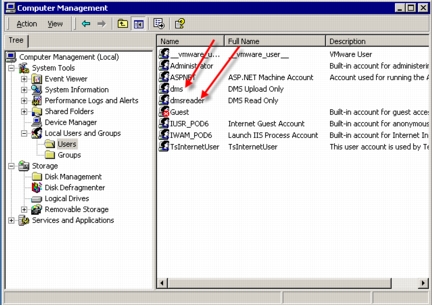
1. Create a local username on the origin server specifically for uploading content from Cisco DMM to the file server and create a local username for read-only access to the uploaded content. In the screenshot here, local usernames dms and dmsreader have been created, both have passwords that do not expire, and both have been removed from all groups, including the User group, so that access to any resource on the file server must be explicitly granted.
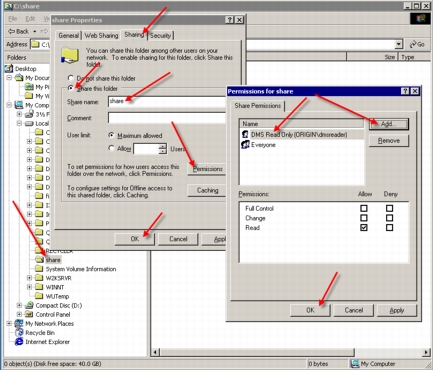
2. To allow users to view content stored on the file server, each user must be given read access to certain shares on the file server and be authenticated to the file server prior to accessing content using the Cisco Video Portal. To do this without compromising the security of the file server or its content, we will create an empty shared file folder called share on the server. In a Microsoft Active Directory environment typical of most enterprises, read-only access to the share can be assigned to one or more Active Directory groups. For this lab setup, we will grant read-only access to the local machine (dmsreader) user. Each user who will use the Cisco Video Portal must mount this share and authenticate with the server prior to accessing the Cisco Video Portal.
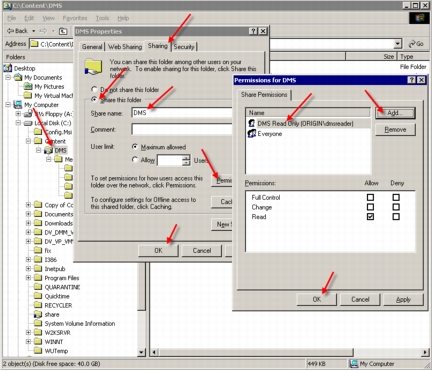
Create a folder named share, right-click the folder and choose Properties. In the "share Properties" dialog box, select the Sharing tab. Click the "Share this folder" radio button and name the share. Click Permissions. In the "Permissions for share" dialog box, click the Add button. A Select Users, Computers, or Groups dialog box will appear (not shown). In the "Look in" drop-down menu, select the origin server. Under Name, find and select the dmsreader username, click Add, and then click OK. Click OK to close the "Permissions for share" dialog box and click OK again to create the share.
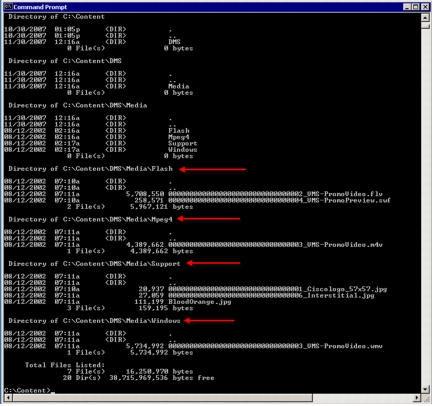
3. Create a folder hierarchy to contain the published media content and share the high-level folder. The screenshot here shows a shared folder called DMS within the Content folder. Inside is a Media folder with subfolders of Flash, Mpeg4, Windows, and Support. Each of these subfolders will contain the corresponding media content type published by the Cisco DMM. The content of each folder will be prepositioned by Cisco WAAS. The Windows Media content in the Windows folder will be served by the Cisco WAAS WAE at the edge.
Security for the shared DMS folder is set so that the dms username, used by the Cisco Video Portal deployment facility, can update the folder contents. Each subfolders inherits permissions from the DMS folder.
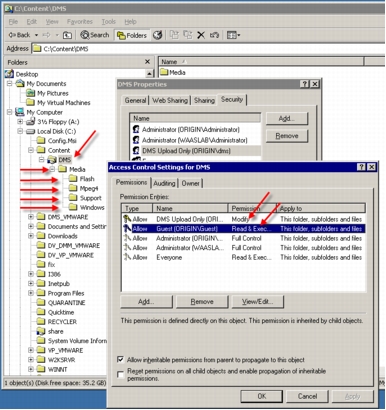
4. Create the DMS folder similar to the way you did the share folder in Step 2. Like the share folder, the DMS folder is shared. Set security for the shared DMS folder so that the dmsreader user can (only) read the folder content.
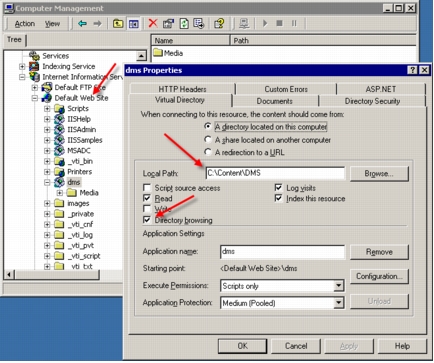
5. From the Computer Management Internet Information Services console, right-click Default Web Site and create a new virtual directory with an alias name of dms. Enter the directory path to the DMS file share created in Step 4 as the website content directory. Enable the Directory Browsing access permission for the new virtual directory.
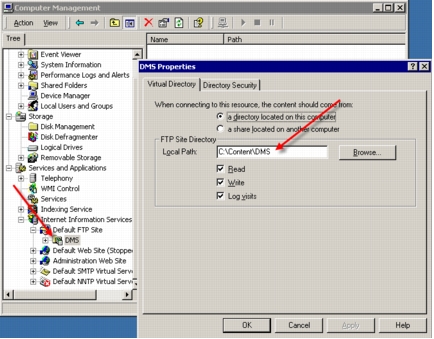
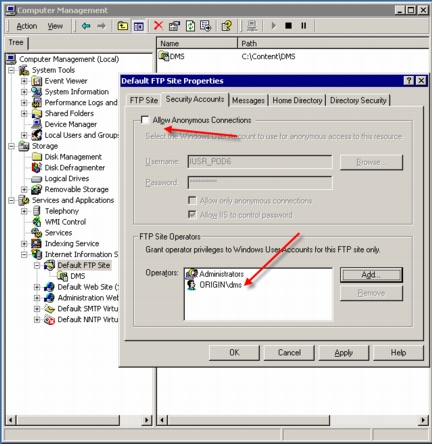
6. From the Computer Management Internet Information Services console, right-click Default FTP Site and create a new FTP virtual directory called DMS with a local path of the shared DMS folder just created. Give the DMS virtual directory read and write permissions. This FTP site will be used by the Cisco DMM to publish content.
7. In most production environments, anonymous connection to an FTP server is prohibited. If this will be the case, make sure that the dms username is granted access to the FTP server.
Configuring the Cisco DMM Video Portal Module
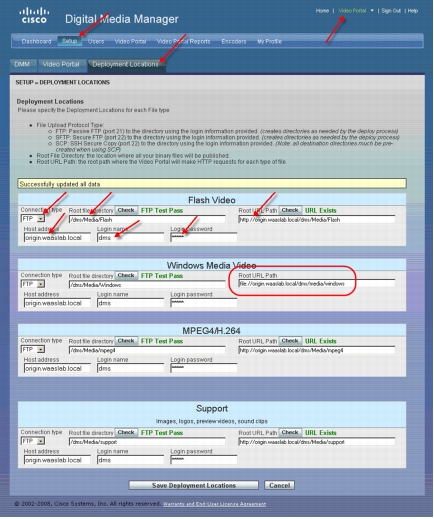
1. In the Cisco DMM Video Portal module, choose Setup > Deployment Locations. Here, we will connect the FTP deployment location with the root URL path. For each file type, Flash, Windows Media Video, Mpeg-4/H.264, and Support, do the following:
• Choose FTP as the connection type.
• Enter the root file directory path to the folder created for that specific content type.
• Enter the host address of the FTP server.
• Enter the FTP login name and login password created for Cisco DMS to access the FTP server.
• Enter the root URL path expressed as an HTTP reference for the Flash, Mpeg4, and Support video root URL path, and as a file reference for the Windows Media video root URL path.
Note: Cisco DMS will not be able to check the validity of your Windows Media video root URL path when it is specified as a file path URL. However, you should be able to manually copy this root URL path into the address box of a browser, and it should resolve to the specified directory listing on the origin server.
2. In the Cisco DMM Video Portal Module, deploy content in the normal way. The Cisco DMM should send the deployed video content through FTP to the respective folders on the origin file server. As shown in the screenshot here, a newly installed Cisco DMM and Cisco Video Portal will have at least one sample video for each content type. Verify that the content is correctly deployed to the origin server.
Configuring Cisco WAAS Prepositioning
1. This document assumes that the Cisco WAAS deployment has been set up properly, that the standard default policies are in effect, and that traffic interception on the edge Cisco WAE has been set up and tested. For video-specific setup, in the Cisco WAAS Central Manager GUI (https://<waas-cm-ip-or-fqdn>:8443), verify the following:
• Both a server-side and an edge Cisco WAAS WAE exist and both are online.
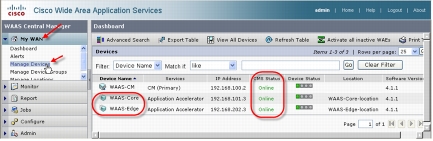
• The server-side core Cisco WAE has an Enterprise license.
• The edge Cisco WAE has an Enterprise and a Video license.
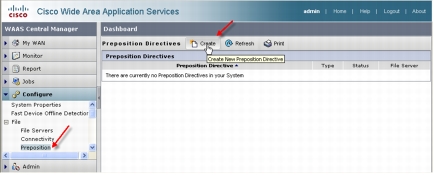
2. Create a new preposition directive. A preposition directive allows you to determine which files should be proactively copied from CIFS file servers to the cache of selected edge Cisco WAEs. Prepositioning enables you to take advantage of idle time on the WAN to transfer large or frequently accessed files to selected Cisco WAEs, so that users can benefit from cache-level performance even during first-time access of these files. From the menu list on the left, select Preposition. Then click the Create button.
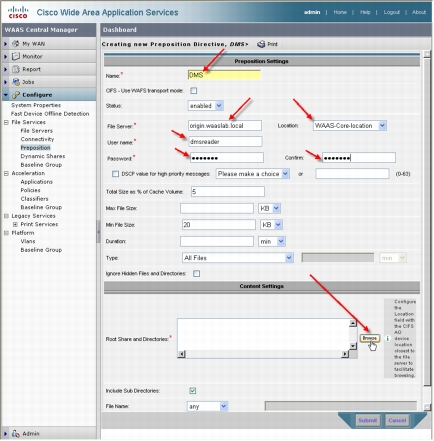
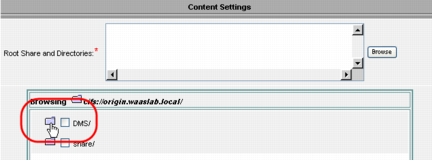
3. Enter a name for this preposition directive, the fully qualified domain name (FQDN) of the origin server, the Cisco WAE location that is closest to the origin server, and the dmsreader username and password that was set up on the origin server for read-only access. Click the Browse button. A browse window will appear below the Root Share and Directories list.
4. Click the folder next to the DMS/ directory. When the display refreshes, click the folder next to the Media/ directory.
5. Select Windows/ and then click the Select Directory button. /DMS/Media/Windows/ will be added to the Root Shares and Directories list. Click Submit.
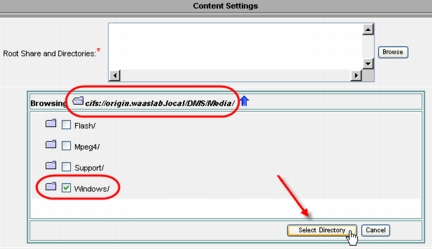
Note: For this sample deployment, we are prepositioning only the Windows Media files in the Windows directory as that file type is the only one that can currently be played using a CIFS file-based URL. However, it is advantageous and a best practice to preposition all files in all subdirectories in the DMS/Media directory, subject to available cache disk space. Prepositioning causes the DRE cache to become prepopulated so that when Cisco Video Portal makes a subsequent request for the Adobe Flash, Mpeg4, or Support assets, the download time will be significantly reduced.
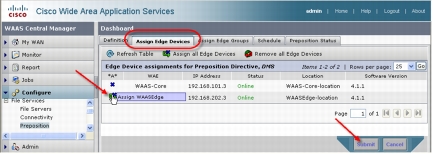
6. Four new tabs will appear next to the Definition tab. Select either Assign Edge Devices or Assign Edge Groups. Edge Cisco WAEs can be assigned to this preposition directive using either or both. Click the blue ![]() next to the edge Cisco WAE or defined edge group. The blue
next to the edge Cisco WAE or defined edge group. The blue ![]() will change to
will change to ![]() . Click Submit.
. Click Submit.
7. After create a preposition directive and assign Cisco WAEs to the directive, you should create a schedule that determines when and how often prepositioning occurs. Select the Schedule tab. This panel allows you to set up a regular schedule for prepositioning content to the edge Cisco WAEs. For this exercise and to immediately test the preposition directive, click Now and then click Submit. Your preposition directive will immediately begin to copy all files in the DMS/Media/Windows directory share.
Configuring Setup Verification
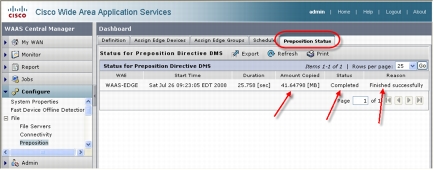
1. To monitor the preposition directive status, select the Preposition Status tab. Click the Refresh button until the Status column shows Completed.
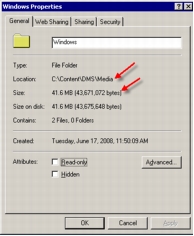
2. You can verify that the amount copied approximately equals the size of the prepositioned directory content. To do so, right-click on the folder name in Windows Explorer and select Properties.

3. To monitor the preposition directive status on a particular edge Cisco WAE, from the Cisco WAAS Central Manager GUI, under My WAN, select Manage Devices and select the edge Cisco WAE that will be monitored. In the Device Info panel, click Device GUI. A new window will appear showing the edge Cisco WAE GUI.
4. Under CifsAO, click Preposition.

5. A list of all preposition directives for this device will be displayed. Click the line of the DMS preposition directive and click View.
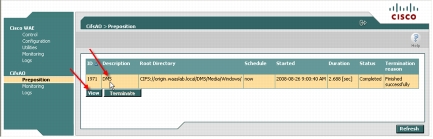
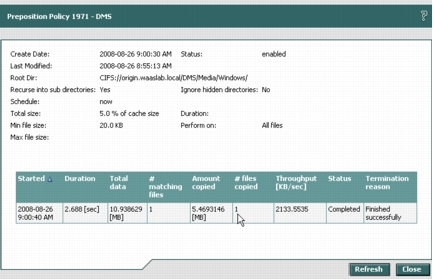
The current status of the directive will be displayed. In the screenshot here, the preposition directive has completed successfully.
6. Close the Preposition Policy status window, but do not close the edge Cisco WAE GUI window. We will use it again in this document to verify the setup.
Verifying Cisco DMS Setup
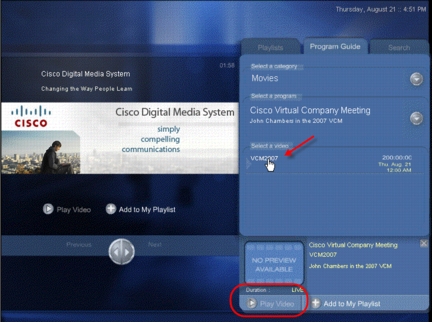
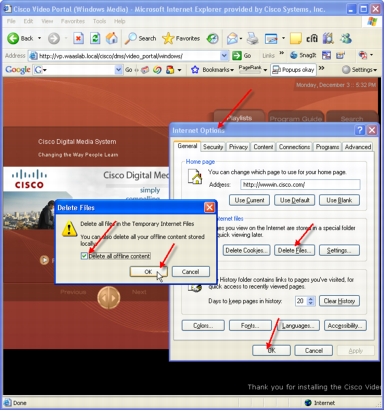
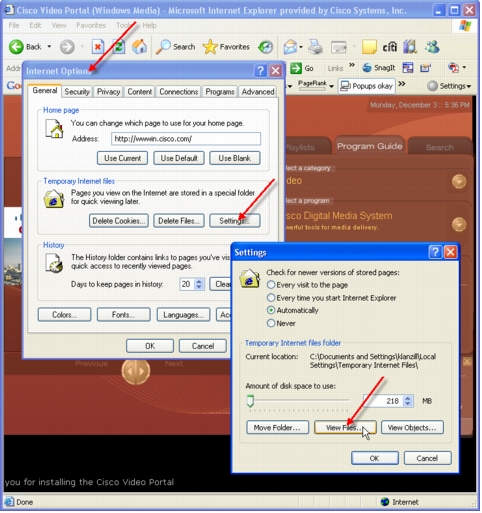
1. Open a browser window and enter the address to the installed Cisco Video Portal (http://<vp-fqdn> ). Delete all temporary Internet files.
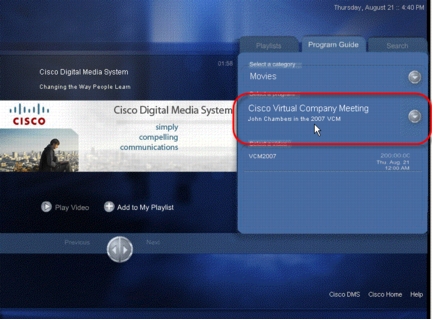
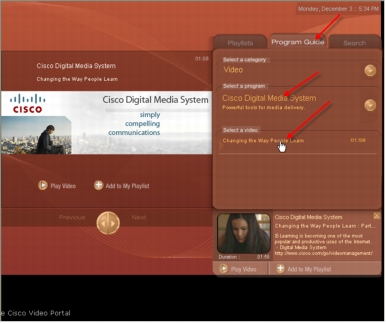
2. Click the Program Guide tab. Click the Cisco Digital Media System program and then select the video displayed. Do not play the video yet.
3. In the browser's Tools menu, choose Internet Options. In the Internet Options dialog Box, click Settings. In the Settings dialog box, click View Files. A new browser window will appear showing all temporary Internet files and cookies.
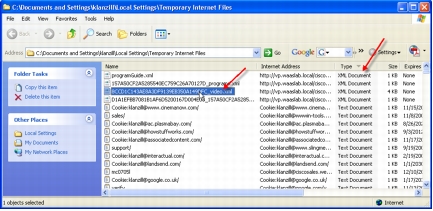
4. Perform a reverse sort on Type so that the XML files are at the top of the list. You are looking for the file that ends with "_video.xml." This XML file contains the metadata for the selected video. Double-click the filename to display the file in a new browser window.
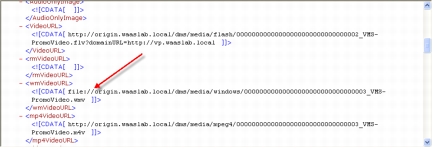
5. Scroll down the XML file display looking for the <wmVideoURL> XML tag. Note that the URL is a well-formed file-access URL. This URL can be copied and entered directly in Windows Media Player (WMP) and will be used by the embedded WMP contained in the Cisco Video Portal.
Verifying Playback of Prepositioned Video
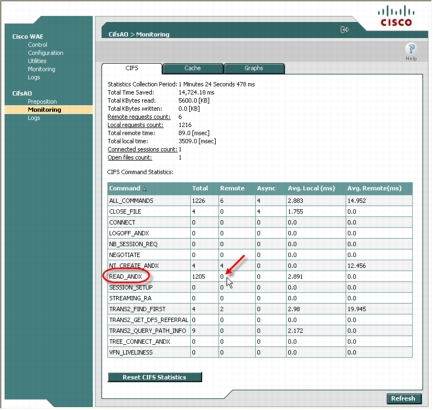
1. Return to the edge Cisco WAAS WAE GUI browser window and, under CifsAO, select Monitoring. Select the CIFS tab and click Reset CIFS Statistics. Your display may not contain all the CIFS commands shown in the screenshot here.

2. Back in the Cisco Video Portal browser window, close the Settings and Internet Options dialog box. In the Cisco Video Portal browser window, click the Play Video button for the selected video. Play the video through to the end.
3. In the edge Cisco WAAS WAE GUI browser window, click Refresh. The CIFS command statistics will be displayed showing the total commands processed for each type and the number that were processed remotely. The difference will be the commands processed by the edge Cisco WAE. Note that the READ_ANDX command was processed completely on the local Cisco WAE, indicating that the played video file was served completely from the local Cisco WAAS WAE.
Conclusion
For More Information