Feedback Feedback
|
Table Of Contents
Wireless Device Profiling and Policy Classification Engine on WLC
Scope, Objectives, and Expectations
Profiling and Policy Configuration
Creating Policies on WLAN from WLC GUI
Mapping the Policy to an AP Group
Example of Policy Enforcement on Other Device Types
Commands to Configure Profiling through CLI
Commands to Configure Policy through CLI
WLAN Configuration for Sleeping Client
Wireless Device Profiling and Policy Classification Engine on WLC
Last Updated: November, 2013Release: Wireless Device Profiling and Policy Classification Engine on WLC, Release 7.5
Table of Contents
•
Scope, Objectives, and Expectations
•
•
•
•
•
•
–
Overview
Cisco currently offers a rich set of features which provides device identification, onboarding, posture and policy, through ISE. WLC has been enhanced with some of these capabilities. This document deals with basic configuration of device profiling and policy implementation through Cisco WLC.
This new feature (Profiling and Policy) on WLC does the profiling of devices based on protocols like HTTP and DHCP to identify the end devices on the network. Users can configure device based policies and enforce per user or per device policy on the network. The WLC will also display statistics based on per user or per device end points and policies applicable per device.
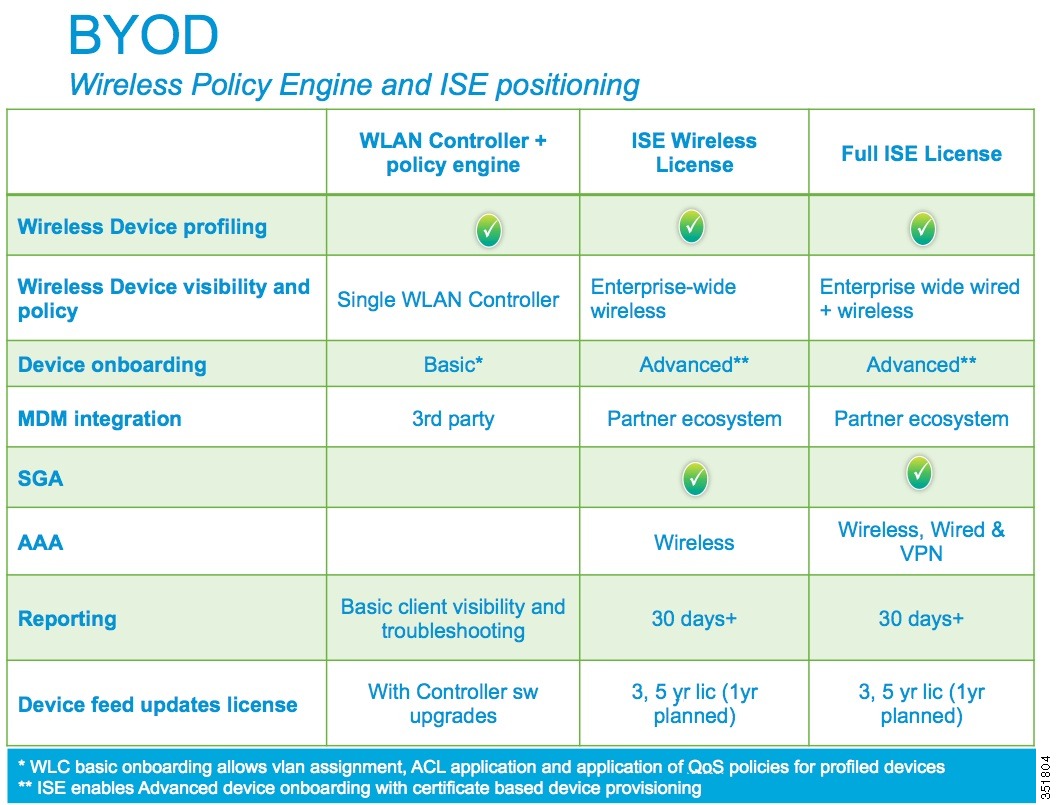
Wireless device profiling and policy classification engine enables simple BYOD deployments with visibility and user/wireless device policy integrated into the wireless controller.
Scope, Objectives, and Expectations
Profiling and policy enforcement allows profiling of mobile devices and basic onboarding of the profiled devices to a specific vlan, assigns ACL and QOS, or configures session timeout. It can be configured as two separate components. The configuration on the WLC is based on defined parameters specific to clients joining the network. The policy attributes which are of interest are:
a.
b.
c.
d.
e.
The above parameters are configurable as policy match attributes. Once WLC has a match corresponding to the above parameters per end-point, the policy enforcement comes into picture. Policy enforcement allows basic device on-boarding of mobile devices based on session attributes like:
a.
b.
c.
d.
e.
The user can configure these policies and enforce end-points with specified policies. The wireless clients will be profiled based on MAC OUI, DHCP, HTTP user agent (valid internet required for successful HTTP profiling). The WLC uses these attributes and predefined classification profiles to identify devices.
Terminology
Profiling and Policy Configuration
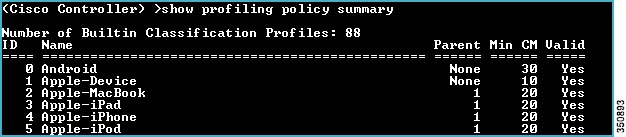
In 7.5 release, only embedded or built-in profiles are available on the WLC through which it can identify devices.
In later releases, it should be possible to create user-defined profiles, which will take precedence over the embedded profiles. Currently there are 88 built-in profiles and can be viewed through WLC CLI prompt.
Go to WLC and run
show profiling policy summary. For the purpose of this document we just displayed the first 6 profile.
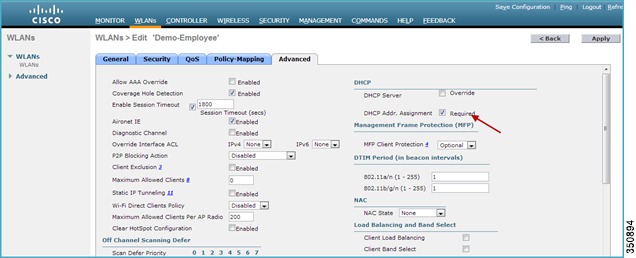
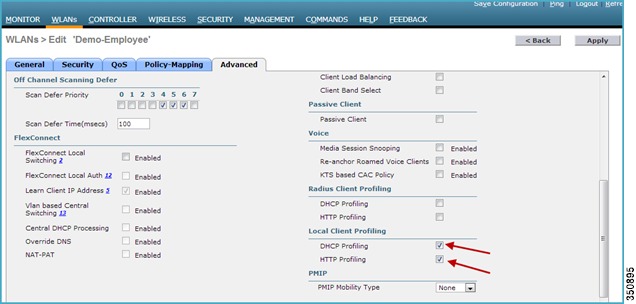
To configure device profiling on a WLAN through GUI, go to the WLAN (here we created WLAN Demo-Employee) and click Advance, then enable DHCP by checking the Required check box. After enabling the DHCP required option, scroll down and under Local Client Profiling enable DHCP Profiling and HTTP Profiling by checking the respective check boxes and click Apply.
Note
Now, try associating a client to the WLAN on which profiling is enabled. In our setup we associated an Apple iPad, an Android device and a Windows machine.
From the WLC main menu bar, navigate to Monitor > Clients and under Device Type column, notice that there are three devices associated to the WLAN and all of them are being profiled. See the below figure - Windows PC as Microsoft-Workstation, iPad as an Apple-iPad and Motorola Zoom as an Android device.
The same can be viewed from CLI as well, run a command show client summary devicetype to see the clients being profiled.
We clearly see that the client devices are classified under Device Type.
Creating Policies on WLAN from WLC GUI
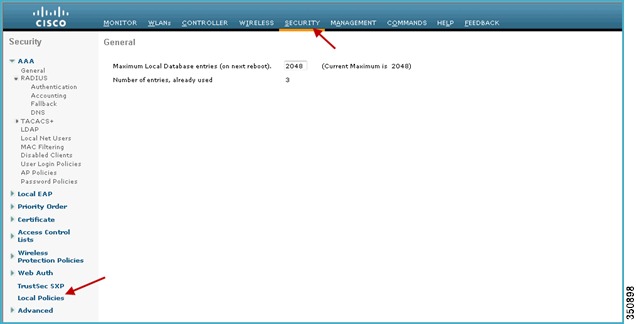
Once the policy has been configured you can create policies and apply them on the WLAN. On WLC menu bar, go to Security > Local Policies which will navigate you to the Policy List.
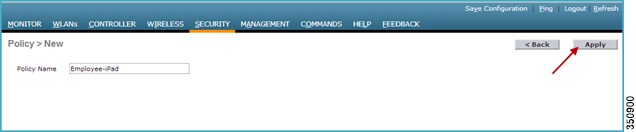
In Policy List page, click New to create a Policy Name. In our set up we are using "Employee-iPad" as a policy-name but you can use any name to define your own policy.
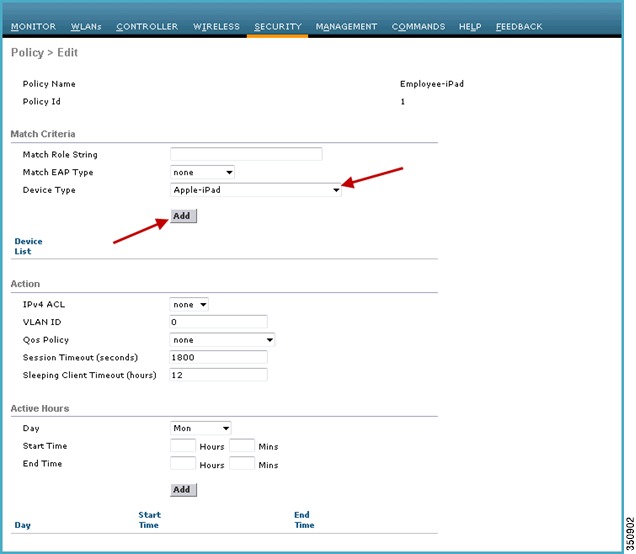
Once the Policy Name is created, click that policy name to configure the rules.
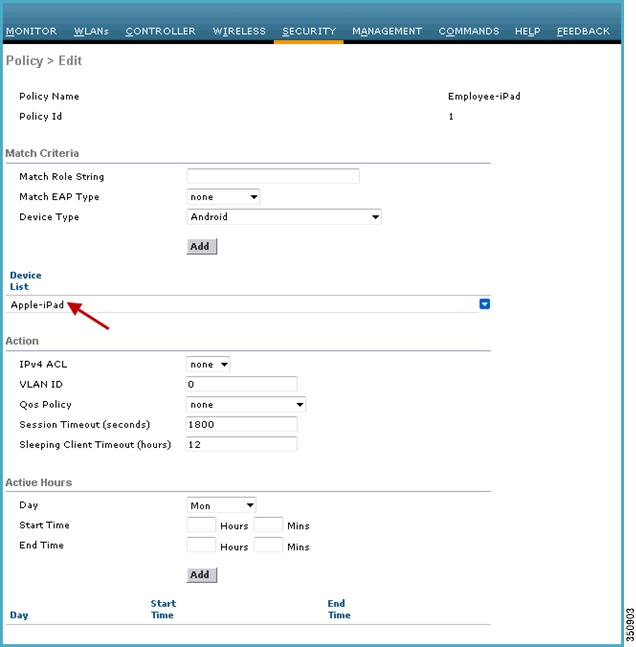
Under Policy Name, you can create policies to match a Role, EAP Type and Device Type. You can also define what actions to take related to the Match criteria. In our setup we used Device Type for the Match Criteria but if required, you can use Role or EAP type as well.
To apply the policy based on a user device, go to Device Type and scroll down to select the device type from the drop down menu on which you want to enforce policy and then click Add.
Here we used Apple-iPad as a device type for Match Criteria.
The device type will appear under the Device List section.
Note
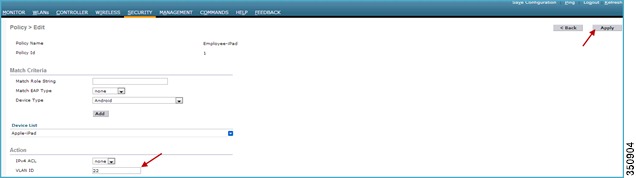
Now to apply the appropriate action, choose from the parameters under the Action menu to enforce the Policy. There are five attributes ACL, VLAN ID, QoS Policy, Session Timeout and Sleeping Client Timeout. You can configure these attributes and enforce clients with specified policies. By default the Session timeout is 1800 seconds and Sleeping client timeout is 12 Hrs.
The Sleeping Client refers to the clients already in RUN state after successful web authentication and are allowed to sleep and wakeup without the need to re-authenticate through the login page. The sleep client's duration for which client needs to be remembered for re-authentication is based on user configuration.
The Sleeping Client timeout configuration set in policy overrides the global sleeping client timeout configuration set on WLAN. These configurations and details are discussed later in this document, refer Appendix-A.
Active Hours menu allows configuration to be defined/set for what time of the day clients are allowed on the network.
Note
Now Assign a VLAN ID and click Apply.
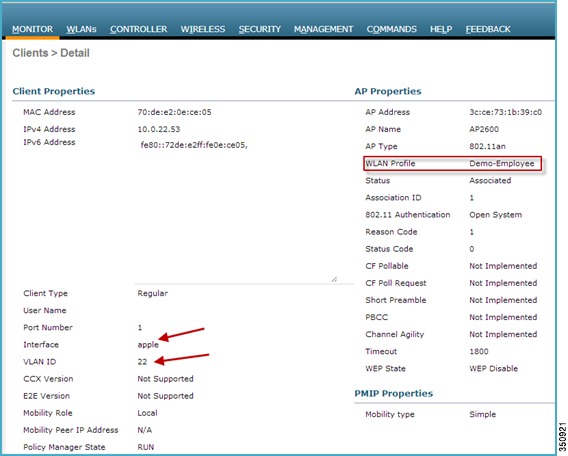
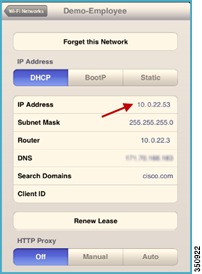
As discussed in previous sections, we created a separate interface on the WLC when enforcing policy through vlan attributes. We have VLAN 20 for management and VLAN 22 for Employees iPads and Apple devices. Any iPad or Apple device connecting to a policy enforced WLAN will be redirected to a different VLAN. In the case of the given example, it is VLAN 22.
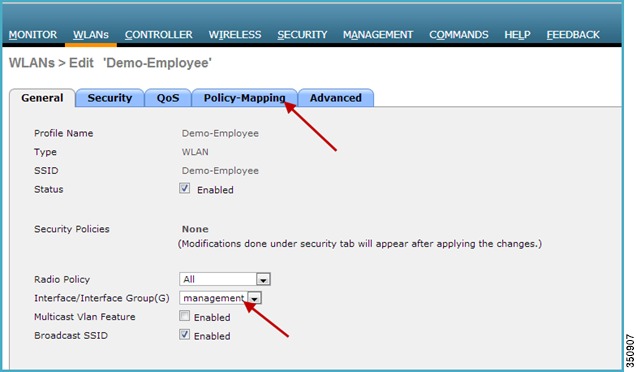
Mapping a Policy on WLAN
Go to WLANs from WLC menu and click the WLAN ID on which you want the policy to be implemented. As you can see in the WLAN> General tab, Interface/Interface Group is tied to management interface which is on VLAN 20.
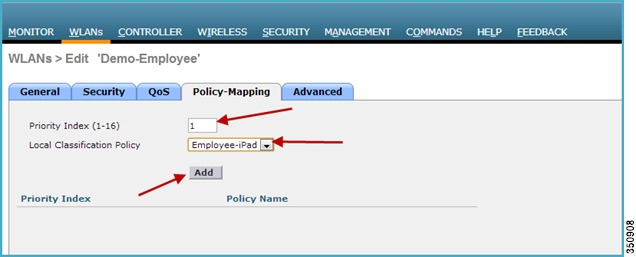
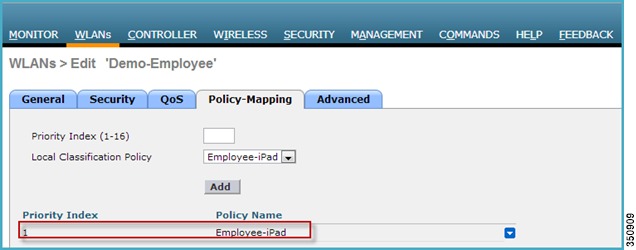
From the WLAN edit menu choose the Policy-Mapping tab.
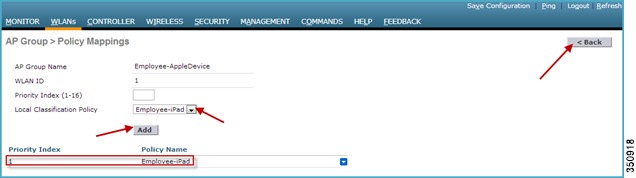
Set the Priority index to any value from 1-16. Then select the policy which you already created, from the Local Policy drop down menu. To Apply the policy on WLAN click Add. The policy will be mapped to WLAN and can be seen under Policy Name.
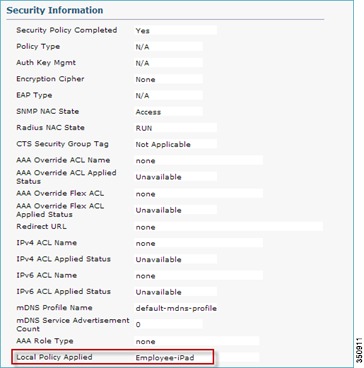
Now when an iPad associates to a policy enforced WLAN it is redirected to a VLAN tied to that policy. Scrolling down to Security Information will show you the local policy applied.
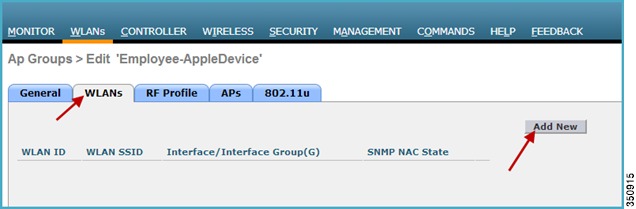
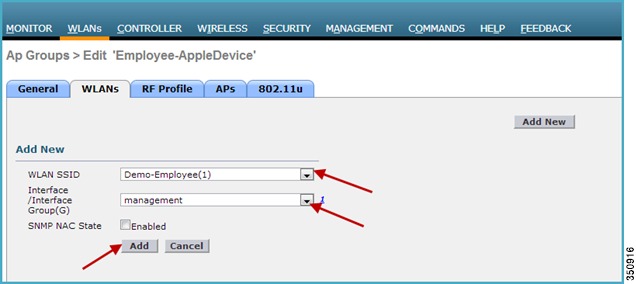
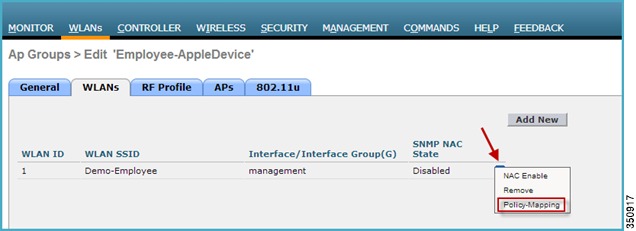
Mapping the Policy to an AP Group
Disable the WLAN on which you want to configure the policy.
To apply the policy on an AP group we assume that you already have AP Groups configured on the WLC. If AP Groups has already been configured in your setup, please skip Step1 to 3.
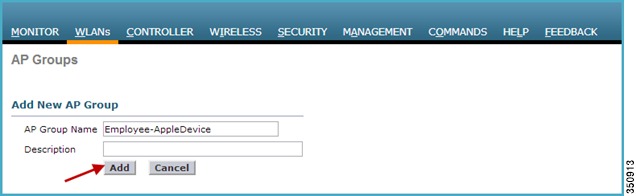
If not, create an AP Group by going to WLC menu.
Step 1
Then type in the name to define your AP Group Name and click Add button.
Step 2
Step 3
Step 4
Step 5
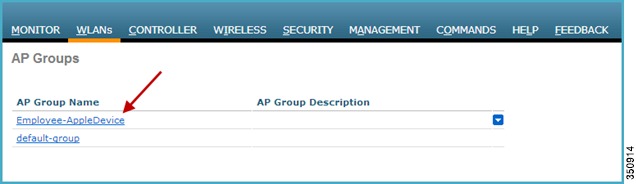
Click Back to go to the AP Group menu.
Step 6
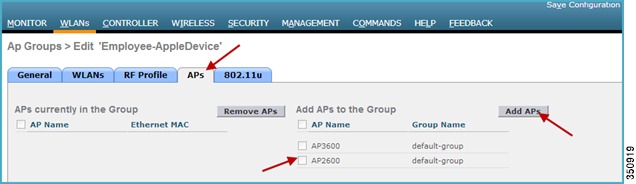
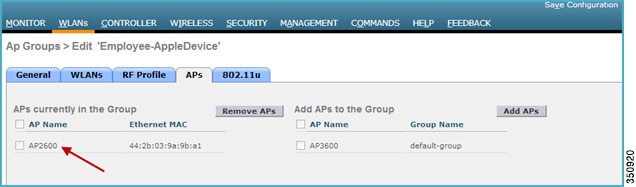
Once the AP has joined the specific AP group then Enable the WLAN on which the policy is enforced.
Test the policy enforcement by associating an iPad/Client to the WLAN. Once the device is associated and profiled, it gets redirected to the VLAN matching the policy.
Note
Example of Policy Enforcement on Other Device Types
Example
Policies were created for different device types (Android, Macbook, and Windows) coming into our network to be redirected to particular VLANs once they get profiled and policies are being enforced.
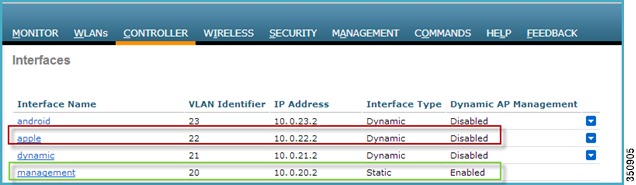
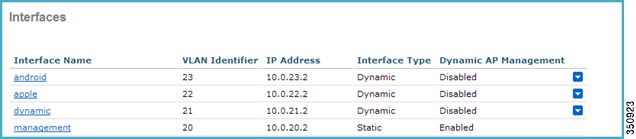
For this, dynamic interfaces such as "android" mapped to VLAN 23, Interface "apple" mapped to VLAN 22 and interface "dynamic" mapped to VLAN 21 was created.
In the following example, we are demonstrating profiling and policy implementation for Android and MAC devices.
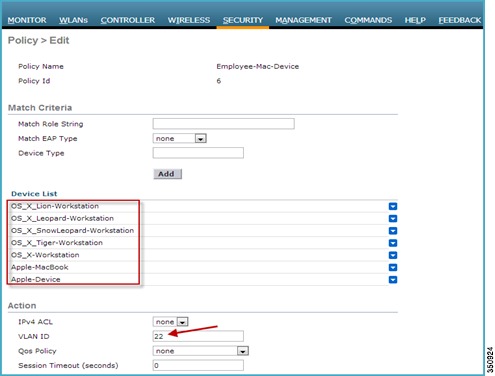
For Employee MacBooks we created a policy name Employee-Mac-Device and added the Profiles from the WLC predefined profile list from the Device Type drop down menu.
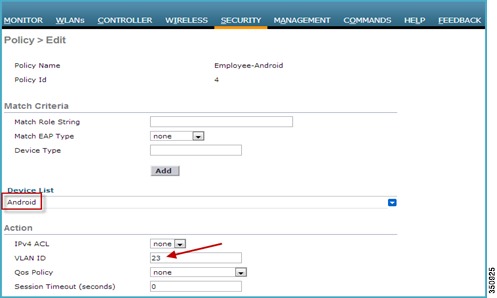
Once the profile is matched, the policy enforcement is based on VLAN attribute. Here, the device should be redirected to VLAN 22 if it is a MacBook and to VLAN 23 if it is an Android device.
Policy "Employee-Mac-Device"
Policy "Employee-Android"
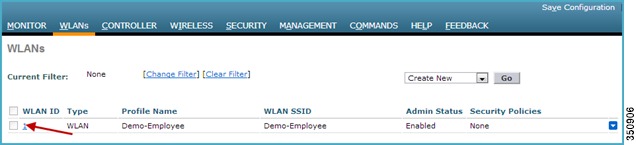
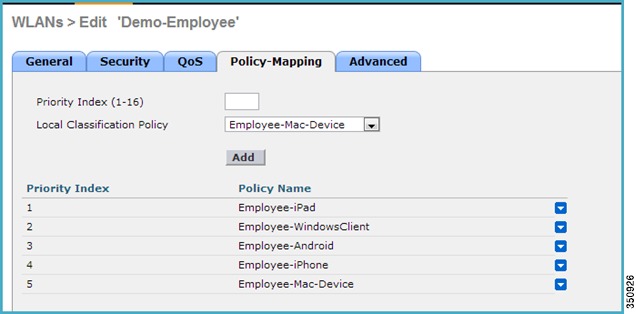
These policies are mapped to the WLAN "Demo-Employee"
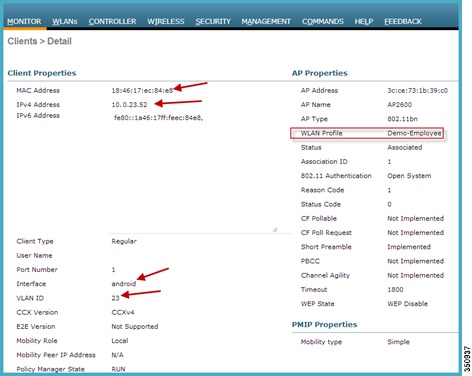
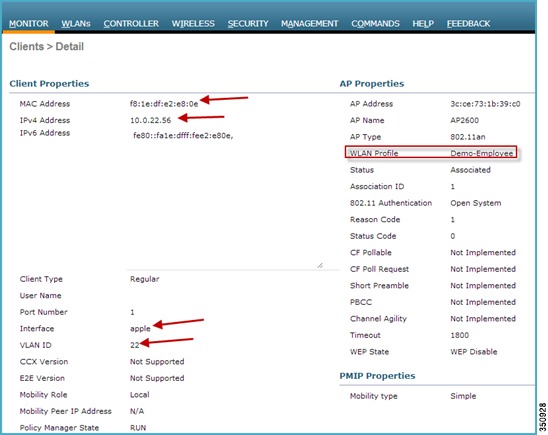
In the above example, an Android device and a Macbook is associated to SSID Demo-Employee and both the device is being redirected to the VLAN 23 and VLAN 22 respectively.
Client details for Android Device:
Client details for Apple MacBook:
Device Profile:
Role Based Policy
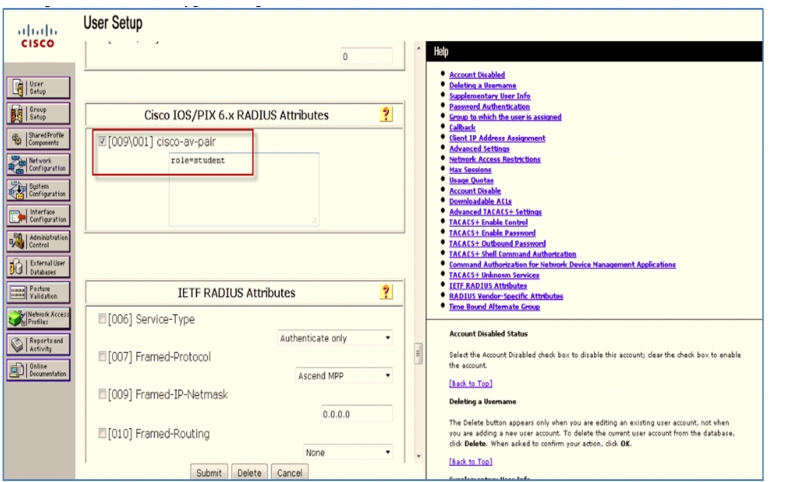
Role is identified as a Cisco AV-pair from the AAA server and a user needs to configure the role as per user on the AAA server as:
Cisco:cisco-av-pair= role= <role-type>
The following example shows the role type "student" configured on ISE.
Example of similar role type configured on ACS:
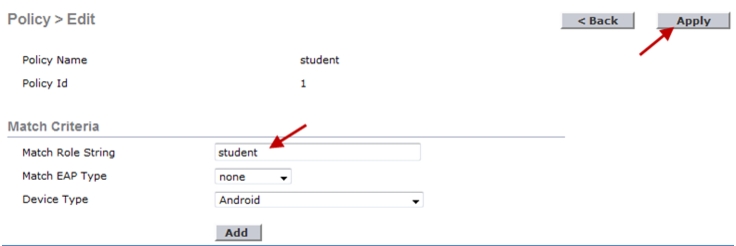
Now, to apply the role based policy on WLC, navigate to Policy > Edit page and under Match Criteria define the Match Role String that the user created earlier on the AAA server. In the example, the Match Role String is configured as student. Once the policy is created, the user can tie the policy to a specific WLAN (with L2 Security set to 802.1x).
Flex-Connect Support
The following table explains the Policy application support matrix for FlexConnect mode.
Limitations
•
•
•
•
•
•
•
•
Summary
•
•
•
•
•
•
•
•
Note
Show Commands
show user <username> devices
show client wlan <WLAN Id>
show client wlan <WLAN Id> device-type <ipad | ipod | macbook ..>
show wlan <wlan-id>Debug Commands
debug policy [events|errors] <enable|disables>
Debugs for profiler will be enabled by the existing "debug profiling <enable | disable>" CLICommands to Configure Profiling through CLI
config wlan disable<wlan-id>
config wlan profiling <radius/local> <all/dhcp/http> enable <wlan-id>
config wlan enable <wlan-id>Commands to Configure Policy through CLI
config policy <policy-name> create
config policy <policy-name> match device-type add <device name>
config policy <policy-name>action vlan <enable|disable> <vlan #>
config wlan policy add <policy index number> <policy-name> <WLAN Id>To configure the policy and match it to a corresponding AP group, we need the policy Index also, which signifies which policies need to be matched first. The CLI command will be:
config wlan apgroup policy add <policy index number> <policy-name> <apgroup name> <WLAN Id>To configure the policy and match it with time of day, the CLI command will be:
config policy <policy-name>active add hours <08:00 - 17:00> days <Mon | Tue | Wed | Thurs | Fri | Daily | Weekdays >To configure the policy match with EAP type, the CLI command will be:
config policy <policy-name> match eap-type add <peap | leap | eap-fast | eap-tls>For policy action as ACL, the CLI command will be:
config policy <policy-name> action acl <acl-name> <enable/disable>For policy action as QoS, the CLI command will be:
config policy<policy-name> action qos <bronze | gold | platinum | silver> <enable|disable>For policy action as Session-Timeout, the CLI command will be:
config policy <policy-name> action session-timeout <timeout in sec> <enable|disable>For policy action as Sleeping Client Timeout, the CLI command will be:
config policy <policy-name> action sleeping-client-timeout <enable|disable><timeout in hours>Appendix-A
Sleeping Client Support
Currently in 7.4 release, guest client devices connected to the WLC on web-auth enabled WLANs have to enter login credentials every time the client goes to sleep and wakes up.
From 7.5 release, clients already in RUN state after successful web authentication are allowed to sleep and wakeup without the need to re-authenticate through the login page. The sleep client duration for which client needs to be remembered for re-authentication is based on the configuration.
Other salient features are as follows:
•
•
•
•
–
–
–
•
•
WLAN Configuration for Sleeping Client
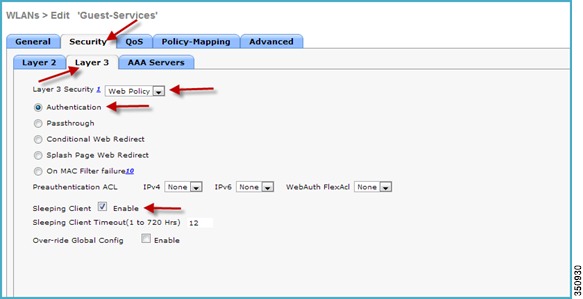
As sleeping client is only supported for L3 security WLANs, navigate to the particular WLAN on which you want to enable the sleeping client feature. Navigate to Security > Layer 3 and select Web Policy from the Layer 3 Security drop-down list.
Select the radio button Authentication and enable Sleeping Client by checking the box as shown in the image below.
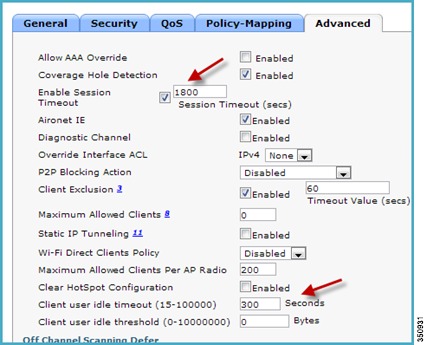
Navigate to Advanced tab and make sure that the session timeout is greater than the client idle timeout, otherwise the sleeping client entry would not be created.
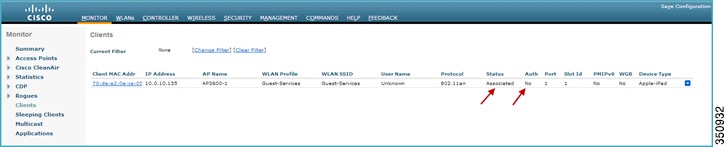
Now connect a client to the WLAN on which sleeping client feature is enabled. Then navigate to Monitor > Clients, the status of the client shows that it is in Associated state but Not Authenticated as username/password required for web-auth.
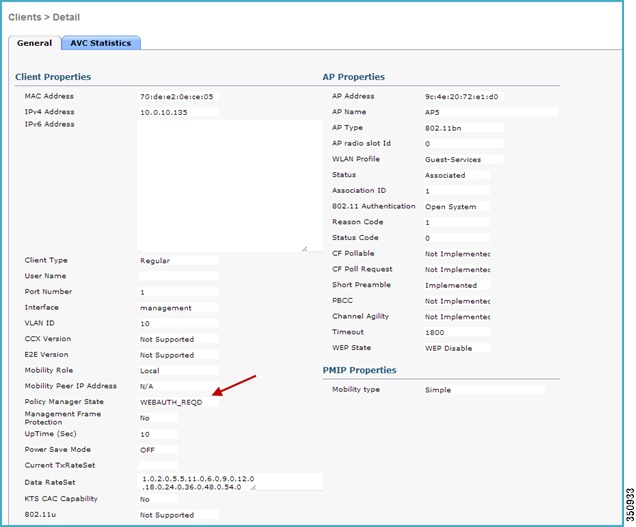
Under Client Properties menu, it is seen that the client is in Web-auth required state.
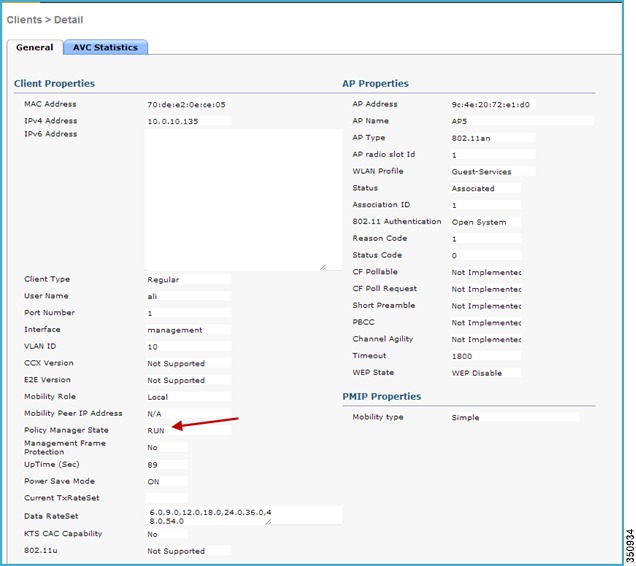
After entering the appropriate login credentials for web-auth, the client get authenticated and moves to RUN state.
After successful web-auth, the user is successfully authenticated.
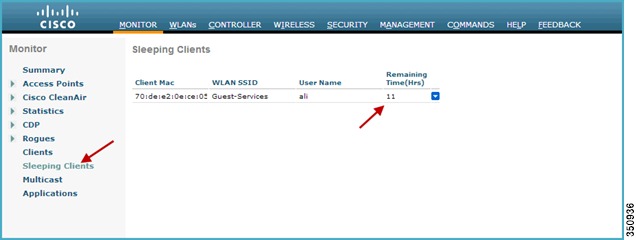
Now if the client configured is idle for 300 seconds (default idle timeout value) or disconnects from the WLAN it is connected to, then the client will move to sleeping clients. Click Sleeping Clients option to check if the client entry exists.
Once the client is moved to the Sleeping Clients, the timeout session starts and the remaining time before the client entry is deleted/cleared is displayed.
If the client wakes up or joins back to the same WLAN, it doesn't require re-authentication.
Sleeping Client CLI commands
To enable the sleeping-client feature on wlan:
(controller) >config wlan custom-web sleep-client enable/disable <wlan-id>To configure sleeping-client interval on wlan:
(controller) > config wlan custom-web sleep-client timeout <1- 720hours> <wlan-id>To check sleep client configuration on wlan:
(controller) > show wlan <wlan-id>To delete any unwanted sleeping-client entries:
(controller) > config custom-web sleep-client delete <mac-addr>To show summary of all the sleeping-client entries:
(controller) > show custom-web sleep-client summaryTo show the details of sleeping-client entry based on mac address:
(controller) > show custom-web sleep-client detail <mac-addr>