Feedback
Table Of Contents
Unpacking and Installing the Access Point
Understanding the Access Point LEDs
Unpacking and Installing the Access Point
This chapter provides the following information:
•
Understanding the Access Point LEDs
Unpacking the Access Point
Each Cisco Aironet 600 Series OfficeExtend Access Point package contains the following items:
•
•
•
•
•
Placing the Access Point
To ensure the best RF coverage for your access point, place your access point in an area as close to the wireless clients as possible and practical to do so.
If the internet source or gateway router is in a remote area, position your access point away from metal obstructions.
The access point can be placed/mounted in a horizontal position, as the access point has rubber feet on its bottom panel.
The access point may also be mounted in a vertical position using the supplied cradle or wall mounted slots.
Note
Areas to avoid or places that may result in reduced range or performance are as follows.
•
•
•
Note
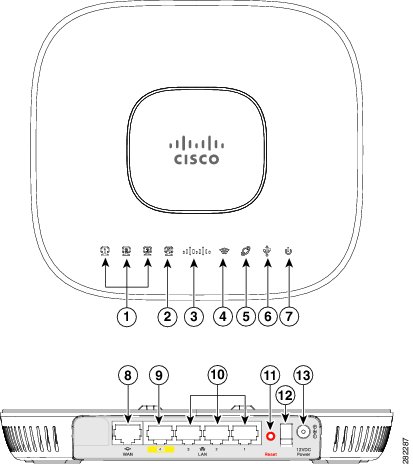
Parts of the Access Point
Installing the Access Point
To install the Cisco Aironet 600 Series OfficeExtend Access Point, follow these steps:
Step 1
Step 2
Note
Step 3
Step 4
Step 5
Step 6
Note
Step 7
Note
Note
Resetting the Access Point
To reset a 600 Series OfficeExtend AP, while the unit is powered on, hold the reset button dowon for 5 seconds to restart the unit. Then hold the reset button down for 20 seconds to clear the configuration and restart the unit with the factory default settings.
Understanding the Access Point LEDs
The LEDs on the top panel indicate the operating status of the unit. Table 1-1 provides LED status indications for 600 Series OfficeExtend Access Points. A properly functioning and configured AP transitions from blinking blue to solid within ten minutes. Usually the time will be much shorter.