-
User Guide for the Cisco Unity Connection Assistant Web Tool (Release 7.x)
-
Index
-
The Cisco Unity Assistant Web Tool
-
Working with the Media Master in the Cisco Unity Assistant Web Tool
-
Changing Your Personal Preferences
-
Changing Your Cisco Unity Connection Passwords
-
Changing Your Cisco Unity Connection Conversation Preferences
-
Changing Your Message Playback Preferences
-
Changing Your Call Transfer and Screening Preferences
-
Managing Your Personal Greetings
-
Managing Message Notifications
-
Managing Your Personal Contacts
-
Managing Your Private Lists
-
 Feedback
Table Of Contents
Working with the Media Master in the Cisco Unity Assistant Web Tool
Using Sound Files in Your Recordings
Changing Your Playback and Recording Devices
Media Master Keyboard Shortcuts
Working with the Media Master in the Cisco Unity Assistant Web Tool
•
Using Sound Files in Your Recordings
•
•
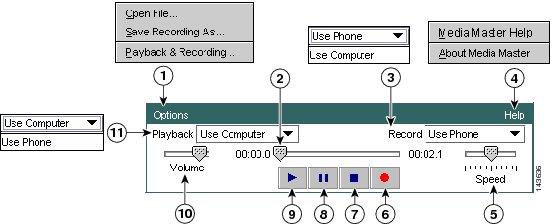
About the Media Master
The Media Master appears on assorted pages in the Cisco Unity Assistant web tool. By clicking the controls, you can make and play recordings with either your phone or your computer microphone and speakers.
Figure 1 Media Master
Options menu
Stop
Recording/playback progress
Pause
Record list
Play
Help menu
Volume control
Playback speed control
Playback list
Record
Table 1 describes the options available on the Media Master Help menu (4 in Figure 1).
Table 1 Help Menu
Media Master Help
Open Media Master Help.
About Media Master
Display Media Master version and configuration information.
Using Sound Files in Your Recordings
The Options menu on the Media Master (1 in Figure 1) allows you to work with other sound (WAV) files in your recordings. Table 2 describes the available options.
Changing Your Playback and Recording Devices
You can choose the devices that you use for making and playing recordings while working with the Cisco Unity Assistant web tool:
Tip
Note that updates to the Media Master are saved per user, per computer. If you also use another computer to access the Media Master (for example, a computer at home), you need to update the Media Master settings on the second computer as well.
To Change Your Recording or Playback Device
Step 1
Step 2
Step 3
Step 4
Choose the phone or the computer.
Choose the phone or the computer.
Step 5
Tip
Step 6
Media Master Keyboard Shortcuts
•
•