Feedback
Table Of Contents
Interactive Voice Response Functions
Screening-List-Editing Services
Using IVR for Selective Call Forwarding
Selective Call Forwarding—Listing and Deleting Entries
Using IVR for SCA, SCR, and DR/CW Services
Deleting Numbers from the Service List
Two-Level Automatic Recall Activation
NSA—Initial Authentication and PIN Change
NSA—Adding DNs to the NSA List
No Solicitation Announcement—Deleting DNs
NSA—Scheduling the Service Time Slot
Subscriber Activation and Management of Privacy Screening
Caller Interaction with Privacy Screening
Subscriber Interaction with Privacy Screening
Privacy Screening Announcements
Privacy Screening Manage Announcements
Interactive Voice Response Functions
Revised: July 2, 2009, OL-7680-24The Cisco BTS 10200 Softswitch supports interactive voice response (IVR) functions for the remote activation call forwarding (RACF) and screening list editing (SLE) features. To use the RACF feature, the user dials a specified directory number (DN—assigned by the service provider) and is connected to the appropriate IVR media server. The user enters a personal ID number (PIN) to access the IVR functions, and follows the voice prompts of the IVR server to activate, deactivate, or edit RACF options.
To use the SLE feature, the user dials one of several vertical service code (VSC) numbers (in the form *xx) and is connected to the appropriate IVR media server. The user follows the voice prompts to edit screening lists.
This section includes IVR information on the following features:
•
RACF
•
•
Note
Furthermore, service providers can create names for services that differ from the names of the services in this document.
RACF
RACF permits users to control their call forwarding unconditional (CFU) functions when they are away from the phone. The service provider sets up this function for the user, and designates a DN the user should call to access interactive voice response (IVR) functions that control the RACF feature. Once the RACF function is set up, the user can take the following actions from a remote station:
•
•
•
The procedure is similar to making call-forwarding changes at a home or local business phone but requires the additional step of dialing the remote location:
•
•
–
–
•
For more information about RACF, see Chapter 2, "Subscriber Features."
Using IVR Functions for RACF
For a detailed description of RACF, see the "Call Forwarding Features" section in Chapter 2, "Subscriber Features."
To use the IVR functions to access the RACF feature, complete the following steps:
Step 1
The media server plays the following announcement and prompt:
"Welcome to your remote access to the Call Forwarding feature. Please enter your home telephone number including area code."
Step 2
The media server plays the following prompt:
"You entered <number>. If correct, press 1.
If this is not correct, press 2."
The media server plays the following voice prompt:
"Enter your PIN."
Step 3
Note
The media server plays the following announcement and prompt:
"You entered: <PIN>.
If correct, press 1.
If this is not correct, press 2."
Step 4
The media server plays the following prompt:
"Please enter the number where you wish to forward your calls.
Step 5
The media server plays the following voice prompt:
"You entered: <xxx-xxx-xxx>
If correct, press 1.
If this is not correct, press 2."
Note
In this case, the server returns to the voice prompt for entering a call-forwarding
number.Step 6
The media server plays the following voice prompt:
"Your calls are currently being forwarded to <xxx-xxx-xxxx>.
To keep forwarding calls to this number, press 1.
To stop forwarding calls to this number, press 2.
To forward your calls to a new number, press 3."
Step 7
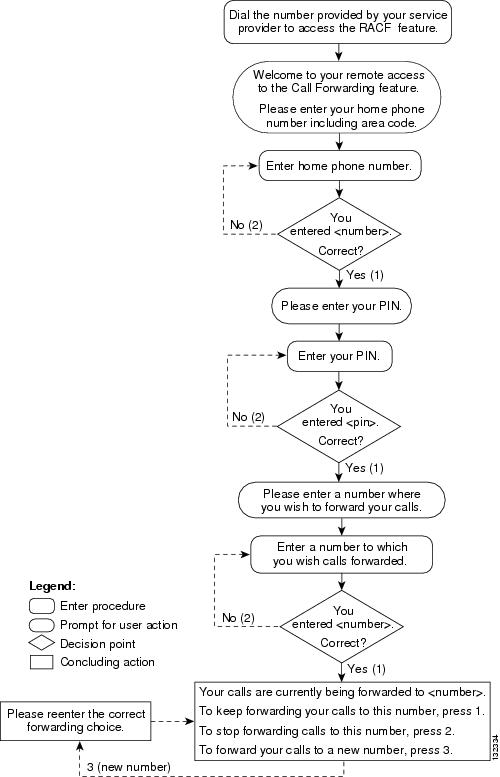
Figure A-1 presents a flow chart that shows the sequence of IVR prompts and audio responses that pertain when you are using the RACF feature.
Figure A-1 Remote Activation of Call Forwarding
RACF PIN Change
To use the RACF feature from a remote location (away from home phone) you must change the default PIN originally assigned by the service provider. If you do not change the PIN and then attempts to use the RACF feature, the media server plays an announcement stating that the PIN should be changed and access is denied.
You perform a PIN change from the home (or base) telephone.
Changing a PIN
To use the IVR announcements and prompts to change a previously established PIN (or the PIN initially supplied by the service provider), complete the following steps from the home (or base) telephone:
Step 1
(See Figure A-2.)The media server plays the following prompt:
"Please enter your PIN."
Step 2
The media server plays the following voice prompt:
"Please reenter your PIN."
Step 3
The media server plays the following voice prompt:
"You entered <xxxx>.
If this is correct, press 1.
Note
If this is not correct, press 2."
Step 4
The media server plays the following voice prompt:
"Please enter your new PIN number."
Step 5
The media server plays the following voice prompt:
"Please reenter your new PIN number."
Step 6
"You entered <xxxx>.
If this is correct, press 1.
If this is not correct, press 2."
Note
Step 7
The media server plays the following voice announcement:
"Your PIN has been changed. Goodbye."
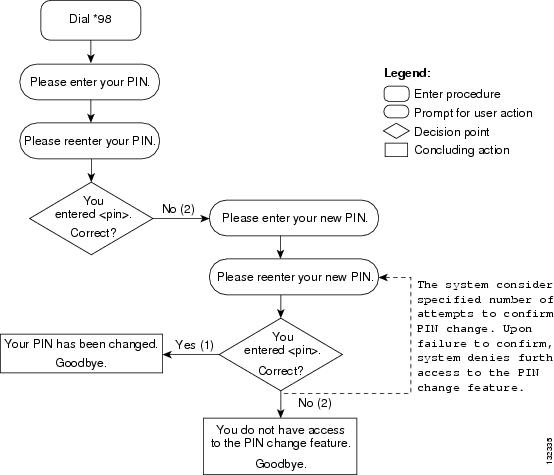
Figure A-2 presents a flow chart that shows the sequence of IVR prompts and audio responses when you are changing the PIN required to use the RACF feature.
Figure A-2 Changing the RACF PIN
Screening-List-Editing Services
This section describes how to use IVR functions from a handset to operate a number of screening-list-editing services. These services include Selective Call Forwarding (SCF), Selective Call Acceptance (SCA), Selective Call Rejection (SCR), and Distinctive Ring/Call Waiting (DR/CW). For a detailed description of these services, see Chapter 2, "Subscriber Features."
Using IVR for Selective Call Forwarding
To use the Selective Call Forwarding service to specify a forward-to number and a list of DNs from which calls will be forwarded, complete the following steps:
Step 1
The system plays the following voice announcement to indicate whether the service is currently on or off:
"Your Selective Call Forwarding service is now off.
There are no entries on your list.
You may interrupt announcements at any time by entering a command key. When you are finished, hang up.
Note
The system then announces the set of key commands that you can enter to perform the various screening-list-editing operations offered by the SCF service.
To turn this service on, press 3.
To add an entry, press the number-sign key.
To remove one or more entries, press the star key.
To remove all list entries, press 0 8.
To remove all anonymous list entries, press 0 9.
To hear the entries on your list, press 1.
To hear these instructions repeated, press 0."
Step 2
The system plays the following voice prompt:
"To turn this service on, you must add an entry to your list.
Please enter the number to which you want your calls forwarded, followed by
the number-sign key."Step 3
The system plays the following voice announcement and prompt:
"Your calls will be forwarded to <xxx-xxx-xxxx>.
If this number is correct, press 1.
If this number is not correct, press 0."
If you enter 0, the system returns to the initial prompt for entering the forward-to number.
Step 4
Step 5
The system plays the following voice prompt:
"There are no entries on your list.
Enter the number to be added, then press the number-sign key.
To add the last-calling party, press 0 1, followed by the number-sign key."
Note
Step 6
The system plays the following voice announcement and prompt:
"The number <xxx-xxx-xxxx> has been added to your list.
Please continue. Press 0 for instructions or hang up."
Step 7
The system plays one of the following voice announcements:
"The number <xxx-xxx-xxxx> has been added to your list."
or:
"The number you have added is an anonymous entry."
The system then plays the following prompt:
"Please continue. Press 0 for instructions or hang up."
Step 8
Note
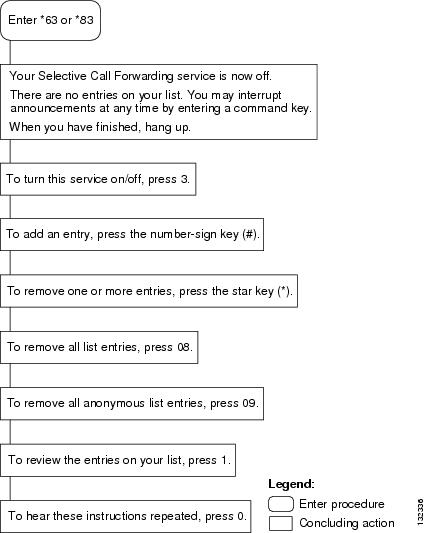
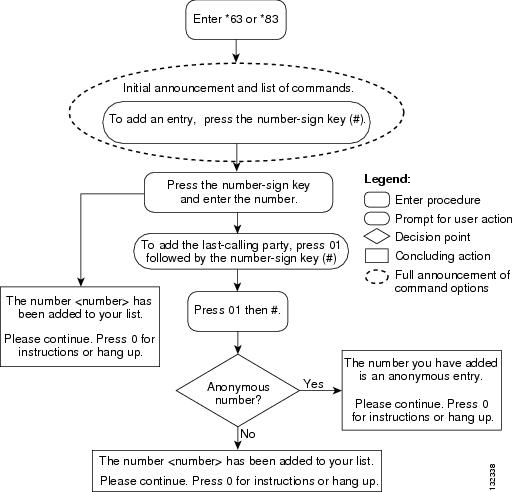
Figure A-3 presents a flow chart that shows the initial announcement and list of command options for implementing and managing the Selective Call Forwarding service.
Figure A-3 Selective Call Forwarding—Initial Announcement and List of Commands
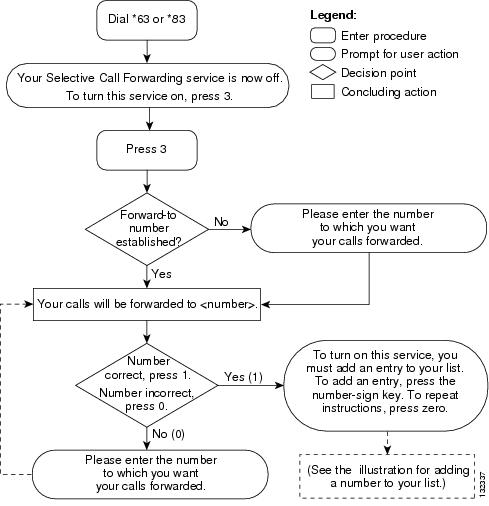
Figure A-4 presents a flow chart that shows the sequence of IVR prompts and audio responses for activating the Selective Call Forwarding service and adding a forward-to number.
Figure A-4 Selective Call Forwarding—Adding the Forward-to Number
Figure A-5 presents a flow chart that shows the sequence of IVR prompts and announcements for activating the Selective Call Forwarding service and adding DNs from which calls will be forwarded.
Note
Figure A-5 Selective Call Forwarding—Adding a Number or Last Calling Party
Selective Call Forwarding—Listing and Deleting Entries
To use the Selective Call Forwarding service to list and then delete one or more of the numbers from which calls will be forwarded, complete the following steps. (See Figure A-6.)
Step 1
The system plays the following voice announcement and prompt:
"There are <number> entries on your list.
To delete an entry,
press 0 7 as soon as you hear it.You may enter a list-editing command at any time, including 0 for the list of commands.
The first entry on your list is <xxx-xxx-xxxx>.
Next <xxx-xxx-xxxx>.This is the end of your list. Please continue. Press 0 for instructions or hang up."
Step 2
If you press *, the system plays the following prompt:
"Enter the number to be deleted then press the star key.
To delete the last-calling party, press 0 1 followed by the star key."
Step 3
The system plays the following prompt:
"The number <xxx-xxx-xxxx> has been deleted from your list. Please continue. Press 0 for instructions or hang up."
or:
"The number to be removed is not on your list. Please continue. Press 0 for instructions or
hang up."Step 4
The system plays the following announcement:
"There are no more entries on your list."
Step 5
The system plays the following announcement:
"There are no more anonymous entries on your list. Please continue. Press 0 for instructions or hang up."
or:
"We're sorry, there are no entries on your list. Please continue. Press 0 for instructions
or hang up."Step 6
The system plays the following announcement:
"Your Selective Call Forwarding service is now off."
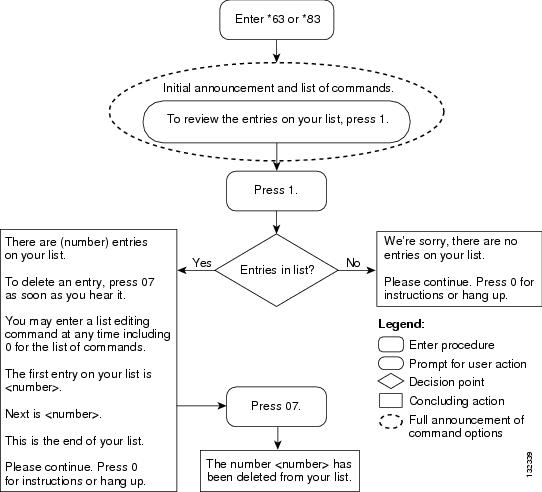
Figure A-6 presents a flow chart that shows the sequence of IVR prompts and announcements for using the Selective Call Forwarding service to review the list of DNs from which calls are forwarded and to delete DNs from the list.
Figure A-6 Selective Call Forwarding—Listing and Deleting Entries
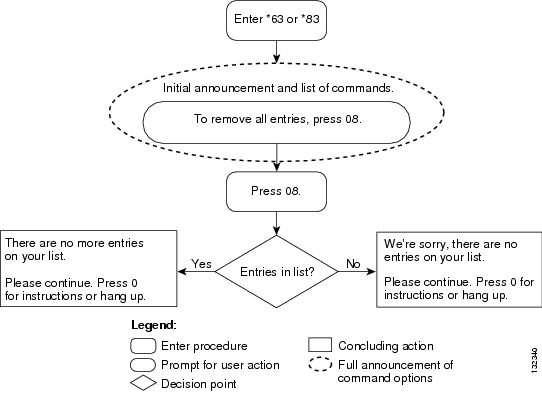
Figure A-7 presents a flow chart that shows the sequence of IVR prompts and announcements for using the Selective Call Forwarding service to remove DNs from the list from which calls are forwarded.
Figure A-7 Selective Call Forwarding—Removing All Entries from a List
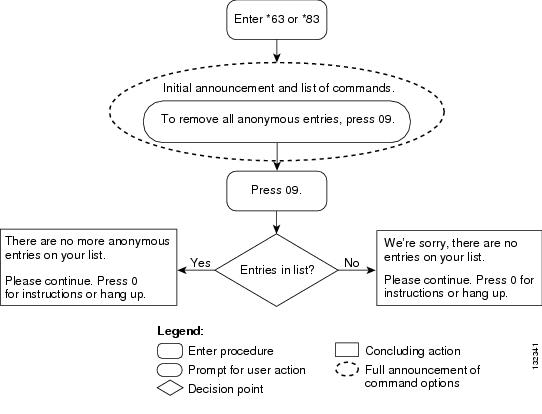
Figure A-8 presents a flow chart that shows the sequence of IVR prompts and announcements for using the Selective Call Forwarding service to remove anonymous DNs from the list from which calls are forwarded.
Figure A-8 Selective Call Forwarding—Removing All Anonymous Entries from a List
Using IVR for SCA, SCR, and DR/CW Services
The following sections provide generic descriptions of how a subscriber uses IVR functions to operate the Selective Call Acceptance, Selective Call Rejection, and Distinctive Ring/Call Waiting services. After you enter the specific VSC for the service you wish to access, the method for using the available options is identical, regardless of which service you select.
Note
For a detailed description of SCA, SCR, and DR/CW, see Chapter 2, "Subscriber Features."
Activating an IVR Service
To activate an IVR service and add a DN to the service list, complete the following steps:
Step 1
The system plays the following voice announcement to indicate whether the service is currently on or off. It then announces the set of key commands that you can enter to perform the various screening-list-editing operations offered by the service.
"Your <service_name> service is now off.
There are no entries on your list.
You may interrupt announcements at any time by entering a command key. When you are finished, hang up.
Note
To turn this service on, press 3.
To add an entry, press the number-sign key.
To remove one or more entries, press the star key.
To remove all list entries, press 0 8.
To remove all anonymous list entries, press 0 9.
To review the entries on your list, press 1.
To hear these instructions repeated, press 0."
Step 2
The system plays the following voice prompt:
"There are no entries on your list. To turn this service on, you must add an entry to your list.
Enter the number to be added, then press the number-sign key (#)."
Note
"Your <service_name> service is now on. Please continue. Press 0 for instructions or hang up."Step 3
The system plays the following voice announcement and prompt:
"The number <xxx-xxx-xxxx> has been added to your list.
Please continue. Press 0 for instructions or hang up."
Step 4
The system plays one of the following voice announcements and prompt:
"The number <xxx-xxx-xxxx> has been added to your list."
or:
"The number you have added is an anonymous entry.
Please continue. Press 0 for instructions or hang up."
Step 5
Note
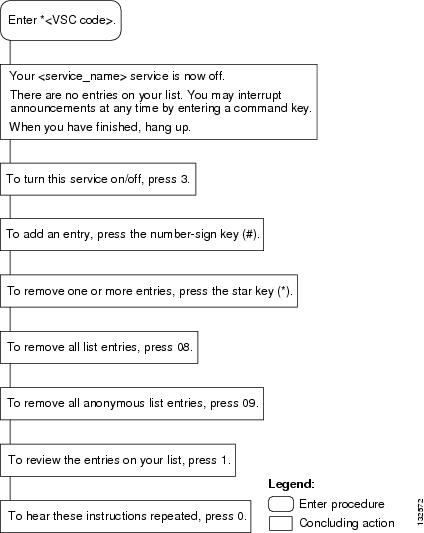
Figure A-9 presents a flow chart that shows the initial announcement and list of command options for implementing and managing an IVR service.
Figure A-9 IVR Service—Initial Announcement and List of Commands
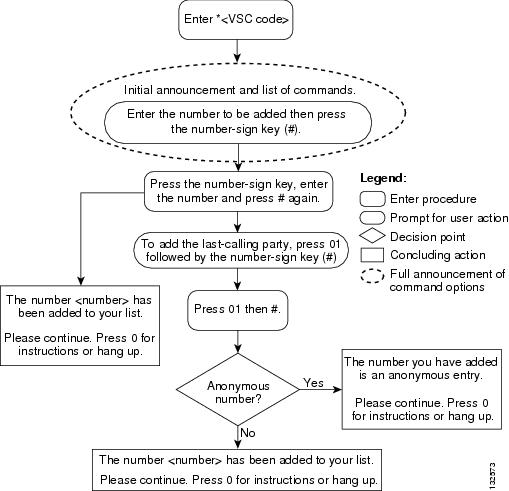
Figure A-10 presents a flow chart that shows the sequence of IVR prompts and audio responses for activating the IVR service and adding DNs to the service list.
Figure A-10 Adding a Number or Last Calling Party
Figure A-11 presents a flow chart that shows the sequence of IVR prompts and audio responses for reviewing the list of DNs for a service.
Figure A-11 Selective Call Forwarding—Reviewing List Entries
Deleting Numbers from the Service List
To use an IVR service to list and then delete one or more of the numbers from the service list, complete the following steps:
Step 1
The system plays the following voice announcement and prompt:
"There are <number> entries on your list.
To delete an entry,
press 0 7 as soon as you hear it.You may enter a list-editing command at any time, including 0 for the list of commands.
The first entry on your list is <xxx-xxx-xxxx>.
Next <xxx-xxx-xxxx>.This is the end of your list. Please continue. Press 0 for instructions or hang up."
Step 2
If you press *, the system plays the following voice prompt:
"Enter the number to be deleted, then press the star key.
To delete the last-calling party, press 0 1 followed by the star key."
Step 3
The system plays the following voice prompt:
"The number <xxx-xxx-xxxx> has been deleted from your list. Please continue. Press 0 for instructions or hang up."
or:
"The number to be removed is not on your list. Please continue. Press 0 for instructions or
hang up."Step 4
The system plays the following announcement:
"There are no more entries on your list."
Step 5
The system plays the following announcement:
"There are no more anonymous entries on your list. Please continue. Press 0 for instructions or hang up."
or:
"We're sorry, there are no entries on your list. Please continue. Press 0 for instructions
or hang up."Step 6
The system plays the following announcement:
"Your <Service_Name> service is now off."
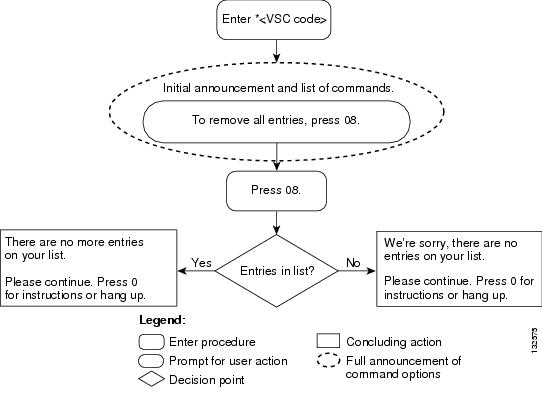
Figure A-12 presents a flow chart that shows the sequence of IVR prompts and audio responses for removing all DNs from the service list.
Figure A-12 Removing All Entries from a Service List
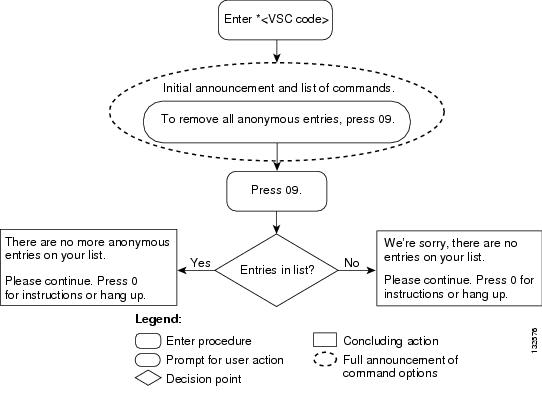
Figure A-13 presents a flow chart that shows the sequence of IVR prompts and audio responses for removing all anonymous DNs from the service list.
Figure A-13 Removing All Anonymous Entries from a Service List
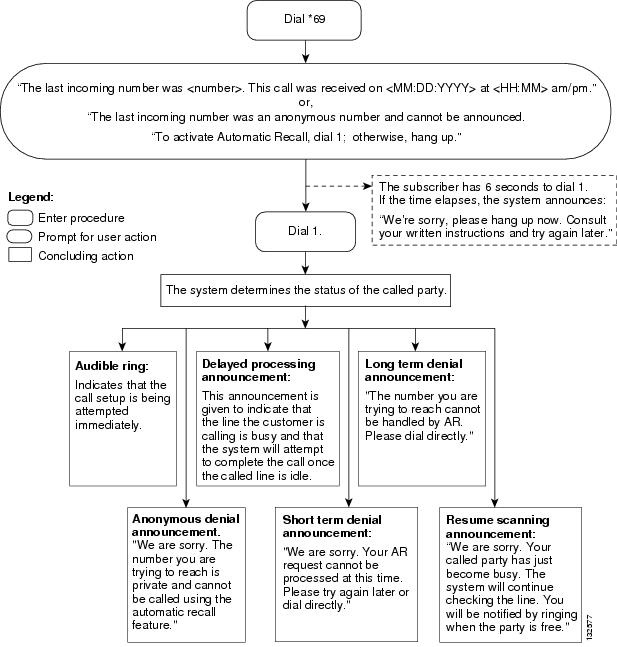
Two-Level Automatic Recall Activation
Two-Level Automatic Recall (AR) activation is an extension of one-level AR, which requires communication with an IVR server. The IVR server generates the announcement of the calling-party number, provides appropriate voice prompts, and collects the user's response.
To use the IVR functions to access the two-level AR feature, complete the following steps:
Step 1
Step 2
Step 3
The system plays one of the following two announcements:
•
•
Note
(This is a provisional timer that can be set to a duration from 1 to 10 seconds.)
If the time elapses, the system announces:
"We're sorry, please hang up now. Consult your written instructions and try again later."Step 4
Whether the last incoming call was announced or anonymous, the system determines the status of the calling number and, depending on that status, performs one of the following actions.
Note
''We are sorry. The number you are trying to reach is private and cannot be called using the automatic recall feature."•
•
•
•
•
Step 5
Figure A-14 presents a flow chart that shows the sequence of IVR prompts and audio responses when you are using two-level activation of AR.
Figure A-14 Two-Level Automatic Recall
No Solicitation Announcement
The No Solicitation Announcement (NSA) service enables a subscriber to announce to callers, whose phone numbers are not added to an NSA-bypass list, that the subscriber is not accepting calls. The subscriber can define the time interval during which the no-solicitation announcement is played to every caller whose DN is not on the bypass list.
A caller who receives the no-solicitation announcement can continue the call by pressing a key specified in the announcement (by default, the digit 1) or by waiting on the line.
The feature also enables the subscriber to:
•
•
•
•
Typically, a caller who attempts to contact the NSA subscriber during a time when the service is scheduled and active hears the following announcement:
"You have reached a number that does not accept solicitations. If you are a solicitor, please add this number to your do-not-call list and hang up now. Otherwise, press 1 or stay on the line."
The subscriber can maintain a bypass list of complete or partial DNs. A call made from a listed DN is accepted. The system does not play the NSA announcement to callers from DNs on the NSA-bypass list.
The subscriber can also turn this feature on or off and can set a time schedule (start and end times) when this feature is active. The billing record indicates whether the solicitor hangs up when the announcement is played.
The feature has two subfeatures, Invocation and Activation:
•
•
–
–
–
This sub-feature is called Activation.
Note
NSA Activation
The NSA activation feature enables a subscriber to manage the following no-solicitation preferences:
•
•
•
A caller whose DN is not on the subscriber's no-solicitation bypass list and whose call does not go through to the subscriber can do one of the following:
•
•
•
Note
Creating the NSA Bypass List
The NSA bypass list of DNs can include the following:
•
For example, if the subscriber adds the full DN 214-555-1234 to the NSA bypass list, the caller's number must match that number exactly. If the subscriber enters a number for a seven-digit area, the number is normalized.•
For example, if the Centrex group adds the extension 501 to the NSA bypass list, a callers extension must match 501 to bypass the no-solicitation announcement.
Note
•
–
–
The NSA bypass list can include up to 25 entries.
Establishing an NSA Schedule
The NSA service enables the service provider or a subscriber to set the time period when the NSA service will be active.Typically, a subscriber sets a start time, stop time, start day, and stop day. For example, a subscriber could make these entries: start time 8:00 a.m. (entered as 0800), stop time 5:00 p.m. (entered as 1700), start day Monday (entered as 1), and stop day Friday (entered as 5). Such settings would make the NSA service active from 8:00 a.m. Monday until 5:00 p.m. Friday.
When the NSA service is inactive, the subscriber's no-solicitation bypass list is preserved. During times when the NSA service is not scheduled, it is considered inactive.
Because it is possible that the Cisco BTS 10200 and a subscriber might not be located in the same time zone, the NSA schedule uses the time zone information present in the point of presence (POP) to which the subscriber belongs. If a time slot is not assigned to a subscriber for a feature, by default, the feature is considered always active. In provisioning the Cisco BTS 10200 feature table, the service provider can control whether a subscriber can set NSA schedules by interactive voice response (IVR) handset provisioning.
Note
PIN Management
If the service provider enables authentication for the NSA service, the subscriber must enter a PIN to authenticate access to that service. When access is successfully authenticated, the subscriber can change the settings of the NSA service. The PIN can be a number from 1 to 26 digits.
The service provider can disable a PIN check for the NSA service by provisioning the feature-config table. This would enable a subscriber to manage the NSA service without passing PIN authentication.
Note
The service provider provisions a value for PIN in the service-feature-data table. After that, the service provider enables a subscriber to alter the PIN one time. To enable a subscriber to alter the PIN one time. To enable the subscriber to alter the PIN, the service provider provisions the PIN and sets the PINTYPE to NEWPIN. If PINTYPE is not set to NEWPIN, the service provider retains maintenance of the PIN and, therefore, control of the authentication to access and manage the NSA service options.
If the PINTYPE is not NEWPIN and the PIN is not present, the authentication for access to the NSA service fails.
Caution
Managing the NSA Service
A NSA service subscriber can perform the following operations using a handset:
•
•
•
•
•
•
•
•
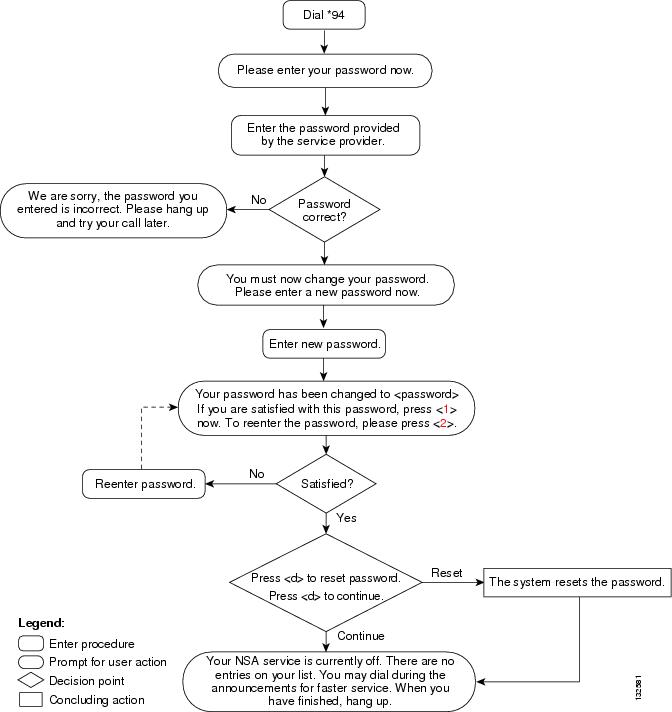
NSA—Initial Authentication and PIN Change
When accessing the NSA service for the first time, the subscriber enters the password (PIN) provided by the service provider and then (if the service provider has set PINTYPE TO NEWPIN), the subscriber is prompted to change the password to one the subscriber chooses. The subscriber can set the PIN only once. Thereafter, the subscriber must contact the service provider to change the PIN.
To authenticate access to the NSA service, complete the following steps:
Step 1
The system plays the following voice prompt:
"Please enter your password now."
Step 2
If you enter the password incorrectly, the system plays the following announcement:
"We are sorry, the password you entered is incorrect. Please hang up and try your call later."
If you enter the password correctly, the system plays the following prompt:
"You must now change your password. Please enter a new password now."
Step 3
The system plays the following announcement:
"Your password has been changed to <xxx...>. If you are satisfied with this password, press 1."
Step 4
Figure A-15 presents a flow chart that shows the IVR prompts and announcements that are played when PINTYPE is set to NEWPIN and the subscriber is enabled to change the PIN (one time only).
Figure A-15 No Solicitation Announcement—PIN Change
Managing NSA Service Options
After the subscriber either passes the PIN check or accesses the NSA service directly (with authentication disabled), the subscriber can control activation of the service and manage service options.
To access and manage the NSA service, complete the following steps:
Step 1
The system responds in one of two ways:
•
•
When the subscriber accesses the NSA service, the system plays the following voice announcement to indicate whether the service is currently on or off. It then announces the set of key commands that one can enter to perform the various operations offered by the service.
"Your NSA service is currently off.
There are no entries on your list.
You may interrupt announcements at any time by entering a command key. When you have finished, hang up.
Tip
To turn this service on, press 3.
To add an entry, press the number-sign key.
To remove one or more entries, press the star key.
To remove all list entries, press 0 8.
To remove all anonymous list entries, press 0 9.
To hear the entries on your list, press 1.
To schedule based on the time-of-day schedule, press 2.
To hear these instructions repeated, press 0.
Please dial now."
Step 2
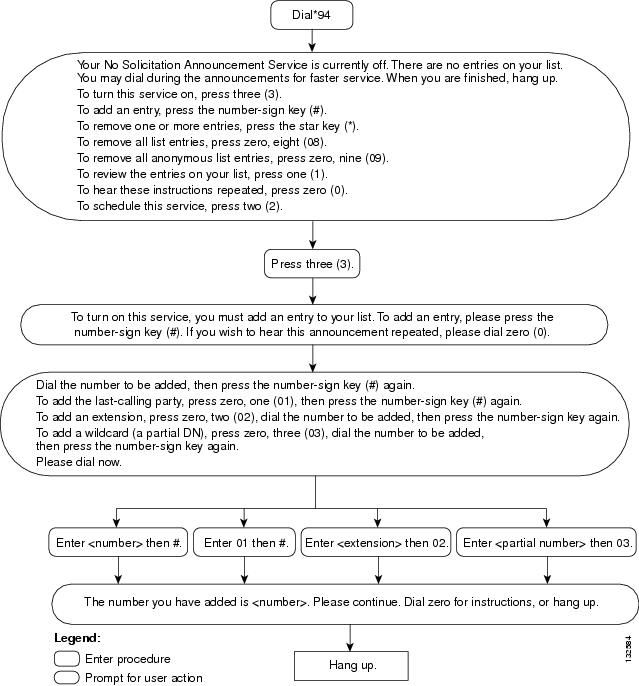
NSA—Adding DNs to the NSA List
A caller whose DN is on the NSA bypass list does not receive the NSA announcement.
Initially, you must add a number to the NSA bypass list in order to turn the NSA service on. That is, if you want the service to play the NSA announcement to all callers not on your NSA bypass list (during the time when the service is scheduled to be active), you must have at least one DN on your list.
You can enter as many as 25 DNs on the NSA bypass list.
To add the DNs of callers whose calls you want to bypass the NSA announcement, complete the following steps:
Step 1
The system plays the following announcement:
"Your No Solicitation Announcement service is currently off. There are no entries on your list.
You may dial during the announcements for faster service. When you are finished, hang up.
To turn this service on, press 3.
To add an entry, press the number-sign key.
To remove one or more entries, press the star key.
To remove all list entries, press 0 8.
To remove all anonymous list entries, press 0 9.
To review the entries on your list, press 1.
To hear these instructions repeated, press 0.
To schedule this service, press 2."
Step 2
The system plays the following announcement:
"To turn on this service, you must add an entry to your list. To add an entry, please press the number-sign key. If you wish to hear this announcement repeated, please dial 0."
Step 3
The system plays the following prompt:
"Dial the number to be added, then press the number-sign key again.
To add the last-calling party, press 0 1, then press the number-sign key again.
To add an extension, press 0 2, dial the number to be added, then press the number-sign key again.
Note
To add a wildcard (a partial DN), press 0 3, dial the number to be added, then press the number-sign key again. Please dial now."
Step 4
When you add a number to the NSA bypass list, the system plays the following announcement:
"The number you have added is <number>. Please continue. Dial 0 for instructions, or hang up."
Step 5
Figure A-16 presents a flow chart that shows the IVR prompts and announcements that are played when you are adding DNs to an NSA bypass list.
Figure A-16 No Solicitation Announcement—Adding DNs to the NSA Bypass List
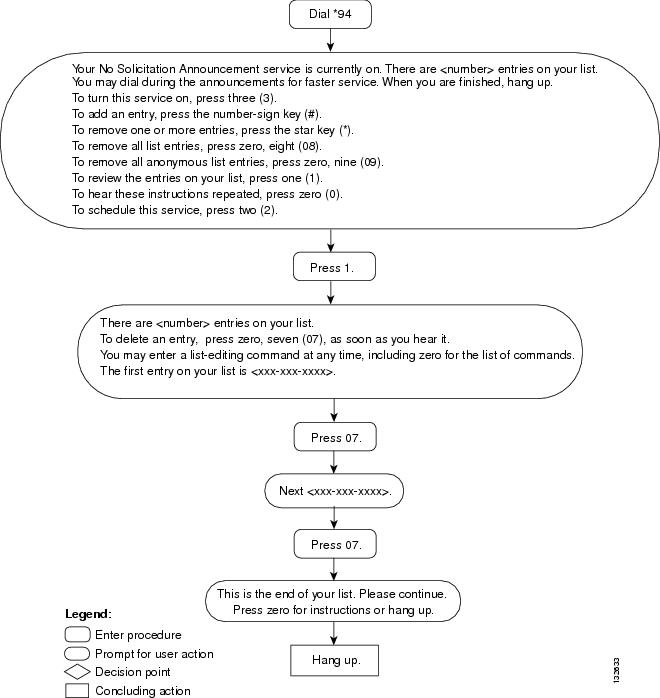
No Solicitation Announcement—Deleting DNs
To use the No Solicitation Announcement service to delete the DNs of callers who are allowed to bypass the NSA announcement, complete the following steps:
Step 1
Presuming that you previously entered DNs on your NSA bypass list and that you turned the service on, the system announces the set of key commands that you can enter to perform the various screening-list-editing operations offered by the NSA service.
"Your No Solicitation Announcement service is now on.
You may dial during the announcements for faster service. When you are finished, hang up.
To turn this service off, press 3.
To add an entry, press the number-sign key.
To remove one or more entries, press the star key.
To remove all list entries, press 0 8.
To remove all anonymous list entries, press 0 9.
To review the entries on your list, press 1.
To hear these instructions repeated, press 0.
To schedule this service, press 2."
Step 2
The system plays the following announcement and prompt:
"There are <number> entries on your list.
To delete an entry, press 0 7 as soon as you hear it.
You may enter a list-editing command at any time, including 0 for the list of commands.
The first entry on your list is <xxx-xxx-xxxx>.
Next <xxx-xxx-xxxx>.This is the end of your list. Please continue. Press 0 for instructions or hang up."
Step 3
Figure A-17 presents a flow chart that shows the sequence of prompts and announcements that are played when you are deleting DNs from an NSA bypass list.
Figure A-17 No Solicitation Announcement—Deleting DNs from the NSA List.
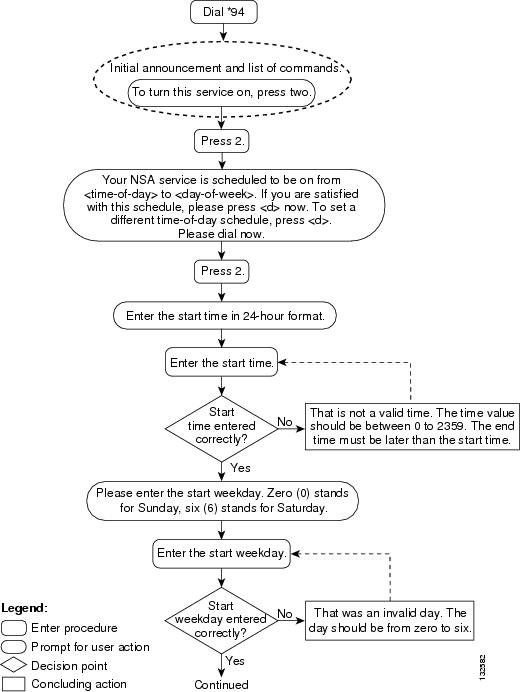
NSA—Scheduling the Service Time Slot
To schedule the time of day and days of the week during which the No Solicitation Announcement service applies, when activated, complete the following steps:
Step 1
Presuming that you previously entered DNs on your NSA bypass list and that you turned the service on, the system announces the set of key commands that you can enter to perform the various screening-list-editing operations offered by the NSA service:
"Your No Solicitation Announcement service is now on.
You may interrupt announcements at any time by entering a command key. When you are finished, hang up.
To turn this service off, press 3.
To add an entry, press the number-sign key.
To remove one or more entries, press the star key.
To remove all list entries, press 0 8.
To remove all anonymous list entries, 0 9.
To review the entries on your list, press 1.
To hear these instructions repeated, press 0.
To schedule this service, press 2."
Step 2
If a schedule for the NSA service was previously set, the system plays the following prompt:
"Your NSA service is scheduled to be on from <time_of_day><day_of_week> to <time_of_day><day_of_week>. If you are satisfied with this schedule, please press one now. To set a different time-of-day schedule, press 2. Please dial now."
If no schedule was previously set, the system plays the initial prompt for setting the start time:
"Please enter the start time in 24-hour format."
Step 3
If you enter the start time incorrectly, the system plays the following prompt:
"That was an invalid time. The time value should be between 0 and 2359. The end time must be later than the start time."
If you enter the start time correctly, the system plays the following prompt:
"Please enter the start weekday. 0 stands for Sunday, 6 stands for Saturday."
Step 4
If you enter the weekday incorrectly, the system plays the following announcement:
"That was an invalid day. The day value should be from 0 to 6."
If you entered the start weekday correctly, the system plays the following prompt:
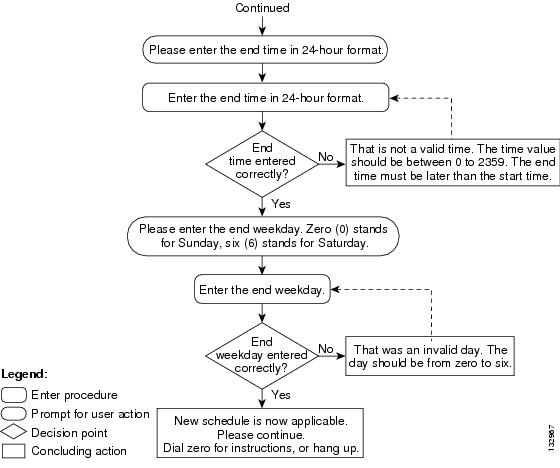
"Please enter the end time in 24-hour format." (The end time must be later than the start time.)
Step 5
If you enter the end time correctly, the system plays the following prompt:
"Please enter the end weekday. 0 stands for Sunday, 6 stands for Saturday."
Step 6
If you enter the weekday incorrectly, the system plays the following announcement:
"That was an invalid day. The day should be from 0 to 6."
If you enter the end weekday correctly, the system plays the following prompt:
"New schedule is now applicable. Please continue. Dial 0 for instructions, or hang up."
Figure A-18 presents a flow chart that shows the IVR prompts and announcements that are played when you are scheduling the service time interval for the No Solicitation Announcement service.
Figure A-18 No Solicitation Announcement—Scheduling
Privacy Screening
The Privacy Screening feature enables a subscriber to accept or reject an anonymous call based on a short message (usually the caller's name) recorded by the caller. When a caller encounters the Privacy Screening message, the feature enables the caller to:
•
•
This feature operates in conjunction with application and media servers, which comprise the IVR system.
For a detailed description of the Privacy Screening feature, see the "Privacy Screening (Calling Identity with Enhanced Screening)" section on page 2-101.
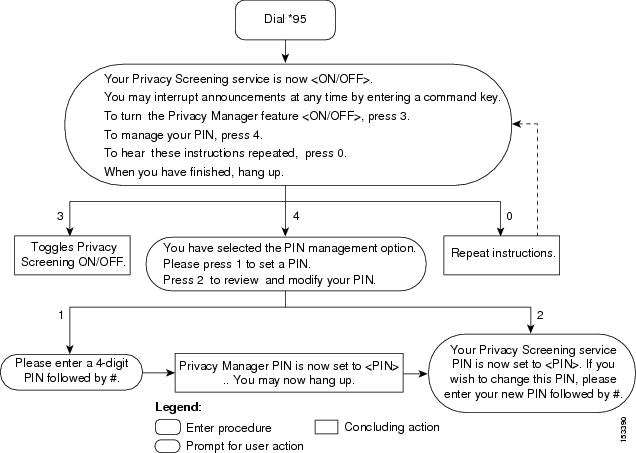
Subscriber Activation and Management of Privacy Screening
This section describes how a subscriber interacts with the IVR system to activate or deactivate Privacy Screening and to manage PIN authentication.
Step 1
The system plays the following announcement:
"Your Privacy Screening service is now <ON/OFF>. You may interrupt announcements at any time by entering a command key. When you have finished, hang up.
To turn the Privacy Screening feature <OFF/ON>, press 3.
To manage your PIN, press 4.
To hear these instructions repeated, press 0."
Pressing 3 toggles the feature ON or OFF.
Pressing 0 repeats the instructions.
Step 2
The system plays the following announcement:
"You have selected the PIN management option.
Please press 1 to set a PIN or press 2 to review and modify your PIN."
If the subscriber presses 1, the system plays the following announcement:
"Please enter a 4-digit PIN followed by the number sign."
If the subscriber presses 2, the system plays the following announcement:
"Your Privacy Screening service PIN is now set to <PIN>. If you wish to change this PIN, please enter your PIN followed by the number sign.
Step 3
The system plays the following announcement:
"Privacy Screening PIN is now set to <PIN>. You may now hang up."
Figure A-19 presents a flow chart that shows the IVR announcements and prompts that are played when a Privacy Screening subscriber accesses the service to activate, deactivate or manage PIN authentication.
Figure A-19
Privacy Screening Activation and PIN Change
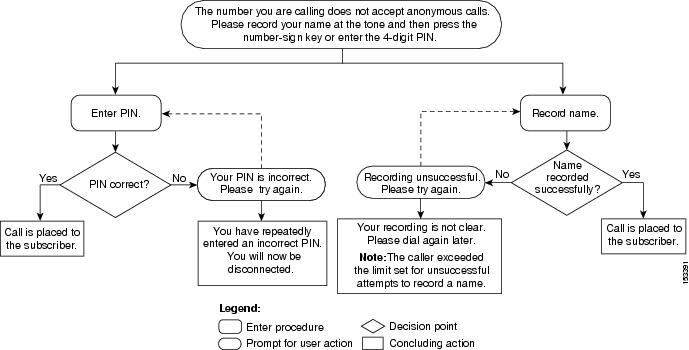
Caller Interaction with Privacy Screening
This section describes how an anonymous caller interacts with the IVR system when attempting to place a call to a subscriber who has Privacy Screening activated. The caller is given the option of recording his name or entering a PIN.
Caller Name Recording
Step 1
The system plays the following announcement:
"The number you are calling does not accept anonymous calls. Please record your name at the tone and then press the number sign key; or, enter the 4-digit PIN."
Step 2
If the system records the name successfully, the call is placed to the subscriber.
If the system exceeds the maximum number of attempts allowed to record a name successfully, it plays the following announcement:
"Your recording is not clear. Please dial again later."
Caller PIN Entry
Step 1
The system plays the following announcement:
"The number you are calling does not accept anonymous calls. Please record your name at the tone and then press the number sign key or enter the 4-digit PIN."
Step 2
If the PIN is correct, the call is placed to the subscriber.
If the PIN is incorrect, the system plays the following announcement:
"Your PIN is incorrect. Please try again."
The system permits a configurable number of attempts to enter the correct PIN. When the caller exceeds the permitted number of attempts to enter the PIN, the system plays the following announcement:
You have repeatedly entered an incorrect PIN. You will now be disconnected.
Note
Figure A-20 presents a flow chart that shows the IVR prompts and announcements that are played when a caller attempts to call a subscriber who has Privacy Screening activated.
Figure A-20
Privacy Screening—Caller Interaction
Subscriber Interaction with Privacy Screening
This section describes how a subscriber who has Privacy Screening activated interacts with the IVR system when an anonymous caller attempts a call.
Step 1
"This message is from your Privacy Screening service. You have an incoming call.
Press 1 to review the caller's name.
Press 2 to accept the call.
Press 3 to forward the call to voice mail if your are subscribed to voice mail.
Press 4 to play a `not-available' announcement.
Press 5 to play a `no-solicitation' announcement."
Press 0 to replay this menu at any time.
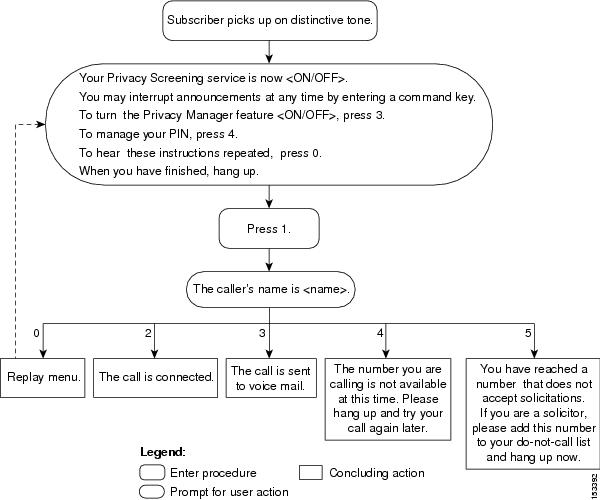
Step 2
Note
Figure A-21 presents a flow chart that shows the IVR prompts and announcements that are played when a subscriber picks up the phone upon hearing the Privacy Screening distinctive tone.
Figure A-21
Privacy Screening—Subscriber Interaction
Privacy Screening Announcements
Table A-1 lists the Privacy Screening prompts played by the AS.
Privacy Screening Manage Announcements
Table A-2 lists the Privacy Screening management announcements played by the AS.