Table Of Contents
Configuring SME Tapes
Information About SME Tape Management
Configuring SME Tape Management Using the CLI
Enabling and Disabling Tape Compression
Enabling and Disabling Key-on-Tape
Configuring a Tape Volume Group
Enabling and Disabling Automatic Volume Groups
Adding a Tape Device to the Tape Group
Adding Paths to the Tape Device
Bypassing Tape Encryption
Configuring SME Tape Management Using the GUI
Configuring Groups
Adding Tape Groups
Deleting Tape Groups
Configuring Tape Devices
Adding Tape Devices
Deleting Tape Devices
Configuring Tape Paths
Adding Tape Paths
Deleting Paths from a Device
Configuring Tape Volume Groups
Adding Tape Volume Groups
Deleting Tape Volume Groups
Configuring Key Management Operations
Purging Volumes
Purging Volume Groups
Exporting Volume Groups
Importing Volume Groups
Rekeying Tape Volume Groups
Auto Replicating Tape Media Keys
Creating Tape Key Replication Relationships
Removing Tape Key Replication Relationships
Using Basic Security Mode for Master Key Download
Replacing Smart Cards
Replacing Smart Cards Using Standard Mode
Replacing Smart Cards Using Advanced Mode
Exporting Volume Groups From Deactivated Clusters
Exporting Volume Groups Using Basic Mode
Exporting Volume Groups Using Standard Mode
Exporting Volume Groups Using Advanced Mode
Migrating KMC Server
Verifying SME Tape Management Configuration
Monitoring SME Tape Management
Viewing Host Details
Viewing Tape Device Details
Viewing SME Tape Information Using the CLI
Viewing Tape Cartridge Information
Viewing Tape Volume Group Information
Viewing the Status of the Tape Device
Feature History for SME Tape Management
Configuring SME Tapes
This chapter contains information about managing tapes that are encrypted using SME.
This chapter includes the following topics:
•
Information About SME Tape Management
•
Configuring SME Tape Management Using the CLI
•
Configuring SME Tape Management Using the GUI
•
Configuring Key Management Operations
•
Verifying SME Tape Management Configuration
•
Monitoring SME Tape Management
•
Feature History for SME Tape Management
Information About SME Tape Management
Once provisioned, SME provides transparency to hosts and targets. To manage the paths from a hosts to tape devices, SME uses the following:
•
Tape group—A backup environment in the SAN. This consists of all the tape backup servers and the tape libraries that they access.
•
Tape device—A tape drive that is configured for encryption.
•
Tape volume—A physical tape cartridge identified by a barcode for a given use.
•
Tape volume group—A logical set of tape volumes configured for a specific purpose. Using SME, a tape volume group can be configured using a barcode range or a specified regular expression. In an auto-volume group, a tape volume group can be the volume pool name configured at the backup application.
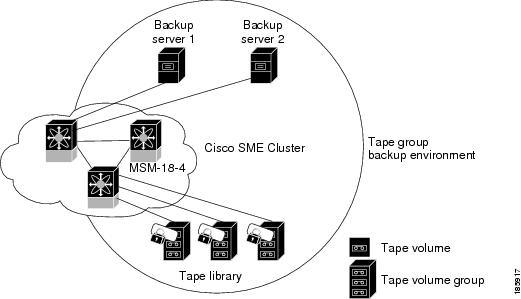
SME provides the capability to export a volume group with an encryption password. This file could later be imported to a volume group. Also, volume group filtering options provide mechanisms to specify what type of information will be included in a specific volume group. For example, you could filter information in a volume group by specifying a barcode range.
Figure 5-1 shows the SME tape backup environment.
Figure 5-1 SME Tape Backup Environment and Configuration
The following concepts are used in tape management procedures:
•
Key management settings
•
Auto-volume group
•
Key-on-Tape
•
Compression
•
Configuring volume groups
Note
If data is written to a partially non-SME encrypted tape, it is left in clear text. When a tape is recycled or relabeled, the tape will be encrypted by SME.
Configuring SME Tape Management Using the CLI
This section includes the following topics:
•
Enabling and Disabling Tape Compression
•
Enabling and Disabling Key-on-Tape
•
Configuring a Tape Volume Group
•
Enabling and Disabling Automatic Volume Groups
•
Adding a Tape Device to the Tape Group
•
Adding Paths to the Tape Device
Enabling and Disabling Tape Compression
Detailed Steps
To enable tape compression, follow these steps:
|
Command
|
Purpose
|
Step 1
|
switch# config t
|
Enters configuration mode.
|
Step 2
|
switch(config)# sme cluster
clustername1
switch(config-sme-cl)#
|
Specifies the cluster and enters SME cluster configuration submode.
|
Step 3
|
switch(config-sme-cl)#
tape-compression
switch(config-sme-cl)#
|
Enables tape compression.
|
Step 4
|
switch(config-sme-cl)# no
tape-compression
switch(config-sme-cl)#
|
Disables tape compression.
|
Enabling and Disabling Key-on-Tape
SME provides the option to store the encrypted security keys on the backup tapes.
Detailed Steps
To enable the key-on-tape feature, follow these steps:
|
Command
|
Purpose
|
Step 1
|
switch# config t
|
Enters configuration mode.
|
Step 2
|
switch(config)# sme cluster
clustername1
switch(config-sme-cl)#
|
Specifies the cluster and enters SME cluster configuration submode.
|
Step 3
|
switch(config-sme-cl)# key-ontape
switch(config-sme-cl)#
|
Enables the key-on-tape feature.
|
Step 4
|
switch(config-sme-cl)# no key-ontape
switch(config-sme-cl)#
|
Disables key-on-tape feature.
|
Configuring a Tape Volume Group
A tape volume group is a group of tapes that are categorized usually by function. For example, HR1 could be the designated tape volume group for all Human Resource backup tapes; EM1 could be the designated tape volume group for all e-mail backup tapes.
Adding tape groups allows you to select the VSANs, hosts, storage devices, and paths that SME will use for encrypted data. For example, adding a tape group for HR data sets the mapping for SME to transfer data from the HR hosts to the dedicated HR backup tapes.
Detailed Steps
To configure a tape volume group, follow these steps:
|
Command
|
Purpose
|
Step 1
|
switch# config t
|
Enters configuration mode.
|
Step 2
|
switch(config)# sme cluster clustername1
switch(config-sme-cl)#
|
Specifies the cluster and enters SME cluster configuration submode.
|
Step 3
|
switch(config-sme-cl)# tape-bkgrp groupname1
switch(config-sme-cl-tape-bkgrp)#
|
Specifies the tape volume group and enters the SME tape volume group submode.
|
Step 4
|
switch(config-sme-cl-tape-bkgrp)# tape-device
devicename1
switch(config-sme-cl-tape-bkgrp-tapedevice)#
|
Specifies the tape device name and enters the SME tape device submode.
|
Step 5
|
switch(config-sme-cl-tape-bkgrp-tapedevice)#
tape-device devicename1 D
switch(config-sme-cl-tape-bkgrp-tapedevice)#
|
Specifies the tape cartridge identifier.
|
Step 6
|
switch(config-sme-cl-tape-bkgrp-tapedevice)#
host 10:00:00:00:c9:4e:19:ed target
2f:ff:00:06:2b:10:c2:e2 vsan 4093 lun 0
fabric f1
switch(config-sme-cl-tape-bkgrp-tapedevice)#
|
Specifies the host and target, the VSAN, LUN and the fabric (f1) for the tape volume group.
|
Step 7
|
switch(config-sme-cl-tape-bkgrp-tapedevice)#
enable
|
Enables the tape device.
|
Enabling and Disabling Automatic Volume Groups
When SME recognizes that a tape barcode does not belong to an exiting volume group, then SME creates a new volume group when automatic volume grouping is enabled.
Automatic volume grouping is disabled by default.
Detailed Steps
To enable or disable automatic volume grouping, follow these steps:
|
Command
|
Purpose
|
Step 1
|
switch# config t
|
Enters configuration mode.
|
Step 2
|
switch(config)# sme cluster
clustername1
switch(config-sme-cl)#
|
Specifies the cluster and enters SME cluster configuration submode.
|
Step 3
|
switch(config-sme-cl)# auto-volgrp
switch(config-sme-cl)#
|
Specifies automatic volume grouping.
|
Step 4
|
switch(config-sme-cl)# no
auto-volgrp
switch(config-sme-cl)#
|
Specifies no automatic volume grouping.
|
Adding a Tape Device to the Tape Group
A tape device is specified as part of a tape group and is identified using a name as an alias.
Detailed Steps
To add a tape device to the tape group, follow these steps:
|
Command
|
Purpose
|
Step 1
|
switch# config t
|
Enters configuration mode.
|
Step 2
|
switch(config)# sme cluster
clustername1
switch(config-sme-cl)#
|
Specifies the cluster and enters SME cluster configuration submode.
|
Step 3
|
switch(config-sme-cl)# tape-bkgrp
groupname1
switch(config-sme-cl-tape-bkgrp)#
|
Specifies the tape volume group and enters the SME tape volume group submode.
|
Step 4
|
switch(config-sme-cl-tape-bkgrp)#
tape-device devicename1
switch(config-sme-cl-tape-bkgrp-tape
device)#
|
Specifies the tape device name and enters the SME tape device submode.
|
Step 5
|
switch(config-sme-cl-tape-bkgrp-tape
device)# tape-device devicename1 D
switch(config-sme-cl-tape-bkgrp-tape
device)#
|
Specifies the tape cartridge identifier.
|
Adding Paths to the Tape Device
Caution 
All IT-nexuses that host paths between the server and storage must be added to the configuration or else the data integrity is at risk.
A tape device is specified as part of a tape group and is identified using a name as an alias. All the paths to the tape device in the cluster must be specified using the host, target, LUN, VSAN, and fabric.
Detailed Steps
To add a path to a tape device in the cluster, follow these steps:
|
Command
|
Purpose
|
Step 1
|
switch# config t
|
Enters configuration mode.
|
Step 2
|
switch(config)# sme cluster
clustername1
switch(config-sme-cl)#
|
Specifies the cluster and enters SME cluster configuration submode.
|
Step 3
|
switch(config-sme-cl)# tape-bkgrp
groupname1
switch(config-sme-cl-tape-bkgrp)#
|
Specifies the tape volume group and enters the SME tape volume group submode.
|
Step 4
|
switch(config-sme-cl-tape-bkgrp)#
tape-device devicename1
switch(config-sme-cl-tape-bkgrp-tape
device)#
|
Specifies the tape device name and enters the SME tape device submode.
|
Step 5
|
switch(config-sme-cl-tape-bkgrp-tape
device)# tape-device devicename1 D
switch(config-sme-cl-tape-bkgrp-tape
device)#
|
Specifies the tape cartridge identifier.
|
Step 6
|
switch(config-sme-cl-tape-bkgrp-tape
device)# host
10:00:00:00:c9:4e:19:ed target
2f:ff:00:06:2b:10:c2:e2 vsan 4093
lun 0 fabric f1
switch(config-sme-cl-tape-bkgrp-tape
device)#
|
Specifies the host and target, the VSAN, LUN and the fabric (f1) for the tape volume group.
|
Step 7
|
switch(config-sme-cl-tape-bkgrp-tape
device)# no host
10:00:00:00:c9:4e:19:ed target
2f:ff:00:06:2b:10:c2:e2 vsan 4093
lun 0
switch(config-sme-cl-tape-bkgrp-tape
device)#
|
Removes the specified path from the tape device.
|

Note
If the IT-nexus specified in the path above is not configured in SME, SME will also trigger a discovery of the IT-nexus along with adding the configured path to the specified tape device. In a scripted environment, when adding paths, it is always advisable to give a delay of one minute to allow the IT-nexus discovery to complete.
Bypassing Tape Encryption
You can enable or disable the bypass feature once you create the tape device.
Note
By default, bypass encryption is disabled. Writes fails when a clear text tape is loaded.
Detailed Steps
To enable or disable bypass tape encryption, follow these steps:
|
Command
|
Purpose
|
Step 1
|
switch# config t
|
Enters configuration mode.
|
Step 2
|
switch(config)# sme cluster
clustername1
switch(config-sme-cl)#
|
Specifies the cluster and enters SME cluster configuration submode.
|
Step 3
|
switch(config-sme-cl)# tape-bkgrp
groupname1
switch(config-sme-cl-tape-bkgrp)#
|
Specifies the tape volume group and enters the SME tape volume group submode.
|
Step 4
|
switch(config-sme-cl-tape-bkgrp)#
tape-device tapename1
switch(config-sme-cl-tape-bkgrp
tape-device tapename1)#
|
Specifies the tape that has clear text data.
|
Step 5
|
switch(config-sme-cl-tape-bkgrp-tape
device)# no by pass
|
Specifies the bypass policy for the tape device, which rejects writes when a clear text tape is used.
|
switch(config-sme-cl-tape-bkgrp-tape
device)# by pass
|
Specifies the bypass policy for the tape device, which allows data to pass in clear text.
|
Configuring SME Tape Management Using the GUI
This section includes the following topics:
•
Configuring Groups
•
Configuring Tape Devices
•
Configuring Tape Paths
•
Configuring Tape Volume Groups
Configuring Groups
This section includes the following topics:
•
Adding Tape Groups
•
Deleting Tape Groups
Adding Tape Groups
Note
Messages are logged to the switch when the tapes bypass encryption.
Restrictions
If a tape is written before SME is activated, it will remain a clear text tape and will only become an encrypted tape when it is reformatted or relabeled on a tape drive that is defined in an active SME environment.
Detailed Steps
To add a tape group, follow these steps:
Step 1
Select Tape Groups. Click Add.
Note
A default volume group is created when the tape group is created; none of the configurations can be changed for the default volume group; however, you can create a new volume group.
Step 2
Enter a name for the tape group. Click Next.
Note
You can click Finish to create an empty tape group that can be used for preprovisioning. You can specify the devices later.
Step 3
Select specific VSANs for the tape group. Click Next.
Step 4
Select the hosts (backup servers) for the tape group. Click Next.
Step 5
Select the tape drives for the tape group. Click Next.
Step 6
Select the paths to use to create the tape group. Click Next.
Step 7
Verify the information. Click Confirm to save and activate the changes. Your screen will refresh to the DCNM-SAN SME screen.
Step 8
View the hosts, tape devices, and volume groups that belong to the tape group.
Note
Messages are logged to the switch when tapes are bypassing encryption.
Deleting Tape Groups
Prerequisites
•
Before deleting a tape group, delete tape devices and tape volume groups.
Detailed Steps
To delete a tape group, follow these steps:
Step 1
Select Tape Groups to display the tape groups that are part of the cluster.
Step 2
Select a tape group and click Remove.
Step 3
Click OK to delete the tape group.
Configuring Tape Devices
This section includes the following topics:
•
Adding Tape Devices
•
Deleting Tape Devices
Adding Tape Devices
Detailed Steps
To add tape devices to an existing tape group, follow these steps:
Step 1
Click Tape Devices. Click Add.
Step 2
Select the VSANs that you would like to discover paths from. Click Next.
Step 3
Select the hosts that you would like to discover paths from. Click Next.
Step 4
Select the tape drives. Click Next.
Step 5
Select the paths that SME would use for encrypted data between the host and tape devices. Click Next.
Step 6
Confirm the addition of the new tape device. Click Confirm to close the SME wizard and to return to the DCNM-SAN SME screen.
Step 7
View the new tape device that was added to the cluster.
Deleting Tape Devices
Detailed Steps
To delete a tape device from an existing tape group, follow these steps:
Step 1
Click Tape Devices, and then select the device you want to remove.
Step 2
Click Remove.
Step 3
Click OK to delete the tape device.
Step 4
View the notification that the tape drive has been removed.
Configuring Tape Paths
This section includes the following topics:
•
Adding Tape Paths
•
Deleting Paths from a Device
Adding Tape Paths
Use the Tape Path Wizard to quickly add or modify tape paths between hosts and target backup devices.
Caution 
All IT-nexuses that host paths between the server and storage must be added to the configuration or else the data integrity is at risk.
Detailed Steps
To add a tape path to a tape device, follow these steps:
Step 1
Select a tape device.
Step 2
Click Add.
Step 3
Select the appropriate fabric and enter the VSAN, initiator and target WWNs, and the LUN. Click Next.
Step 4
Confirm the addition of the new tape path. Click Confirm to close the SME wizard and to return to the DCNM-SAN SME screen.
Deleting Paths from a Device
Detailed Steps
To delete a tape path from a device, follow these steps:
Step 1
Click a tape device name to display the tape device details and the paths.
Step 2
Select a tape path and click Remove.
Step 3
Click OK to delete the tape path and to view the tape path removed notification.
Configuring Tape Volume Groups
This section includes the following topics:
•
Adding Tape Volume Groups
•
Deleting Tape Volume Groups
Adding Tape Volume Groups
Restrictions
•
Overlapping ranges are not recommended. If there are overlapping ranges, then SME places the volume based on the lexicographic ordering of the volume group.
Detailed Steps
To add tape volume groups to an existing tape group, follow these steps:
Step 1
Click Volume Groups. Click Create.
Step 2
Enter the new volume group name and configure a filter that SME will use to match volumes for that volume group. Select from the following:
•
None—Used only if you want to import volume groups into another volume group.
•
Regex—SME will place the volume if the barcode matches the expression.
•
Ranges—SME will place the volume within a specific barcode range.
Note
If there is not a direct match, then the volumes will be placed in the default volume group.
Alternately, you can enter the barcode ranges that will be included in this volume group.
Click Next.
Step 3
Confirm the addition of the new volume group. Click Confirm to close the SME wizard and to return to the DCNM-SAN SME screen.
Step 4
View the new volume group added to the tape group.
Note
For information on importing and exporting volume groups, see Chapter 7 "Configuring SME Key Management."
Deleting Tape Volume Groups
Detailed Steps
To delete a tape volume group from a SME cluster, follow these steps:
Step 1
Select Volume Groups in the navigation pane to display the tape volume groups in the cluster.
Step 2
Select a tape volume group and click Remove.
Step 3
Click OK to delete the tape volume group and to view the volume group notification.
Configuring Key Management Operations
Key management operations include archiving and purging keys. It also includes exporting and importing volume groups.
This section includes the following topics:
•
Purging Volumes
•
Purging Volume Groups
•
Exporting Volume Groups
•
Importing Volume Groups
•
Rekeying Tape Volume Groups
•
Auto Replicating Tape Media Keys
•
Using Basic Security Mode for Master Key Download
•
Replacing Smart Cards
•
Exporting Volume Groups From Deactivated Clusters
•
Migrating KMC Server
Purging Volumes
Purging keys deletes deactivated or active keys from the Cisco KMC. You can delete the deactivated volume group, which purges all keys. If you delete an active volume group, all the keys are deactivated.
Purging keys at the volume level in unique key mode allows you to purge specific volumes.
Restrictions
•
Purging keys from the Cisco KMC cannot be undone.
Detailed Steps
To purge keys that are currently active or deactivated, follow these steps:
Step 1
Select a volume group and click Active or Deactivated to view the keys that are deactivated in the Cisco KMC.
Step 2
Select the deactivated keys that you want to purge.
Step 3
Click Remove.
Purging Volume Groups
Detailed Steps
To purge a volume group, follow these steps:
Step 1
Select a deactivated volume group and click Remove.
Step 2
Click Confirm.
Exporting Volume Groups
Exporting tape volume groups can be advantageous when tapes are moved to a different cluster. In that scenario, you will need the keys if you have to restore those tapes. If the source cluster is online, follow the steps in this section.
Detailed Steps
To export volume groups from an online cluster, follow these steps:
Step 1
Select a volume group to display the volume groups in the cluster.
Step 2
Select a volume group.
Step 3
Click Export.
Step 4
Enter the volume group file password. Click Next.
Step 5
Click Download to download the volume group file.
Step 6
A dialog box appears asking you if you want to save this file. Save the .dat file.
Note
The exported volume group file can be used by the Offline Data Restore Tool (ODRT) software to convert the SME encrypted tape back to clear-text when the SME line card or the Cisco MDS switch is unavailable.
Importing Volume Groups
You can import a previously exported volume group file into a selected volume group.
Detailed Steps
To import a volume group file, follow these steps:
Step 1
Select Volume Groups in the navigation pane to display the volume groups in the cluster.
Step 2
Select a volume group and click Import.
Note
You must select an existing volume group. To import into a new volume group, create the volume group first, and then import a volume group.
Step 3
Browse and locate the file to import. Enter the password that was assigned to encrypt the file. Click Next.
Step 4
Select the volume group .dat file. Click Open.
Step 5
Click Confirm to begin the import process or click Back to choose another volume group file.
Note
The imported keys in tape volume groups are read-only by default. However, if the entry "sme.retain.imported.key.state=true" is set in the conf/smeserver.properties file and the DCNM-SAN is restarted, the state of the imported keys are retained and both read and write operations can be performed.
Rekeying Tape Volume Groups
Tape volume groups can be rekeyed periodically to ensure better security and also when the key security has been compromised.
In the unique key mode, the rekey operation generates a new tape volume group wrap key. The current tape volume group wrap key is archived. The current media keys remain unchanged, and the new media keys are wrapped with the new tape volume group wrap key.
In the shared key mode, the rekey operation generates a new tape volume group wrap key and a new tape volume group shared key. The current tape volume group wrap key is archived while the current tape volume group shared key remain unchanged (in active state).
The volume groups can be rekeyed monthly even if you do not use the unique key mode.
Detailed Steps
To rekey tape volume groups, follow these steps:
Step 1
In the DCNM-SAN Web Client navigation pane, select Volume Groups to display the volume groups in the cluster.
Step 2
Select one or more volume groups.
Step 3
Click Rekey. A confirmation dialog box is displayed asking if the rekey operation is to be performed. Click OK to rekey the selected volume groups.
Auto Replicating Tape Media Keys
This section describes how to auto replicate the media keys in the DCNM-SAN Web Client. The following topics are covered:
•
Creating Tape Key Replication Relationships
•
Removing Tape Key Replication Relationships
Creating Tape Key Replication Relationships
Detailed Steps
To auto replicate the tape media keys, follow these steps:
Step 1
In the DCNM-SAN Web Client, click the SME tab.
Step 2
Select Clusters in the navigation pane to display the clusters.
Step 3
Select a cluster and select Tape Key Replication. The Tape Key Replication Relationships pane appears.
Step 4
Click Create to create a tape key replication relationship. A Create Replication Relationship area appears where the source cluster and the destination clusters are displayed.
Step 5
Select the clusters to expand or collapse the list of the Source Volume Group and the Destination Volume Group. Choose tape groups from the Source Volume Group and the Destination Volume Group to create a tape key replication relationship context.
Step 6
Click Submit to save the settings. A notification window appears to indicate the creation of the tape key replication relationship and the replication status shows as Created.
Removing Tape Key Replication Relationships
Detailed Steps
To remove a tape key replication relationship, follow these steps:
Step 1
Click Clusters in the navigation pane to display the clusters and select Tape Key Replication. The Tape Key Replication Relationships area appears on the right-hand pane.
Step 2
Select the tape group whose replication relationship needs to be removed. Click Remove.
Step 3
A confirmation dialog box is displayed asking if the relationship needs to be removed. Click OK to remove the replication relationship of the selected volume groups.
Step 4
A notification window appears that indicates the removal of the tape key replication relationship.
Using Basic Security Mode for Master Key Download
In Basic security mode, the master key file can be downloaded multiple times from the DCNM-SAN Web Client. The cluster detail view includes a button to download the master key file.
Detailed Steps
To download the master key file (Basic security mode), follow these steps:
Step 1
Select a cluster name in the navigation pane to view the cluster details.
Step 2
Click the Download Keyfile button to download the master key file.
Step 3
Enter the password to protect the master key file. Confirm the password. Click Download to begin downloading the encrypted file.
Step 4
Click Close to close the wizard.
Step 5
You will be asked if you want to open or save the file. Click Save to save the downloaded master key file.
Replacing Smart Cards
This section describes how to replace smart cards for clusters in the following modes:
•
Replacing Smart Cards Using Standard Mode
•
Replacing Smart Cards Using Advanced Mode
Replacing Smart Cards Using Standard Mode
In Standard security mode, the master key can be downloaded to a replacement smart card from the DCNM-SAN Web Client.
Detailed Steps
To replace a smart card (Standard security mode), follow these steps:
Step 1
Select Smartcards to display the smart card information for the cluster.
Step 2
Click Replace to launch the smart card replacement wizard. Click Next.
Step 3
Insert the smart card and enter the Password, PIN, and Label for the smart card. Click Next.
Step 4
Click Finish to close the wizard.
Replacing Smart Cards Using Advanced Mode
Note
In SME Disk cluster, replacing smart cards does not rewrap disk keys. This feature will be supported in a future release.
Detailed Steps
To replace a smart card (Advanced security mode), follow these steps:
Step 1
Select Smartcards to display the smart card information for the cluster.
Step 2
Select the smart card that you want to replace. Click Replace to launch the smart card replacement wizard.
Step 3
Insert the new smart card. Click Next.
The SME Recovery Officer who owns the replacement smart card is prompted to log in and to insert the smart card to download the master key.
Step 4
Enter the switch login information and the smart card PIN and label. Click Next.
Each member of the Cisco Recovery Officer quorum is requested to log in and present their smart card to authorize and authenticate the operation.
Step 5
Insert one of the smart cards that stores the master key. Click Next.
Step 6
Enter the switch login information and the smart card PIN and Label. Click Next. Do this for each of the smart cards.
Step 7
Insert the smart cards belonging to each recovery officer in any order.
To store the new master keyshares, follow these steps:
a.
Enter the switch login information, the PIN number for the smart card, and a label that will identify the smart card. Click Next.
A notification is shown that the first keyshare is successfully stored.
b.
Enter the switch credentials and PIN information for the second recovery officer. Click Next.
A notification is shown that the second keyshare is successfully stored.
c.
Enter the switch credentials and PIN information for the third recovery officer. Click Next.
A notification is shown that the third keyshare is successfully stored.
d.
Enter the switch credentials and PIN information for the fourth recovery officer. Click Next.
A notification is shown that the fourth keyshare is successfully stored.
e.
Enter the switch credentials and PIN information for the fifth recovery officer. Click Next.
A notification is shown that the fifth keyshare is successfully stored. Click Next to begin the automatic synchronization of volume groups.
You will see an indication that the operation is in progress and to wait until the synchronization of volume groups is completed.
Step 8
The smart card replacement is completed. Click Close to return to the DCNM-SAN Web Client and to view the smart card information.
Step 9
Select Smartcards to view the new smart card information. The smart card details display the old recovery shares and the new recovery shares.
Exporting Volume Groups From Deactivated Clusters
Note
Exporting volume groups from deactivated clusters applies to both Tape and Disk. However for Disk, if the cluster is offline you must provide the master key for the cluster.
When an SME cluster is deactivated, all key management operations such as exporting volume groups, are performed at the Cisco KMC. Exporting volume keys is a critical operation and must be authorized by SME Recovery Officers.
The following sections describe the exporting of volume groups in different modes:
•
Exporting Volume Groups Using Basic Mode
•
Exporting Volume Groups Using Standard Mode
•
Exporting Volume Groups Using Advanced Mode
Exporting Volume Groups Using Basic Mode
Detailed Steps
To export a volume group from a deactivated cluster (Basic security mode), follow these steps:
Step 1
Select a volume group to display the volume groups in the cluster. Click Export.
Step 2
Click Browse to locate the volume group master key file.
Step 3
Select the master key file. Click Open.
Step 4
Enter the password that protects the master key for the archived volume group. Click Next.
Step 5
Enter the password that will be used to encrypt the exported file. Confirm the password and click Next.
Step 6
Click Download to begin downloading the volume group file.
Step 7
You will be asked if you want to open or save the file. To save the exported volume group, click Save.
Exporting Volume Groups Using Standard Mode
Detailed Steps
To export a volume group from a deactivated cluster (Standard security mode), follow these steps:
Step 1
Select Volume Groups (in a deactivated cluster) to display the volume groups in the cluster. Select a volume group and click Export.
Step 2
Insert one of the five smart cards into the smart card reader. Click Next.
Step 3
Enter the smart card Label and PIN. Click Next.
Step 4
Enter the password to encrypt the volume group file. Confirm the password and click Next.
Step 5
Click Download to begin downloading the file.
Step 6
You will be asked if you want to open or save the file. To save the file, click Save.
Exporting Volume Groups Using Advanced Mode
Detailed Steps
To export a volume group from a deactivated cluster (Advanced security mode), follow these steps:
Step 1
Select Volume Groups (in a deactivated cluster) to display the volume groups in the cluster. Select a volume group and click Export.
Step 2
Insert one of the five smart cards into the smart card reader. Click Next.
Step 3
Enter the smart card Label and PIN. Click Next.
The keyshare is retrieved.
Step 4
Insert the next smart card into the smart card reader. Click Next.
Note
Repeat this step for each smart card that is required to unlock the master key. The number of required smart cards depends on the quorum number selected during the cluster creation, for example, two of five smart cards.
Step 5
Enter the smart card Label and PIN. Click Next.
Step 6
Enter the volume group file password. Confirm the password and click Next.
Step 7
Click Download to begin downloading the volume group.
Step 8
You will be asked if you want to open or save the file. Click Save to save the .dat file.
Migrating KMC Server
Prerequisites
If the KMC server is integrated with RSA Key Manager, both the KMC and RSA Key Manager must be synchronized. If a KMC server is removed to purge all the keys, follow the required procedures to purge all the keys first before you uninstall the KMC server. This ensures that the keys in the RSA Key Manager are also purged.
Restrictions
The migrating of the KMC server is only applicable for SME Tape. For SME Disk, there is no RSA key manager support.
Detailed Steps
To migrate a KMC server, follow these steps:
Step 1
Migrate all keys to the new KMC server. Refer to the backup and restore procedures outlined in "Database Backup and Restore."
Step 2
After restoring the database, install DCNM-SAN in the new KMC server and point the DCNM-SAN to the database. This ensures that all the keys are maintained across the KMC migration.
Step 3
Update the cluster with the new KMC server details when the new KMC server is active.
a.
Go to the DCNM-SAN Web Client and click the SME tab.
b.
Select the cluster. The cluster details page displays.
c.
Click Modify and choose the new KMC server.
If the KMC server is integrated with RSA Key Manager, modify the settings and select the RKM server.
Step 4
Uninstall the DCNM-SAN server instance of the previous KMC server. This removes the previous KMC server.
Verifying SME Tape Management Configuration
To display SME Tape management configuration information, perform one of the following tasks:
Command
|
Purpose
|
show sme cluster tape
|
Displays summary or detailed information about tapes.
|
show sme cluster tape detail
|
Displays information about tape cartridges.
|
show sme cluster tape-bkgrp
|
Displays information about all tape volume groups or about a specific group.
|
For detailed information about the fields in the output from these commands, refer to the Cisco MDS 9000 Family NX-OS Command Reference.
Monitoring SME Tape Management
This section includes the following topics:
•
Viewing Host Details
•
Viewing Tape Device Details
•
Viewing SME Tape Information Using the CLI
Viewing Host Details
You can view detailed information about hosts in a SME cluster. Information for a specific host includes the tape group membership, paths from the host to the target, VSAN, fabric, status, and the tape device.
To view the host details, select a host in the navigation pane.
Viewing Tape Device Details
You can view detailed information about tape devices in a SME cluster. Information for a specific tape device includes the tape group membership, device description, serial number, and the host and target PWWN.
To view the tape device details, select a tape device in the navigation pane.
Viewing SME Tape Information Using the CLI
Use the show sme cluster tape command to view summary or detailed information about tapes.
switch# show sme cluster clustername1 tape summary
-------------------------------------------------------------------------------
Host WWN Description Crypto-Tape Status
-------------------------------------------------------------------------------
10:00:00:00:c9:4e:19:ed HP Ultrium 2-SCSI HR1 online
Viewing Tape Cartridge Information
Use the show sme cluster tape detail to view information about tape cartridges.
switch# show sme cluster clustername1 tape detail
Serial Number is 2b10c2e22f
Host 10:00:00:00:c9:4e:19:ed Target 2f:ff:00:06:2b:10:c2:e2 LUN 0x0000
Viewing Tape Volume Group Information
Use the show sme cluster tape-bkgrp command to view information about all tape volume groups or about a specific group.
switch# show sme cluster clustername1 tape-bkgrp
-------------------------------------------------------------------------------
Name Tape Devices Volume Groups
-------------------------------------------------------------------------------
switch# show sme cluster clustername1 tape-bkgrp HR1
Number of tape devices is 1
Number of volume groups is 1
Tape device td1 is online
Description is HP Ultrium 2-SCSI
Serial number is 2b10c2e22f
Host 10:00:00:00:c9:4e:19:ed Target 2f:ff:00:06:2b:10:c2:e2 Lun 0x0000 vsan 4093[f1]
Viewing the Status of the Tape Device
Use the show sme internal info cluster <cname> tape-all command to view tape information.
SWitch# show sme internal info cluster tie1 tape-all
Memory Address : 0x10788854
Tape Key Recycle : Enabled
Shared Key Mode : Disabled
Auto Volume Group : Disabled
Memory Address : 0x107ba054
SME (Encryption) : Enabled
Bypass-Policy : BYPASS DISABLED
FSM State : SME_CTAPE_DEVICE_G_ST_STABLE
LUN FSM State : SME_LUN_ST_STABLE
IT :V 3 I 40:00:00:00:00:00:00:01 T 40:00:00:00:00:00:00:02
Use the sh sme internal info cluster tie1 tape-bkgrp tb2 tape-device td0 to view the information about a particular Tape Device in a particular Tape Backup Group.
Switch# sh sme internal info cluster tie1 tape-bkgrp tb2 tape-device td0
Memory Address : 0x107ba054
SME (Encryption) : Enabled
Bypass-Policy : BYPASS DISABLED
FSM State : SME_CTAPE_DEVICE_G_ST_STABLE
LUN FSM State : SME_LUN_ST_STABLE
IT :V 3 I 40:00:00:00:00:00:00:01 T 40:00:00:00:00:00:00:02
Use the Show Interface smex/y to view statistical information about the SME interface configured for Encryption.
----------------------------------------------------------------------------
Host Reads 0 0 0 0.00 B/s
Host Writes 0 0 0 0.00 B/s
Host Total 0 0 0 0.00 B/s
Tgt Writes 0 0 0 0.00 B/s
Clear IOs IO/s Bytes Rate
----------------------------------------------------------------------------
Host Reads 0 0 0 0.00 B/s
Host Writes 0 0 0 0.00 B/s
Host Total 0 0 0 0.00 B/s
Tgt Writes 0 0 0 0.00 B/s
Clear Luns 1, Encrypted Luns 0
0 CTH, 0 Authentication 0 Compression
0 Key Generation, 0 Incorrect Read Size
0 Overlap Commands, 0 Stale Key Accesses
0 Overload Condition, 0 Incompressible
0 XIPC Task Lookup, 0 Invalid CDB
0 Ili, 0 Eom, 0 Filemark, 0 Other
2 FAILED WRITE Count - BYPASS DISABLED by USER ======> If write fails for clear text
tape
last error at Tue Jun 26 13:39:49 2012
Use the module Commands to view LUN specific information.
show sme internal info crypto-node 1 lun all
module-1# sh sme internal info crypto-node 1 lun all
serial no. 0003-0000-00000000:0000000000000000
Bypass_Policy BYPASS DISABLED
wrap guid 0000000000000000-0000000000000000
media guid 0000000000000000-0000000000000000
Feature History for SME Tape Management
Table 5-1 lists the release history for this feature.
Table 5-1 Feature History for SME Tape Configuration
Feature Name
|
Releases
|
Feature Information
|
Added a new SME tape command
|
5.2(6)
|
Added a new SME tape command.
|
Software change
|
5.2(1)
|
In Release 5.2(1), Fabric Manager is changed to DCNM for SAN (DCNM-SAN).
|
4.1(1c)
|
In Release 4.1(1b) and later, the MDS SAN-OS software is changed to MDS NX-OS software. The earlier releases are unchanged and all refrerences are retained.
|