Feedback
Table Of Contents
Migrating SANTap from a 9513 Chassis to a 9216 Chassis
Licensing Requirements for SANTap
Software Licensing Requirements
Configuring SANTap on the SSM Using the CLI
Task Flow for Configuring SANTap on SSM
Configuring SANTap on the SSM Using DCNM-SAN
Configuring SANTap Multiservice Module Using the CLI
Task Flow to Configure SANTap on MSM-18/4 Module
Enabling SANTap on the MDS 9222i Switch and the MSM-18/4 Module
Deploying SANTap on the MSM-18/4
Configuring DVTs on the MDS 9222i Switch and MSM-18/4 Module
Configuring SANTap on the MSM-18/4 Using DCNM-SAN
Removing Appliance-Generated Entities
Removing Initiator-Target-LUNs
Configuring the Replacement Chassis
Moving a Host from a Dedicated DPP to a Different DPP
Verifying the SANTap Configuration
Configuring SANTap
This chapter describes Cisco SANTap and provides configuration information and other related procedures.
This chapter includes the following sections:
•
Licensing Requirements for SANTap
•
•
•
•
•
•
•
Information About SANTap
Cisco SANTap is one of the Intelligent Storage Services features supported on the Storage Services Module (SSM), MDS 9222i Multiservice Modular Switch and MDS 9000 18/4-Port Multiservice Module (MSM-18/4). These three SANTap enabling platforms will be referred to with the general term Services Nodes (SNs). The Storage Services Module (SSM) supports SANTap in Cisco MDS SAN-OS Release 3.0(2a), 3.0(2b), 3.1(1), 3.1(2), 3.1(2a), 3.1(2b), 3.1(3a), and 3.2(2c) or higher, and in Cisco NX-OS 4.1(x). The MDS 9222i Multiservice Modular Switch and MDS 9000 18/4-Port Multiservice Module (MSM-18/4) support SANTap only starting from Cisco NX-OS Release 4.1(x).
The Cisco MDS 9000 SANTap service enables customers to deploy third-party appliance-based storage applications without compromising the integrity, availability, or performance of a data path between the server and disk.
The Cisco SANTap service can run on the following modules and switches:
•
•
The architecture of these services nodes enables SANTap to service devices connected directly to the ports on the module, or devices connected anywhere in the fabric, including devices attached to legacy switches.
The SANTap feature allows third-party data storage applications, such as long distance replication and continuous backup, to be integrated into the SAN.
SANTap provides several advantages such as high performance, low cost of ownership, high availability, ease of deployment, and high interoperability.
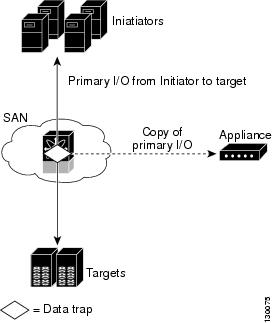
The protocol-based interface that is offered by SANTap allows easy and rapid integration of the data storage service application because it delivers a loose connection between the application and an SSM, which reduces the effort needed to integrate applications with the core services being offered by the SSM. Figure 1-1 shows integrating third-party storage applications in a SAN.
Figure 1-1 Integrating Third-Party Storage Applications in a SAN
This section includes the following topics:
•
SANTap Control and Data Path
SANTap has a control path and a data path. The control path handles requests that create and manipulate replication sessions sent by an appliance. The control path is implemented using an SCSI-based protocol. An appliance sends requests to a Control Virtual Target (CVT), which the SANTap process creates and monitors. Responses are sent to the control logical unit number (LUN) on the appliance. SANTap also allows LUN mapping to Appliance Virtual Targets (AVTs). You can have a maximum of 512 target LUNs.
SANTap does not require reconfiguration of either the host or target when introducing SANTap-based applications. Also, neither the host initiator nor the target is required to be directly connected to an SSM. The configuration is accomplished by assigning Cisco-specific WWNs to the virtual initiators (VIs) and Data Virtual Targets (DVTs). A host initiator or a target can be connected directly to an SSM. However, you must partition the SAN using VSANs.
You must configure the host initiator and the DVT in one VSAN and configure the VI and the target in another VSAN.
You can use SANTap to remove your appliance-based storage applications from the primary data path in a SAN. Removing these applications from the primary data path prevents them from compromising the security, availability, and performance of the SAN. SANTap copies the data at line speed and makes it available to other storage applications; these storage applications are prevented from affecting the SAN while maintaining the integrity of the data that storage applications need.
Dynamic LUNs is a feature introduced in Cisco SAN-OS Release 3.2(1). When one or more LUNs are removed or added on the backend target during the periodic scan, SANTap automatically uninstalls the deleted DVT LUNs and installs any additional LUNs. Uninstallation of the deleted DVT LUNs occurs even if the total number of LUNs remains the same.
In previous releases, when the set of LUNs changed on the target, the original LUN list was displayed on the DVT. The new and changed LUNs were not reflected on the DVT. However, if the total number of LUNs increases, then the additional LUNs are installed and displayed on the host.
Before Cisco SAN-OS Release 3.2(1), a user had the following options for displaying the LUN list on the DVT:
•
•
In Cisco SAN-OS Release 3.2(1) or NX-OS Release 4.1(x), SANTap supports 32-bit LUNs on the target.
SANTap Proxy Mode
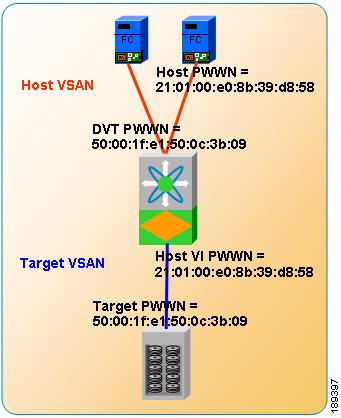
SANTap proxy mode is designed to provide SANTap functionality to devices connected anywhere in the fabric, whether using modern SANTap-capable switches or legacy switches. Proxy mode allows SANTap to be enabled in a fabric with minimal downtime and minimal reconfiguration and recabling. The keys to SANTap functioning in this mode are the ability to segment fabrics using VSANs and the virtual interfaces that the SSM presents to the fabric. These virtual interfaces can be added into any VSAN and present a virtual initiator to the target in one VSAN and present a virtual target to a host in another VSAN.
SANTap proxy mode offers the following advantages:
•
•
•
•
Figure 1-2 shows a SANTap proxy mode-2 example.
Figure 1-2 SANTap Proxy Mode-2 Example
Migrating SANTap from a 9513 Chassis to a 9216 Chassis
This section explains the environments required for migrating SANTap from an existing MDS 9513 to a MDS 9216 switch and provides the migration procedure.
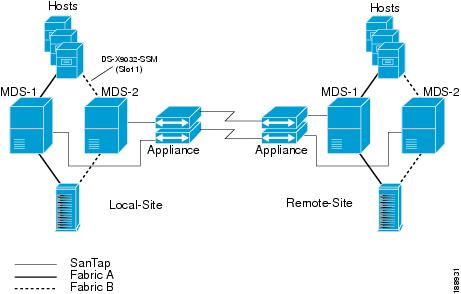
A dual-fabric topology setup provides extra resiliency during this migration procedure. Both of the fabrics in Figure 1-3 are built using MDS 9513 Directors, which need to be replaced by MDS 9216 Switches. The appliance setup is also a dual-node cluster configured for continuous remote replication (CRR) between the local and remote sites.
Figure 1-3 shows the setup before migration.
Figure 1-3 Setup Before Migration
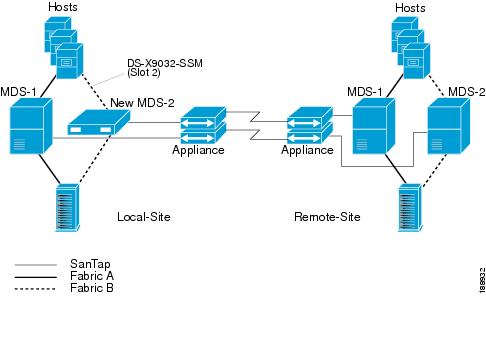
The Fabric B switch on the local site (MDS-2) should be replaced by an MDS 9216 (new MDS-2) switch. The same SSM card used in the current topology (MDS-2) will be swapped with the MDS 9216 switch on slot 2. After reconfiguration, the SANTap configuration with the appliance should be reestablished. Figure 1-4 shows the setup after migration.
Figure 1-4
Setup After Migration
Concepts and Terminology
Table 1-1 includes brief definitions of some of the common SANTap acronyms and terms.
SANTap on the SSM
The SANTap service can be configured to run in proxy operating mode. This mode offers unique design advantages that allow SANTap to fit customer requirements with minimal changes to current configurations.
The SANTap service provides a reliable copy of storage write operations to a third-party appliance, which enables applications to provide data protection, data migration, remote replication, and SLA monitoring, without the disadvantages of deploying devices in-band within the data path or out-of-band in conjunction with host-based software agents.
SANTap Scalability Matrix
Table 1-2 lists the scalability limits for the SAN-OS and NX-OS releases that support SANTap.
Table 1-3 lists the scalability limits for NX-OS Release 4.1(1i) on the MSM-18/4 module and the MDS 9222i switch.
Licensing Requirements for SANTap
The following are the licensing requirements to set up SANTap:
•
Software Licensing Requirements
SANTap has the following software license requirement:
•
The MSM-18/4 module and the MDS 9222i switch require the following licenses:
•
•
Hardware Requirements
SANTap has the following hardware requirements:
•
•
•
Guidelines and Limitations
Cisco SANTap has the following guidelines and limitations:
Configuration Using CLI and Cisco DCNM for SAN
SANTap provides a set of CLI commands for configuration. It can be configured using the Cisco DCNM- SAN, which is a GUI-based application.
High Performance and Scalability
The ASIC-based innovation provides high-throughput IOPS. SANTap offloads the replication tasks from the initiators and appliance. A host software, driver, license, and agent are not required.
High Availability
The SANTap appliance does not reside on the primary data path. The primary I/Os are not impacted if the appliance becomes unavailable. The solution takes advantage of dual-fabric redundancy.
The appliances are in a highly available cluster.
Manageability
There is no need to reconfigure end devices. SANTap works with heterogeneous hosts and targets. The hosts and storage can be added on-demand.
Ease of Deployment
There is no rewiring required for SANTap. The hosts and targets do not have to be connected to the SSM. You do not need to reconfigure the hosts and targets.
Leveraging the SAN Investment
The SSM can be deployed in the following switches:
•
•
•
•
•
In addition, SANTap also works with Supervisor-1 and Supervisor-2 modules. The hosts and storage can be connected to the existing 1-/2-/4-/10-Gbps Fibre Channel switching modules.
Protocol-Based Interface
The protocol-based interface offered by SANTap allows easy and rapid integration of the data storage service application because it delivers a loose coupling between the application and the Intelligent Line Card (ILC), which reduces the effort needed to integrate applications with the core services being offered by the ILC.
Default Settings
Table 1-4 lists the default settings for SANTap parameters.
Table 1-4 Default SANTap Parameters
SANTap feature
Disabled.
DVT I/O timeout
10 seconds.
DVT LUN size handling flag
1 (enabled).
Note
Configuring SANTap on the SSM Using the CLI
This section describes how to configure SANTap and includes the following topics:
•
Task Flow for Configuring SANTap on SSM
Follow these steps to configure SANTap on SSM:
Step 1
Step 2
Step 3
Enabling SANTap on the SSM
Restrictions
•
Detailed Steps
To enable the SANTap feature, follow these steps:
Deploying SANTap
Detailed Steps
To deploy SANTap, follow these steps:
Step 1
switch# show moduleMod Ports Module-Type Model Status--- ----- -------------------------------- ------------------ ------------1 16 1/2 Gbps FC/Supervisor DS-X9216-K9-SUP active *2 32 Storage Services Module DS-X9032-SMA okMod Sw Hw World-Wide-Name(s) (WWN)--- -------------- ------ --------------------------------------------------1 4.1(1) 1.0 20:01:00:05:30:00:43:5e to 20:10:00:05:30:00:43:5e2 4.1(1) 0.5 20:41:00:05:30:00:43:5e to 20:60:00:05:30:00:43:5eMod Application Image Description Application Image Version-------- ----------------------------- -------------------------2 SSI linecard image 4.1(1)Mod MAC-Address(es) Serial-Num--- -------------------------------------- ----------1 00-0b-46-a1-a4-28 to 00-0b-46-a1-a4-2c JAB065004G72 00-05-30-00-ad-12 to 00-05-30-00-ad-16 JAB070605MW* this terminal sessionStep 2
switch# show license usageFeature Ins Lic Status Expiry Date CommentsCount--------------------------------------------------------------------------------STORAGE_SERVICES_ENABLER_PKG No 0 Unused Grace 106D 18HStep 3
switch(config)# ssm enable feature santap module numberStep 4
switch# show ssm provisioningModule Ports/Nodes Application Provisioning Status-----------------------------------------------------------7 1-32 santap successStep 5
SANTap uses two VSANs: a Back-End VSAN (BE-VSAN) and a Front-End VSAN (FE-VSAN). The BE-VSAN includes all storage targets, RPAs, and the control virtual target (CVT). A FE-VSAN includes host initiators and the data virtual target (DVT), which is a virtual representation of a storage target.
Step 6
switch(config)# santap module number appl-vsan number cvt-name nameStep 7
You must create a DVT for each storage port that you want to replicate. You can create several DVTs in one FE-VSAN or create DVTs in different VSANs.
switch(config)# santap module number dvt target-pwwn pwwn target-vsan number dvt-name name
dvt-vsan number lun-size-handling 1
The BE-VSAN is zoned using the WWNs of the host initiator ports and the storage target ports. The same WWNs will be used in the FE-VSAN. Consequently, the back-end zoning scheme may be used for the FE-VSAN.
At this point, all I/O activity between the host and the target is relayed by SANTap. The I/Os are relayed from the actual host port in the FE-VSAN to the actual target port in the BE-VSAN via the DVT and the host port VI. This process has no impact to the hosts and is completely transparent.
Configuring DVTs on the SSM
Restrictions
•
Detailed Steps
To configure a DVT, follow these steps:
Configuring SANTap on the SSM Using DCNM-SAN
This section includes the following topics:
Creating a SANTap CVT SSM
Prerequisites
•
Detailed Steps
To create a SANTap CVT, follow these steps:
Note
Deleting a SANTap CVT SSM
Detailed Steps
To delete a SANTap CVT, follow these steps:
Step 1
You see the FCWA tab in the Information pane.
Step 2
You see the SANTap configuration in the Information pane.
Step 3
Step 4
You see the DCNM-SAN confirmation dialog box.
Step 5
Creating a SANTap DVT SSM
Detailed Steps
To create a SANTap DVT, follow these steps:
Step 1
You see the FCWA tab in the Information pane.
Step 2
You see the SANTap configuration in the information pane.
Step 3
You see the create SANTap DVT SSM dialog box.
Step 4
Step 5
Step 6
Step 7
Step 8
Note
Step 9
Step 10
Step 11
Step 12
Deleting a SANTap DVT SSM
Detailed Steps
To delete a SANTap DVT, follow these steps:
Step 1
You see the FCWA tab in the information pane.
Step 2
You see the SANTap configuration in the Information pane.
Step 3
Step 4
You see the DCNM-SAN confirmation dialog box.
Step 5
Configuring SANTap Multiservice Module Using the CLI
This section includes the following topics:
•
•
•
•
Task Flow to Configure SANTap on MSM-18/4 Module
Follow these steps to configure SANTap on the MSM-18/4 Module:
Step 1
Step 2
Step 3
Enabling SANTap on the MDS 9222i Switch and the MSM-18/4 Module
You will need a license to provision SANTap. Set the boot ssi value for module 1 (MDS 9222i Switch) and then reload the switch before you provision SANTap on Module 1.
SANTap can be enabled on an MDS 9222i Switch and an MSM-18/4 platform.
Enter the following command to enable SANTap on an Octeon-based Module:
switch(config)#switch(config)#ssm enable feature santap module xmodule x is where the MSM module is present.
Enabling SANTap on the SSM
The following command enables SANTap on the SSM:
switch(config)#switch(config)# ssm enable feature santap module 1
Note
Deploying SANTap on the MSM-18/4
Detailed Steps
To deploy SANTap, follow these steps:
Step 1
switch# show moduleMod Ports Module-Type Model Status--- ----- -------------------------------- ------------------ ------------1 22 4x1GE IPS, 18x1/2/4Gbps FC/Sup2 DS-X9222I-K9 active *Mod Sw Hw World-Wide-Name(s) (WWN)--- -------------- ------ --------------------------------------------------1 3.2(1a) 0.610 20:01:00:0d:ec:4a:c8:40 to 20:12:00:0d:ec:4a:c8:40Mod Application Image Description Application Image Version-------- ----------------------------- -------------------------1 SSI linecard image (Packaged in SAN-OS) 3.2(1a)Mod MAC-Address(es) Serial-Num--- -------------------------------------- ----------1 00-17-5a-b5-6d-1c to 00-17-5a-b5-6d-24 JAE1123KB03* this terminal sessionStep 2
switch# show license usageFeature Ins Lic Status Expiry Date CommentsCount--------------------------------------------------------------------------------FM_SERVER_PKG No - Unused Grace expiredMAINFRAME_PKG No - Unused -ENTERPRISE_PKG No - Unused -DMM_FOR_SSM_PKG No 0 Unused -SAN_EXTN_OVER_IP No 0 Unused -PORT_ACTIVATION_PKG No 0 Unused -SAN_EXTN_OVER_IP_18_4 No 0 Unused -SAN_EXTN_OVER_IP_IPS2 No 0 Unused -SAN_EXTN_OVER_IP_IPS4 No 0 Unused -10G_PORT_ACTIVATION_PKG No 0 Unused -STORAGE_SERVICES_ENABLER_PKG No 0 Unused Grace 117D 23Hswitch# ------------------------------------------------------------------------Step 3
switch(config)# ssm enable feature santap module numberStep 4
switch# show ssm provisioningModule Ports/Nodes Application Provisioning Status-----------------------------------------------------------12 1-1 santap successStep 5
SANTap uses two VSANs: a Back-End VSAN (BE-VSAN) and a Front-End VSAN (FE-VSAN). The BE-VSAN includes all storage targets, RPAs, and the control virtual target (CVT). A FE-VSAN includes host initiators and the data virtual target (DVT), which is a virtual representation of a storage target.
Step 6
switch(config)# santap module number appl-vsan number cvt-name nameStep 7
You must create a DVT for each storage port that you want to replicate. You may create several DVTs in one FE-VSAN or create DVTs in different VSANs.
switch(config)# santap module number dvt target-pwwn pwwn target-vsan number dvt-name name
dvt-vsan number lun-size-handling 1
The BE-VSAN is zoned using the WWNs of the host initiator ports and the storage target ports. The same WWNs will be used in the FE-VSAN. Consequently, the back-end zoning scheme may be used for the FE-VSAN.
At this point, all I/O activity between the host and the target is relayed by SANTap. The I/Os are relayed from the actual host port in the FE-VSAN to the actual target port in the BE-VSAN via the DVT and the host port VI. This process has no impact to the hosts and is completely transparent.
Configuring DVTs on the MDS 9222i Switch and MSM-18/4 Module
A data virtual target (DVT) is a logical target port that resides on the switch and is used to intercept traffic for a real target.
Restrictions
•
•
•
Detailed Steps
To configure a DVT, follow these steps:
Configuring SANTap on the MSM-18/4 Using DCNM-SAN
This section includes the following topics:
Creating a SANTap DVT MSM
Detailed Steps
To create a SANTap DVT MSM, follow these steps:
Step 1
You see the FCWA tab in the information pane.
Step 2
You see the SANTap configuration in the information pane.
Step 3
You see the create SANTap DVT MSM dialog box.
Step 4
Step 5
Step 6
Step 7
Step 8
Note
Step 9
Step 10
Step 11
Step 12
Deleting a SANTap DVT MSM
Detailed Steps
To delete a SANTap CVT, follow these steps:
Step 1
You see the FCWA tab in the Information pane.
Step 2
You see the SANTap configuration in the Information pane.
Step 3
Step 4
You see the DCNM-SAN confirmation dialog box.
Step 5
Deleting a SANTap DVT MSM
Detailed Steps
To delete a SANTap DVT MSM, follow these steps:
Step 1
You see the FCWA tab in the information pane.
Step 2
You see the SANTap configuration in the information pane.
Step 3
Step 4
You see the DCNM-SAN confirmation dialog box.
Step 5
Removing Appliance-Generated Entities
An appliance might terminate its SANTap application without removing generated entities on the MDS switch. This section describes how to remove these entities using the CLI on the MDS switch.
This section includes the following topics:
•
Removing AVTs and AVT LUNs
The AVT and AVT LUN configuration occasionally remains after a SANTap application terminates.
Detailed Steps
To remove AVTs and AVT LUNs, follow these steps:
Removing SANTap Sessions
A SANTap session continues occasionally after a SANTap application terminates.
Detailed Steps
To remove a SANTap session, follow these steps:
Removing Initiator-Target-LUNs
The initiator-target-LUN (ITL) triplet identifies a LUN loaded on a DVT. The ITL configuration occasionally remains after a SANTap application terminates.
Detailed Steps
To remove all LUNs for an ITL triplet, follow these steps:
Migrating SANTap Switches
This section describes the SANTap migration procedures and the environments required for migrating SANTap from an existing switch, such as an MDS 9513 Director, to another switch, such as an MDS 9216 Switch. The chapter also discusses how to move a host from a dedicated data path processor (DPP) to a different DPP.
This section includes the following topics:
•
•
Migrating the Switches
Detailed Steps
To complete the migration procedure, follow these steps:
Step 1
Step 2
Step 3
switch# clear santap module slot-number {avt avt-pwwn [lun avt-lun] | itl target-pwwn
host-pwwn | session session-id}
Step 4
Step 5
switch# conf tEnter configuration commands, one per line. End with CNTL/Z.switch(config)# no santap module num dvt target-pwwn pwwnStep 6
switch# conf tEnter configuration commands, one per line. End with CNTL/Z.switch(config)# no santap module num appl-vsan IDAt this point, all MDS-2 associated DVTs, CVTs, AVT and AVT LUNs are deleted.
Step 7
This command will purge all SANTap information for the SSM in slot 1.
Step 8
switch# conf tEnter configuration commands, one per line. End with CNTL/Z.switch(config)# no ssm enable feature santap module numswitch(config)# endVerify that the SANTap feature is unprovisioned from MDS-2:
switch# show ssm provisioningModule Ports/Nodes Application Provisioning Status-----------------------------------------------------------7 1-32 santap successStep 9
This completes the necessary steps on the MDS-2 switch. Ensure that the appropriate cable is connected to the MDS 9216 chassis.
Configuring the Replacement Chassis
Detailed Steps
To configure the replacement MDS 9216 chassis (new MDS-2), follow these steps:
Step 1
Step 2
Step 3
Step 4
Step 5
Refer to the "Deploying SANTap" section to reconfigure the new MDS 9216 chassis.
After reconfiguration, ensure that the appliance communicates to the new MDS-2 switch, and follow the same procedure to swap the Fabric A on the MDS-1 switch.
Moving a Host from a Dedicated DPP to a Different DPP
Restrictions
•
Detailed Steps
To move a dedicated DPP to a different DPP, follow these steps:
Step 1
Step 2
Step 3
switch# conf tEnter configuration commands, one per line. End with CNTL/Z.switch(config)# no santap module num dvt target-pwwn pwwnStep 4
switch(config)# clear santap module slot-number {avt avt-pwwn [lun avt-lun] | <itl
target-pwwn host-pwwn | session session-id}
Step 5
switch# reload module XX is the SSM module number.
Step 6
Step 7
switch# santap module num dvt target-pwwn pwwn target-vsan vsan-id dvt-name name dvt-vsan
vsan-id dvt-port num
This will place the new DVT on DPP 4.
Step 8
Step 9
For more information, refer to the "Deploying SANTap" section.
Verifying the SANTap Configuration
Displaying SANTap Information
Use the show santap module command to display information about SANTap (see Example 1-1 to Example 1-6).
Example 1-1 Displays SANTap CVT Information
switch# show santap module 2 cvtCVT Information :cvt pwwn = 23:4f:00:0d:ec:09:3c:02cvt nwwn = 23:9d:00:0d:ec:09:3c:02cvt id = 135895180cvt xmap_id = 135895212cvt vsan = 8cvt name = MYCVTExample 1-2 Displays SANTap DVT Information
switch# show santap module 2 dvtDVT Information :dvt pwwn = 50:06:0e:80:03:81:32:36dvt nwwn = 50:06:0e:80:03:81:32:36dvt id = 136773180dvt mode = 3dvt vsan = 12dvt if_index = 0x1080000dvt fp_port = 1dvt name = MYDVTdvt tgt-vsan = 9dvt io timeout = 10 secsdvt lun size handling = 0dvt app iofail behaviour = 1dvt quiesce behavior = 1dvt tgt iofail behavior = 0dvt appio failover time = 50 secsdvt inq data behavior = 0Example 1-3 Displays SANTap DVT LUN Information
switch# show santap module 2 dvtlunDVT LUN Information :dvt pwwn = 22:00:00:20:37:88:20:efdvt lun = 0x0xmap id = 8dvt id = 3dvt mode = 0dvt vsan = 3tgt pwwn = 22:00:00:20:37:88:20:eftgt lun = 0x0tgt vsan = 1Example 1-4 Displays SANTap Session Information
switch# show santap module 2 sessionSession Information :session id = 1host pwwn = 21:00:00:e0:8b:12:8b:7advt pwwn = 50:06:0e:80:03:81:32:36dvt lun = 0x0tgt pwwn = 50:06:0e:80:03:81:32:36tgt lun = 0x0adt pwwn = 33:33:33:33:33:33:33:00adt lun = 0x0aci pwwn = 22:22:22:22:22:22:22:22cvt pwwn = 23:4f:00:0d:ec:09:3c:02num ranges = 0session state = 5redirect mode = 0mrl requested 1MRL : vsan 8 RegionSize 4806720, DiskPWWN 0x234f000dec093c02, DiskLun 0x 1, startLBA 1pwl requested 1PWL : type 2, UpdatePol 2, RetirePolicy 4, pwl_start 1iol requested 0Example 1-5 Displays SANTap AVT Information
switch# show santap module 2 avtAVT Information :avt pwwn = 2a:4b:00:05:30:00:22:25avt nwwn = 2a:60:00:05:30:00:22:25avt id = 12avt vsan = 4avt if_index = 0x1080000hi pwwn = 21:00:00:e0:8b:07:61:aatgt pwwn = 22:00:00:20:37:88:20:eftgt vsan = 1Example 1-6 Displays SANTap AVT LUN Information
switch# show santap module 2 avtlunAVT LUN Information :avt pwwn = 2a:4b:00:05:30:00:22:25avt lun = 0x0xmap id = 16avt id = 12tgt lun = 0x0
Additional References
For additional information related to implementing SANTap, see the following sections:
•
•
Related Documents
SANTap DVT Interoperability Support Matrix
The SANTap DVT Interoperability Support Matrix is located in the SANTap section of the Cisco Data Center Interoperability Support Matrix.
SANTap Compatibility with Storage Service Interface Images
For compatibility information between SANTap, Cisco MDS SAN-OS software releases, and Storage Service Interface (SSI) releases, refer to the Cisco MDS SAN-OS Release Compatibility Matrix for Storage Service Interface Images.
MIBs