Feedback
Table Of Contents
Wireless (for ISA550W and ISA570W only)
Viewing Wireless Client Status
Configuring the Basic Settings
Controlling Wireless Access Based on MAC Addresses
Configuring Wi-Fi Protected Setup
Using External Web-Hosted CGI Scripts
CGI Source Code Example: No Authentication and Accept Button
Configuring Wireless Rogue AP Detection
Wireless (for ISA550W and ISA570W only)
This chapter describes how to configure your wireless network. It includes the following sections:
•
Configuring the Basic Settings
•
•
To access the Wireless pages, click Wireless in the left hand navigation pane.
Viewing Wireless Status
This section describes how to view information for your wireless network. Refer to the following topics:
•
Viewing Wireless Statistics
Use the Wireless Status page to view the cumulative total of relevant wireless statistics for all SSIDs. This page is automatically updated every 10 seconds. Click Refresh to manually refresh the data.
Wireless > Wireless Status > Wireless Status
Viewing Wireless Client Status
Use the Client Status page to view information for all client stations that are already connected to each SSID. The MAC address and IP address for all connected client stations for each SSID are displayed. To open this page, click Wireless > Wireless Status > Client Status. This page is automatically updated every 10 seconds. Click Refresh to manually refresh the data.
Configuring the Basic Settings
Use the Basic Settings page to change the wireless mode to suit the devices in your network, specify the wireless channel and bandwidth for operation to resolve issues with interference from other access points in the area, or enable U-APSD and SSID Isolation if needed.
STEP 1
STEP 2
•
•
–
–
–
•
•
•
•
•
STEP 3
•
•
•
NOTE: Disabling SSID Broadcast is sufficient to prevent clients from accidentally connecting to your network, but it will not prevent even the simplest of attempts by a hacker to connect or monitor unencrypted traffic. Suppressing the SSID broadcast offers a very minimal level of protection on an otherwise exposed network (such as a guest network) where the priority is making it easy for clients to get a connection and where no sensitive information is available.
•
•
•
•
•
STEP 4
Configuring SSID Profiles
ISA550W and ISA570W support four SSIDs. By default, all SSIDs are disabled. For security purposes, we strongly recommend that you configure each SSID with the highest level of security that is supported by the devices into your wireless network.
Multiple SSIDs can segment the wireless LAN into multiple broadcast domains. This configuration helps you to maintain better control over broadcast and multicast traffic, which affects network performance.
Refer to the following topics:
•
•
Configuring Wireless Security
This section describes how to configure the security mode for the SSID. All devices on this network must use the same security mode and settings to work correctly. Cisco recommends using the highest level of security that is supported by the devices in your network.
NOTE
STEP 1
STEP 2
The SSID - Edit window opens.
STEP 3
•
•
NOTE: The maximum number of users that can simultaneously connect to all enabled SSIDs is 200.
•
STEP 4
STEP 5
•
•
•
•
•
STEP 6
•
•
•
STEP 7
•
•
•
STEP 8
•
•
•
STEP 9
•
•
•
–
–
–
–
–
–
NOTE: You can change the settings in the above fields but the RADIUS server settings you specify will replace the default settings of the selected group. To maintain the RADIUS servers, go to the Users > RADIUS Servers page. See Configuring RADIUS Servers.
STEP 10
•
•
•
STEP 11
•
•
•
STEP 12
STEP 13
STEP 14
Controlling Wireless Access Based on MAC Addresses
MAC Filtering allows or blocks access to the SSID by the MAC (hardware) address of the requesting device. By default, MAC Filtering is disabled for each SSID.
MAC Filtering provides additional security, but it also adds to the complexity and maintenance. You need to specify the list of MAC addresses that you want to block or allow. Be sure to enter each MAC address correctly to ensure that the policy is applied as intended. Generally it is easier and more secure to use this feature to allow access to the specified MAC addresses, thereby denying access to unknown MAC addresses.
STEP 1
STEP 2
The SSID - Edit window opens.
STEP 3
•
•
–
–
–
STEP 4
STEP 5
STEP 6
Mapping the SSID to VLAN
STEP 1
STEP 2
The SSID - Edit window opens.
STEP 3
•
•
STEP 4
STEP 5
Configuring SSID Schedule
This section describes how to specify the schedule to keep the SSID active within a specific time per day.
STEP 1
STEP 2
The SSID - Edit window opens.
STEP 3
•
•
–
–
STEP 4
STEP 5
Configuring Wi-Fi Protected Setup
Use the Wi-Fi Protected Setup page to configure Wi-Fi Protected Setup (WPS) on the security appliance to allow WPS-enabled devices to more easily connect to the wireless network.
STEP 1
The Wi-Fi Protected Setup window opens.
STEP 2
STEP 3
•
–
–
•
•
•
STEP 4
a.
b.
c.
d.
STEP 5
a.
b.
c.
d.
e.
STEP 6
a.
b.
c.
d.
NOTE: If the wireless client device does not connect to the SSID after 2 minutes, please manually disable WPS on the security appliance to prevent the WPS brute-force attack.
STEP 7
Configuring Captive Portal
You may want to direct users to a web portal before they can access the Internet through the security appliance. To achieve this goal, you can enable Captive Portal on a wireless network, a VLAN, or a DMZ.
When a user in a Captive Portal user group attempts to access the Internet via a web browser, a portal page appears. You can require a log in or the entry of payment information, for example, and you can set up the portal page to display information, usage guidelines, warning messages, and so on. After successfully logging in, paying, or acknowledging your messages, the user can use other applications on the PC to communicate with the network.
In addition to the portal options mentioned above, additional options make it easy to adapt the Captive Portal feature to your needs:
•
•
Requirements
This feature is compatible with these browsers:
•
•
•
•
A computer accessing the Captive Portal must have one of these operating systems:
•
•
•
Captive Portal also can be used from a mobile device with one of these operating systems:
•
•
Before You Begin
Before you configure your portal, you may need to configure VLANs, SSIDs, and users. Read the following information to determine what steps may be needed to achieve your goals.
VLAN Setup
No special VLAN configuration is required for a Captive Portal, but you may want to consider the points below before proceeding. To configure VLANs, use the Networking > VLAN page..
•
•
•
Wireless Setup
For a Captive Portal on the wireless network, you must enable the wireless radio and at least one SSID before you can enable a Captive Portal. To configure these settings, use the Wireless > Basic Settings page. .
•
•
•
User Authentication
If you want to require user authentication for your portal, the security appliance can authenticate the users by using the local database and an external AAA server (such as RADIUS, AD, and LDAP). The authentication method is derived from the user authentication settings that you specified in the Users > User Authentication page. See Configuring User Authentication Settings.
For the local database option, you need to set up a User Group with the Captive Portal service enabled, and add the users' names and passwords. .
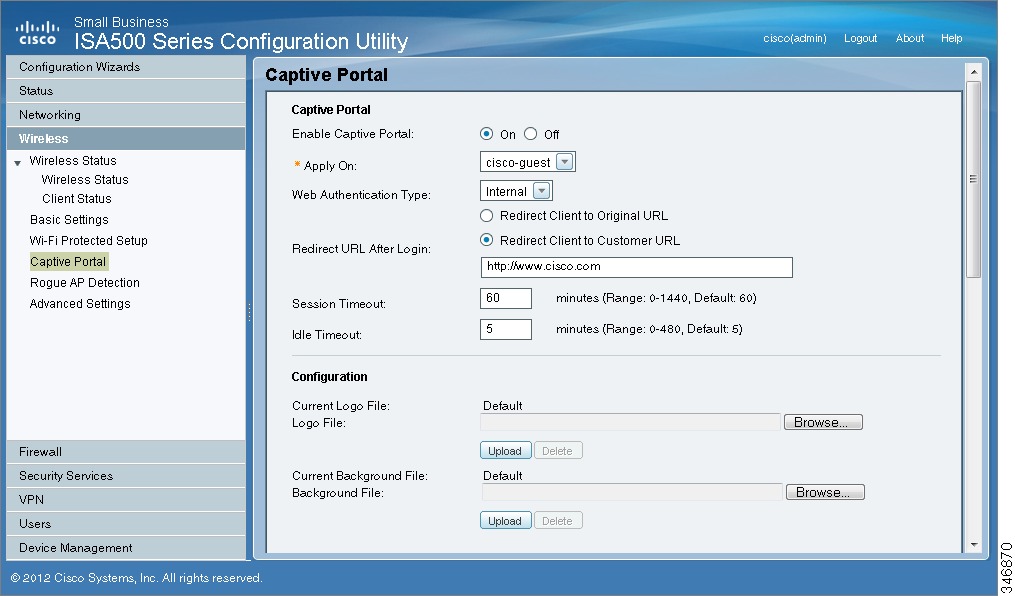
Configuring a Captive Portal
You configure this feature separately for the wireless network (Wireless > Captive Portal ) and for the wired network (Networking > Captive Portal).
STEP 1
STEP 2
STEP 3
•
•
•
•
Note: If you chose Internal or External, you will need to use the Users > Users and Groups page to create a User Group with Captive Portal service enabled, and to add users to the group.
STEP 4
•
•
STEP 5
•
•
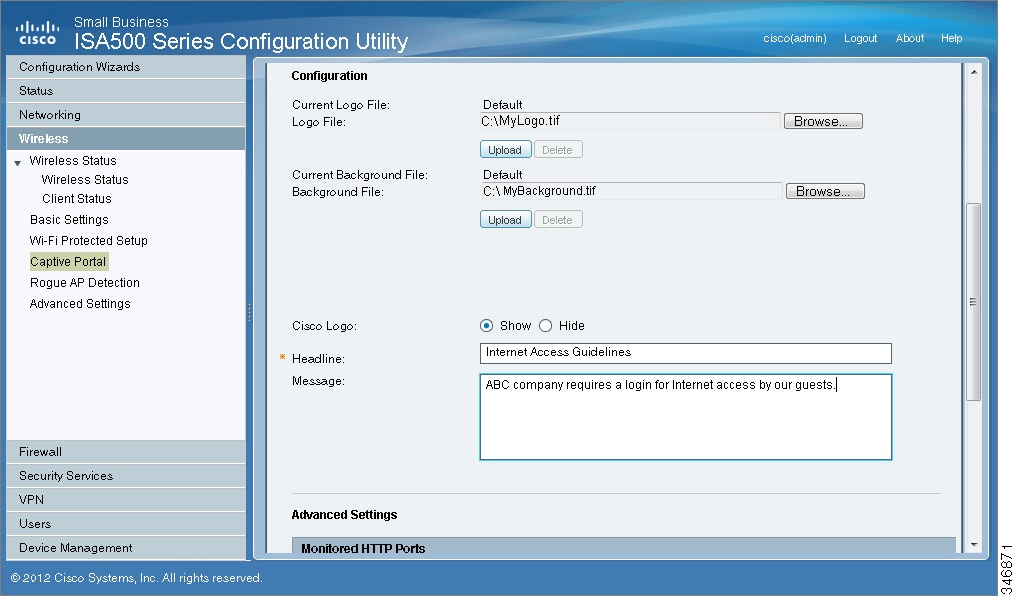
STEP 6
•
•
NOTE: When uploading a file, select a bmp, jpg, gif, or png file of 200KB or less. The Current Logo File field displays the filename of the file that is in use, or Default if no file has been uploaded for this purpose.
•
•
•
STEP 7
•
•
STEP 8
NOTE: Captive Portal only monitors HTTPS requests through the port 443.
a.
b.
c.
STEP 9
a.
b.
c.
STEP 10
Troubleshooting
Problem 1: User is not redirected to portal page when internal web authentication type is chosen.
Solution: Either of the following could resolve the problem:
•
•
•
Problem 2: User is not redirected to portal page when internal web authentication type is chosen.
Solution: Either of the following could resolve the problem:
•
•
•
•
•
•
Using External Web-Hosted CGI Scripts
Following is a CGI script which asks for the authentication information of a user.
The secret string programmed in the uamsecret variable should be configured as Authentication Web Key on the Captive portal page. Replace the MySMB string in the following section with your company name.
# !/usr/bin/perl# chilli - ChilliSpot.org. A Wireless LAN Access Point Controller# Copyright (C) 2003, 2004 Mondru AB.## The contents of this file may be used under the terms of the GNU# General Public License Version 2, provided that the above copyright# notice and this permission notice is included in all copies or# substantial portions of the software.# Redirects from ChilliSpot daemon:## Redirection when not yet or already authenticated# notyet: ChilliSpot daemon redirects to login page.# already: ChilliSpot daemon redirects to success status page.## Response to login:# already: Attempt to login when already logged in.# failed: Login failed# success: Login succeded## logoff: Response to a logout# Shared secret used to encrypt challenge with. Prevents dictionary attacks.# You should change this to your own shared secret.$uamsecret = "ht2eb8ej6s4et3rg1ulp";# Uncomment the following line if you want to use ordinary user-password# for radius authentication. Must be used together with $uamsecret.$userpassword=1; [1]# Our own path$loginpath = $ENV{'SCRIPT_URL'};use Digest::MD5 qw(md5 md5_hex md5_base64);# Make sure that the form parameters are clean$OK_CHARS='-a-zA-Z0-9_.@&=%!';$| = 1;if ($ENV{'CONTENT_LENGTH'}) {read (STDIN, $_, $ENV{'CONTENT_LENGTH'});}s/[^$OK_CHARS]/_/go;$input = $_;# Make sure that the get query parameters are clean$OK_CHARS='-a-zA-Z0-9_.@&=%!';$_ = $query=$ENV{QUERY_STRING};s/[^$OK_CHARS]/_/go;$query = $_;# If she did not use https tell her that it was wrong.if (!($ENV{HTTPS} =~ /^on$/)) {print "Content-type: text/html\n\n<!DOCTYPE HTML PUBLIC \"-//W3C//DTD HTML 4.01 Transitional//EN\"><html><head><title>MySMB Login Failed</title>[7.1]<meta http-equiv=\"Cache-control\" content=\"no-cache\"><meta http-equiv=\"Pragma\" content=\"no-cache\"></head><body bgColor = '#c0d8f4'><h1 style=\"text-align: center;\">MySMB Login Failed</h1>[7.2]<center>Login must use encrypted connection.</center></body><!--<?xml version=\"1.0\" encoding=\"UTF-8\"?><WISPAccessGatewayParamxmlns:xsi=\"http://www.w3.org/2001/XMLSchema-instance\"xsi:noNamespaceSchemaLocation= \"http://www.acmewisp.com/WISPAccessGatewayParam.xsd\"><AuthenticationReply><MessageType>120</MessageType><ResponseCode>102</ResponseCode><ReplyMessage>Login must use encrypted connection</ReplyMessage>[7.3]</AuthenticationReply></WISPAccessGatewayParam>--></html>";exit(0);}#Read form parameters which we care about@array = split('&',$input);foreach $var ( @array ){@array2 = split('=',$var);if ($array2[0] =~ /^UserName$/) { $username = $array2[1]; }if ($array2[0] =~ /^Password$/) { $password = $array2[1]; }if ($array2[0] =~ /^challenge$/) { $challenge = $array2[1]; }if ($array2[0] =~ /^button$/) { $button = $array2[1]; }if ($array2[0] =~ /^logout$/) { $logout = $array2[1]; }if ($array2[0] =~ /^prelogin$/) { $prelogin = $array2[1]; }if ($array2[0] =~ /^res$/) { $res = $array2[1]; }if ($array2[0] =~ /^uamip$/) { $uamip = $array2[1]; }if ($array2[0] =~ /^uamport$/) { $uamport = $array2[1]; }if ($array2[0] =~ /^userurl$/) { $userurl = $array2[1]; }if ($array2[0] =~ /^timeleft$/) { $timeleft = $array2[1]; }if ($array2[0] =~ /^redirurl$/) { $redirurl = $array2[1]; }}#Read query parameters which we care about@array = split('&',$query);foreach $var ( @array ){@array2 = split('=',$var);if ($array2[0] =~ /^res$/) { $res = $array2[1]; }if ($array2[0] =~ /^challenge$/) { $challenge = $array2[1]; }if ($array2[0] =~ /^uamip$/) { $uamip = $array2[1]; }if ($array2[0] =~ /^uamport$/) { $uamport = $array2[1]; }if ($array2[0] =~ /^reply$/) { $reply = $array2[1]; }if ($array2[0] =~ /^userurl$/) { $userurl = $array2[1]; }if ($array2[0] =~ /^timeleft$/) { $timeleft = $array2[1]; }if ($array2[0] =~ /^redirurl$/) { $redirurl = $array2[1]; }}$reply =~ s/\+/ /g;$reply =~s/%([a-fA-F0-9][a-fA-F0-9])/pack("C", hex($1))/seg;$userurldecode = $userurl;$userurldecode =~ s/\+/ /g;$userurldecode =~s/%([a-fA-F0-9][a-fA-F0-9])/pack("C", hex($1))/seg;$redirurldecode = $redirurl;$redirurldecode =~ s/\+/ /g;$redirurldecode =~s/%([a-fA-F0-9][a-fA-F0-9])/pack("C", hex($1))/seg;$password =~ s/\+/ /g;$password =~s/%([a-fA-F0-9][a-fA-F0-9])/pack("C", hex($1))/seg;# If attempt to loginif ($button =~ /^Login$/) {$hexchal = pack "H32", $challenge;if (defined $uamsecret) {$newchal = md5($hexchal, $uamsecret);}else {$newchal = $hexchal;}$response = md5_hex("\0", $password, $newchal);$pappassword = unpack "H32", ($password ^ $newchal);#sleep 5;print "Content-type: text/html\n\n";print "<!DOCTYPE HTML PUBLIC \"-//W3C//DTD HTML 4.01 Transitional//EN\"><html><head><title>MySMB Login</title><meta http-equiv=\"Cache-control\" content=\"no-cache\"><meta http-equiv=\"Pragma\" content=\"no-cache\">";if ((defined $uamsecret) && defined($userpassword)) {print " <meta http-equiv=\"refresh\" content=\"0;url= http://$uamip:$uamport/logon?username=$username&password= $pappassword&userurl=$userurl\">";} else {print " <meta http-equiv=\"refresh\" content=\"0;url= http://$uamip:$uamport/logon?username=$username&response=$response&userurl= $userurl\">";}print "</head><body bgColor = '#c0d8f4'>";print "<h1 style=\"text-align: center;\">Logging in to MySMB</h1>";print "<center>Please wait......</center></body><!--<?xml version=\"1.0\" encoding=\"UTF-8\"?><WISPAccessGatewayParamxmlns:xsi=\"http://www.w3.org/2001/XMLSchema-instance\"xsi:noNamespaceSchemaLocation= \"http://www.acmewisp.com/WISPAccessGatewayParam.xsd\"><AuthenticationReply><MessageType>120</MessageType><ResponseCode>201</ResponseCode>";if ((defined $uamsecret) && defined($userpassword)) {print "<LoginResultsURL>http://$uamip:$uamport/logon?username= $username&password=$pappassword</LoginResultsURL>";} else {print "<LoginResultsURL>http://$uamip:$uamport/logon?username= $username&response=$response&userurl=$userurl</LoginResultsURL>";}print "</AuthenticationReply></WISPAccessGatewayParam>--></html>";exit(0);}# Default: It was not a form request$result = 0;# If login successfulif ($res =~ /^success$/) {$result = 1;}# If login failedif ($res =~ /^failed$/) {$result = 2;}# If logout successfulif ($res =~ /^logoff$/) {$result = 3;}# If tried to login while already logged inif ($res =~ /^already$/) {$result = 4;}# If not logged in yetif ($res =~ /^notyet$/) {$result = 5;}# If login from smart clientif ($res =~ /^smartclient$/) {$result = 6;}# If requested a logging in pop up windowif ($res =~ /^popup1$/) {$result = 11;}# If requested a success pop up windowif ($res =~ /^popup2$/) {$result = 12;}# If requested a logout pop up windowif ($res =~ /^popup3$/) {$result = 13;}# Otherwise it was not a form request# Send out an error messageif ($result == 0) {print "Content-type: text/html\n\n<!DOCTYPE HTML PUBLIC \"-//W3C//DTD HTML 4.01 Transitional//EN\"><html><head><title>MySMB Login Failed</title><meta http-equiv=\"Cache-control\" content=\"no-cache\"><meta http-equiv=\"Pragma\" content=\"no-cache\"></head><body bgColor = '#c0d8f4'><h1 style=\"text-align: center;\">MySMB Login Failed</h1><center>Login must be performed through MySMB daemon.</center></body></html>";exit(0);}#Generate the outputprint "Content-type: text/html\n\n<!DOCTYPE HTML PUBLIC \"-//W3C//DTD HTML 4.01 Transitional//EN\"><html><head><title>MySMB Login</title>[2.1]<meta http-equiv=\"Cache-control\" content=\"no-cache\"><meta http-equiv=\"Pragma\" content=\"no-cache\"><SCRIPT LANGUAGE=\"JavaScript\">var blur = 0;var starttime = new Date();var startclock = starttime.getTime();var mytimeleft = 0;function doTime() {window.setTimeout( \"doTime()\", 1000 );t = new Date();time = Math.round((t.getTime() - starttime.getTime())/1000);if (mytimeleft) {time = mytimeleft - time;if (time <= 0) {window.location = \"$loginpath?res=popup3&uamip=$uamip&uamport= $uamport\";}}if (time < 0) time = 0;hours = (time - (time % 3600)) / 3600;time = time - (hours * 3600);mins = (time - (time % 60)) / 60;secs = time - (mins * 60);if (hours < 10) hours = \"0\" + hours;if (mins < 10) mins = \"0\" + mins;if (secs < 10) secs = \"0\" + secs;title = \"Online time: \" + hours + \":\" + mins + \":\" + secs;if (mytimeleft) {title = \"Remaining time: \" + hours + \":\" + mins + \":\" + secs;}if(document.all || document.getElementById){document.title = title;}else {self.status = title;}}function popUp(URL) {if (self.name != \"chillispot_popup\") {chillispot_popup = window.open(URL, 'chillispot_popup', 'toolbar= 0,scrollbars=0,location=0,statusbar=0,menubar=0,resizable=0,width= 500,height=375');}}function doOnLoad(result, URL, userurl, redirurl, timeleft) {if (timeleft) {mytimeleft = timeleft;}if ((result == 1) && (self.name == \"chillispot_popup\")) {doTime();}if ((result == 1) && (self.name != \"chillispot_popup\")) {chillispot_popup = window.open(URL, 'chillispot_popup', 'toolbar= 0,scrollbars=0,location=0,statusbar=0,menubar=0,resizable=0,width= 500,height=375');}if ((result == 2) || result == 5) {document.form1.UserName.focus()}if ((result == 2) && (self.name != \"chillispot_popup\")) {chillispot_popup = window.open('', 'chillispot_popup', 'toolbar= 0,scrollbars=0,location=0,statusbar=0,menubar=0,resizable=0,width= 400,height=200');chillispot_popup.close();}if ((result == 12) && (self.name == \"chillispot_popup\")) {doTime();if (redirurl) {opener.location = redirurl;}else if (userurl) {opener.location = userurl;}else if (opener.home) {opener.home();}else {opener.location = \"about:home\";}self.focus();blur = 0;}if ((result == 13) && (self.name == \"chillispot_popup\")) {self.focus();blur = 1;}}function doOnBlur(result) {if ((result == 12) && (self.name == \"chillispot_popup\")) {if (blur == 0) {blur = 1;self.focus();}}}</script></head><body onLoad=\"javascript:doOnLoad($result, '$loginpath?res=popup2&uamip= $uamip&uamport=$uamport&userurl=$userurl&redirurl=$redirurl&timeleft= $timeleft','$userurldecode', '$redirurldecode', '$timeleft')\" onBlur = \"javascript:doOnBlur($result)\" bgColor = '#c0d8f4'>";# if (!window.opener) {# document.bgColor = '#c0d8f4';# }#print "THE INPUT: $input";#foreach $key (sort (keys %ENV)) {# print $key, ' = ', $ENV{$key}, "<br>\n";#}if ($result == 2) {print "<h1 style=\"text-align: center;\">MySMB Login Failed</h1>";[6.1]if ($reply) {print "<center> $reply </BR></BR></center>";}}if ($result == 5) {print "<h1 style=\"text-align: center;\">MySMB Login</h1>";[2.2]}if ($result == 2 || $result == 5) {print "<form name=\"form1\" method=\"post\" action=\"$loginpath\"><INPUT TYPE=\"hidden\" NAME=\"challenge\" VALUE=\"$challenge\"><INPUT TYPE=\"hidden\" NAME=\"uamip\" VALUE=\"$uamip\"><INPUT TYPE=\"hidden\" NAME=\"uamport\" VALUE=\"$uamport\"><INPUT TYPE=\"hidden\" NAME=\"userurl\" VALUE=\"$userurldecode\"><center><table border=\"0\" cellpadding=\"5\" cellspacing=\"0\" style=\"width: 217px;\"><tbody><tr><td align=\"right\">Username:</td>[2.3]<td><input STYLE=\"font-family: Arial\" type=\"text\" name= \"UserName\" size=\"20\" maxlength=\"128\"></td></tr><tr><td align=\"right\">Password:</td>[2.4]<td><input STYLE=\"font-family: Arial\" type=\"password\" name= \"Password\" size=\"20\" maxlength=\"128\"></td></tr><tr><td align=\"center\" colspan=\"2\" height=\"23\"><input type= \"submit\" name=\"button\" value=\"Login\"[2.5] onClick= \"javascript:popUp('$loginpath?res=popup1&uamip=$uamip&uamport= $uamport')\"></td></tr></tbody></table></center></form></body></html>";}if ($result == 1) {print "<h1 style=\"text-align: center;\">Logged in to MySMB</h1>";[8.1]if ($reply) {print "<center> $reply </BR></BR></center>";}print "<center><a href=\"http://$uamip:$uamport/logoff\">Logout</a>[8.2]</center></body></html>";}if (($result == 4) || ($result == 12)) {print "<h1 style=\"text-align: center;\">Logged in to MySMB</h1>[4.1]<center><a href=\"http://$uamip:$uamport/logoff\">Logout</a>[4.2]</center></body></html>";}if ($result == 11) {print "<h1 style=\"text-align: center;\">Logging in to MySMB</h1>[3.1]";print "<center>Please wait...... [3.2]</center></body></html>";}if (($result == 3) || ($result == 13)) {print "<h1 style=\"text-align: center;\">Logged out from MySMB</h1>[5.1]<center><a href=\"http://$uamip:$uamport/prelogin\">Login</a>[5.2]</center></body></html>";}exit(0);CGI Source Code Example: No Authentication and Accept Button
Following is a CGI script which presents a Accept button on the portal page.
The secret string programmed in uamsecret variable should be configured as Authentication Web Key on the Captive portal page. Replace the MySMB string in the following section with your company name.
#!/usr/bin/perl# chilli - ChilliSpot.org. A Wireless LAN Access Point Controller# Copyright (C) 2003, 2004 Mondru AB.## The contents of this file may be used under the terms of the GNU# General Public License Version 2, provided that the above copyright# notice and this permission notice is included in all copies or# substantial portions of the software.# Redirects from ChilliSpot daemon:## Redirection when not yet or already authenticated# notyet: ChilliSpot daemon redirects to login page.# already: ChilliSpot daemon redirects to success status page.## Response to login:# already: Attempt to login when already logged in.# failed: Login failed# success: Login succeded## logoff: Response to a logout# Shared secret used to encrypt challenge with. Prevents dictionary attacks.# You should change this to your own shared secret.#$uamsecret = "ht2eb8ej6s4et3rg1ulp";$uamsecret = "gemteksmb";# Uncomment the following line if you want to use ordinary user-password# for radius authentication. Must be used together with $uamsecret.$userpassword=1;# Our own path$loginpath = $ENV{'SCRIPT_URL'};use Digest::MD5 qw(md5 md5_hex md5_base64);# Make sure that the form parameters are clean$OK_CHARS='-a-zA-Z0-9_.@&=%!';$| = 1;if ($ENV{'CONTENT_LENGTH'}) {read (STDIN, $_, $ENV{'CONTENT_LENGTH'});}s/[^$OK_CHARS]/_/go;$input = $_;# Make sure that the get query parameters are clean$OK_CHARS='-a-zA-Z0-9_.@&=%!';$_ = $query=$ENV{QUERY_STRING};s/[^$OK_CHARS]/_/go;$query = $_;# If she did not use https tell her that it was wrong.if (!($ENV{HTTPS} =~ /^on$/)) {print "Content-type: text/html\n\n<!DOCTYPE HTML PUBLIC \"-//W3C//DTD HTML 4.01 Transitional//EN\"><html><head><title>MySMB Login Failed</title><meta http-equiv=\"Cache-control\" content=\"no-cache\"><meta http-equiv=\"Pragma\" content=\"no-cache\"></head><body bgColor = '#c0d8f4'><h1 style=\"text-align: center;\">MySMB Login Failed</h1><center>Login must use encrypted connection.</center></body><!--<?xml version=\"1.0\" encoding=\"UTF-8\"?><WISPAccessGatewayParamxmlns:xsi=\"http://www.w3.org/2001/XMLSchema-instance\"xsi:noNamespaceSchemaLocation= \"http://www.acmewisp.com/WISPAccessGatewayParam.xsd\"><AuthenticationReply><MessageType>120</MessageType><ResponseCode>102</ResponseCode><ReplyMessage>Login must use encrypted connection</ReplyMessage></AuthenticationReply></WISPAccessGatewayParam>--></html>";exit(0);}#Read form parameters which we care about@array = split('&',$input);foreach $var ( @array ){@array2 = split('=',$var);if ($array2[0] =~ /^UserName$/) { $username = $array2[1]; }if ($array2[0] =~ /^Password$/) { $password = $array2[1]; }if ($array2[0] =~ /^challenge$/) { $challenge = $array2[1]; }if ($array2[0] =~ /^button$/) { $button = $array2[1]; }if ($array2[0] =~ /^logout$/) { $logout = $array2[1]; }if ($array2[0] =~ /^prelogin$/) { $prelogin = $array2[1]; }if ($array2[0] =~ /^res$/) { $res = $array2[1]; }if ($array2[0] =~ /^uamip$/) { $uamip = $array2[1]; }if ($array2[0] =~ /^uamport$/) { $uamport = $array2[1]; }if ($array2[0] =~ /^userurl$/) { $userurl = $array2[1]; }if ($array2[0] =~ /^timeleft$/) { $timeleft = $array2[1]; }if ($array2[0] =~ /^redirurl$/) { $redirurl = $array2[1]; }}#Read query parameters which we care about@array = split('&',$query);foreach $var ( @array ){@array2 = split('=',$var);if ($array2[0] =~ /^res$/) { $res = $array2[1]; }if ($array2[0] =~ /^challenge$/) { $challenge = $array2[1]; }if ($array2[0] =~ /^uamip$/) { $uamip = $array2[1]; }if ($array2[0] =~ /^uamport$/) { $uamport = $array2[1]; }if ($array2[0] =~ /^reply$/) { $reply = $array2[1]; }if ($array2[0] =~ /^userurl$/) { $userurl = $array2[1]; }if ($array2[0] =~ /^timeleft$/) { $timeleft = $array2[1]; }if ($array2[0] =~ /^redirurl$/) { $redirurl = $array2[1]; }}$reply =~ s/\+/ /g;$reply =~s/%([a-fA-F0-9][a-fA-F0-9])/pack("C", hex($1))/seg;$userurldecode = $userurl;$userurldecode =~ s/\+/ /g;$userurldecode =~s/%([a-fA-F0-9][a-fA-F0-9])/pack("C", hex($1))/seg;$redirurldecode = $redirurl;$redirurldecode =~ s/\+/ /g;$redirurldecode =~s/%([a-fA-F0-9][a-fA-F0-9])/pack("C", hex($1))/seg;$password =~ s/\+/ /g;$password =~s/%([a-fA-F0-9][a-fA-F0-9])/pack("C", hex($1))/seg;# If attempt to loginif ($button =~ /^Accept$/) {$hexchal = pack "H32", $challenge;if (defined $uamsecret) {$newchal = md5($hexchal, $uamsecret);}else {$newchal = $hexchal;}$response = md5_hex("\0", $password, $newchal);$pappassword = unpack "H32", ($password ^ $newchal);#sleep 5;print "Content-type: text/html\n\n";print "<!DOCTYPE HTML PUBLIC \"-//W3C//DTD HTML 4.01 Transitional//EN\"><html><head><title>MySMB Login</title><meta http-equiv=\"Cache-control\" content=\"no-cache\"><meta http-equiv=\"Pragma\" content=\"no-cache\">";if ((defined $uamsecret) && defined($userpassword)) {print " <meta http-equiv=\"refresh\" content=\"0;url= http://$uamip:$uamport/logon?username=$username&password= $pappassword&userurl=$userurl\">";} else {print " <meta http-equiv=\"refresh\" content=\"0;url= http://$uamip:$uamport/logon?username=$username&response=$response&userurl= $userurl\">";}print "</head><body bgColor = '#c0d8f4'>";print "<h1 style=\"text-align: center;\">Logging in to MySMB</h1>";print "<center>Please wait......</center></body><!--<?xml version=\"1.0\" encoding=\"UTF-8\"?><WISPAccessGatewayParamxmlns:xsi=\"http://www.w3.org/2001/XMLSchema-instance\"xsi:noNamespaceSchemaLocation= \"http://www.acmewisp.com/WISPAccessGatewayParam.xsd\"><AuthenticationReply><MessageType>120</MessageType><ResponseCode>201</ResponseCode>";if ((defined $uamsecret) && defined($userpassword)) {print "<LoginResultsURL>http://$uamip:$uamport/logon?username= $username&password=$pappassword</LoginResultsURL>";} else {print "<LoginResultsURL>http://$uamip:$uamport/logon?username= $username&response=$response&userurl=$userurl</LoginResultsURL>";}print "</AuthenticationReply></WISPAccessGatewayParam>--></html>";exit(0);}# Default: It was not a form request$result = 0;# If login successfulif ($res =~ /^success$/) {$result = 1;}# If login failedif ($res =~ /^failed$/) {$result = 2;}# If logout successfulif ($res =~ /^logoff$/) {$result = 3;}# If tried to login while already logged inif ($res =~ /^already$/) {$result = 4;}# If not logged in yetif ($res =~ /^notyet$/) {$result = 5;}# If login from smart clientif ($res =~ /^smartclient$/) {$result = 6;}# If requested a logging in pop up windowif ($res =~ /^popup1$/) {$result = 11;}# If requested a success pop up windowif ($res =~ /^popup2$/) {$result = 12;}# If requested a logout pop up windowif ($res =~ /^popup3$/) {$result = 13;}# Otherwise it was not a form request# Send out an error messageif ($result == 0) {print "Content-type: text/html\n\n<!DOCTYPE HTML PUBLIC \"-//W3C//DTD HTML 4.01 Transitional//EN\"><html><head><title>MySMB Login Failed</title><meta http-equiv=\"Cache-control\" content=\"no-cache\"><meta http-equiv=\"Pragma\" content=\"no-cache\"></head><body bgColor = '#c0d8f4'><h1 style=\"text-align: center;\">MySMB Login Failed</h1><center>Login must be performed through MySMB daemon.</center></body></html>";exit(0);}#Generate the outputprint "Content-type: text/html\n\n<!DOCTYPE HTML PUBLIC \"-//W3C//DTD HTML 4.01 Transitional//EN\"><html><head><title>MySMB Login</title><meta http-equiv=\"Cache-control\" content=\"no-cache\"><meta http-equiv=\"Pragma\" content=\"no-cache\"><SCRIPT LANGUAGE=\"JavaScript\">var blur = 0;var starttime = new Date();var startclock = starttime.getTime();var mytimeleft = 0;function doTime() {window.setTimeout( \"doTime()\", 1000 );t = new Date();time = Math.round((t.getTime() - starttime.getTime())/1000);if (mytimeleft) {time = mytimeleft - time;if (time <= 0) {window.location = \"$loginpath?res=popup3&uamip=$uamip&uamport= $uamport\";}}if (time < 0) time = 0;hours = (time - (time % 3600)) / 3600;time = time - (hours * 3600);mins = (time - (time % 60)) / 60;secs = time - (mins * 60);if (hours < 10) hours = \"0\" + hours;if (mins < 10) mins = \"0\" + mins;if (secs < 10) secs = \"0\" + secs;title = \"Online time: \" + hours + \":\" + mins + \":\" + secs;if (mytimeleft) {title = \"Remaining time: \" + hours + \":\" + mins + \":\" + secs;}if(document.all || document.getElementById){document.title = title;}else {self.status = title;}}function popUp(URL) {if (self.name != \"chillispot_popup\") {chillispot_popup = window.open(URL, 'chillispot_popup', 'toolbar= 0,scrollbars=0,location=0,statusbar=0,menubar=0,resizable=0,width= 500,height=375');}}function doOnLoad(result, URL, userurl, redirurl, timeleft) {if (timeleft) {mytimeleft = timeleft;}if ((result == 1) && (self.name == \"chillispot_popup\")) {doTime();}if ((result == 1) && (self.name != \"chillispot_popup\")) {chillispot_popup = window.open(URL, 'chillispot_popup', 'toolbar= 0,scrollbars=0,location=0,statusbar=0,menubar=0,resizable=0,width= 500,height=375');}if ((result == 2) || result == 5) {//document.form1.UserName.focus()}if ((result == 2) && (self.name != \"chillispot_popup\")) {chillispot_popup = window.open('', 'chillispot_popup', 'toolbar= 0,scrollbars=0,location=0,statusbar=0,menubar=0,resizable=0,width= 400,height=200');chillispot_popup.close();}if ((result == 12) && (self.name == \"chillispot_popup\")) {doTime();if (redirurl) {opener.location = redirurl;}else if (userurl) {opener.location = userurl;}else if (opener.home) {opener.home();}else {opener.location = \"about:home\";}self.focus();blur = 0;}if ((result == 13) && (self.name == \"chillispot_popup\")) {self.focus();blur = 1;}}function doOnBlur(result) {if ((result == 12) && (self.name == \"chillispot_popup\")) {if (blur == 0) {blur = 1;self.focus();}}}</script></head><body onLoad=\"javascript:doOnLoad($result, '$loginpath?res=popup2&uamip= $uamip&uamport=$uamport&userurl=$userurl&redirurl=$redirurl&timeleft= $timeleft','$userurldecode', '$redirurldecode', '$timeleft')\" onBlur = \"javascript:doOnBlur($result)\" bgColor = '#c0d8f4'>";# if (!window.opener) {# document.bgColor = '#c0d8f4';# }#print "THE INPUT: $input";#foreach $key (sort (keys %ENV)) {# print $key, ' = ', $ENV{$key}, "<br>\n";#}if ($result == 2) {print "<h1 style=\"text-align: center;\">MySMB Login Failed</h1>";if ($reply) {print "<center> $reply </BR></BR></center>";}}if ($result == 5) {print "<h1 style=\"text-align: center;\">MySMB Login</h1>";}if ($result == 2 || $result == 5) {print "<form name=\"form1\" method=\"post\" action=\"$loginpath\"><INPUT TYPE=\"hidden\" NAME=\"challenge\" VALUE=\"$challenge\"><INPUT TYPE=\"hidden\" NAME=\"uamip\" VALUE=\"$uamip\"><INPUT TYPE=\"hidden\" NAME=\"uamport\" VALUE=\"$uamport\"><INPUT TYPE=\"hidden\" NAME=\"userurl\" VALUE=\"$userurldecode\"><INPUT TYPE=\"hidden\" NAME=\"UserName\" VALUE=\"\"><INPUT TYPE=\"hidden\" NAME=\"Password\" VALUE=\"\"><center><table border=\"0\" cellpadding=\"5\" cellspacing=\"0\" style=\"width: 217px;\"><tbody><tr><td align=\"center\" colspan=\"2\" height=\"23\"><input type= \"submit\" name=\"button\" value=\"Accept\" onClick= \"javascript:popUp('$loginpath?res=popup1&uamip=$uamip&uamport= $uamport')\"></td></tr></tbody></table></center></form></body></html>";}if ($result == 1) {print "<h1 style=\"text-align: center;\">Logged in to MySMB</h1>";if ($reply) {print "<center> $reply </BR></BR></center>";}print "<center><a href=\"http://$uamip:$uamport/logoff\">Logout</a></center></body></html>";}if (($result == 4) || ($result == 12)) {print "<h1 style=\"text-align: center;\">Logged in to MySMB</h1><center><a href=\"http://$uamip:$uamport/logoff\">Logout</a></center></body></html>";}if ($result == 11) {print "<h1 style=\"text-align: center;\">Logging in to MySMB</h1>";print "<center>Please wait......</center></body></html>";}if (($result == 3) || ($result == 13)) {print "<h1 style=\"text-align: center;\">Logged out from MySMB</h1><center><a href=\"http://$uamip:$uamport/prelogin\">Login</a></center></body></html>";}exit(0);Related Information
Cisco and the Cisco logo are trademarks or registered trademarks of Cisco and/or its affiliates in the U.S. and other countries. To view a list of Cisco trademarks, go to this URL: www.cisco.com/go/trademarks. Third-party trademarks mentioned are the property of their respective owners. The use of the word partner does not imply a partnership relationship between Cisco and any other company. (1110R)
© 2013 Cisco Systems, Inc. All rights reserved.
78-21182-01
Configuring Wireless Rogue AP Detection
A Rogue AP is an access point connected to your network without authorization. It is not under the management of your network administrators and does not necessarily conform to your network security policies.
The security appliance provides proactive Rogue AP Detection in the 2.4-GHz band. Rogue AP Detection is able to discover, detect, and report unauthorized access points. You can specify an authorized access point by its MAC address.
STEP 1
The Rogue AP Detection window opens.
STEP 2
STEP 3
STEP 4
STEP 5
•
•
•
•
•
Choose whether to replace the existing list of Authorized Access Points or add the entries in the imported file to the list of Authorized Access Points.
–
–
After the import is complete, the screen refreshes and the MAC addresses of the imported access points appear in the list of Authorized Access Points.
STEP 6
Advanced Radio Settings
Use the Advanced Settings page to specify the advanced radio settings.
NOTE
STEP 1
STEP 2
•
NOTE: The short frame is only available when the specified wireless mode includes 802.11n.
•
–
–
•
•
•
•
•
STEP 3