-
Catalyst 6500 Series Switch and Cisco 7600 Series Router Firewall Services Module Configuration Guide, 2.2
-
About This Guide
-
Quick Start Steps
-
Introduction to the Firewall Services Module
-
Configuring the Switch for the Firewall Services Module
-
Connecting to the Firewall Services Module and Managing the Configuration
-
Configuring the Firewall Mode
-
Managing Security Contexts
-
Configuring Basic Settings
-
Configuring Bridging Parameters and ARP Inspection
-
Configuring IP Addresses, Routing, and DHCP
-
Configuring Network Address Translation
-
Controlling Network Access with Access Control Lists
-
Allowing Remote Management
-
Configuring AAA
-
Configuring Application and Protocol Inspection
-
Filtering HTTP, HTTPS, or FTP Requests Using an External Server
-
Using Failover
-
Managing Software and Configuration Files
-
Monitoring and Troubleshooting the Firewall Services Module
-
Specifications
-
Sample Configurations
-
Understanding the Command-Line Interface
-
Addresses, Protocols, and Ports Reference
-
Acronyms and Abbreviations
-
Index
-
 Feedback
Table Of Contents
Common Uses for Security Contexts
How the FWSM Classifies Packets
Sharing Resources and Interfaces Between Contexts
Logging into the FWSM in Multiple Context Mode
Enabling or Disabling Multiple Context Mode
Backing Up the Single Mode Configuration
Entering an Activation Key for Multiple Security Contexts
Enabling Multiple Context Mode
Configuring Resource Management
Classes and Class Members Overview
Configuring a Security Context
Changing Between Contexts and the System Execution Space
Changing the Security Context URL
Reloading by Clearing the Configuration
Reloading by Removing and Re-adding the Context
Managing Security Contexts
This chapter tells how to configure multiple security contexts on the Firewall Services Module (FWSM), and includes the following sections:
•
Enabling or Disabling Multiple Context Mode
•
•
•
•
Security Context Overview
You can partition a single FWSM into multiple virtual firewalls, known as security contexts. Each context is an independent firewall, with its own security policy, interfaces, and administrators. Multiple contexts are similar to having multiple stand-alone firewalls.
Each context has its own configuration that identifies the security policy, interfaces, and almost all the options you can configure on a stand-alone firewall. If desired, you can allow individual context administrators to implement the security policy on the context. Some resources are controlled by the overall system administrator, such as VLANs and system resources, so that one context cannot affect other contexts inadvertently.
The system administrator adds and manages contexts by configuring them in the system configuration, which identifies basic settings for the FWSM. The system administrator has privileges to manage all contexts. The system configuration does not include any network interfaces or network settings for itself; rather, when the system needs to access network resources (such as downloading the contexts from the server), it uses one of the contexts that is designated as the admin context.
The admin context is just like any other context, except that when a user logs into the admin context (for example, over an SSH connection), then that user has system administrator rights, and can access the system execution space and all other contexts. Typically, the admin context provides network access to network-wide resources, such as a syslog server or context configuration server.
This section provides an overview of security contexts, and includes the following topics:
•
•
•
•
Common Uses for Security Contexts
You might want to use multiple security contexts in the following situations:
•
•
•
•
Context Configuration Files
Each context has its own configuration file that identifies the security policy, interfaces, and almost all the options you can configure on a stand-alone firewall. You can store context configurations on the local disk partition on the Flash memory card, or you can download them from a TFTP, FTP, or HTTP(S) server.
In addition to individual security contexts, the FWSM also includes a system configuration that identifies basic settings for the FWSM, including a list of contexts. Like the single mode configuration, this configuration resides as the "startup" configuration in the flash partition.
The system configuration does not include any network interfaces or network settings for itself; rather, when the system needs to access network resources (such as downloading the contexts from a server), it uses one of the contexts that is designated as the admin context. The system configuration does include a specialized failover interface for failover traffic only, as well as the Ethernet Out-of-Band Channel (EOBC) to the switch, which does not require any configuration. If your system is already in multiple context mode, or if you convert from single mode, the admin context is created automatically as a file on the disk partition called admin.cfg. In the FWSM CLI, this context is named "admin." If you do not want to use admin.cfg as the admin context, you can change the admin context using the "Changing the Admin Context" section.
How the FWSM Classifies Packets
Each packet that enters the FWSM must be classified, so that the FWSM can determine to which context to send a packet. The classifier checks for the following characteristics:
•
•
The FWSM uses the characteristic that is unique and not shared across contexts. For example, if you share a VLAN across contexts, then the classifier uses the IP address. See the "Sharing Resources and Interfaces Between Contexts" section for more information about sharing VLANs.
The FWSM classifier only "knows" about context IP addresses that have static NAT translations or that have active NAT translations (xlates). The classifier only looks at static statements where the global interface matches the source interface of the packet.
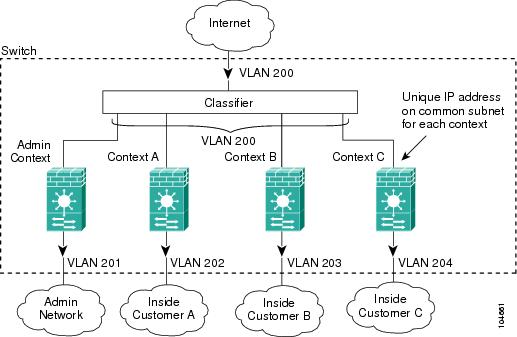
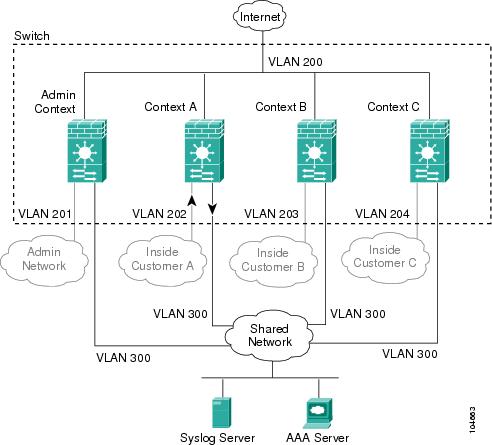
You can share a VLAN interface so long as each IP address space on that VLAN is unique, or you can have overlapping IP addresses so long as the VLANs are unique. Figure 5-1 shows multiple contexts sharing an outside VLAN, while the inside VLANs are unique, allowing overlapping IP addresses.
Figure 5-1 Multiple Security Contexts
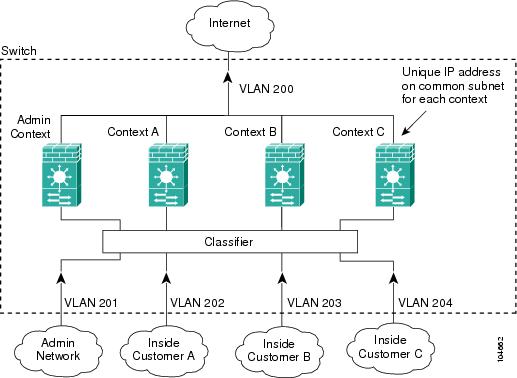
Note that all new incoming traffic must be classified, even from inside networks (see Figure 5-2).
Figure 5-2 Incoming Traffic from Inside Networks
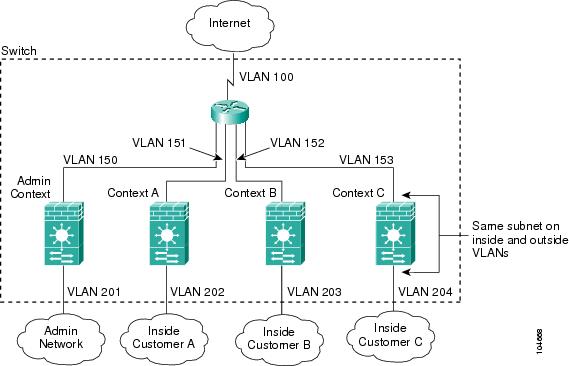
For transparent firewalls, interfaces do not have IP addresses, so you must use unique VLANs (see Figure 5-3):
Figure 5-3 Transparent Firewall Contexts
IP Routing Support
Security contexts support only static routes. You cannot enable OSPF or RIP in multiple context mode.
Sharing Resources and Interfaces Between Contexts
The FWSM allows you to share an interface between contexts. Typically in routed mode, you share the outside interface to conserve VLANs. You can also share inside VLANs to share resources between contexts, or you can place the shared resource on a single context and provide access to that resource to other contexts.
This section includes the following topics:
Sharing Resources
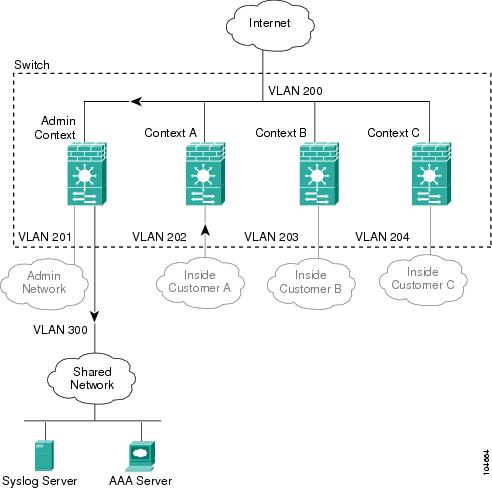
If you have a server that needs to be accessed by multiple contexts (such as a AAA server or a syslog server), then you can choose to place the server on one context network to which all other contexts have access, or you can place the server on a shared inside VLAN.
If you put the server on one context network, allow access to the server by authorized users. The benefit of placing the shared resources on one context is that you only need to configure that one context for the shared resources network. The downside is that you must allow outside access to the shared network for the other contexts. Also, because traffic must go out of one context and then back in another, the FWSM has a slightly greater load than if the traffic stays within a context (see Figure 5-4).
Figure 5-4 Shared Resources on One Context
Alternatively, you can share a VLAN on the inside of each context and place the shared resources on a DMZ, labeled "VLAN 300" in Figure 5-5. The downside of placing the shared network inside each context is that you must configure the interface for all contexts; however, this task can be simplified by cutting and pasting between context configurations, and changing only the interface IP address. You also need to make sure that traffic cannot go from one context to another, using the shared network as an interim hop. For example, you could disallow any traffic from originating on the shared network. If you need to originate traffic on the shared interface, for example, to access the Internet, then refer to the "Shared Interface Limitations" section.
Figure 5-5 Shared Resources on a Shared DMZ
Shared Interface Limitations
For traffic originating on a shared interface, you must configure a static NAT statement for the destination address within a context. This requirement is valid for accessing both higher security interfaces (outside to inside, where a static NAT translation is already required) as well as lower security interfaces (inside to outside), such as connecting to the Internet. This requirement exists because the FWSM classifier must use a unique IP address to determine to which context to send traffic (when you use a shared VLAN, the classifier cannot use the VLAN to classify traffic). However, the FWSM classifier only "knows" about context addresses from already existing NAT translations (returning traffic) and from static NAT translations.
Note
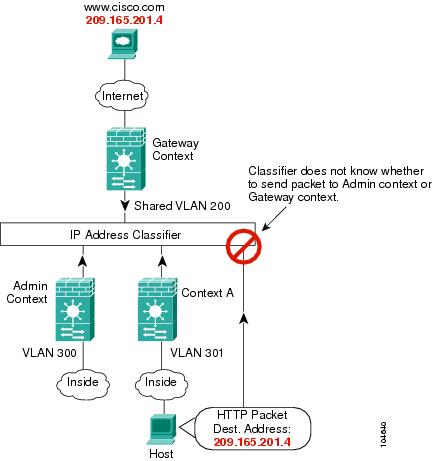
For example, if you send a packet from a host on an inside shared VLAN to www.cisco.com, the FWSM does not know to which context to send the packet unless you statically translate the www.cisco.com IP address in one of the contexts. Figure 5-6 shows two servers on a shared VLAN. One server sends the packet to the translated address, and the FWSM classifies the packet to go through Context C, which includes a static translation for the address. The other server sends the packet to the real untranslated address, and the packet is dropped because the FWSM cannot classify it. If you intend to statically translate addresses for servers like www.cisco.com, then you also need to consider DNS entry addresses and how NAT affects them. For example, if a server sends a packet to www.cisco.com, then the DNS server needs to return the translated address. Managing DNS entries for translated addresses depends on where the DNS server resides. See the "DNS and NAT" section for more information.
Figure 5-6 Originating Traffic on a Shared VLAN
Because of the limitation for originating traffic on a shared VLAN, a scenario where you place one context behind another is not practical because you would have to configure static statements in the top context for every single outside address that users connected to the bottom context want to access (see Figure 5-7).
Figure 5-7 Cascading Context Limitations
Logging into the FWSM in Multiple Context Mode
When you session into the FWSM, you access the system execution space. If you later configure Telnet or SSH access to a context, you can log into a specific context. If you log into a specific context, you can only access the configuration for that context. However, if you log into the admin context or session into the system execution space, you can access all contexts.
When you change to a context from admin, you continue to use the username and command authorization settings set in the admin context.
The system execution space does not support any AAA commands, but you can configure its own login and enable passwords, as well as usernames in the local database to provide individual logins.
Enabling or Disabling Multiple Context Mode
Your FWSM might already be configured for multiple security contexts depending on how you ordered it from Cisco. If you are upgrading, however, you might need to convert from single mode to multiple mode by following the procedures in this section. To view the mode, enter show mode.
The default software license lets you create and use two contexts in addition to the admin context. For more contexts (up to 100), purchase a license from Cisco Systems.
This section includes:
•
•
•
•
Backing Up the Single Mode Configuration
When you convert from single mode to multiple mode, the FWSM converts the running configuration into two files: a new startup configuration (in Flash) that comprises the system configuration, and admin.cfg (in the disk partition) that comprises the admin context. The original running configuration is saved as old_running.cfg (in disk). The original startup configuration is not saved, so if it differs from the running configuration, you should back it up before proceeding.
Entering an Activation Key for Multiple Security Contexts
The activation key to enable more than two contexts (plus the admin context) is based on your FWSM serial number. Enter the following commands to view your serial number and to enter a key.
•
FWSM> show version | include NumberEnter the pipe character (|) as part of the command.
•
FWSM(config)# activation-key keyThe key is a four-element hexadecimal string with one space between each element. For example, a key in the correct form might look like the following key:
0xe02888da 0x4ba7bed6 0xf1c123ae 0xffd8624eThe leading 0x specifier is optional; all values are assumed to be hexadecimal.
If you are already in multiple context mode, enter this command in the system execution space.
Note
Enabling Multiple Context Mode
The context mode (single or multiple) is not stored in the configuration file, even though it does endure reboots. If you need to copy your configuration to another device, you will need to reenter this command on the new device.
When you convert from single mode to multiple mode, the FWSM converts the running configuration into two files: a new startup.cfg (in Flash) that comprises the system configuration, and admin.cfg (in the disk partition) that comprises the admin context. The original running configuration is saved as old_running.cfg (in disk). The original startup configuration is not saved. The FWSM automatically adds an entry for the admin context to the system configuration with the name "admin."
To enable multiple mode, enter the following command:
FWSM(config)# mode multipleYou are prompted to reboot the FWSM.
Restoring Single Context Mode
If you convert from multiple mode to single mode, the startup configuration is not automatically converted back to the original running configuration. You must copy the backup version of the original running configuration to the current startup configuration. (If you do not have the original configuration, you can start over at the command line.) Because the system configuration does not have any network interfaces as part of its configuration, you must session into the FWSM from the switch to perform the copy (see the "Sessioning and Logging into the Firewall Services Module" section).
To copy the old running configuration to the startup configuration and to change the mode to single mode, enter these commands in the system execution space:
Step 1
FWSM(config)# copy disk:old_running.cfg startup-configStep 2
FWSM(config)# mode singleThe FWSM reboots.
Configuring Resource Management
By default, all security contexts have unlimited access the resources of the FWSM, except where maximum limits per context are enforced. However, if you find that one or more contexts use too many resources, and they cause other contexts to be denied connections, for example, then you can configure resource management to limit the use of resources per context.
Note
This section includes the following topics:
•
Classes and Class Members Overview
The FWSM manages resources by assigning contexts to resource classes. Each context uses the resource limits set by the class. This section includes the following topics:
Resource Limits
When you create a class, the FWSM does not set aside a portion of the resources for each context assigned to the class; rather, the FWSM sets the maximum limit for a context. If you oversubscribe resources, or allow some resources to be unlimited, a few contexts can "use up" those resources, potentially affecting service to other contexts.
You can set the limit for all resources together as a percentage of the total available for the device. Also, you can set the limit for individual resources as a percentage or as an absolute value.
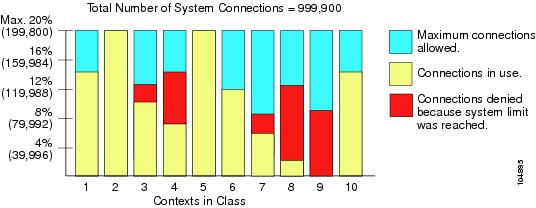
You can oversubscribe the FWSM by assigning more than 100% of the resources across all contexts. For example, you can set the Bronze class to limit connections to 20% per context, and then assign 10 contexts to the class for a total of 200%. If contexts concurrently use more than the system limit, then each context gets less than the 20% you intended (see Figure 5-8).
Figure 5-8 Resource Oversubscription
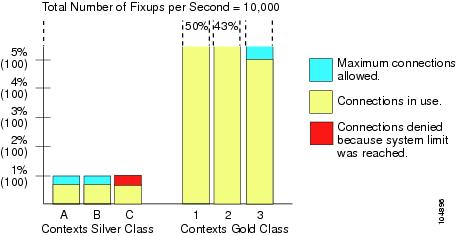
The FWSM lets you assign unlimited access to one or more resources in a class, instead of a percentage or absolute number. When a resource is unlimited, contexts can use as much of the resource as the system has available. For example, Context A, B, and C are in the Silver Class, which limits each class member to 1% of the system inspections per second, for a total of 3%; but the three contexts are currently only using 2% combined. Gold Class has unlimited access to inspections. The contexts in Gold Class can use more than the 97% of "unassigned" inspections; they can also use the 1% of inspections not currently in use by Context A, B, and C, even if that means that Context A, B, and C are unable to reach their 3% combined limit (see Figure 5-9). Setting unlimited access is similar to oversubscribing the FWSM, except that you have less control over how much you oversubscribe the system.
Figure 5-9 Unlimited Resources
Default Class
All contexts belong to the default class if they are not assigned to another class; you do not have to actively assign a context to the default class.
If a context belongs to a class other than the default class, those class settings always override the default class settings. However, if the other class has any settings that are not defined, then the member context uses the default class for those limits. For example, if you create a class with a 2% limit for all concurrent connections, but no other limits, then all other limits are inherited from the default class. Conversely, if you create a class with a 2% limit for all resources, the class uses no settings from the default class.
By default, the default class provides unlimited access to resources for all contexts, except for the following limits, which are by default set to the maximum allowed per context:
•
•
•
•
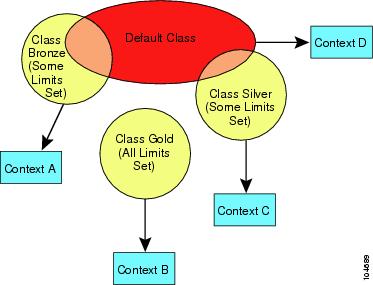
Figure 5-10 shows the relationship between the default class and other classes. Contexts A and C belong to classes with some limits set; other limits are inherited from the default class. Context B inherits no limits from default because all limits are set in its class, the Gold class. Context D was not assigned to a class, and is by default a member of the default class.
Figure 5-10 Resource Classes
Class Members
To use the settings of a class, assign the context to the class when you define the context. All contexts belong to the default class if they are not assigned to another class; you do not have to actively assign a context to default. You can only assign a context to one resource class. The exception to this rule is that limits that are undefined in the member class are inherited from the default class; so in effect, a context could be a member of default plus another class.
Configuring a Class
To add or change a class in the system configuration, follow these steps. After you add the class, you can add more limits as required by following this procedure again for the same class name and specifying additional limits. You do not need to reenter existing resource commands; the commands you already set remain in place unless you remove them with the no form of the command. You can change the value of a particular resource limit by reentering the command with a new value.
To configure a resource class, follow these steps:
Step 1
FWSM(config)# class nameThe name is a string up to 20 characters long. To set the limits for the default class, enter default for the name.
Step 2
•
FWSM(config-resmgmt)# limit-resource all {number% | 0}The number is an integer greater than or equal to 1. 0 (without a percent sign (%)) sets the resources to unlimited. You can assign more than 100% if you want to oversubscribe the device.
•
FWSM(config-resmgmt)# limit-resource [rate] resource_name number[%]For this particular resource, the limit overrides the limit set for all. Enter the rate argument to set the rate per second for certain resources. See Table 5-1 for resources for which you can set the rate per second.
Table 5-1 lists the resource types and the limits. See also the show resource types command.
Table 5-1 Resource Names and Limits
mac-addresses
N/A
65 K concurrent
For transparent firewall mode, the number of MAC addresses allowed in the MAC address table.
conns
N/A
999,900 concurrent
102,400 per second (rate)
TCP or UDP connections between any two hosts, including connections between one host and multiple other hosts.
Note
fixups
N/A
10,000 per second (rate)
Application inspection.
hosts
N/A
256 K concurrent
Hosts that can connect through the FWSM.
ipsec
1 minimum
5 maximum concurrent
10 concurrent
IPSec sessions
ssh
1 minimum
5 maximum concurrent
100 concurrent
SSH sessions.
syslogs
N/A
30,000 per second (rate)
System messages.
Note
telnet
1 minimum
5 maximum concurrent
100 concurrent
Telnet sessions.
xlates
N/A
256 K concurrent
NAT translations.
For example, to set the default class limit for conns to 10% instead of unlimited, enter the following commands:
FWSM(config)# class defaultFWSM(config-class)# limit-resource conns 10%All other resources remain at unlimited.
To add a class called gold with all resources set to 5%, except for fixups, with a setting of 10%, enter the following commands:
FWSM(config)# class goldFWSM(config-class)# limit-resource all 5%FWSM(config-class)# limit-resource fixups 10%To add a class called silver with all resources set to 3%, except for syslogs, with a setting of 500 per second, enter the following commands:
FWSM(config)# class silverFWSM(config-class)# limit-resource all 3%FWSM(config-class)# limit-resource rate syslogs 500Configuring a Security Context
The security context definition in the system configuration identifies the context name, configuration file URL, VLANs that a context can use, and the resource class to which a context belongs. After you add the context, you can add more VLAN interfaces as required by following this procedure again and specifying additional interfaces. You do not need to reenter other context commands again; the commands you already set remain in place unless you remove them with the no form of the command. You can change the value of single-instance commands by reentering the command with a new value. For commands that you can enter multiple times, such as the allocate-interface command, you must remove the command with the no form and then re-add the altered version.
Note
FWSM(config)#admin-context name
You can now enter the context name command to match the name you specified for the admin context.
To add or change a context in the system configuration, follow these steps:
Step 1
FWSM(config)# context nameThe name is a string up to 32 characters long. This name is case sensitive, so you can have two contexts named "customerA" and "CustomerA," for example.
We recommend you do not use the names "count" or "detail." These names are options in the show context command, so you cannot use the show context command to show information about a context called "count" or "detail." "system" is a reserved name, and cannot be used.
Step 2
FWSM(config-context)# description textStep 3
FWSM(config-context)# allocate-interface vlannumber[-vlannumber] [map_name[-map_name]]You can enter this command multiple times to specify different ranges. For transparent firewall mode, you can only use two interfaces per context.
Enter a VLAN number or a range of VLANs, typically from 1 to 1000 and from 1025 to 4094 (see the switch documentation for supported VLANs). You can assign the same VLANs to multiple contexts, if desired. See the "Sharing Resources and Interfaces Between Contexts" section for more information about shared VLAN limitations.
The map_name is an alphanumeric alias for the VLAN interface that can be used within the context instead of the VLAN number. If you do not specify a mapped name, the VLAN number is used within the context. For security purposes, you might not want the context administrator to know which VLANs are being used by the context. Instead of using the VLAN number in the nameif command, for example, you can use the mapped name.
A mapped name must start with a letter, end with a letter or digit, and have as interior characters only letters, digits, or an underscore. For example, you can use the following names:
int0intaint_0If you specify a range of VLAN IDs, you can specify a matching range of mapped names. Follow these guidelines for ranges:
•
int0-int10•
vlan100-vlan199 int1-int100If you enter vlan100-vlan199 int1-int15 or vlan100-vlan199 happy1-sad5, for example, the command fails.
The following example shows VLANs 100, 200, and 300 through 305 assigned to the context. The mapped names are int1 through int8.
FWSM(config-context)# allocate-interface vlan100 int1FWSM(config-context)# allocate-interface vlan200 int2FWSM(config-context)# allocate-interface vlan300-vlan305 int3-int8Step 4
FWSM(config-context)# config-url urlWhen you add a context URL, the system immediately loads the context so that it is running.
Note
See the following URL syntax:
•
•
•
•
•
The FWSM can download a context from a TFTP or FTP server, HTTP or HTTPS server, or from the local disk (called disk). The disk is a 64-MB partition of Flash that uses a navigable file system. The disk partition is used only for context storage. The system configuration and the software image reside in the Flash partition (called flash).
The server must be accessible from the admin context. The admin context file must be stored on the disk.
The filename does not require a file extension, although we recommend using ".cfg".
If the system cannot retrieve the context configuration file because the server is unavailable, or the file does not yet exist, the system creates a blank context that is ready for you to configure with the command-line interface.
For example, enter the following command:
FWSM(config-context)# config-url ftp://joe:passw0rd1@10.1.1.1/configlets/test.cfgStep 5
FWSM(config-context)# member class_nameIf you do not specify a class, the context belongs to the default class. You can only assign a context to one resource class.
For example, to assign the context to the gold class, enter the following command:
FWSM(config-context)# member goldSee the following sample context configurations:
FWSM(config)# context administratorFWSM(config-context)# allocate-interface vlan10FWSM(config-context)# allocate-interface vlan11FWSM(config-context)# config-url disk://admin.cfgFWSM(config-context)# context testFWSM(config-context)# allocate-interface vlan100 int1FWSM(config-context)# allocate-interface vlan200 int2FWSM(config-context)# allocate-interface vlan300-vlan305 int3-int8FWSM(config-context)# config-url ftp://joe:passw0rd@10.1.1.1/configlets/test.cfgFWSM(config-context)# member goldFWSM(config-context)# context sampleFWSM(config-context)# allocate-interface vlan101 int1FWSM(config-context)# allocate-interface vlan201 int2FWSM(config-context)# allocate-interface vlan306-vlan311 int3-int8FWSM(config-context)# config-url ftp://joe:passw0rd@10.1.1.1/configlets/sample.cfgFWSM(config-context)# member silverRemoving a Security Context
You can only remove a context by editing the system configuration. You cannot remove the current admin context, unless you remove all contexts.
Note
See the following commands for removing contexts:
•
FWSM(config)# no context nameAll context subcommands are also removed.
•
FWSM(config)# clear contextChanging the Admin Context
You can set any context to be the admin context.
To set the admin context, enter the following command in the system execution space:
FWSM(config)# admin-context context_name
Changing Between Contexts and the System Execution Space
If you log into the system execution space or the admin context, you can change between contexts and perform configuration and monitoring tasks within each context. The "running" configuration that you edit in configuration mode, or that is used in the copy or write commands, depends on your location. When you are in the system execution space, the running configuration consists only of the system configuration; when you are in a context, the running configuration consists only of that context. For example, you cannot view all running configurations (system plus all contexts) by entering the show running-config command. Only the current configuration displays.
To change between the system execution space and a context, or between contexts, see the following commands:
•
FWSM# changeto context nameThe prompt changes to the following:
FWSM/name#•
FWSM/admin# changeto systemThe prompt changes to the following:
FWSM#Changing the Security Context URL
You cannot change the security context URL without reloading the configuration from the new URL. When you reload the configuration, the new configuration merges with the one in running memory. A merge adds any new commands from the new configuration to the running configuration. If the configurations are the same, no changes occur. If commands conflict or if commands affect the running of the context, then the effect of the merge depends on the command. You might get errors, or you might have unexpected results. If the running configuration is blank (for example, if the server was unavailable and the configuration was never downloaded), then the new configuration is used.
If you do not want to merge the configurations, you can clear the running configuration, which disrupts any communications through the context, and then reload the configuration from the new URL.
To change the URL for a context, follow these steps:
Step 1
FWSM# changeto context nameFWSM/name# configure terminalFWSM/name(config)# clear config allStep 2
FWSM/name(config)# changeto systemStep 3
FWSM(config)# context nameStep 4
FWSM(config)# config-url new_urlThe system immediately loads the context so that it is running.
Reloading a Security Context
You can reload the context in two ways:
•
This action clears most attributes associated with the context, such as connections, and NAT tables.
•
This action clears additional attributes, such as memory allocation, which might be useful for troubleshooting. However, to add the context back to the system requires you to respecify the URL, VLANs, and class membership.
This section includes the following topics:
•
•
Reloading by Clearing the Configuration
To reload the context by clearing the context configuration, and reloading the configuration from the URL, follow these steps:
Step 1
FWSM# changeto context nameStep 2
FWSM/name# configure terminalStep 3
FWSM/name(config)# clear configure allThis command stops the context from running.
Step 4
FWSM/name(config)# copy startup-config running-configThe FWSM copies the configuration from the URL specified in the system configuration. You cannot change the URL from within a context.
Reloading by Removing and Re-adding the Context
To reload the context by removing the context and then re-adding it, follow the steps in the following sections:
1.
2.
Monitoring Security Contexts
This section describes how to view and monitor context information, and includes the following topics:
Viewing Context Information
From the system execution space, you can view a list of contexts including the name, class, interfaces, and configuration file URL.
From the system execution space, view all contexts by entering the following command:
FWSM# show context [name [detail]| count]The detail option shows additional information. See the sample displays below for more information.
If you want to show information for a particular context, specify the name.
The count option shows the total number of contexts.
The following sample display shows three contexts:
FWSM# show contextContext Name Class Interfaces URL*admin default Vlan10,22,55-57 disk:/admin.cfgcontexta gold vlan10,100-101 disk:/contexta.cfgcontextb silver vlan10,110-111 disk:/contextb.cfgTotal active Security Contexts: 3Table 5-2 shows each field description.
The following sample display shows the detail option:
FWSM# show context detailContext "admin", is ADMIN and activeConfig URL: disk:/admin.cfgInterfaces: Vlan10,22,55-57Class: default, Flags: 0x00000057, ID: 1Context "contexta", is activeConfig URL: disk:/contexta.cfgInterfaces: vlan10,100-101Class: default, Flags: 0x00000055, ID: 2The "Flags" and "ID" fields are for internal use only.
Viewing Resource Allocation
From the system execution space, you can view the allocation for each resource across all classes and class members.
From the system execution space, view the resource allocation by entering the following command:
FWSM# show resource allocation [detail]This command shows the resource allocation, but does not show the actual resources being used. See the "Viewing Resource Usage" section for more information about actual resource usage.
The detail argument shows additional information. See the sample displays below for more information.
The following sample display shows the total allocation of each resource as an absolute value and as a percentage of the available system resources:
FWSM# show resource allocationResource Total % of AvailConns [rate] 35000 35.00%Fixups [rate] 35000 35.00%Syslogs [rate] 10500 35.00%Conns 305000 30.50%Hosts 78842 30.07%IPsec 7 35.00%SSH 35 35.00%Telnet 35 35.00%Xlates 91749 34.99%All unlimitedTable 5-3 shows each field description.
Table 5-3 show resource allocation Fields
Resource
The name of the resource that you can limit.
See the "Configuring a Class" section for more information about each resource name.
Total
The total amount of the resource that is allocated across all contexts. The amount is an absolute number of concurrent instances or instances per second. If you specified a percentage in the class definition, the FWSM converts the percentage to an absolute number for this display.
% of Avail
The percentage of the total system resources that is allocated across all contexts.
The following sample display shows the detail option:
FWSM# show resource allocation detailResource Origin:A Value was derived from the resource 'all'C Value set in the definition of this classD Value set in default classResource Class Mmbrs Origin Limit Total Total %Conns [rate] default all CA unlimitedgold 1 C 34000 34000 20.00%silver 1 CA 17000 17000 10.00%bronze 0 CA 8500All Contexts: 3 51000 30.00%Fixups [rate] default all CA unlimitedgold 1 DA unlimitedsilver 1 CA 10000 10000 10.00%bronze 0 CA 5000All Contexts: 3 10000 10.00%Syslogs [rate] default all CA unlimitedgold 1 C 6000 6000 20.00%silver 1 CA 3000 3000 10.00%bronze 0 CA 1500All Contexts: 3 9000 30.00%Conns default all CA unlimitedgold 1 C 200000 200000 20.00%silver 1 CA 100000 100000 10.00%bronze 0 CA 50000All Contexts: 3 300000 30.00%Hosts default all CA unlimitedgold 1 DA unlimitedsilver 1 CA 26214 26214 9.99%bronze 0 CA 13107All Contexts: 3 26214 9.99%IPSec default all C 5gold 1 D 5 5 50.00%silver 1 CA 1 1 10.00%bronze 0 CA unlimitedAll Contexts: 3 11 110.00%SSH default all C 5gold 1 D 5 5 5.00%silver 1 CA 10 10 10.00%bronze 0 CA 5All Contexts: 3 20 20.00%Telnet default all C 5gold 1 D 5 5 5.00%silver 1 CA 10 10 10.00%bronze 0 CA 5All Contexts: 3 20 20.00%Xlates default all CA unlimitedgold 1 DA unlimitedsilver 1 CA 23040 23040 10.00%bronze 0 CA 11520All Contexts: 3 23040 10.00%mac-addresses default all C 65535gold 1 D 65535 65535 100.00%silver 1 CA 6553 6553 9.99%bronze 0 CA 3276All Contexts: 3 137623 209.99%Table 5-4 shows each field description.
Table 5-4 show resource allocation detail Fields
Resource
The name of the resource that you can limit.
See the "Configuring a Class" section for more information about each resource name.
Class
The name of each class, including the default class.
The All contexts field shows the total values across all classes.
Mmbrs
The number of contexts assigned to each class.
Origin
The origin of the resource limit, as follows:
•
•
•
The FWSM can combine "A" with "C" or "D."
Limit
The limit of the resource per context, as an absolute number. If you specified a percentage in the class definition, the FWSM converts the percentage to an absolute number for this display.
Total
The total amount of the resource that is allocated across all contexts in the class. The amount is an absolute number of concurrent instances or instances per second. If the resource is unlimited, this display is blank.
% of Avail
The percentage of the total system resources that is allocated across all contexts in the class. If the resource is unlimited, this display is blank.
Viewing Resource Usage
From the system execution space, you can view the resource usage.
From the system execution space, view the resource usage for each context by entering the following command:
FWSM# show resource usage [context context_name | top n | all | summary | system]
[resource {[rate] resource_name | all} | detail] [counter counter_name [count_threshold]]
all is the default, and shows resource usage for each context individually.
Enter the top n keyword to show the contexts that are the top n users of the specified resource. You must specify a single resource type, and not resource all, with this option.
The summary option shows the total for all contexts together. For example, the denied column shows the items that have been denied for each context limit. The system option shows the counts for the entire system. For the limit and denied counts, for example, you only see a number in the denied column if the system limit is reached, not if one or more context limits are reached.
Note
For the resource name, see Table 5-1 for resource names.
The detail keyword shows the resources you can limit in a class, plus other system resources for which you cannot configure limits.
The counter counter_name is one of the following keywords:
•
•
•
•
The count_threshold sets the number above which resources are shown. The default is 1. If the usage of the resource is below the number you set, then the resource is not shown. If you specify all for the counter name, then the count_threshold applies to the current usage.
Note
The following sample display shows the resource usage for all contexts and all resources.
FWSM# show resource usage summaryResource Current Peak Limit Denied ContextSyslogs [rate] 1743 2132 12000(U) 0 SummaryConns 584 763 100000(S) 0 SummaryXlates 8526 8966 93400 0 SummaryHosts 254 254 262144 0 SummaryConns [rate] 270 535 42200 1704 SummaryFixups [rate] 270 535 100000(S) 0 SummaryU = Some contexts are unlimited and are not included in the total.S = All contexts are unlimited; system limit is shown.