-
Cisco Content Security and Control SSM Administrator Guide, 6.1.1569.0
-
Cisco Content Security and Control Version 6.1.1569.0 Patch Release Notes
-
Cisco Content and Control SSM Administrator Guide, Version 6.1.1567.0
-
About This Guide
-
Contents
-
Introducing the CSC SSM
-
Verifying Initial Setup
-
Configuring SMTP and POP3 Mail Traffic
-
Configuring Web (HTTP) and File Transfer (FTP)
-
Managing Updates and Log Queries
-
Administering Trend Micro InterScan
-
Monitoring Content Security
-
Troubleshooting Trend Micro InterScan for Cisco CSC SSM
-
Reimaging and Configuring the CSC SSM Using the CLI
-
Using CSC SSM with Trend Micro Control Manager
-
Glossary
-
Index
-
 Feedback
Table Of Contents
Configuring SMTP and POP3 Mail Traffic
Default Mail Scanning Settings
Defining Incoming and Outgoing SMTP Mail
Enabling SMTP and POP3 Spyware and Grayware Detection
Reviewing SMTP and POP3 Notifications
Enabling SMTP and POP3 Spam Filtering
Enabling SMTP and POP3 Content Filtering
Enabling Network Reputation Services
Configuring SMTP and POP3 Mail Traffic
This chapter describes additional configuration required to detect security risks such as spyware or to add an organizational disclaimer to incoming and outgoing messages, and includes the following sections:
•
Default Mail Scanning Settings
•
•
•
•
•
Default Mail Scanning Settings
Table 3-1 lists the mail configuration settings, and the default values that are in effect after installation.
These default settings give you some protection for your e-mail traffic after you install Trend Micro InterScan for Cisco CSC SSM. You may change these settings. See the online help for more information about these selections before making e-mail changes.
To obtain the maximum protection for your e-mail traffic, additional configuration settings are available that you may want to update. If you purchased the Plus License, which entitles you to receive anti-spam and content filtering functionality, you must configure these features.
Defining Incoming and Outgoing SMTP Mail
When an e-mail message is addressed to multiple recipients, one or more of which is an incoming message (addressed to someone within the same organization with the same domain name) and one of which is outgoing (addressed to someone in a different organization with a different domain name), the incoming rules apply. For example, a message from psmith@example.com is addressed to jdoe@example.com and gwood@example.net.
The message from psmith to jdoe and gwood is treated as an incoming message for both recipients, although gwood is considered an "outgoing" recipient.
You should set scanning to the Scan all option for incoming SMTP messages, and scanning to the IntelliScan option for outgoing messages. Make sure that you enable spyware or grayware detection for incoming messages only.
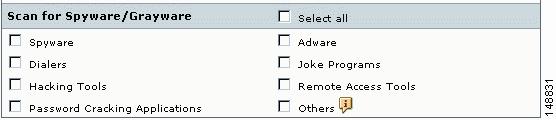
Enabling SMTP and POP3 Spyware and Grayware Detection
Grayware is a category of software that may be legitimate, unwanted, or malicious. Unlike threats such as viruses, worms, and Trojans, grayware does not infect, replicate, or destroy data; however, it may violate your privacy. Examples of grayware include spyware, adware, and remote access tools.
To detect spyware and other forms of grayware in your e-mail traffic, you must configure this feature on the SMTP Incoming Message Scan/Target, SMTP Outgoing Message Scan/Target, and POP3 Scanning/Target windows according to the following steps:
Step 1
Step 2
Step 3
Step 4
Figure 3-1 Spyware and Grayware Scanning Configuration
Step 5
Reviewing SMTP and POP3 Notifications
This section describes notification settings and includes the following topics:
If you are satisfied with the default notification setup, no further action is required. However, you might want to review the notification options and decide whether you want to change the defaults. For example, you may want to send a notification to the administrator when a security risk has been detected in an e-mail message. For SMTP, you can also notify the sender or recipient.
You may also want to tailor the default text in the notification message to something more appropriate for your organization.
To review and reconfigure e-mail notifications, go to each of the following windows in the CSC SSM console:
•
•
•
Types of Notifications
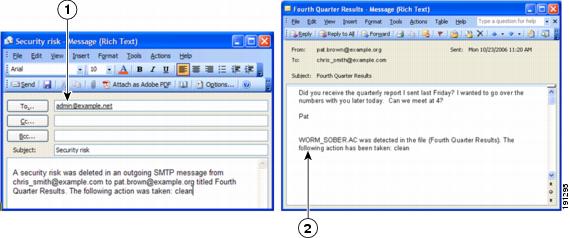
There are two types of notifications available in e-mail traffic: e-mail notifications and inline notifications, as shown in Figure 3-2.
Figure 3-2 Examples of Notifications
Notifications use variables called tokens to provide information that makes the notification more meaningful. For example, a token called %VIRUSNAME% is replaced with the text
WORM_SOBER.ACin the inline notification example on the right.For more information about tokens, see the online help topic, "Using Tokens in Notifications."
Modifying Notifications
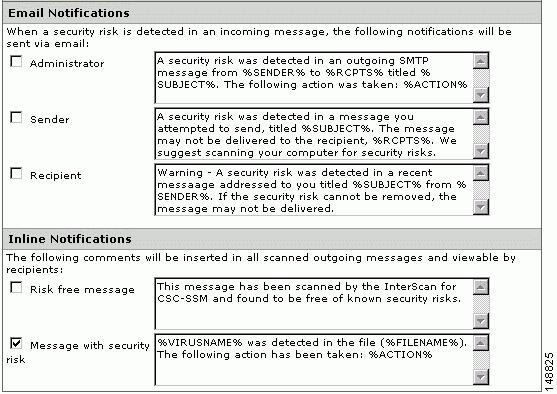
To send a notification to additional recipients, or to change the default text of the notification message that is sent when an event occurs, go to the applicable window to update the settings. For example, Figure 3-3 shows the notification options on the Mail (SMTP) > Scanning > Outgoing > SMTP Outgoing Message Scan/Notification window.
Figure 3-3 Configure Notifications for Outgoing SMTP Messages
By default, the only notification is an inline notification to the message recipient, which means neither the sender nor the administrator of the originating organization is aware that a security threat has been detected and cleaned.
To make changes to these notifications:
Step 1
Step 2
Step 3
Step 4
Configuring SMTP Settings
Review the configuration settings available in the Mail (SMTP) > Configuration > SMTP Configuration window. The SMTP Configuration window contains the following four tabs:
•
•
•
•
Note
To configure settings in this window, perform the following steps:
Step 1
Step 2
Step 3
•
•
•
The Incoming mail domains field should already contain the incoming e-mail domain name you entered in the Host Configuration installation window during installation. If you have additions, enter the top-level domain (tld) name only. For example, enter only example.com; exclude subsidiary domains such as example1.com, example2.com, and so on. If there are no other incoming domains, no further action is needed.
Step 4
•
•
–
–
–
Step 5
Enabling SMTP and POP3 Spam Filtering
You must configure the SMTP and POP3 anti-spam feature.
Note
To configure the anti-spam feature, perform the following steps:
Step 1
Step 2
Step 3
Step 4
Tip
Step 5
Note
You can create the Blocked Senders list in either window; however, the list appears in both windows.Step 6
Step 7
•
•
Step 8
Enabling SMTP and POP3 Content Filtering
You must configure the SMTP and POP3 content filtering feature.
Note
To configure the content filtering feature, perform the following steps:
Step 1
Step 2
Step 3
Step 4
Step 5
Step 6
Step 7
Step 8
•
•
For attachments, the options are as follows:
•
•
Step 9
Step 10
Enabling Network Reputation Services
In addition to filtering spam on the basis of content, CSC SSM provides Network Reputation Services (NRS), which allow you to determine spam based on the reputation of the originating MTA, which off-loads the task from the CSC SSM server. With NRS enabled, all inbound SMTP traffic is checked by the IP databases to see whether the originating IP address is clean or it has been black-listed as a known spam vector.
About RBL+ and QIL
The Realtime Blackhole List (RBL+) is a database that tracks the reputation of about two billion IP addresses. IP addresses that have been consistently associated with the delivery of spam messages are added to the database and rarely removed. The Quick IP Lookup (QIL) list is another database for tracking the reputation of IP addresses, but with this database, IP addresses are added and removed more frequently and thus, can be considered more current.
When an IP address is found in either database, NRS "marks" the connection and CSC SSM behaves according to the settings that you have selected.
For example, an MTA has been hijacked or an open relay exploited and used by a third party to deliver spam messages. The system administrator may discover the exploit after a brief period of time and correct it. Nevertheless, during this period of time, millions of spam messages are being and have been sent by the server. The tainted IP address may be added to the QIL database after only a few reports of spam, but then removed after the reports have subsided. On the other hand, because it takes longer for an IP address to be added to the RBL+, many that are only temporarily problematic (but nonetheless responsible for millions of spam) are not flagged by RBL+. After these IP addresses have been added to the RBL+, however, it is more difficult to remove them from the database.
Note
Both services are applied to the message before the message is delivered to your MTA, freeing it from the overhead of processing complex heuristics and analysis and routing the mail at the same time.
To enable and configure NRS filtering, perform the following steps:
Step 1
Step 2
Step 3
Step 4
Step 5
•
•
Note
•