-
Cisco Security Appliance Command Line Configuration Guide, Version 7.0
-
About This Guide
-
Introduction to the Security Appliance
-
Getting Started
-
Enabling Multiple Context Mode
-
Configuring Ethernet Settings and Subinterfaces
-
Adding and Managing Security Contexts
-
Configuring Interface Parameters
-
Configuring Basic Settings
-
Configuring IP Routing and DHCP Services
-
Configuring IPv6
-
Configuring AAA Servers and the Local Database
-
Configuring Failover
-
Firewall Mode Overview
-
Identifying Traffic With Access Lists
-
Applying NAT
-
Permitting or Denying Network Access
-
Applying AAA for Network Access
-
Applying Filtering Services
-
Using Modular Policy Framework
-
Intercepting and Responding to Network Attacks
-
Applying QoS Policies
-
Applying Application Layer Protocol Inspection
-
Configuring ARP Inspection and Bridging Parameters
-
Configuring IPSec and ISAKMP
-
Setting General VPN Parameters
-
Configuring Tunnel Groups, Group Policies, and Users
-
Configuring IP Addresses for VPN
-
Configuring Remote Access VPNs
-
Configuring LAN-to-LAN VPNs
-
Configuring WebVPN
-
Configuring Certificates
-
Managing System Access
-
Managing Software, Licenses, and Configurations
-
Monitoring and Troubleshooting
-
Feature Licenses and Specifications
-
Sample Configurations
-
Using the Command-Line Interface
-
Addresses, Protocols, and Ports
-
Glossary
-
 Feedback
Table Of Contents
Observing WebVPN Security Precautions
Understanding Features Not Supported for WebVPN
Using SSL to Access the Central Site
Using HTTPS for WebVPN Sessions
Setting WebVPN HTTP/HTTPS Proxy
Configuring SSL/TLS Encryption Protocols
Authenticating with Digital Certificates
Enabling Cookies on Browsers for WebVPN
Understanding WebVPN Global and Group Policy Settings
Authenticating with Digital Certificates
Configuring Global WebVPN Attributes
Creating and Applying WebVPN Policies
Creating Port Forwarding, URL, and Access Lists in Global Configuration Mode
Assigning Lists to Group Policies and Users in Group-Policy or User Mode
Enabling Features for Group Policies and Users
Assigning Users to Group Policies
Using the Security Appliance Authentication Server
Configuring WebVPN Group Policy and User Attributes
Email Proxy Certificate Authentication
Configuring Web Email: MS Outlook Web Access
Understanding WebVPN End User Set-up
Defining the End User Interface
Viewing the WebVPN Application Access Panel
Requiring Usernames and Passwords
Configuring Remote Systems to Use WebVPN Features
Recovering from hosts File Errors in Application Access
Stopping Application Access Improperly
Reconfiguring hosts File Automatically Using WebVPN
Reconfiguring hosts File Manually
Activating the WebVPN Capture Tool
Locating and Uploading the WebVPN Capture Tool Output Files
Configuring WebVPN
This chapter describes WebVPN. WebVPN lets users establish a secure, remote-access VPN tunnel to a security appliance using a web browser. There is no need for either a software or hardware client. WebVPN provides easy access to a broad range of web resources and web-enabled applications from almost any computer on the Internet. These include secure access to the following resources:
•
Internal websites
•
•
•
•
•
•
WebVPN uses Secure Sockets Layer Protocol and its successor, Transport Layer Security to provide a secure connection between remote users and specific, supported internal resources that you configure at a central site. The security appliance recognizes connections that need to be proxied, and the HTTP server interacts with the authentication subsystem to authenticate users.
The network administrator provides access to WebVPN resources to users on a group basis. Users have no direct access to resources on the internal network.
This chapter includes the following sections:
•
•
•
•
•
•
•
•
•
•
•
Observing WebVPN Security Precautions
WebVPN connections on the security appliance are very different from remote access IPSec connections, particularly with respect to how they interact with SSL-enabled servers, and precautions to reduce security risks.
In a WebVPN connection, the security appliance acts as a proxy between the end user web browser and target web servers. When a WebVPN user connects to an SSL-enabled web server, the security appliance establishes a secure connection and validates the server SSL certificate. The end user browser never receives the presented certificate, so therefore cannot examine and validate the certificate.
The current implementation of WebVPN on the security appliance does not permit communication with sites that present expired certificates. Nor does the security appliance perform trusted CA certificate validation. Therefore, WebVPN users cannot analyze the certificate an SSL-enabled web-server presents before communicating with it.
To minimize the risks involved with SSL certificates:
1.
2.
3.
Understanding Features Not Supported for WebVPN
The security appliance does not support the following features for WebVPN connections:
•
•
•
•
•
•
•
•
Using SSL to Access the Central Site
WebVPN uses SSL and its successor, TLS1 to provide a secure connection between remote users and specific, supported internal resources at a central site. This section includes the following topics:
•
•
•
Using HTTPS for WebVPN Sessions
Establishing WebVPN sessions requires the following:
•
•
To permit WebVPN sessions on an interface, perform the following steps:
Step 1
Step 2
For example, to enable WebVPN sessions on the interface called outside, enter the following:
hostname(config)# webvpnhostname(config-webvpn)# enable outside
Note
Setting WebVPN HTTP/HTTPS Proxy
The security appliance can terminate HTTPS connections and forward HTTP/HTTPS requests to HTTP and HTTPS proxy servers. These servers act as intermediaries between users and the Internet. Requiring all Internet access via a server that the organization controls provides another opportunity for filtering to assure secure Internet access and administrative control.
To set values for HTTP and HTTPS proxy, enter the http-proxy and https-proxy commands in webvpn mode.
Configuring SSL/TLS Encryption Protocols
When you set SSL/TLS encryption protocols, be aware of the following:
•
•
•
•
•
•
•
•
•
•
•
•
•
Authenticating with Digital Certificates
SSL uses digital certificates for authentication. The security appliance creates a self-signed SSL server certificate when it boots; or you can install in the security appliance an SSL certificate that has been issued in a PKI context. For HTTPS, this certificate must then be installed on the client. You need to install the certificate from a given security appliance only once.
Restrictions for authenticating users with digital certificates include the following:
•
•
Enabling Cookies on Browsers for WebVPN
Browser cookies are required for the proper operation of WebVPN. When cookies are disabled on the web browser, the links from the web portal home page open a new window prompting the user to log in once more.
Understanding WebVPN Global and Group Policy Settings
In general, the tunnel group and group policy commands for IPSec sessions do not apply for WebVPN. For WebVPN, use these same commands in global webvpn mode. The exceptions to this are:
•
•
•
Web VPN uses authentication, authorization, and accounting settings specific to WebVPN, which you configure with the global webvpn commands. Table 29-1 lists the commands specific to WebVPN for these features:
Table 29-1 Commands Specific to WebVPN
accounting-server-group
authentication-server-group
authorization-server-group
authorization-dn-attributes
authoriziation-required
Note
Authenticating with Digital Certificates
WebVPN users that authenticate using digital certificates do not use global authentication and authorization settings. Instead, they use an authorization server to authenticate once the certificate validation occurs.
Configuring DNS Globally
WebVPN does not use the DNS settings of the group policy with which it has connected. WebVPN follows the security appliance global DNS settings. Ensure that the global DNS settings of the security appliance are configured properly.
Configuring Global WebVPN Attributes
Table 29-2 lists WebVPN attributes that apply globally to WebVPN users:
You enter these WebVPN commands in webvpn mode. To enter webvpn mode, in global configuration mode, enter the webvpn command.
To reset all commands entered with the webvpn command to default values, use the no webvpn command.
Creating and Applying WebVPN Policies
Creating and applying WebVPN policies that govern access to resources at the central site includes the following tasks:
•
•
•
•
Creating Port Forwarding, URL, and Access Lists in Global Configuration Mode
Use the port forward, url-list, and access-list commands in global configuration mode to configure the lists of ports to forward and URLs to present to WebVPN users, and their level of access.
Assigning Lists to Group Policies and Users in Group-Policy or User Mode
After you configure port forwarding and URL lists, use the port forward and url-list, and filter commands in webvpn group-policy or user mode to assign lists to group policies and/or users.
Enabling Features for Group Policies and Users
To enable features for group policies and users, issue the functions command in group-policy or user configuration mode.
Assigning Users to Group Policies
Assigning users to group policies simplifies configuration, by letting you apply policies to many users, rather than configuring policies for each user individually.There are two ways to assign users to group policies:
Using a RADIUS Server
Using a RADIUS server to authenticate users, assign users to group policies by following these steps:
Step 1
Step 2
For example, to set a WebVPN user to the SSL_VPN group, set the RADIUS Class Attribute to a value of OU=SSL_VPN; (Do not omit the semicolon.)
Using the Security Appliance Authentication Server
You can also configure users to authenticate to the security appliance internal authentication server, and assign these users to a group policy on the security appliance.
Configuring WebVPN Group Policy and User Attributes
Table 29-3 lists all WebVPN group policy and user attributes:
Configuring Email
WebVPN supports several ways to access email. This section includes the following methods:
•
Configuring Email Proxies
WebVPN supportsIMAP4S, POP3S, and SMTPS email proxies. Table 29-4 lists attributes that apply globally to Email proxy users:
Note
Email Proxy Certificate Authentication
Certificate authentication for email proxy connections works with Netscape 7x email clients. Other email clients such as MS Outlook, MS Outlook Express, and Eudora lack the ability to access the certificate store.
Configuring MAPI
MAPI, also called MS Outlook Exchange proxy, has the following requirements:
•
•
hostname(config)# group-policy group_policy_name attributeshostname(config-group-policy)# webvpnhostname(config-group-webvpn)# functions mapi•
hostname(config)# domain domain_namehostname(config)#
Note
Configuring Web Email: MS Outlook Web Access
Web email is MS Outlook Web Access for Exchange 2000, Exchange 5.5, and Exchange 2003. It requires an MS Outlook Exchange Server at the central site. It also requires that users perform the following tasks:
•
•
•
Understanding WebVPN End User Set-up
This section is for the system administrator who sets up WebVPN for end users. It describes how to customize the end-user interface.
This section summarizes configuration requirements and tasks for a remote system. It specifies information to communicate to users to get them started using WebVPN. It includes the following topics:
•
•
•
Defining the End User Interface
The WebVPN end user interface is a series of html panels. A user logs on to WebVPN by entering the IP address of a security appliance interface in the format https://address. The first panel that displays is the login screen.
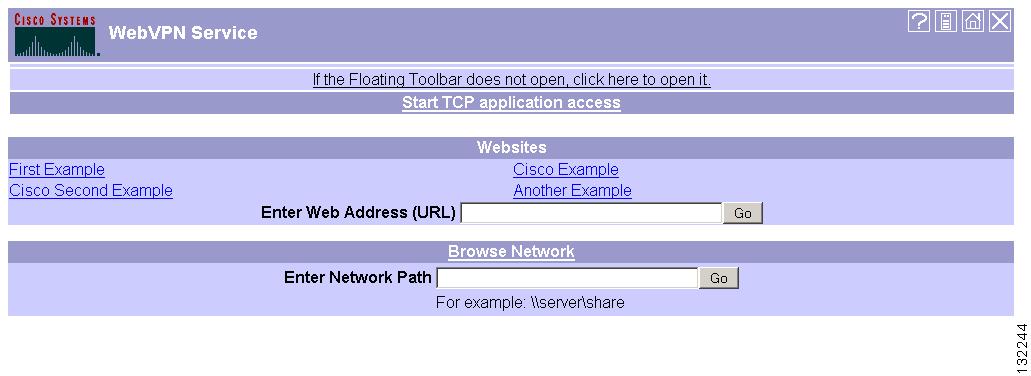
Viewing the WebVPN Home Page
After the user logs in, the WebVPN home page displays (Figure 29-1).
Figure 29-1 WebVPN Home Page
The home page displays all of the WebVPN features you have configured, and its appearance reflects the logo, text, and colors you have selected. This sample home page includes all available WebVPN features with the exception of identifying specific file shares. It lets users browse the network, enter URLs, access specific websites, and use port forwarding to access TCP applications.
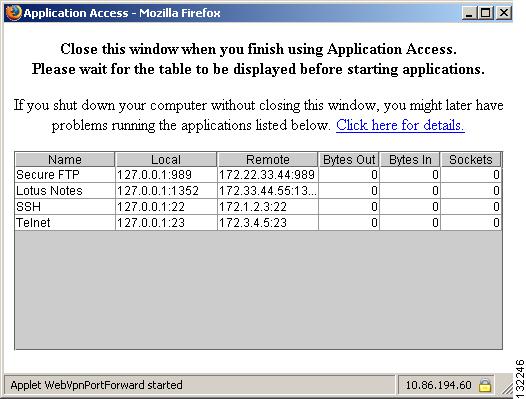
Viewing the WebVPN Application Access Panel
To start port forwarding, also called application access, a user clicks the "Start TCP application access" link. The Application Access Panel opens (Figure 29-2).
Figure 29-2 WebVPN Application Access Panel
This panel displays the TCP applications configured for this WebVPN connection. To use an application, with this panel open, the user starts the application in the normal way.
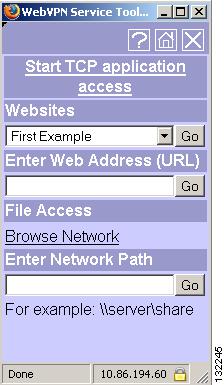
Viewing the Floating Toolbar
WebVPN also includes a floating toolbar (Figure 29-3).
Figure 29-3 WebVPN Floating Toolbar
Be aware of the following characteristics of the floating toolbar:
•
•
•
See Table 29-6 for detailed information about using WebVPN.
Requiring Usernames and Passwords
Depending on your network, during a remote session users might have to log in to any or all of the following: the computer itself, an Internet servicde provider, WebVPN, mail or file servers, or corporate applications. Users might have to authenticate in many different contexts, requiring different information, such as a unique username, password, or pincode.
Table 29-5 lists the type of usernames and passwords that WebVPN users might need to know.
Communicating Security Tips
Advise users always to log out from the WebVPN session. (To log out of WebVPN, click the logout icon on the WebVPN toolbar or close the browser.)
Advise users that using WebVPN does not ensure that communication with every site is secure. WebVPN ensures the security of data transmission between the remote PC or workstation and the security appliance on the corporate network. If the user then accesses a non-HTTPS web resource (located on the Internet or on the internal network), the communication from the corporate security appliance to the destination web server is not secure.
Configuring Remote Systems to Use WebVPN Features
Table 29-6 includes information about setting up remote systems to use WebVPN. It includes the following tasks:
•
•
•
•
•
•
•
•
Table 29-6 also provides information about the following:
•
•
•
•
•
It is possible you have configured user accounts differently and that different WebVPN features are available to each user. We have organized the information in Table 29-6 by feature, so you can skip over the information for unavailable features.
Table 29-6 WebVPN Remote System Configuration and End User Requirements
Starting WebVPN
A connection to the Internet
Any Internet connection is supported, including:
•
•
•
•
•
A WebVPN-supported browser
We recommend the following browsers for WebVPN. Other browsers might not fully support WebVPN features.
On Microsoft Windows:
•
•
•
•
On Linux:
•
•
•
On Solaris:
•
On Macintosh OS X:
•
•
Cookies enabled on browser
Cookies must be enabled on the browser in order to access applications via port forwarding.
The URL for WebVPN
An https address in the following form:
https://address
where address is the IP address or DNS hostname of an interface of the security appliance (or load balancing cluster) on which WebVPN is enabled. For example: https://10.89.192.163 or https://cisco.example.com.
A WebVPN username and password
[Optional] A local printer
WebVPN does not support printing from a web browser to a network printer. Printing to a local printer is supported.
Using the WebVPN Floating Toolbar
A floating toolbar is available to simplify the use of WebVPN. The toolbar lets you enter URLs, browse file locations, and choose preconfigured web connections without interfering with the main browser window.
If you configure your browser to block popups, the floating toolbar cannot display.
The floating toolbar represents the current WebVPN session. If you click the Close button, the security appliance prompts you to confirm that you want to close the WebVPN session.
Tip
Web Browsing
Usernames and passwords for protected websites
Using WebVPN does not ensure that communication with every site is secure. See the Communicating Security Tips section.
The look and feel of web browsing with WebVPN might be different from what users are accustomed to. For example, when using WebVPN:
•
•
–
–
–
Also, depending on how you configured a particular account, it might be that:
•
•
Network Browsing and File Management
File permissions configured for shared remote access
Only shared folders and files are accessible via WebVPN.
Server name and passwords for protected file servers
Domain, workgroup, and server names where folders and files reside
Users might not be familiar with how to locate their files through your organization network.
Patience
Do not interrupt the Copy File to Server command or navigate to a different screen while the copying is in progress. Interrupting the operation can cause an incomplete file to be saved on the server.
Using Applications
(called Port Forwarding or Application Access)
Note
Note
Caution
Client applications installed
Cookies enabled on browser
Administrator privileges
User must be local administrator on the PC if you use DNS names to specify servers. This is because modifying the hosts file requires administrator privileges.
Sun Microsystems Java Runtime Environment (JRE) version 1.4.x and 1.5.x installed.
Javascript must be enabled on the browser. By default, it is enabled.
If JRE is not installed, a pop-up window displays, directing users to a site where it is available.
On rare occasions, the WebVPN port forwarding applet fails with JAVA exception errors. If this happens, do the following:
1.
2.
3.
Client applications configured, if necessary.
Note
All non-Windows client applications require configuration.
To see if configuration is necessary for a Windows application, check the value of the Remote Server.
•
•
To configure the client application, use the server's locally mapped IP address and port number. To find this information:
1.
2.
3.
Note
Using Email
via Application AccessFulfill requirements for Application Access (See Using Applications)
To use mail, start Application Access from the WebVPN home page. The mail client is then available for use.
Note
Other mail clients
We have tested Microsoft Outlook Express versions 5.5 and 6.0.
WebVPN should support other SMTPS, POP3S, or IMAP4S email programs via port forwarding, such as Netscape Mail, Lotus Notes, and Eudora, but we have not verified them.
Using Email via
Web AccessWeb-based email product installed
Supported:
•
For best results, use OWA on Internet Explorer 6.x or higher, Mozilla 1.7, or Firefox 1.x.•
Other web-based email products should also work, but we have not verified them.
Using Email via
Email ProxySSL-enabled mail application installed
Do not set the security appliance SSL version to TLSv1 Only. Outlook and Outlook Express do not support TLS.
Supported mail applications:
•
•
•
•
Other SSL-enabled mail clients should also work, but we have not verified them.
Mail application configured
See instructions and examples for your mail application in the "Configuring Email" section.
Recovering from hosts File Errors in Application Access
It is very important to close the Application Access window properly. When you finish using Application Access, click the close icon. If you do not close the window properly:
•
Backup HOSTS File Founderror message.•
These errors can result from terminating the Application Access window in any improper way. For example:
•
•
•
This section includes the following topics:
•
Understanding the hosts File
The hosts file on your local system maps IP addresses to host names. When you start Application Access, WebVPN modifies the hosts
file, adding WebVPN-specific entries. Stopping Application Access by properly closing the Application Access window returns the file to its original state.
Note
Stopping Application Access Improperly
Once Application Access terminates abnormally, the
hostsfile is left in a WebVPN-customized state. WebVPN checks for this possibility the next time you start Application Access by searching for a hosts.webvpn file. If it finds one, you receive aBackup HOSTS File Founderror message(see Figure 29-4), and Application Access is temporarily disabled.Once you shut down Application Access improperly, you leave your remote access client/server applications in limbo. If you try to start these applications without using WebVPN, they might malfunction. You might find that hosts that you normally connect to are unavailable. This situation could commonly occur if you run applications remotely from home, fail to quit the Application Access window before shutting down the computer, then try to run the applications later from the office.
Reconfiguring hosts Files
To reenable Application Access or malfunctioning applications:
•
•
Reconfiguring hosts File Automatically Using WebVPN
If you are able to connect to your remote access server, follow these steps to reconfigure the hosts file and reenable both Application Access and the applications.
Step 1
Step 2
Backup HOSTS File Foundmessage displays. (See Figure 29-4.)Figure 29-4 Backup HOSTS File Found Message
Step 3
•
hostsfile, restoring it to its original state, then deletes hosts.webvpn. You then have to restart Application Access.•
•
hostsfile settings are lost. Then Application Access starts, using the WebVPN-customized hosts file as the new original. Choose this option only if you are unconcerned about losing hosts file settings. If you or a program you use might have edited the hosts file after Application Access has shut down improperly, choose one of the other options, or edit the hosts file manually. (See the "Reconfiguring hosts File Manually" section.)
Reconfiguring hosts File Manually
If you are not able to connect to your remote access server from your current location, or if you have customized the hosts file and do not want to lose your edits, follow these steps to reconfigure the hosts file and reenable both Application Access and the applications.
Step 1
Step 2
# added by WebVpnPortForwardIf any lines contain this string, your hosts file is WebVPN-customized. If your hosts file is WebVPN-customized, it looks similar to the following example:123.0.0.3 server1 # added by WebVpnPortForward123.0.0.3 server1.example.com vpn3000.com # added by WebVpnPortForward123.0.0.4 server2 # added by WebVpnPortForward123.0.0.4 server2.example.com.vpn3000.com # added by WebVpnPortForward123.0.0.5 server3 # added by WebVpnPortForward123.0.0.5 server3.example.com vpn3000.com # added by WebVpnPortForward# Copyright (c) 1993-1999 Microsoft Corp.## This is a sample HOSTS file used by Microsoft TCP/IP for Windows.## This file contains the mappings of IP addresses to host names. Each# entry should be kept on an individual line. The IP address should# be placed in the first column followed by the corresponding host name.# The IP address and the host name should be separated by at least one# space.## Additionally, comments (such as these) may be inserted on individual# lines or following the machine name denoted by a '#' symbol.## For example:## 102.54.94.97 cisco.example.com # source server# 38.25.63.10 x.example.com # x client host123.0.0.1 localhostStep 3
# added by WebVpnPortForwardStep 4
Step 5
Step 6
Capturing WebVPN Data
WebVPN capture lets you log information about websites that do not display properly over a WebVPN connection. The data recorded can help your Cisco customer support engineer troubleshoot problems.
Note
WebVPN Capture Files
When you enable WebVPN capture using the capture command, the security appliance stores the data from the first URL visited in the following files:
•
•
For each subsequent capture, the security appliance generates additional pairs of matching capture name_ORIGINAL.<nnn> and capture name_MANGLED.<nnn> files and increments the file extensions. In the following example, the capture name sales was assigned to the capture, and the output of the dir command displays three sets of files from three URL captures:
hostname# dirDirectory of disk0:/2952 -rw- 10931 10:38:32 Jan 19 2005 config6 -rw- 5124096 19:43:32 Jan 01 2003 cdisk.bin3397 -rw- 5157 08:30:56 Feb 14 2005 sales_ORIGINAL.0003398 -rw- 6396 08:30:56 Feb 14 2005 sales_MANGLED.0003399 -rw- 4928 08:32:51 Feb 14 2005 sales_ORIGINAL.0013400 -rw- 6167 08:32:51 Feb 14 2005 sales_MANGLED.0013401 -rw- 5264 08:35:23 Feb 14 2005 sales_ORIGINAL.0023402 -rw- 6503 08:35:23 Feb 14 2005 sales_MANGLED.002hostname#Activating the WebVPN Capture Tool
Note
icon appears in the WebVPN window.
To activate WebVPN capture, use the capture command from privileged EXEC mode.
capture capture-name type webvpn user webvpn-user [url url]
no capture capture-name
where:
•
•
•
–
–
If no URL is specified, all traffic is logged.
The following example creates a capture designated hr, which is configured to capture HTTP traffic for user2 visiting website wwwin.abcd.com/hr/people:
hostname# capture hr type webvpn user user2 url http://wwwin.abcd.com/hr/peopleWebVPN capture started.capture name hruser name user2url /http/0/wwwin.abcd.com/hr/peoplehostname#Locating and Uploading the WebVPN Capture Tool Output Files
To locate the WebVPN capture tool output files, use the dir command. The following example shows the output of the dir command including the ORIGINAL.000 and MANGLED.000 files that were generated:
hostname# dirDirectory of disk0:/2952 -rw- 10931 10:38:32 Jan 19 2005 config6 -rw- 5124096 19:43:32 Jan 01 2003 cdisk.bin3397 -rw- 5157 08:30:56 Feb 14 2005 hr_ORIGINAL.0003398 -rw- 6396 08:30:56 Feb 14 2005 hr_MANGLED.000hostname#You can upload the WebVPN capture tool output files to another computer using the copy flash command. In the following example, the copy flash command is used to upload the hr_ORIGINAL.000 and hr_MANGLED.000 files via tftp:
hostname# copy flash:/hr_original.000 tftp://10.86.194.191/hr_original.000Source filename [hr_original.000]?Address or name of remote host [10.86.194.191]?Destination filename [hr_original.000]?!!!!!!21601 bytes copied in 0.370 secshostname# copy flash:/hr_mangled.000 tftp://10.86.194.191/hr_mangled.000Source filename [hr_mangled.000]?Address or name of remote host [10.86.194.191]?Destination filename [hr_mangled.000]?!!!!!!23526 bytes copied in 0.380 secshostname#
Note