-
Prime Central for Hosted Collaboration Solution 9.2.1 User Guide
-
Preface
-
Chapter 1: Introduction
-
Chapter 2: Working with Prime Central for HCS Portal
-
Chapter 3: Managing Users and Configuring Role-Based Access Control
-
Chapter 4: Understanding the Relationship with Domain Managers
-
Chapter 5: Understanding Events
-
Chapter 6: Troubleshooting Faults Using the Alarm Browser
-
Chapter 7: Understanding Services
-
Appendix A: Understanding Common Service Faults
-
Glossary
-
Index
-
 Feedback
Table Of Contents
Working with Prime Central for HCS Portal
Configuring Your IE Setting for Prime Central for HCS
Configuring IE for Launching Prime Central for HCS
Configuring Mozilla for Prime Central for HCS
Logging Into the Prime Central for HCS Portal
Understanding the Menu Structure
Customizing the Prime Central for HCS Portal
Maximizing or Minimizing a Portlet
Viewing the Prime Central for HCS Version
Logging Out of the Prime Central for HCS Portal
Working with Prime Central for HCS Portal
This chapter outlines the basic activities that you perform on your Prime Central for HCS dashboard. This chapter lists the following sections:
•
Configuring Your IE Setting for Prime Central for HCS
•
•
•
•
•
Configuring Your IE Setting for Prime Central for HCS
To configure IE to run Prime Central for HCS, follow the procedure outlined below:
Step 1
Step 2
Step 3
Step 4
Step 5
Step 6
https://service_visualizer_hostname:16311 (hostname) and https://service_visualizer_fqdn:16311 (fully qualified domain name) for the Service Visualizer.Step 7
Step 8
You can now launch Prime Central for HCS.
For more details on client requirements see "Prime Central for HCS Client Requirements" in Cisco Prime Central for Hosted Collaboration Solution 9.2.1 Installation Guide.
Configuring IE for Launching Prime Central for HCS
To configure IE before launching Prime Central for HCS for the first time, do the following:
Step 1
Step 2
Step 3
–
–
–
–
Step 4
Configuring Mozilla for Prime Central for HCS
To configure Mozilla before launching Prime Central for HCS for the first time, do the following:
Step 1
Step 2
Step 3
–
–
–
–
Step 4
Logging Into the Prime Central for HCS Portal
Prime Central for HCS features single sign-on (SSO), meaning that when you log into the Prime Central for HCS portal, you do not have to log in separately to each domain manager within your domain. Currently, SSO is supported for the Cisco Prime Unified Operations Manager and DCNM SAN domain managers.
Note
To log into the Prime Central for HCS portal:
Step 1
•
•
Note
The login screen opens.
Step 2
If you are an administrator logging in for the first time, enter the username centraladmin and the password that you configured during installation.
Step 3
Step 4
Understanding the Menu Structure
When you log into Prime Central for HCS, the menu structure that you can access depends on your user privileges and which domain managers are installed and available. The following menus are visible to users with administrator-level privileges.
Note
Table 2-1 Prime Central Menu Structure
Takes you to the Prime Central for HCS home page.
Contains the following menu options:
•
Contains the following menu options:
•
Customizing the Prime Central for HCS Portal
When you log into Prime Central for HCS, the portlets that you see on the home page depend on your user privileges and which domain managers are installed and available.
Figure 2-1 Prime Central for HCS - Home Page
The Alarm Browser - All Events portlet displays the following charts:
•
•
–
–
The following sections describe the customization options that are available from the Prime Central for HCS home page.
Adding a Portlet
In Prime Central for HCS, you can invoke most of the portlets from the options provided in the top menu bar. This section describes the steps required to add any other portlets that are not available from the top menu bar, such as the My Accounts and User Preferences portlets.
Note the following portlet management constraints:
•
•
Step 1
On all pages other than the home page, the Add Applications icon is not highlighted.
Step 2
Step 3
Step 4
Step 5
Note
Maximizing or Minimizing a Portlet
Step 1
Step 2
Step 3
Step 4
Removing a Portlet
Step 1
Step 2
Managing a Session Timeout
By default, the Prime Central for HCS session times out after 60 minutes of inactivity; you will be prompted to extend the session before your current session terminates. Click the Extend button to extend your session. If you do not extend the session, you will be logged out automatically from Prime Central for HCS and from the domain managers that you are currently logged into.
When a session times out, the login screen appears. When you log back in, you return to the page you were on before the session timed out. We recommended that you clear your browser cache and delete the cookies before logging in again.
Note
To change the session timeout value:
Step 1
Step 2
Step 3
The User Management - Configuration dialog box appears.
Step 4
Step 5
Filtering and Searching
Using the filtering and searching option, you can quickly locate the data you require. Filtering helps you to eliminate unnecessary details, while searching helps you to quickly locate data that you want to examine further. This feature can be helpful when you are working with tables that contain many entries.
Using the Quick Filter
The User Management portlet has a Show drop-down list from which you can choose the Quick Filter option to narrow the data in a table.
To use the Quick Filter, do the following:
Step 1
Step 2
The table data is displayed based on your Quick Filter search criteria.
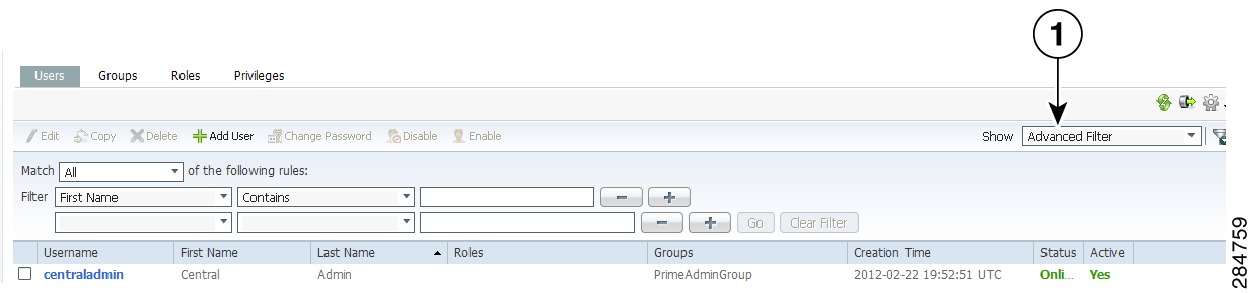
Using the Advanced Filter
The User Management portlet has a Show drop-down list from which you can choose Advanced Filter option.
Figure 2-2 Advanced Filter
To use the Advanced Filter:
Step 1
Step 2
•
•
Step 3
a.
b.
–
–
–
–
–
–
–
–
–
–
–
–
c.
–
–
Any entry that is not a regular expression is treated as a string.
Step 4
Step 5
Step 6
The table data is displayed using the defined filter.
Step 7
Note
Step 8
The table is refreshed and all entries are displayed.
Sorting
To sort data in a table, click a column heading to toggle between ascending and descending sort order. The column tooltip indicates whether the column is sortable, not sortable, or currently sorted.
Note
A triangle next to the column heading indicates the sort order:
•
indicates the column is sorted in ascending order.
•
indicates the column is sorted in descending order.
Viewing the Prime Central for HCS Version
To view the Prime Central for HCS version you are running, click the About link on the portal home page.
The About dialog box displays the Prime Central for HCS version. Use the vertical scroll bar to view the Prime Central for HCS build and patch numbers.
Logging Out of the Prime Central for HCS Portal
When you log out of Prime Central for HCS, you are logged out of Prime Central for HCS only, and not from the domain managers. You will continue to remain logged in to all domain managers to which you had established a connection. To log out:
Step 1
Step 2