-
User Guide for the Cisco Mobile Wireless Transport Manager 6.1.3
-
Preface
-
Overview
-
Configuring Security
-
Setting Up Your Server
-
Getting Started
-
Basic Operations
-
Managing Views
-
Understanding Basic Object Functions
-
Understanding Detailed Object Functions
-
Managing Alarms and Events
-
Viewing Network Topology
-
Accessing Data from the Web Interface
-
Viewing Administrative Information from the Web Interface
-
Managing Reports
-
Editing ITP Route Table File
-
Editing an ITP Global Title Translation Table
-
Editing ITP MLR Address Table Files
-
Client Object Map Reference
-
Command Reference
-
FAQs
-
Troubleshooting the MWTM and the Network
-
Status Definitions
-
MIB Reference
-
Trap Reference
-
Configuring MWTM to Run with Various Networking Options
-
MWTM Ports
-
Glossary
-
Index
-
 Feedback
Table Of Contents
Displaying Active Alarms and Event History
Right-Click Menu for All Alarms and Events
Right-Click Menu for a Specific Alarm or Event
Managing Filters for Alarms and Events
Setting Alarm or Event Filters
Alarm and Event Filter Buttons
Viewing Properties for Alarms and Events
Attaching Notes to Alarms or Events
Viewing Archived Event Files on the Web
Changing the Way the MWTM Processes Events
Specifying SNMP Servers for Trap Forwarding
Configuring Trap, Status Alarm, or User Action Events
Forwarding Events as Traps to Other Hosts
Setting Sounds for Events at an MWTM Client
Creating New Event Sound Filters
Adding Sound Files to the MWTM
Changing an Existing Event Sound Filter
Playing and Muting Event Sounds
Managing Alarms and Events
You can use the Cisco Mobile Wireless Transport Manager (MWTM) to view information about alarms and events, including their associated network objects and related information.
This chapter contains:
•
Displaying Active Alarms and Event History
•
•
•
•
•
•
•
Basic Concepts and Terms
This section contains these topics:
Event Definition
Events are created when the status of a device changes and when a user performs certain actions. MWTM detects device status changes by receiving notifications from devices and by periodically polling the devices. Examples of events include:
•
•
•
The MWTM writes events to the MWTM database once, and they never change. By definition, an event is a historical instance in time, and the MWTM does not modify any information about the event. It is important to understand that an event, once it occurs, does not change its status even when the conditions that triggered the event are no longer present.
To view a list of recent events, click Event History in the navigation tree of the client or web interface. To view archived events, click Archived in the web interface toolbar.
Alarm Definition
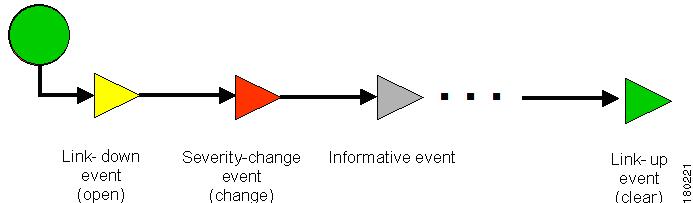
An alarm is a sequence of events, each representing a specific occurrence in the alarm lifecycle.
An alarm represents a series of correlated events that describe a fault occurring in the network or management system. An alarm describes the complete fault life cycle, from the time that the alarm is raised (when the fault is first detected) until the alarm is cleared. Examples of alarms include:
•
•
•
Figure 9-1 shows an example of a sequence of correlated events that describe the lifecycle of one alarm.
Figure 9-1 Example of Alarm
The MWTM constructs alarms from a sequence of correlated events. A complete event sequence for an alarm includes a minimum of two events:
•
•
The lifecycle of an alarm can include any number of correlated events that are triggered by changes in severity, updates to services, and so on. When a new related event occurs, the MWTM correlates it to the alarm and updates the alarm severity and message text based on the new event. If you manually clear the alarm, the alarm severity changes to normal. You can still view the events that formed this alarm in the Event History table.
Tip
To view all alarms, click Active Alarms in the navigation tree. By default, the navigation tree is sorted by alarm severity, with objects having the most severe alarms appearing at the top of the tree.
Note
Displaying Active Alarms and Event History
You use the MWTM to view a network summary of active alarms and historical events. The contents of the Active Alarms window and the Event History window are very similar in appearance (the Active Alarms table shows fewer entries than the Event History table because multiple events are associated with a single alarm.)
Here are a few helpful facts about alarms and events:
•
•
•
To see a summary of all active alarms, in the MWTM client or web interface, click Active Alarms in the navigation tree. The MWTM shows the Active Alarms window in the right pane.
The Active Alarms window provides basic information about all active alarms in your network that are not excluded from your current view. The MWTM updates the information in the window at least once every minute. For more information about the Active Alarms window, see:
To see a summary of all the recent events, in the MWTM client or web interface, click Event History in the navigation tree. The MWTM shows the Event History window in the right pane.
For more information about the Event History window, see:
Note
If you select a specific object in the navigation tree and click the Alarms tab or Recent Events tab, the MWTM shows information about the alarms or events for that object only.
You can resize each column (except when using the web interface), or sort the table based on the information in one of the columns.
Note
To see detailed information about an alarm or event, in the:
•
•
in the toolbar.
Note
The table columns of the Active Alarms, Alarms tab, Event History, and Recent Events tabs include:
Internal ID
Internal ID of the alarm or event. The internal ID is a unique ID that the MWTM assigns for its own internal use. This ID can also be useful when the Cisco Technical Assistance Center (TAC) is debugging problems.
This column is hidden by default.
Ack
Indicates whether the alarm or event has been acknowledged. To:
•
•
Name
Name of the alarm or event.
Alarm Nature
Nature of the alarm.
This column is present in Active Alarms and Alarms tab.
Element Name
Network element name associated with the event.
This column is hidden by default.
Category
Type of the event. Default values include:
•
•
•
•
•
•
•
•
•
•
•
•
•
•
•
•
•
You can customize this field (see Changing Event Categories).
This column is hidden by default in the Active Alarms window and the Alarms tab.
Feature
The feature name of the event.
This column is hidden by default.
Severity
Severity of the alarm or event. Possible severities are:
Critical
Major
Minor
Warning
Normal
Indeterminate
Informational
You can customize this field (see Right-Click Menu for a Specific Alarm or Event).
To change the severity of an alarm, in the:
•
•
Note
Original Severity
Original severity of the event.
This column is hidden by default.
Count
Number of times this alarm occurred.
This column is hidden by default in the Event History window and the Events tab.
Note
Indicates whether a note is associated with the event.
This column is hidden by default.
Create Time timezone
Time at which this event was received.
This column is hidden by default in the Active Alarms window and the Alarms tab.
Create Time (Node Time Zone)
The node time zone at the event was received.
This column is hidden by default.
Change Time timezone
Time at which this event was last updated.
This column is hidden by default in the Event History window and the Events tab.
Change Time (Node Time Zone)
The node time zone at which the event was updated.
This column is hidden by default.
Ack By
If you have not implemented the MWTM User-Based Access, name of the node that last acknowledged the event.
If you have implemented the MWTM User-Based Access, name of the user who last acknowledged the event.
If no one has acknowledged the event, this field is blank.
This column is hidden by default.
Ack Time timezone
The time at which the event was acknowledged.
This column is hidden by default.
Ack Time (Node Time Zone)
The node time zone at which the event was acknowledged.
This column is hidden by default.
Clear By
The user who cleared the event.
This column is present in Active Alarms and Alarms tab and is hidden by default.
Clear Time
The time at which the event was cleared.
This column is present in Active Alarms and Alarms tab.
Clear Time (Node Time Zone)
The node time zone at which the event was cleared.
This column is present in Active Alarms and Alarms tab and is hidden by default.
Node
Name of the node associated with the alarm or event. If no node is associated with the alarm or event, None appears.
Card
(RAN-O only)Card associated with this alarm or event.
This column is hidden by default.
SP (ITP only)
Name of the signaling point associated with the alarm or event. If no signaling point is associated with the alarm or event, None appears.
This column is hidden by default.
Linkset (ITP only)
Name of the linkset associated with the alarm or event. If no linkset is associated with the alarm or event, None appears.
This column is hidden by default.
Link (ITP only)
Name of the link associated with the alarm or event. If no link is associated with the alarm or event, None appears.
This column is hidden by default.
SGMP (ITP only)
Name of the signaling gateway-mated pair associated with the alarm or event. If no signaling gateway-mated pair is associated with the alarm or event, None appears.
This column is hidden by default.
ASP (ITP only)
Name of the application server process associated with the alarm or event. If no application server process is associated with the alarm or event, None appears.
This column is hidden by default.
AS (ITP only)
Name of the application server associated with the alarm or event. If no application server is associated with the alarm or event, None appears.
This column is hidden by default.
ASPA (ITP only)
Name of the application server process association associated with the alarm or event. If no application server process association is associated with the alarm or event, None appears.
This column is hidden by default.
Interface
Interface associated with this alarm or event.
This column is hidden by default.
RAN Backhaul (RAN-O only)
RAN backhaul associated with this alarm or event.
This column is hidden by default.
Message
The message associated with the alarm or event.
Toolbar Buttons
The Active Alarms and Event History windows in the client and the web interfaces provide these toolbar buttons:
Right-click Menus
In the MWTM client interface navigation tree, to display the right-click menu for all:
•
•
In the MWTM client interface, to display the right-click menu for a specific alarm or event, right-click the alarm or event in the right pane (see Right-Click Menu for a Specific Alarm or Event).
Note
Right-Click Menu for All Alarms and Events
To see the right-click menu for all active alarms, in the MWTM client interface, select Active Alarms or Event History in the navigation tree and right-click the mouse button.
Show In New Window
Opens the Active Alarms or Event History window in a new window.
Back > List of Windows
Navigates back to a window viewed in this session.
The MWTM maintains a list of up to 10 Back windows.
Forward > List of Windows
Navigates forward to a window viewed in this session.
The MWTM maintains a list of up to 10 Forward windows.
Right-Click Menu for a Specific Alarm or Event
To see this menu, in the MWTM client interface, select an alarm or event and right-click the mouse button.
The right-click menu provides these options:
Edit Notes
Opens the Edit Alarm and Event Notes dialog for the chosen alarm or event.
Go To > Object
Shows the window for the object associated with the chosen alarm or event.
If no object is associated with the alarm or event, this option is not visible.
Change Severity
Changes the alarm severity to critical, major, minor, warning, informational, indeterminate, or normal.
Note
Acknowledge
Makes the chosen alarms or events acknowledged.
Unacknowledge
Makes the chosen alarms or events unacknowledged.
Clear
Clears the chosen alarm in the Active Alarms table. When you clear an alarm, the alarm no longer affects the severity of the object (its severity changes to normal). The alarm remains visible in the Active Alarms table for 24 hours. After 24 hours, the MWTM archives the alarm in its database.
This option is not available for events.
Note
Delete
Deletes the chosen alarm or event. When you delete an alarm or event, you remove it from the table, and the MWTM archives the alarm or event in its database. Also, the alarm or event no longer affects the severity of the object.
Clear and Delete
Clears the chosen alarm and also deletes it from the Active Alarms table. Use the Clear and Delete button if you need to designate an alarm as manually cleared before deleting it.
When you use the Clear and Delete button, the MWTM changes the alarm severity of the object to normal, sends an alarm log message to /opt/CSCOsgm/logs/messageLog.txt, and sends a trap to a northbound host to indicate that the alarm cleared.
This option is not available for events.
Note
Properties
Opens the Alarm and Event Properties dialog.
Create Sound Filter
Opens the Event Sound Filters dialog box, with fields populated based on the chosen event.
Help for Event
Shows context-sensitive help for the chosen event in a separate browser window.
Managing Filters for Alarms and Events
You can use the MWTM to create filters to customize the information visible for events and alarms.
•
Setting Alarm or Event Filters
You can use the MWTM Alarm and Event Filter dialog box to change the way alarm or event information appears.
Note
To change the way the MWTM presents event information, click Event History in the navigation tree, then click the Modify event filter tool
at the top of the Event History window. The Alarm and Event Filter dialog box appears (in the client interface, the window appears with the Properties tab chosen).
Note
For more information about the Alarm and Event Filter dialog box, see these sections:
•
Related Topics
•
Alarm and Event Filter Buttons
The Alarm and Event Filter dialog box contains:
Select All
Checks all check boxes in the section.
Deselect All
Unchecks all check boxes in the section.
OK
Applies any changes you made to the filter and closes the Alarm and Event Filter dialog box.
Load
Opens the Load File Dialog, which you use to load an already existing filter file.
If you are viewing events for a specific object in the navigation tree of the MWTM main window, this button is not available.
Save
Opens the Save File Dialog, which you use to save the filter file with a new name, or overwrite an existing filter file.
If you are viewing events for a specific object in the navigation tree of the MWTM main window, this button is not available.
Cancel
Closes the Alarm and Event Filter dialog box without applying any changes to the filter.
Help
Shows online help for the current dialog box.
Alarm and Event Filter Panes
You use the Alarm and Event Filter panes in the Alarm and Event Filter dialog box to specify the types of alarms or events the MWTM should display in the Active Alarms or Event History window, including the category, feature, and severity of the alarm or event.
The Alarm and Event Filter dialog box contains these panes:
Categories
Use the Categories pane of the Alarm and Event Filter dialog box to specify which event categories you want to display in the Active Alarms or Event History window.
The following categories are available:
•
•
•
•
•
•
•
•
•
•
•
•
•
•
•
•
•
All categories are checked by default. You can click Deselect All, or Select All.
Note
Severities
Use the Severities pane of the Alarm and Event Filter dialog box to specify which alarm/event severities you want to display in the Active Alarms or Event History window.
The Severities pane contains these default fields:
Informational
Indicates whether events of the specified severity appear in the Active Alarms/Event History window.
Check boxes are checked by default.
Normal
Indeterminate
Warning
Critical
Minor
Major
Features
Use the Features pane of the Alarm and Event Filter dialog box to specify which event features you want to display in the Active Alarms or Event History window.
The following features are available:
•
•
•
•
•
•
•
•
•
•
•
•
•
•
•
•
•
•
•
All categories are checked by default. You can click Deselect All, or Select All.
Other
Use the Other pane of the Alarm and Event Filter dialog box to further define the filter for the Active Alarms or Event History window. These settings are applied to all alarm/event displays in the current view.
Acknowledged
Check box indicating whether only acknowledged alarms/events appear in the Active Alarms/Event History window. This check box is unchecked by default.
Unacknowledged
Check box indicating whether only unacknowledged alarms/events appear in the Active Alarms/Event History window. This check box is checked by default.
Time Before
Check box indicating whether only alarms/events that the MWTM logs prior to a specified date and time appear in the Active Alarms/Event History window. This check box is unchecked by default.
Time Before
Specifies the date and time prior to which alarms/events that the MWTM logs appear in the Active Alarms/Event History window. This field is dimmed unless the Time Before check box is checked.
Time After
Check box indicating whether only alarms/events that the MWTM logs after a specified date and time appear in the Active Alarms/Event History window. This check box is unchecked by default.
Time After
Specifies the date and time after which alarms/events that the MWTM logs appear in the Active Alarms/Event History window. This field is dimmed unless the Time After check box is checked.
Message Contains
Check box indicating whether only alarms/events that contain the specified message text appear in the Active Alarms/Event History window. This check box is unchecked by default.
Match Case
Check box indicating whether only alarms/events that match the case of the text in the Message Contains field appear in the Active Alarms/Event History window. This field is dimmed unless the Message Contains check box is checked. If the Message Contains check box is checked, the default setting for this check box is unchecked.
Suppress for unmanaged nodes
Check box for suppressing alarms/events for any objects that have been set to the unmanaged state (see Unmanaging and Managing Nodes or ITP Signaling Points, page 6-46, for steps to set an object to the unmanaged state). To suppress alarms/events for unmanaged objects, check the check box. To retain alarms/events for unmanaged objects, uncheck the check box.
If you are viewing alarms/events for a specific object in the navigation tree of the MWTM main window, this button is not available.
Selected Objects Settings
Note
•
•
To specify an object for which the MWTM should display alarms or events in the Active Alarms/Event History window:
Step 1
The Active Alarms or Event History window appears in the right pane.
Step 2
The Alarm and Event Filter dialog box appears with the Properties tab chosen.
Step 3
The Alarm and Event Filter dialog box appears with the Selected Objects tab highlighted.
The Selected Objects settings contains:
Node
Drop-down list box of all nodes that the MWTM has discovered. If you:
•
•
ApplicationServerProcess (ITP only)
Drop-down list box of all application server processes associated with the chosen node:
•
•
SignalingGatewayMatedPair
(ITP only)Drop-down list box of all signaling gateway-mated pairs associated with the chosen node:
•
•
SignalingPoint (ITP only)
Drop-down list box of all signaling points associated with the chosen node:
•
•
Linkset (ITP only)
Drop-down list box of all linksets associated with the chosen signaling point:
•
•
Link (ITP only)
Drop-down list box of all links associated with the chosen linkset:
•
•
ApplicationServer (ITP only)
Drop-down list box of all application servers associated with the chosen signaling point:
•
•
ApplicationServerProcess
Association (ITP only)Drop-down list box of all application server process associations associated with the chosen application server:
•
•
Card (RAN-O only)
Drop-down list box of all cards associated with the chosen node:
•
•
Interface
Drop-down list box of all interfaces (including subinterfaces) associated with the chosen node or card:
•
•
Backhaul (RAN-O only)
Drop-down list box of all RAN backhauls associated with the chosen node or card:
•
•
Selected Objects: Object Type
Indicates the type of object, if any, on which the filter is based.
Selected Objects: AS
(ITP only)Indicates the application server, if any, on which the filter is based.
Selected Objects: ASP
(ITP only)Indicates the application server process, if any, on which the filter is based.
Selected Objects: ASPA
(ITP only)Indicates the application server process application, if any, on which the filter is based.
Selected Objects: Link
(ITP only)Indicates the link, if any, on which the filter is based.
Selected Objects: Linkset (ITP only)
Indicates the linkset, if any, on which the filter is based.
Selected Objects: Node
Indicates the node, if any, on which the filter is based.
Selected Objects: SGMP (
ITP only)Indicates the signaling gateway-mated pair, if any, on which the filter is based.
Selected Objects: SP
(ITP only)Indicates the signaling point, if any, on which the filter is based.
Selected Objects: Card (RAN-O only)
Indicates the card, if any, on which the filter is based.
Selected Objects: Interface
Indicates the interface or subinterface, if any, on which the filter is based.
Selected Objects: Backhaul (RAN-O only)
Indicates the RAN backhaul, if any, on which the filter is based.
Event Filter Example
This example shows how to set an event filter to display trap messages for warning events for a specific node. You perform this procedure by using the MWTM client interface.
Step 1
Step 2
The Event Filter dialog box appears with the Properties tab chosen.
Step 3
Step 4
Step 5
Step 6
Step 7
Step 8
a.
b.
c.
d.
In the future, to view traps for warning events for Node109, click Load in the Event Filter dialog box, choose the Node109-WarningTraps filter, then click OK. The Events window will only display warning traps for Node109 until you load a different event filter or change the current one.
Loading Existing Filters
You use the MWTM client interface to load a specific filter file and change the list of filter files.
To load an existing filter, click Load in the Alarm and Event Filter dialog box. The Load File Dialog: Load Filter dialog box appears.
The Load File Dialog: Load Filter contains:
Type
Icon indicating whether the item in the table is a file or a folder.
Name
Name of the filter file or folder.
Last Modified
Date and time the filter file or folder was last modified.
Size (bytes)
Size of the filter file or folder, in bytes.
Number of Files
(appears in lower left corner)Total number of filter files and folders.
OK
Loads the chosen filter, saves any changes you made to the list of files, and closes the dialog box.
To load an filter file, double-click it in the list, select it in the list and click OK, or enter the name of the file and click OK. The MWTM loads the filter file, saves any changes you made to the list of files, closes the Load File Dialog: Load Filter dialog box, and returns to the Alarm and Event Filter dialog box.
Delete
Deletes the chosen file from the filter file list. The MWTM issues an informational message containing the name and location of the deleted file.
Cancel
Closes the dialog box without loading an filter file or saving any changes to the filter file list.
Help
Shows online help for the dialog box.
Saving Filter Files
You use the MWTM client interface to save a specific filter file and change the list of filter files.
When you are satisfied with the filter settings, click Save in the Alarm and Event Filter dialog box. The Save File Dialog:Save Filter dialog box appears.
The Save File Dialog: Save Filter contains:
Type
Icon indicating whether the item in the table is a file or a folder.
Name
Name of the filter file or folder.
Last Modified
Date and time the filter file or folder was last modified.
Size (bytes)
Size of the filter file or folder, in bytes.
Filename
Name by which you want to save the filter file.
If you create a new filter filename, you can use any letters, numbers, or characters in the name that are allowed by your operating system. However, if you include any spaces in the new name, the MWTM converts those spaces to dashes. For example, the MWTM saves file a b c as a-b-c.
Number of Files
(visible in bottom left corner)Total number of filter files and folders.
OK
Saves any changes you made to the current filter file and closes the dialog box.
To save the filter file with a new name, use one of these procedures. To save the file with:
•
•
The MWTM saves the filter file with the new name, saves any changes you made to the list of files, closes the Save File Dialog: Save Filter dialog box, and returns to the Alarm and Event Filter dialog box.
Delete
Deletes the chosen file from the filter file list. The MWTM issues an informational message containing the name and location of the deleted file.
Cancel
Closes the dialog box without saving the filter file or saving any changes to the filter file list.
Help
Shows online help for the dialog box.
Viewing Properties for Alarms and Events
You use the MWTM to view detailed information about a chosen alarm or event, including its associated object, status, and other information.
To view detailed information about an alarm or event, in the:
•
•
The Event Properties dialog box appears. The Event Properties dialog box contains:
Message
Message text for the alarm or event.
You can customize this field (see Changing the Way the MWTM Processes Events).
Properties
Tab that shows detailed information about the chosen alarm or event.
Notes
Tab that shows notes associated with this alarm or event. If no note is currently associated with this alarm or event, this field shows the value No Notes.
In the Notes tab, the date and time the Notes field for this alarm or event was last updated. If no note is currently associated with this alarm or event, this field shows the value Not Set.
Details
Tab that shows specific alarm or event attributes.
Events for Alarm
Tab that shows a table of events that are associated with the selected alarm.
This tab does not appear in the Event Properties dialog box selected via Event History link.
Category
Type of the alarm or event. Default values are:
•
•
•
•
•
•
•
•
•
•
•
•
•
•
You can customize this field (see Changing Event Categories).
Severity
Severity of the alarm or event. Possible severities are:
You can customize this field (see Right-Click Menu for a Specific Alarm or Event).
Original Severity
Original severity of the alarm or event.
Create Time
Date and time the event was logged.
Change Time
Date and time the alarm last changed.
Note
Acknowledged
Indicates whether the alarm or event has been acknowledged.
Acknowledged By
Name of the node that last acknowledged the alarm or event. If no one has acknowledged the alarm or event, this field is not shown.
Acknowledge Time
The time at which the event was acknowledged.
Cleared By User ID
The user who cleared the event.
Cleared Time
The time at which the event was cleared.
Internal ID
An internal identification that the MWTM uses for the alarm or event.
Name
The name for the alarm or event, for example, InterfaceState.
Alarm Nature
Nature of the alarm.
Count
Number of times this alarm occurred.
Note
Element Name
Name of the managed element, for example, the node name.
object name
Name of the object associated with the alarm or event. The object can be:
•
•
•
•
Node
Name of the node associated with the alarm or event.
Create Time (Node Time Zone)
The node time zone at which the event was received.
Change Time (Node Time Zone)
The node time zone at which the event was updated.
Acknowledge Time (Node Time Zone)
The node time zone at which the event was acknowledged.
Clear Time (Node Time Zone)
The node time zone at which the event was cleared.
Attaching Notes to Alarms or Events
You use the MWTM to annotate an alarm or event, attaching a descriptive string to it.
To annotate an alarm or event in the:
•
•
. The Event Properties dialog box appears, with the Notes tab chosen.
Note
The Edit Event Dialog contains:
Name
Message text of the alarm or event.
Last Update
Date and time the Notes field for this alarm or event was last updated. If no note is currently associated with this alarm or event, this field shows the value Not Set.
You cannot edit this field.
Notes
Notes to associate with this alarm or event. In this field, you can enter any important information about the alarm or event, such as its associated object, what triggered the alarm or event, how often it has occurred, and so on.
Edit
Enables you to edit or add a note.
Save
Saves changes you have made to the alarm or event information.
Cancel
Cancels the operation without saving any changes.
Help
Shows online help for the current window.
Related Topic
Viewing Properties for Alarms and Events
Viewing Archived Event Files on the Web
The All Network Event Archived Files page provides access to archived alarm and event files for the server to which you are connected.
To access archived event files:
Step 1
Step 2
In the Last Modified Date column, choose the day you want to view archived event files for.
Step 3
Changing the Way the MWTM Processes Events
The types of MWTM events are:
•
•
•
In those broad types, there occur subordinate types of events, each with a default category, severity, color, message text, and event help file. You use the MWTM to change the default characteristics of each type of event, tailoring them to meet your needs.
Note
To change the MWTM event processing, use one of these procedures:
•
•
•
The MWTM launches the MWTM Event Editor in the client interface. The Event Editor is not available in the web interface.
Note
You use the Event Editor to customize the visible category, severity, color, and message associated with events; and load, save, and deploy customized event configurations. You can also specify a list of SNMP servers to which the MWTM should forward events in the form of traps.
The high-level MWTM event processing settings appear in the navigation tree in the left pane in the MWTM Event Editor window. The detailed settings for each high-level setting appear in the content area in the right pane.
The MWTM Event Editor menu provides these options:
File > Load Draft
Loads the local copy of the event configuration that you saved.
File > Save Draft
(Ctrl-S)Saves a local copy of the event configuration, including any changes you made by using the Event Editor. You can save only one local copy of the event configuration. You cannot specify a filename for the local copy.
File > Load Default
Loads the default event configuration on this MWTM client.
The default event configuration is the standard event configuration that the MWTM uses when it is first installed. The default event configuration stored on the MWTM server and shared by all MWTM clients, but the clients cannot modify it.
File > Load Running
Loads the event configuration that is currently running on the MWTM server.
File > Load Backup
Loads the backup event configuration from the MWTM server.
The MWTM creates a backup event configuration every time the event configuration on the MWTM server is overwritten.
File > Revert
Reverts to the last event configuration that was loaded on the MWTM client. This could be the draft, default, running, or backup event configuration.
File > Deploy
Deploys the event configuration that is currently being edited on this MWTM client to the MWTM server.
The deployed event configuration does not take effect until you restart the MWTM server. When you restart the MWTM server, the MWTM automatically reflects your changes to the event configuration on the MWTM server and on all MWTM clients that connect to that server, and reflects any new or changed categories, severities, and other event characteristics in its web navigation bars.
File > Exit
Closes the Event Editor window. If you have made any changes to the event configuration, the MWTM asks if you want to save the changes before leaving the window. Click:
•
•
The deployed event configuration does not take effect until you restart the MWTM server. When you restart the MWTM server, the MWTM automatically reflects your changes to the event configuration on the MWTM server and on all MWTM clients that connect to that server, and reflects any new or changed categories, severities, and other event characteristics in its web display navigation bars.
•
Help > Topics
(F1)Shows the table of contents for the MWTM online help.
Help > Window
(Shift-F1)Shows online help for the current window.
Help > About
(F3)Shows build date, version, SSL support, and copyright information about the MWTM application.
This section provides this information:
•
•
Changing Event Limits
To change limits for the MWTM event database, click the turner
beside Event Configuration, then click Limits. The Limits Configuration window appears in the right pane.
MaxEventDbRecords
Sets the maximum number of events allowed in the in-memory or active database. You can observe these events in the client NBAPI. The MWTM archives deleted events.
By default, the active database can hold a maximum of 10,000 events. If the database exceeds 10,000 events, the MWTM archives the oldest events until the database is reduced to 10,000 events.
To change the size of the active database, enter the new size, in number of events, in this field. The valid range is 0 events (that is, no limit) to an unlimited number of events. The default setting is 10,000 events.
Note
MaxAlarmDbRecords
Sets the maximum number of alarms allowed in the in-memory or active database. You can observe these alarms in the client NBAPI. The MWTM archives deleted alarms.
By default, the active database can hold a maximum of 10,000 alarms. If the database exceeds 10,000 alarms, the MWTM archives the oldest alarms until the database is reduced to 10,000 alarms.
To change the size of the active database, enter the new size, in number of alarms, in this field. The valid range is 0 alarms (that is, no limit) to an unlimited number of alarms. The default setting is 10,000 alarms.
Note
MaxEventTimeToLive
Sets the maximum length of time, in days, the MWTM should retain events in the in-memory or active database.You can observe these events in the client NBAPI. The MWTM archives deleted events.
By default, the active database retains events a maximum of 7 days. The MWTM archives events that are older than 7 days.
To change the maximum age for events, enter the new age, in days, in this field. The valid range is 0 days (events are purged at each maintenance interval) to an unlimited number of days. The default setting is 7 days.
CompressEventDbInterval
Sets the length of time, in minutes, between maintenance checks of the in-memory or active database. The MWTM archives these events and alarms when this task runs. Also, the oldest archived events and alarms may be deleted from the database.
By default, the MWTM performs maintenance on the active database every 15 minutes, archiving all events and alarms in excess of 10,000, all events older than 7 days, and all alarms older than 14 days.
To change the maintenance interval, enter the new interval, in minutes, in this field. The valid range is 0 minutes (perform continual maintenance; not advised) to an unlimited number of minutes. The default setting is 60 minutes.
Note
AutomationTimeout
Sets the maximum length of time, in seconds, the MWTM should allow an event automation script to run.
By default, the MWTM event database allows an event automation script to run for 300 seconds (5 minutes) before canceling the script and moving on.
To change the event automation timeout interval, enter the new interval, in seconds, in this field. The valid range is 0 seconds (no automation) to an unlimited number of seconds. The default setting is 300 seconds.
Note
ProcessUndiscovered
Determines whether the MWTM should process events from undiscovered nodes:
•
•
Send Updates
Determines whether the MWTM should send traps northbound:
•
•
ProcessUnrecognizedTraps
Determines whether the MWTM should create events for unrecognized traps:
•
•
TrapGenThrottle
A delay (in milliseconds) between each trap sent to a northbound host. This value is helpful if the MWTM is sending traps faster than the northbound host can receive them. The default is 10 milliseconds.
HeartbeatTrapInterval
A delay (in seconds) between each heartbeat trap sent to a northbound host. If this value is zero or less than one, no heartbeat trap is sent. The default is 0.
ArchiveAge
The maximum age, in days, of all archived events and alarms in the database. The default is 31 days.
MaxAlarmAge
The maximum age, in days, of all active alarms in the database. The default is 14 days.
CloneAlarms
Caution
Determines whether the MWTM should create separate alarm instances from underlying events:
•
•
AllowEventDeduplication
Caution
Determines whether the MWTM should eliminate redundant (duplicate) events if a correlation key has been specified and enabled:
•
•
AllowStateAggregation
Caution
Determines whether the MWTM should allow alarms to change the state of the node:
•
•
ClearedAlarmsTimetoLive
The time, in minutes, before the MWTM archives cleared alarms. The default setting is 1440 minutes (24 hours).
SendEvents
Determines whether the MWTM should send events to a northbound system:
•
•
SendAlarms
Determines whether the MWTM should send alarms to a northbound system:
•
•
UseAlternateTrapOids
When set to true, allows user-specified trap OIDs (SNMPv1 trap enterprise/specific type or SNMPv2 snmpTrapOID)
ClearAlarmsOnUpdate
When set to true, automatically clears outstanding alarms when a new event in the alarm sequence occurs.
DeleteAlarmsOnUpdate
When set to true, automatically deletes outstanding alarms when a new event in the alarm sequence occurs.
SendAlarmSetsAndClears
When set to true, sends a northbound notification only when an alarm is raised and when it is cleared.
ArchiveActiveAlarms
Determines whether the MWTM should archive alarms.
•
•
•
FilterIgnoredNEs
Determines whether the MWTM should propagate alarms to a northbound system:
•
•
ThrottleAlarmCountThreshold
Threshold count for Alarms. If the trap count exceeds the threshold, the traps need to be forwarded to NorthBound.
ThrottleAlarmTimeThreshold
Threshold time for Alarms. If X traps are received within configured time, traps need to be forwarded to NorthBound, where X is ThrottleAlarmCountThreshold.
NodeDisplayName
The name from the Node object to be assigned to the NodeDisplayName variable for inclusion in event messages.
The values are:
•
•
•
Specifying SNMP Servers for Trap Forwarding
You use the MWTM to specify a list of SNMP servers, or hosts, to which the MWTM should forward events in the form of traps.
For more information about enabling MWTM trap forwarding, see Forwarding Events as Traps to Other Hosts.
To specify the list of hosts, click the turner
Host
Name of the host NMS that should receive traps from the MWTM. The host must be IP-routable, and the name must be a valid IP address or DNS name.
Port
Host port number to which the MWTM should forward traps.
Community
SNMP community string that the MWTM should include in forwarded traps.
Version
Trap version to forward. Valid values are 1 and 2c.
Trap Type
Type of trap that the MWTM should forward to this host. Valid trap types are:
•
•
Add
Adds a new hostname to the bottom of the list. Type over the default values with the new values.
Delete
Deletes the chosen hostname from the list.
Send a trap for all events
Checks the Send Traps check box for all MWTM events. Click this button if you want the MWTM to forward all events to the list of hosts.
If you click this radio button, and then you uncheck even a single Send Traps check box for any event, the MWTM unchecks this button.
This radio button is mutually exclusive with the Send a trap for no events button.
Send a trap for no events
Unchecks the Send Traps check box for all MWTM events. Click this button if you do not want the MWTM to forward any events to the list of hosts. This is the default setting.
If you click this radio button, and then you check even a single Send Traps check box for any event, the MWTM unchecks this button.
This radio button is mutually exclusive with the Send a trap for all events button.
Changing Event Categories
To change categories for the MWTM event database, click the turner
Category Name
Lists the names of the currently defined MWTM event categories.
By default, the MWTM provides these event categories:
•
•
•
•
•
•
•
•
•
•
•
•
•
•
To change the name of an existing event category, highlight the category name and type over it with the new name. For example, you could replace every occurrence of LoginFail with BadLogin.
Add
Adds a new category name to the bottom of the list. Type over the default category name with the new name.
Delete
Deletes the chosen category name from the list.
If events in the MWTM database use the deleted category name, the Entry Substitution dialog box appears. Use this dialog box to select a new category name in place of the deleted category name. Select an existing category name from the drop-down list box, or enter a new category name. If you enter a new category name, the MWTM adds it to the Category Name field.
Configuring Trap, Status Alarm, or User Action Events
The MWTM can detect these event types:
•
•
•
You can choose to view all traps, all status alarms, and all user actions, or you can view these based on network type (RAN-O, ITP, and so on.)
To configure the event parameters for any of these event types:
Step 1
Step 2
Step 3
•
•
•
•
•
•
•
•
•
•
•
•
•
•
•
The MWTM lists the currently defined traps, status alarms, or user actions in the navigation tree under the event type.
Step 4
The MWTM lists the currently defined events in the navigation tree under the chosen event type.
Step 5
The MWTM adds the chosen event to the list of configured events and creates a default entry for the event in the left pane.
Step 6
The Event Configuration pane appears in the right pane.
Step 7
Step 8
The Event Configuration pane contains:
Name
Fixed, internal name of the event, such as cItpRouteStateChange. You cannot change this field.
Event Keys and Setting
Caution
Names of the event keys, such as RouteDestinationState, and their settings, such as False.
You cannot change the names of the event keys, but you can change their settings. To change an event key setting, select a new setting from the drop-down list box. For example, you can change the setting for RouteDestinationState from Accessible to Unknown.
Category
Category of the event (for example, from Trap to Status).
To change the category, select a new category from the drop-down list box.
Severity
Severity of the event (for example, from Warning to Minor).
To change the severity, select a new severity from the drop-down list box.
Event Name
User-specified name for the event, that the MWTM uses for trap forwarding, also used in the MWTM client.
If you want the MWTM to forward this event in the form of a trap to another host, you can specify a new, more meaningful name for the event. The new name can be from 1 to 30 characters, and can contain any letters (upper- or lowercase), any numbers, and any special characters. If you do not specify a new name, the MWTM uses the default name, MWTM.
For more information about trap forwarding, see Forwarding Events as Traps to Other Hosts.
Message
Message text associated with the event.
To change the message text, type over the message text. You can also right-click in the field and choose Launch Text Editor, where you can update, clear, or discard your text changes.
You can also insert variable text in the message. To do so, right-click in the message text area. A popup menu of the valid substitutions for this event appears. To insert a variable in the text area, select from the popup menu.
Help File
Help file associated with the event.
By default, the MWTM provides extensive type-specific help for events. However, you can use the MWTM to provide your own enterprise-specific instructions to operators in the help file.
To change the help file, create a new HTML help file or change the default MWTM help file. If you installed the MWTM in:
•
•
If you use an MWTM help file as a basis for your help file, rename it when you save it; do not use the existing MWTM name. If you do, the next time you install the MWTM, the MWTM overwrites the file and you lose your changes.
When you have created your new help files, store them in the /opt/CSCOsgm/apache/share/htdocs/customHelp directory. This directory and its contents are preserved when you upgrade to a new MWTM release. If you do not store your new help files in the /customHelp directory, the files are lost the next time you upgrade to a new MWTM release.
When you have created your new help files and stored them in the /customHelp directory, enter the new help file path and filename in the Help File field.
After you deploy the new event settings and restart the MWTM server, whenever you display help for the trap, the MWTM shows your new, custom help file.
Open
Opens the help file associated with the event.
To see the help file, click Open. The MWTM shows context-sensitive help for the chosen event in a separate web browser.
Action: Run
Automation command or script for the event that a UNIX process runs.
You use the MWTM to automate events. That is, you can configure the MWTM to call a UNIX script to drive automatic paging or e-mail, for example, whenever the MWTM logs an event for which you have defined an automation script.
To configure automation for an event, enter a Run line with this format:
UNIXCommand EventParameters
where:
•
•
Action: Run (continued)
For example, this Run line:
/users/johndoe/auto-inhibit.exp $NodeDisplayName $Usercauses these automatic actions whenever the MWTM logs the associated event:
•
•
After you deploy the new event settings and restart the MWTM server, the specified event causes the automation script to run.
When configuring automation for events, remember:
•
•
•
•
You can right-click in the field and choose Launch Text Editor, where you can update, clear, or discard your text changes.
Action: Poll (available only for Trap events)
Check box indicating whether MWTM should poll the associated nodes. If you:
•
•
Action: Send Trap
Check box indicating whether the MWTM should forward the event as a trap to other systems. If you:
•
•
Raise Alarm
Caution
If the Raise Alarm check box is checked, then, when this event happens, the MWTM raises an alarm that appears in the Active Alarms table.
Correlate
Caution
When you check this check box, you can then define a key in the Key field.
Key
Caution
You can define a key to correlate appropriate events. The EPM notification includes this key for use by the north-bound system. Right-click in the text field to select a key. You can also right-click in the field and choose Launch Text Editor, where you can update, clear, or discard your text changes.
Disable
Check box to disable this event without removing the event configuration from the /opt/CSCOsgm/etc file.
Personalities
Clicking Edit opens the Personalities Editor, where you can select from the following networks by checking the box:
•
•
•
•
•
•
•
•
•
•
Check the networks you want to include, then click Update, or click Discard to exit the window without saving your changes.
Detect Flapping
Note
If you check the Detect Flapping check box, the following fields appear:
•
•
•
•
•
Errors
Error messages associated with the event. Correct all errors before deploying the new event configuration.
Forwarding Events as Traps to Other Hosts
You use the MWTM to forward MWTM events to other hosts, in the form of SNMP traps. This operation enables the MWTM to integrate with high-level event- and alarm-monitoring systems such as the Cisco Info Center (CIC). These systems can provide a single high-level view of all alarm monitoring in your network, making it easier to detect and resolve problems.
To forward MWTM events to other hosts:
Step 1
Step 2
a.
b.
Step 3
Step 4
Step 5
Note
Setting Sounds for Events at an MWTM Client
You use the MWTM client interface to create and change event sound filters for the MWTM client. Event sound filters determine the sounds that the MWTM client plays when specific events are logged. The MWTM client plays the sounds even if the Event History window is not currently visible.
On Solaris and Linux systems, the root user can access the sound feature from a local or remote device. However, users other than the root user must use a local device and client, not a remote MWTM client accessed by using the xhost + UNIX command.
This section includes:
•
•
•
•
From the MWTM web interface, you can modify the sound to be played when the client loses its connection to the MWTM server as explained in Event Sounds, page 11-20.
Listing Event Sound Filters
You use the MWTM client interface to change the list of event sound filters that the MWTM client applies to events, or prevent the MWTM client from playing sounds for events.
To work with the list of event sound filters, choose Tools > Event Sounds from the MWTM main menu. The Event Sound Filters List dialog box appears.
The Event Sound Filters List dialog box lists all event sound filters that have been defined.
Sound filters applied in order
Indicates the order in which sound filters are to be applied, from top to bottom. If an event matches two or more filters in the list, the top-most filter determines the sound that the MWTM client plays.
This field is blank until you have created at least one new sound filter for events.
Move Up
Moves the chosen event sound filter up in the Sound filters applied in order list.
Move Down
Moves the chosen event sound filter down in the Sound filters applied in order list.
New
Opens the Event Sound Filters dialog box, which you use to create a new event sound filter.
Edit
Opens the Event Sound Filters dialog box, which you use to change an existing event sound filter in the Sound filters applied in order list.
Delete
Deletes the chosen event sound filter from the Sound filters applied in order list.
Mute Sounds
Check box indicating whether the MWTM client should play event sounds. To:
•
•
Client Disconnect Sound
Drop-down menu of sound files to choose from. When the connection to the MWTM server is lost, an error popup appears and the selected sound plays in a loop for as long as the MWTM client window remains open.
Note
Set Sound
Button to set the sound you chose for loss of server connection.
OK
Applies any changes you made to the event sound filters list and closes the Event Sound Filters List dialog box. When you are satisfied with the changes you made to the event sound filters list, click OK.
Apply
Applies any changes you made to the event sound filters list without closing the Event Sound Filters List dialog box.
Cancel
Closes the Event Sound Filters List dialog box without applying any changes to the event sound filters list.
Help
Shows online help for the current window.
Related Topics
•
Creating New Event Sound Filters
You use the MWTM client interface to create a new event sound filter. Open the Event Sound Filters List dialog box, as described in Listing Event Sound Filters, then click New. The Event Sound Filters dialog box appears.
The Event Sound Filters dialog box contains:
Filter Name
Name of the event sound filter file.
Enter a name for the filter, then specify filter criteria for this event sound filter in the Event Sound Filter Criteria field.
Event Sound Filter Criteria
Table listing the filter criteria for this event sound filter. To add a criteria, select options from the drop-down list boxes:
•
a.
b.
c.
•
a.
b.
c.
•
a.
b.
c.
•
a.
b.
c.
More
Adds one or more additional filter criteria to the event sound filter.
To add a filter criteria to the event sound filter, click More. The MWTM adds a new criteria to the bottom of the list.
Fewer
Removes one or more filter criteria from the event sound filter.
To remove a filter criteria from the event sound filter, click Fewer. The MWTM deletes the last criteria in the list.
Play this sound:
Drop-down list box indicating the sound to play if an event matches this event sound filter.
The MWTM client sound files are stored in the MWTM client's /sounds directory. If you installed the MWTM client:
•
•
To add a sound file to the MWTM, add it to the /sounds directory (see Adding Sound Files to the MWTM).
Play
Plays a sample of the sound chosen in the Play this sound drop-down list box.
OK
Applies any changes you made to the event sound filter criteria and closes the Event Sound Filters dialog box.
When you are satisfied with the changes you made to the event sound filters, click OK.
Cancel
Closes the Event Sound Filters dialog box without applying any changes to the event sound filter criteria.
Help
Shows online help for the current window.
Related Topics
Adding Sound Files to the MWTM
You can add sound files to an MWTM client. The MWTM clients can play these sound file formats:
•
•
•
•
•
Note
The MWTM client sound files are stored in the MWTM client's /sounds directory. If you installed the MWTM client:
•
•
•
Note
If for some reason the MWTM cannot play a specified sound file, the MWTM plays a default beep. For example, the MWTM cannot play a sound file if one of these conditions exists:
•
•
•
•
Related Topics
•
Changing an Existing Event Sound Filter
You use the MWTM client interface to change an existing event sound filter. Open the Event Sound Filters List dialog box, as described in Listing Event Sound Filters, select the filter in the Sound filters applied in order list, then click Edit. The MWTM shows the Event Sound Filters dialog box, populated with the chosen filter's settings.
Change the settings as needed, then click OK. The MWTM applies your changes and closes the Event Sound Filters dialog box.
Deleting Event Sound Filters
You use the MWTM client interface to delete an existing event sound filter. Open the Event Sound Filters List dialog box, as described in Listing Event Sound Filters, select the filter in the Sound filters applied in order list, then click Delete. The MWTM deletes the chosen filter.
Playing and Muting Event Sounds
You use the MWTM client interface to specify whether you want the MWTM client to play event sounds. To do so, open the Event Sound Filters List dialog box, as described in Listing Event Sound Filters. To:
•
•
Event Processing
This section contains these topics:
Event Queue Congestion
Event processing in the MWTM may occasionally experience congestion (for example, during discovery of very large networks). If the number of events exceeds the threshold of the event queue, the event congestion icon
appears in the lower left of the MWTM client and web windows. If the icon appears, the presentation of event information in the MWTM GUI will lag behind the actual state of network objects until the congestion clears. The event congestion icon will disappear from MWTM client and web windows when the congestion clears. No user action is necessary.
The event queue threshold is stored in the EVENT_QUEUE_THRESHOLD_LIMIT property in the /opt/CSCOsgm/properties/Server.properties file. The default setting is 1000 events.
Trap Rate Limits
If one or more nodes in the managed network begin to malfunction, these nodes can generate numerous trap notifications that trigger:
•
•
•
This condition is called a trap storm. In a large network, a trap storm can adversely affect the performance of the MWTM server. To minimize the effect of trap storms, the MWTM provides a server property to limit the trap rate of network nodes.
If a node in the network exceeds the trap rate threshold, the MWTM stops processing traps from that node. The MWTM raises an alarm (TrapStatusAlarm) to indicate that the node is generating excessive traps and that the MWTM has disabled trap processing for the node.
When you have corrected the problem with the faulty node and the trap rate is measured at a rate less than the TRAP_RATE_LIMIT_COUNT minus the TRAP_RATE_ABATE_OFFSET, the trap rate limit alarm will automatically clear and trap processing will automatically resume.
Though optional, you can clear the trap status alarm and re-enable trap processing for the node as described below:
Step 1
Step 2
Step 3
Step 4
The /opt/CSCOsgm/properties/Server.properties file provides these properties to limit the trap rate of managed nodes:
TRAP_RATE_ABATE_OFFSET
This is an offset value from the trap rate limit count. The abate threshold limit is calculated by subtracting this value from the TRAP_RATE_LIMIT_COUNT.
The default value is 200 indicating if a node generates 2000-200 = 1800 or more traps it is still considered to be faulty and MWTM stops further trap processing for these nodes.
TRAP_RATE_LIMIT_COUNT
The threshold limit for a node. The default setting is 2,000. If a node generates 2,000 traps (or more) in the trap rate limit interval, the MWTM:
•
•
TRAP_RATE_LIMIT_INTERVAL
The time interval for trap limitation. The default setting is 30 minutes. The MWTM scans its managed nodes every 30 minutes to determine if any nodes are exceeding the trap rate limit count.
TRAP_RATE_MINOR_LIMIT_COUNT
The threshold limit for the trap rate minor alarm. By default, if a node generates 1,000 or more traps, MWTM raises a minor alarm.
Database Archiving
Database archiving describes the process by which the MWTM archives alarms and events in its database. The archival process for alarms and events follows this basic sequence:
1.
2.
3.
4.
5.
The following sections go into greater detail about the archival process, including the differences between event and alarm archiving:
Event Archival Process
When you click Event History in the navigation tree of the MWTM client or MWTM web interface, the right pane displays a tabular list of recent events. The events that appear in this table remain active for seven days (this is the default setting). After seven days, the MWTM removes active events from the Event History table and archives them in the MWTM database. To view the archived events, go to the MWTM web interface, click Event History in the navigation tree, then click the Archived link in the tool bar.
If a user manually deletes an event from the Event History table, the MWTM removes the event from the table and archives it in the MWTM database.
Also, if the number of active events exceeds 10,000 (this is the default setting), the MWTM archives the oldest events regardless of how long they have been active. This mechanism ensures optimal performance of the MWTM server and its clients.
The MWTM archives events in the MWTM database for 31 days (this is the default setting). After 31 days, the MWTM deletes the archived events from the MWTM database.
To change the default settings for archiving events, change the appropriate event limit. See Changing Event Limits.
Figure 9-2 illustrates the archival process for events and lists the event limits associated with the event archival process.
Figure 9-2 Event Archival Process
Alarm Archival Process
The archival process for alarms is very similar to the process for events. When you click Active Alarms in the navigation tree of the MWTM client or MWTM web interface, the right pane displays a tabular list of active alarms. The alarms that appear in this table remain active for 14 days (the default setting). After 14 days, the MWTM removes alarms from the Active Alarms table and archives them in the MWTM database. To view the archived alarms, go to the MWTM web interface, click Active Alarms in the navigation tree, then click the Archived link in the tool bar.
If the alarm automatically clears or if you manually delete the alarm from the Active Alarms table, the MWTM removes the alarm from the table and archives it in the MWTM database.
Likewise, if the alarm automatically clears or you manually clear an alarm from the Active Alarms table, the MWTM retains the alarm in the table for 1440 minutes, which is 24 hours (the default setting). After 24 hours, the MWTM removes the cleared alarm from the table and archives it in the MWTM database.
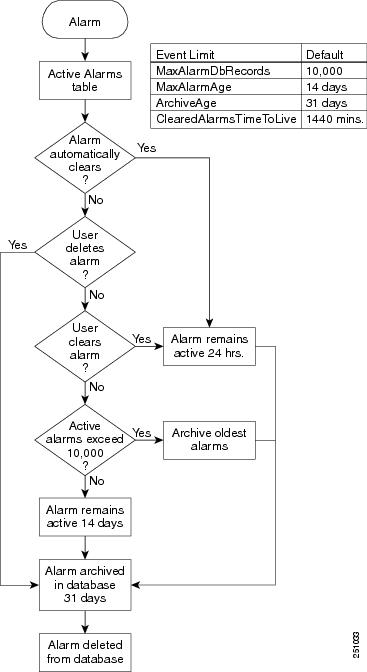
Figure 9-3 illustrates the archival process for alarms and lists the event limits associated with the alarm archival process.
Figure 9-3 Alarm Archival Process
Also, if the number of active alarms exceeds 10,000 (this is the default setting), the MWTM archives the oldest alarms regardless of how long they have been active. This mechanism ensures optimal performance of the MWTM server and its clients.
The MWTM archives alarms in the MWTM database for 31 days (this is the default setting). After 31 days, the MWTM deletes the archived alarms from the MWTM database.
To change the default settings for archiving alarms, change the appropriate event limit. See Changing Event Limits.
File-based Archiving
The MWTM exports events and alarms from its database archives once a day and consolidates them into a CSV-based file. File-based archiving allows administrators to access archived events and alarms in a file format. For example, an administrator may want to process the contents of a file archive by using third-party scripting tools.
To view file-based archives, choose File Archive > Events from the MWTM web interface. The MWTM displays file archives in the right pane. These examples illustrate the file-naming convention:
Status+Trap.WedJun04.log.csv.zipStatus+Trap.TueJun03.log.csv.zipStatus+Trap.MonJun02.log.csv.zipThe MWTM stores file archives in this directory:
/opt/CSCOsgm/logs/netstatus
If you want to change the default directory, use the mwtm msglogdir command.
The MWTM retains file archives for 31 days. (This default setting is the same value that is used for database archiving.) After 31 days, the MWTM deletes the files. If you want to change the default setting, use the mwtm msglogage command.
Another approach would be to configure the aging parameters of the file and database archives with different values. For example, you could use the default setting of 31 days to retain database archives but configure the file archive retention to 90 days (assuming your server has sufficient disk space). This file-based approach for long-term archiving is more efficient than retaining archives in the database beyond the 31-day default setting.
If required, you could retrieve file archives before the MWTM deletes them by using a backup system or a network file system that performs automatic file backups.