Feedback
Table Of Contents
Back Up and Restore of ISC Repository and Standby System
Back Up and Restore of ISC Repository
Data Items Included in Back Up and Recovery
Sybase Backup and Restore Process Overview
Overview of the Backup and Restore Process
Planning your Backup and Restore Process
Installing the Backup and Restore Tool
Configuring the Backup and Restore Process
Understanding the Backup Process Flow
Understanding the Restore Process Flow
Sybase Database Back Up and Restore
Sample Install Prompts and User Responses
Functionality of Backup and Restore Tool
Behavior of the Backup Process
How to Restore the Database from the Back Up
Oracle Database Back Up and Restore
Register the ISC Database with the RMAN Catalog
Modify ISC Database Initial Parameter File
Standby System for ISC (Secondary System)
Sybase Standby System Process Overview
Running Live Back Up of ISC Databases
How to Restore the Database from the Live Back Up
Back Up and Restore of ISC Repository and Standby System
This chapter explains how to back up and restore your Sybase and Oracle databases and how to set up a standby system:
•
Back Up and Restore of ISC Repository
•
Back Up and Restore of ISC Repository
The CCO location of scripts for these procedures is:
http://www.cisco.com/pcgi-bin/tablebuild.pl/isc
The subsections are:
•
•
•
•
Data Items Included in Back Up and Recovery
Most of the ISC-related data items are stored in a repository held on a relational database and the rest are stored in an operating system level file system. For ISC to function flawlessly on restart, following a crash, it is necessary that the proposed backup and recovery feature include various ISC-related data items as a whole. The underlying tasks involved in backup and recovery procedures differ depending on the nature of persistence of these data items. However, these procedures shall work commonly for all the data items in a seamless and transparent manner.
The following data elements are included in ISC's backup and recovery plan:
1.
2.
3.
Guidelines
For the backup and recovery plan to function efficiently, customers are requested to follow these guidelines:
Step 1
a.
b.
c.
d.
Step 2
Step 3
Step 4
Step 5
Sybase Backup and Restore Process Overview
This section describes how to backup and restore Sybase ASA for an ISC installation. This section contains the following sections:
•
•
•
•
•
•
Overview of the Backup and Restore Process
Figure C-1 shows an overview of the Sybase ASA backup and restore process.
Figure C-1 Overview - Sybase ASA Backup and Restore
Planning your Backup and Restore Process
Before backing up and restoring your Sybase installation, you must first prepare a plan. To prepare your plan, follow these steps:
Step 1
Step 2
Step 3
Note
Step 4
Step 5
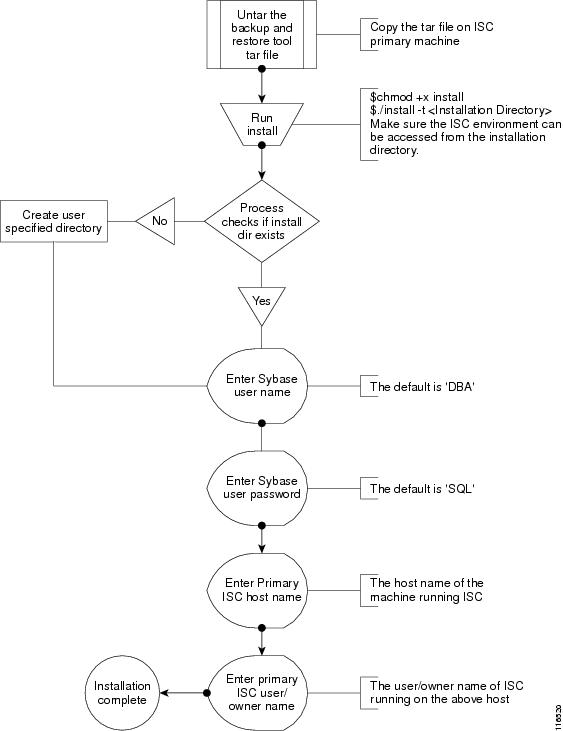
Installing the Backup and Restore Tool
Figure C-2 shows the process flow for installing the backup and restore tool.
Figure C-2 Installing the Backup and Restore Tool
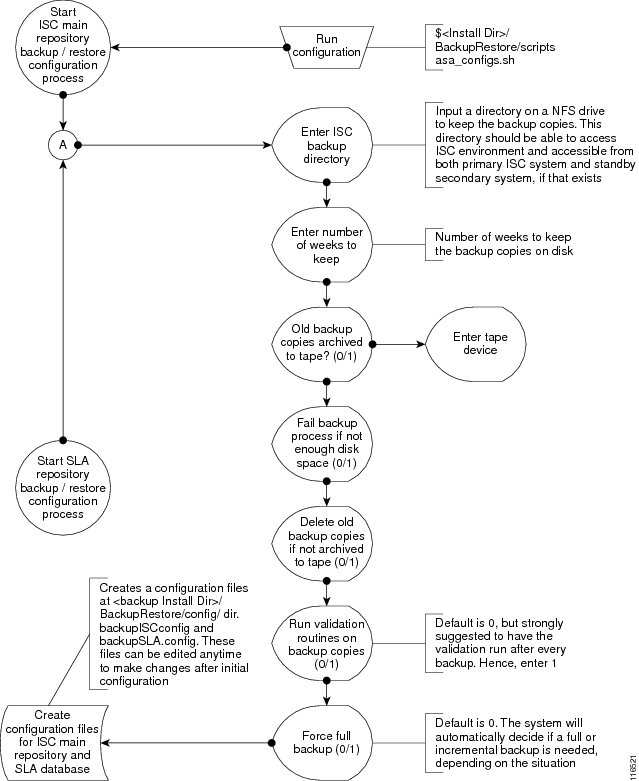
Configuring the Backup and Restore Process
Figure C-3 shows the one-time configuration process for the backup and restore.
Figure C-3 One-Time Configuration Process Flow
Understanding the Backup Process Flow
This section contains the following sections:
•
Preconditions
Before backing up your Sybase installation, you must observe the following preconditions:
1.
2.
3.
4.
5.
Functions
1.
2.
3.
4.
5.
6.
7.
Note
8.
9.
10.
11.
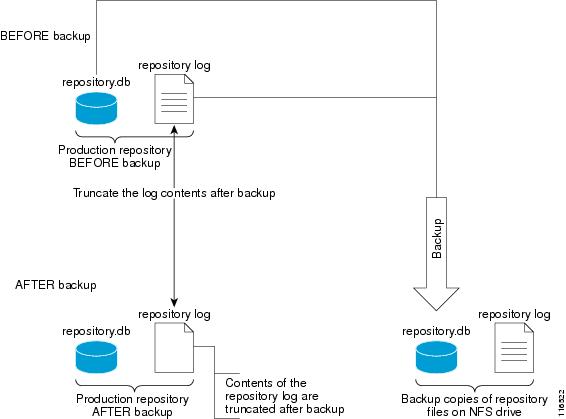
Full Backup Scheme
Figure C-4 shows a full backup scheme.
Figure C-4 Full Backup Scheme
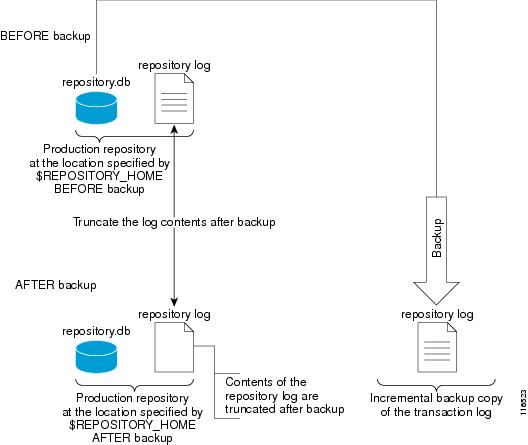
Incremental Backup Scheme
Figure C-5 shows an incremental backup scheme.
Figure C-5 Incremental Backup Scheme
Typical Backup Directory Structure
To create a backup directory structure on an NFS drive, you can use the following procedure.
Assume the Backup Week is 03/14/2004 through 03/20/2004 and the Backup Dir as specified during configuration is /auto/iscBackups (NFS drive). The system creates two subdirectories under user specified backup dir, ISCMain and SLA.
1.
2.
3.
4.
Note
5.
6.
Note
Figure C-6 shows a typical backup directory structure on an NFS drive.
Figure C-6 Typical Backup Directory Structure
Understanding the Restore Process Flow
This section contains the following sections:
•
•
Preconditions
Before restoring your Sybase installation, you must observe the following preconditions:
1.
2.
3.
4.
5.
6.
7.
8.
9.
Functions
1.
2.
3.
4.
5.
a.
b.
For example, $SYBASE_HOME/bin/dbsrv8 $REPOSITORY_HOME/repository.db -f
Note
Note
Restore from Media Failure
Figure C-7 shows the process flow for how to restore from a media failure on the database file (.db).
Figure C-7 Restore from Media Failure on the Database File (.db)
Restore to a Desired Point-in-Time
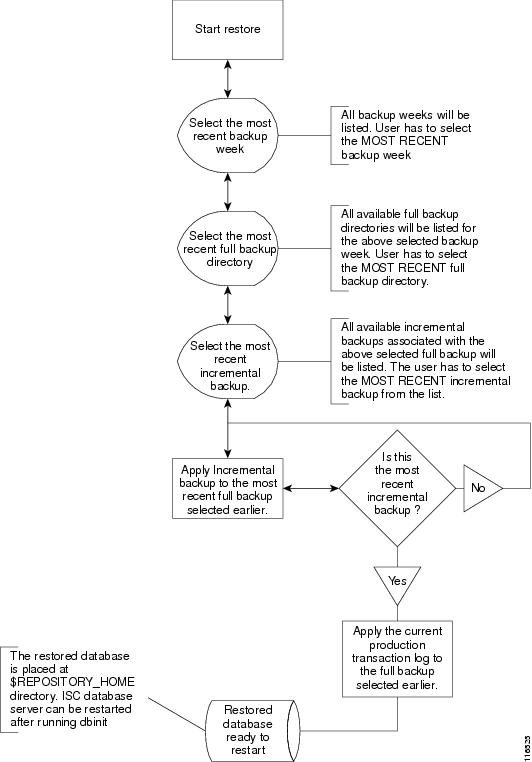
Figure C-8 shows the process flow for how to restore from a desired point-in-time.
Figure C-8 Restore the Database to a Desired Point-in-Time
Sybase Database Back Up and Restore
It is important to protect all ISC-related data by a well-defined backup and recovery plan. Data loss could occur due to the following reasons. The objective of ISC's backup and recovery plan is to greatly minimize the risk of data loss due to any of these reasons:
•
–
–
•
–
The Sybase Backup and Restore tool provides a suite of scripts with several options to back up and restore your embedded Sybase database.
The backup script automatically detects whether a full back up is needed for this current backup week. If a full back up already exists for this current backup week, this script automatically takes an incremental back up. However, the user can force a full back up overriding this default behavior by changing the configuration setting.
Installing
Step 1
mkdir -p $ISC_HOME/backup/Sybase
gzip -d < iscBRToolORA.tar.gz | tar xf -
Step 2
Run install from where the tar file is unpacked. The install script takes command line arguments. Because install is also a system command, to differentiate between the system command and this installation script, run the script as follows:
./install -t <BACKUP_INSTALL_DIR>For help in the install script, use -h(elp) as a command line argument.
Sample Install Prompts and User Responses
The following is a sample install session:
#./install -t /users/yourname/iscBRToolInstallWhen the install script is invoked as above, if the specified target install directory already exists, the user is prompted as follows:
Looks like the installation already existsDo you want to continue installation - it might remove the existing contents [y,n,?]removing the previous installationEnter the Sybase User Name: DBA (user input)Enter the Sybase User Password: SQL (user input)Enter the Primary ISC Host Name: yourname-u10 (user input, the host name of the machine running ISC)Enter Primary ISC user/owner name: yourname (user input, the user/owner name of ISC on the above host)Post Install Status
The installation creates an env.sh script under the <BACKUP_INSTALL_DIR>/BackupRestore/config directory.
Editing the env.sh script is NOT RECOMMENDED. This env.sh script sets the necessary environment variables needed to run ISC backup and restore scripts.
Functionality of Backup and Restore Tool
Step 1
# ./asa_configs.shA sample configuration session is as follows, with the configuration prompt on the LHS and sample user response on the RHS of the prompt.
Starting backup Configuration for Main ISC databaseDB server Name...yourname_yourname-u10ISC Backup script invoked with the following parameters:-----------------------------------------------------------------------Backup directory: /users/yourname/iscBRToolInstall/BackupRestore/BackupsNumber of weeks to keep: 2Backups archived to tape (0=no, 1=yes): 0Tape device: /dev/rmt/0Fail backup if there is not enough space for a full backup (0=no, 1=yes): 1Delete old backups if not archived to tape (0=no, 1=yes): 0Run validation routines on backup files (0=no, 1=yes): 0Force full backup (0=no, 1=yes): 0-----------------------------------------------------------------------The ISC backup configuration file is nonexistent ... creating new fileModifying ISC backup configuration settings ...Enter new ISC backup directory path (a subdirectory ISC will be addedautomatically) [/users/yourname/iscBRToolInstall/BackupRestore/Backups] [?] /users/yourname/iscBackupBackup directory for ISC specified is "/users/yourname/iscBackup/ISCMain".Is this correct? [y] [y,n,?] yEnter the number of weeks to keep [2] [?] 3Number of weeks specified is "3".Is this correct? [y] [y,n,?] yOld backups archived to tape (0=no, 1=yes) [0] [?]Archive to tape option specified is "0".Is this correct? [y] [y,n,?] yEnter tape device [/dev/rmt/0] [?]Tape device specified is "/dev/rmt/0".Is this correct? [y] [y,n,?] yFail backup if there is not enough space for a full backup (0=no,1=yes) [1] [?]Fail backup if not enough space specified is "1".Is this correct? [y] [y,n,?] yDelete old backups if not archived to tape (0=no, 1=yes) [0] [?]Delete old backups specified is "0".Is this correct? [y] [y,n,?] yRun validation routines on backup files (0=no, 1=yes) [0] [?] 1Run validation routines specified is "1".Is this correct? [y] [y,n,?]Force full backup (0=no, 1=yes) [0] [?] 0Force full backup specified is "0".Is this correct? [y] [y,n,?] yISC Backup configuration settings have been modified ...If you wish to verify the values or modify them again then re-run the script asa_configs.sh againThe ISC backup engine is now exiting without backing up the database.You must run the asa_backup.sh script for the backup to take place.ISC Backup Configuration Successfully completedISC Backup Configuration script ending.Starting backup Configuration for SLA databaseDB server Name...rpokalor_rpokalor-u10SLA Backup script invoked with the following parameters:-------------------------------------------------------------------------------Backup directory: /users/yourname/iscBRToolInstall/BackupRestore/BackupsNumber of weeks to keep: 2Backups archived to tape (0=no, 1=yes): 0Tape device: /dev/rmt/0Fail backup if there is not enough space for a full backup (0=no, 1=yes): 1Delete old backups if not archived to tape (0=no, 1=yes): 0Run validation routines on backup files (0=no, 1=yes): 0Force full backup (0=no, 1=yes): 0-------------------------------------------------------------------------------The SLA backup configuration file is nonexistent ... creating new fileModifying SLA backup configuration settings ...Enter new SLA backup directory path (a subdirectory SLA will be addedautomatically) [/users/yourname/iscBRToolInstall/BackupRestore/Backups] [?] /users/yourname/iscBackupBackup directory for SLA specified is "/users/yourname/iscBackup/SLA".Is this correct? [y] [y,n,?] yEnter the number of weeks to keep [2] [?] 3Number of weeks specified is "3".s this correct? [y] [y,n,?] yOld backups archived to tape (0=no, 1=yes) [0] [?]Archive to tape option specified is "0".Is this correct? [y] [y,n,?] yEnter tape device [/dev/rmt/0] [?]Tape device specified is "/dev/rmt/0".s this correct? [y] [y,n,?] yFail backup if there is not enough space for a full backup (0=no,1=yes) [1] [?]Fail backup if not enough space specified is "1".Is this correct? [y] [y,n,?] yDelete old backups if not archived to tape (0=no, 1=yes) [0] [?]Delete old backups specified is "0".Is this correct? [y] [y,n,?] yRun validation routines on backup files (0=no, 1=yes) [0] [?]Run validation routines specified is "0".Is this correct? [y] [y,n,?]Force full backup (0=no, 1=yes) [0] [?]Force full backup specified is "0".Is this correct? [y] [y,n,?]LA Backup configuration settings have been modified ...If you wish to verify the values or modify them again then re-run the script asa_configs.sh againThe SLA backup engine is now exiting without backing up the database. You must run the asa_backup.sh script for the backup to take place.SLA Backup Configuration Successfully completedSLA Backup Configuration script ending.
Post Configuration status
------------------------------------------------------------------------The configuration creates backupISC.config and backupSLA.config files under BACKUP_INSTALL_DIR/BackupRestore/config directory.To modify the initial configuration settings, users can either re-run the asa_configs.sh script or simply modify the contents of these .config files. For example, if the user wants to suppress the validation of the database after each backup, the config file setting validateDB property to 0 instead of 1. Similarly, if the user wants to force full backup, set the property fullBackup=1.How to Use the Backup Script
Step 1
a.
b.
It is important to keep the backup copies on an external storage device to protect the backup copies if the main ISC system crashes.
c.
–
–
–
–
Step 2
Behavior of the Backup Process
Step 1
Step 2
Step 3
Step 4
Step 5
How to Restore the Database from the Back Up
The asa_restore.sh script supports the following types of database restore:
Step 1
Step 2
Note
Step 3
a.
b.
c.
Oracle Database Back Up and Restore
From the location http://www.cisco.com/pcgi-bin/tablebuild.pl/isc, download the tar file iscBRToolORA.tar.gz and untar this file as follows:
mkdir -p $ISC_HOME/backup/Oracle
gzip -d < iscBRToolORA.tar.gz | tar xf -
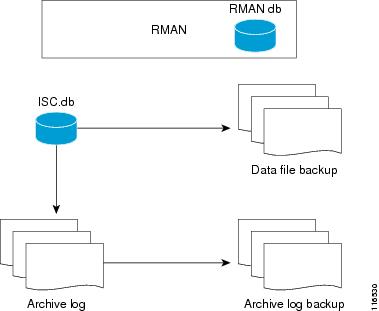
Oracle databases have a backup and restore Recovery Manager (RMAN) tool. To use this tool for online back up, the Oracle database must be in ARCHIVELOG mode, as explained in the "Turn On ARCHIVELOG Mode" section. RMAN maintains the bookkeeping intelligence of backup and recovery files and backs up at the block level. Therefore, RMAN can significantly speed up back ups and reduce the server load by using incremental back ups.
Figure C-9 shows an Oracle Database Backup Diagram.
Figure C-9 Oracle Database Backup
RMAN for Oracle 9i is explained in the user guide, which is available as follows:
http://download-west.oracle.com/docs/cd/B10501_01/server.920/a96566/part3.htm
Note
Be sure that the backup data and RMAN catalog are located on a different disk from where the Oracle database (data files, redo logs, and control files) are located. Both can reside on the same ISC database server.
Oracle Enterprise manager (GUI) can be used to set up RMAN.
Alternatively, RMAN configuration is explained in the following areas that should be implemented sequentially:
Step 1
Step 2
Step 3
Step 4
Step 5
Step 6
Step 7
Step 8
Turn On ARCHIVELOG Mode
Oracle allows manual back up when turning on ARCHIVELOG mode. This makes the database log all transactions into the redo logs. When one log is full, a task is started to copy the redo log to an archive log directory and at the same time the system starts logging to a different redo log. This requires the user to manage and purge archive logs that are no longer needed.
Step 1
•
•
•
Check archive log using archive log list.
Step 2
•
•
SQL> select file_name from dba_data_files;
Step 3
SQL> recover datafile <file_number_or name>;
where <file_number_or name> is the file number, however a file name can be placed here. Recovery will be from /var/tmp/oracle/backup and the specified data file, where the recover command determined that the redo is needed for the recovery in the archive log.
Create RMAN Catalog Database
The catalog database holds the recovery catalogs. This database typically is set up on a different server from any database being registered in it. It also works if this database is set up on the same database server as the ISC database.
Use the Oracle utility dbassist to create a catalog database. (This is the same as ISC database creation, except you should name the RMAN global name rman, and you should name the SID rman.)
Create RMAN User
Creating an RMAN user is the same as creating an ISC user on an rman database. Name the RMAN user ID rmanuser and name the password rmanpassword. Make sure rmanuser has proper privileges. For example:
SQL> grant connect, resource, recovery_catalog_owner to rmanuser;
Create RMAN Catalog
Create a catalog from the RMAN command prompt:
RMAN> connect catalog rmanuser/rmanpassword@rcat
RMAN> create catalog;
Register the ISC Database with the RMAN Catalog
Set the ORACLE_SID environment variable = isc.
%rman
RMAN > connect catalog rmanuser/rmanpassword@rman
RMAN > connect target sys/change_on_install
RMAN > register database;
The default password for an Oracle sys account after Oracle installation is change_on_install. Replace this sys account password with the correct sys account password for the ISC database.
Modify ISC Database Initial Parameter File
To modify the ISC database initial parameter file, do the following:
Step 1
SQL> alter system set log_archive_dest_1 = `location=</var/tmp/oradata/arch>' SCOPE=BOTH;
SQL> alter system archive log start;
where </var/tmp/oradata/arch> is the location of the archive destination.
Step 2
startup mount
alter database archivelog;
alter database open
Step 3
SQL> archive log list;
Backup Database
To back up the database, do the following:
Step 1
http://www.cisco.com/pcgi-bin/tablebuild.pl/isc
Step 2
Use a text editor to open this file and read the directions on how to update each property.
Step 3
$ISC_HOME/backup/Oracle/oracle_backup.sh -f
Step 4
$ISC_HOME/backup/Oracle/oracle_backup.sh -i
Note
Backup Non-database Files
On the ISC server machine, to back up non-database related files, such as task logs or ISC system properties, execute the script: non_db_backup.sh.
Recover Database
To recover a database, do the following:
Step 1
stopall
Step 2
%oracle_recover.sh ["<date_time>"]
The "<date_time>" is optional. The format is "mmm dd yyyy hh:mm:ss", where the first mmm is the month and must be alphabetic characters with an initial capitalization, for example:
"Oct 09 2003 15:25:00"
If you do not specify <date_time>, the script does a full database recovery.
Note
Standby System for ISC (Secondary System)
This section explains how to set up Sybase and Oracle standby systems for ISC.
The subsections are:
•
Sybase Standby System Process Overview
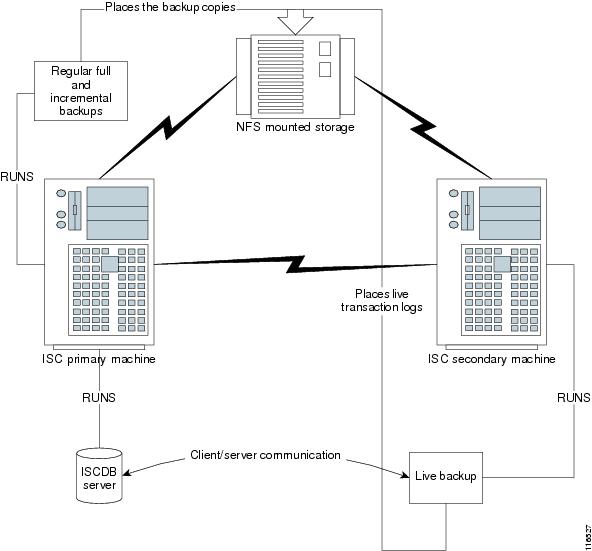
Figure C-10 shows a live backup scheme.
Figure C-10 Live Backup Scheme
Restore from Live Backup
Figure C-11 shows the process flow for how to restore from a live backup.
Figure C-11 Restore from Live Backup
Sybase Standby System Set Up
The explanation of setting up a Sybase standby system is explained as follows:
•
•
Running Live Back Up of ISC Databases
Run BACKUP_INSTALL_DIR/BackupRestore/scripts/asa_liveBackup.sh to start the live back up after being sure to follow these pre-conditions:
Step 1
Step 2
Step 3
Step 4
Step 5
Step 6
Step 7
Step 8
Step 9
Step 10
Step 11
Step 12
Step 13
How to Restore the Database from the Live Back Up
When the primary ISC host fails, the standby system restores the database from the latest available full back up, the latest incremental back up, and the live back up.
Run the BACUP_INSTALL_DIR/BackupRestore/script/asa_restoreFromLiveBackup.sh script on the standby system to restore the database after being sure to follow these pre-conditions:
Step 1
Step 2
Step 3
Oracle Standby System Set Up
For Oracle 9i Data Guard instructions, see:
http://download-west.oracle.com/docs/cd/B10501_01/server.920/a96653/preface.htm#971610
Note
Restart ISC
When the standby database is activated, use the following commands to point ISC to the new database server:
stopall -y
update $ISC_HOME/etc/install.cfg and replace <old_db_server> with <new_db_server>.
execute applycfg.sh
initdb.sh
startwd
where:
<old_db_server> is the name of the old database server
<new_db_server> is the name of the new database server.