Feedback
Table Of Contents
Getting Started with EventVision
Color Coding of Events List Severity Icons
EventVision Navigation Toolbar
Setting EventVision Viewing Options
Getting Started with EventVision
This chapter describes the EventVision application and the options you can use to view system events and tickets that are generated within the Cisco ANA system.
Note
EventVision is available only to administrators.
•
•
•
Launching EventVision
This section provides instructions for launching EventVision. EventVision is password protected to ensure security. Before you start working with EventVision make sure you know your username, password, and the Cisco ANA Gateway IP address or hostname that you require.
Note
To start EventVision:
Step 1
The login dialog box appears.
Step 2
Step 3
or
Select a Cisco ANA Gateway from the Host list.
Note
Note
Step 4
If this is the first time you have logged on, you will see the Ticket tab.
If you are logging in again, you will see the tab that was visible when you logged out of the application.
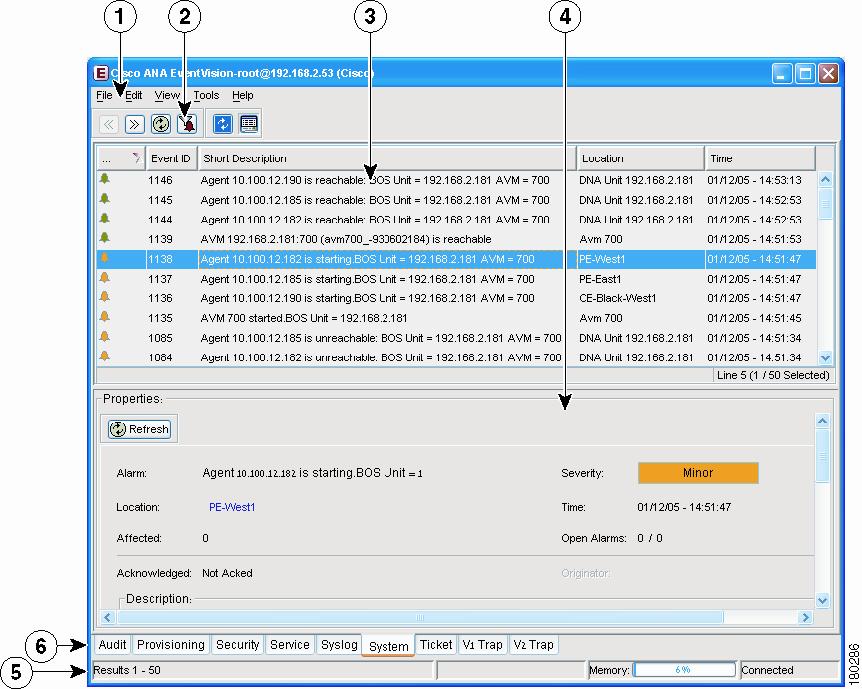
The EventVision Window
The EventVision window displays the events generated in the system. The following figure shows an example of the EventVision window.
Figure 2-1 EventVision Window
The EventVision window is divided into the following parts:
•
•
You can display the Events List only (without the Event Properties pane), and select the required tab to display events, such as Provisioning events only, see Shortcut Properties Menu for an example.
You can also display the following information using the EventVision window toolbar and menu options:
•
•
•
•
EventVision Menus
This section provides a description of each option available in the EventVision menus and shortcut menus.
File Menu
The File menu enables you to export the information displayed and to exit the application:
•
•
Edit Menu
The Edit menu enables you to define a filter for events displayed in the EventVision window:
•
•
View Menu
The View menu enables you to refresh and navigate through the EventVision window as well as view event properties:
•
•
–
–
•
•
Tools Menu
The Tools menu enables you to define various options for displaying events in the EventVision window's Table pane:
•
•
Help Menu
The Help menu provides information about EventVision:
•
•
•
Shortcut Properties Menu
Displays the properties of an event selected in the Event Properties window. See Viewing Event Properties.
Color Coding of Events List Severity Icons
The Events List is color coded according to the severity of the event. An icon appears for each event (ticket/event) in the EventVision tabs (based on its severity) as follows:
•
•
•
•
•
•
EventVision Navigation Toolbar
The EventVision window contains the following tools in the navigation bar/toolbar:
Table 2-1 EventVision Tools
Goes back to the previous page of events in the EventVision window.
Goes forward to the next page of events in the EventVision window.
Refreshes the events (if a filter is active, the refresh is done according to the filter) displayed in the log by querying the database. The log returns to the beginning of the list, displaying the events in ascending or descending order depending on the order of the current list. Descending order means that the last event is displayed first. For more information, see Refreshing the Events List.
Displays the EventVision Filter dialog box enabling you to define a filter for the events displayed in the EventVision log. For more information, see Filtering Events.
Toggles automatic refresh of event data on and off. You define the refresh-time period (in seconds) in the EventVision Options dialog box. The default is 60 seconds. If a filter is active, the refresh is done according to the filter. For more information, see Setting EventVision Viewing Options.
Displays the properties of the selected event or ticket in the EventVision Properties Details pane.
Setting EventVision Viewing Options
The EventVision Options dialog box enables you to define the options for displaying events in the EventVision window.
To define EventVision options:
Step 1
The following fields are displayed:
•
Note
•
•
•
•
Note
•
Step 2
Step 3