Feedback
Table Of Contents
Customizing Your Configuration
Creating and Setting Group Membership
Using a Script to Determine Service
Configuring Multiple UserLists
Configuring Separate UserLists
Configuring a Remote Server for AA
Changing the Authentication and Authorization Defaults
Configuring Multiple Remote Servers
Configuring Two Remote Servers
Configuring Session Management
Configuring a Resource Manager
Configuring Session Management
Customizing Your Configuration
After you have configured and tested a basic site, you can begin to make changes to better address your own sites's needs. This chapter provides information that describes how to
•
Use groups to select the appropriate user service
•
•
•
•
The examples in this chapter provide an introduction to many of the Cisco Access Registrar 3.5 objects and their properties. For more detailed descriptions, see the Cisco Access Registrar 3.5 User's Guide.
Configuring Groups
The first change you might want to make is to create distinct groups based on the type of service, and divide your user community according to these groups.
You can use Cisco Access Registrar 3.5 UserGroups in two ways:
•
•
The default Cisco Access Registrar 3.5 installation provides examples of both types of groups.
Configuring Specific Groups
For users who always require the same type of service, you can create specific user groups, and then set the user's group membership to that group.
Table 5-1 provides an overview of the process. The following sections describe the process in more detail.
Table 5-1 Configuring UserGroups
UserGroups
Add a new UserGroup
UserLists
Set group membership
Creating and Setting Group Membership
Step 1
aregcmd
Step 2
cd /Radius/UserGroups
Step 3
This example sets the BaseProfile to default-SLIP-users. When you set this property to the name of a profile, Cisco Access Registrar 3.5 adds the properties in the profile to the response dictionary as part of the authorization process.
add SLIP-users "Users who always connect using SLIP" default-SLIP-users
Step 4
cd /Radius/UserLists/Default/jean
Step 5
set group SLIP-users
Step 6
save
Step 7
reload
Note
Configuring a Default Group
If you allow users to request different Services based on how they specify their username, you can use a script to determine the type of Service to provide. For example, the user joe can request either PPP or Telnet Service by either logging in as joe%PPP or joe%Telnet.
This works because there are two scripts: ParseServiceHints and AuthorizeService.
•
•
Table 5-2 provides an overview of the process. The following sections describe the process in more detail.
Table 5-2 Choosing Among UserGroups
UserGroups
Add a new UserGroup or use existing Default group.
Set AuthorizationScript
Scripts
Add new Script.
UserLists
Set group membership.
Using a Script to Determine Service
The following instructions assume you have already created a UserGroup and you have written a script that performs this function. For some sample scripts, refer to the Cisco Access Registrar User's Guide.
Step 1
cd /Radius/UserGroups/Default
Step 2
set AuthorizationScript AuthorizeService
Step 3
cd /Radius/Scripts
Step 4
add AuthorizeService "" Rex libAuthorizeService.so AuthorizeService
Step 5
cd /Radius/UserLists/Default/beth
Step 6
set Group Default
Step 7
save
Step 8
reload
Note
Configuring Multiple UserLists
The basic site contains a single userlist, Default, and uses group membership to determine the type of Service to provide each user. When all users are in the same UserList, each username must be unique.
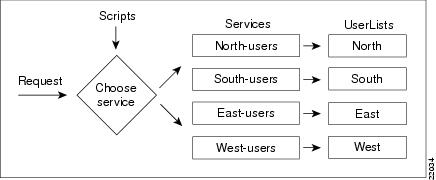
You can, however, group your user community by department or location, and use separate UserLists to distinguish amongst them. In this case, the users names must be unique only within each UserList. Thus, you can allow a user Jane in the North UserList as well as one in the South UserList.
When you have more than one UserList, you must have an incoming script that Cisco Access Registrar 3.5 can run in response to requests. The script chooses the authentication and/or authorization Service, and the Service specifies the actual UserList (Figure 5-1).
Figure 5-1 Using a Script to Choose a UserList
Table 5-3 provides an overview of the process. The following sections describe the process in more detail.
Configuring Separate UserLists
Divide your site along organizational or company lines, and create a UserList for each unit.
Creating Separate UserLists
Step 1
aregcmd
Step 2
cd /Radius/UserLists
Step 3
add North "Users from the northern office"
Step 4
Configuring Users
After you have created multiple UserLists, you must populate them with the appropriate users.
Populating UserLists
Step 1
cd /Radius/UserLists/North
Step 2
add beth telemarketing 123 TRUE PPP-users
Step 3
You can use the script, add-100-users, which is located in the /opt/CSCOar/examples/cli directory to automatically add 100 users.
Configuring Services
You must create a corresponding Service for each UserList. For example, when you create four UserLists, one for each section of the country, you must create four Services.
Creating Separate Services
Step 1
cd /Radius/Services
Step 2
Caution
Step 3
cd /Radius/Services/North-users
Step 4
set type local
set UserList North
Step 5
Creating the Script
You must write a script that looks at the username and chooses the Service to which to direct the request.
For example, you create four UserLists (North, South, East, and West), with the Service based on the origin of the user. When a user requests a Service, your script can strip off the origin in the request and use it to set the environment dictionary variables Authentication-Service and/or Authorization-Service to the name or names of the appropriate Service.
In this situation, when beth@North.QuickExample.com makes an Access-Request, the script will strip off the word North and use it to set the value of the environment variable Authentication-Service and/or Authorization-Service. Note, the script overrides any existing default authentication and/or authorization specifications.
Note
Configuring the Script
When you have multiple UserLists, you need a script to determine which UserList to check when a user makes an Access-Request. When you want the script to apply to all users, irrespective of the NAS they are using, place the script at the Radius level. When, on the other hand, you want to run different scripts depending on the originating NAS, place the script at the Client level.
Choosing the Scripting Point
Step 1
cd /Radius
Step 2
set IncomingScript ParseUserName
Step 3
cd /Radius/Scripts
Step 4
The following example specifies the name ParseUserName, the language Rex (which is RADIUS Extension), the file name LibParseUserName.so, and the entry point ParseUserName.
add ParseUserName "" Rex libParseUserName.so ParseUserName
Step 5
save
Step 6
reload
Handling Multiple Scripts
Cisco Access Registrar 3.5 can run only one script from a given extension point. However, you can write a script that runs several scripts serially, one after the other. For example, the following tcl script, MasterScript, might look like the following:
## this MasterScript executes both tParseAAA and MyProcedure# it assumes that tclscript.tcl and myscripts.tcl are in the same# directory as this filesource tclscript.tclsource myscripts.tclproc MasterScript { request response environ } {tParseAAA $request $response $environMyProcedure $request $response $environ}Save tcl scripts in the directory /opt/CSCOar/scripts/radius/tcl.
Configuring a Remote Server for AA
All the sites described so far in this chapter have used the Cisco Access Registrar 3.5 RADIUS server for authentication and authorization. You might want to delegate either one or both of those tasks to another server, such as an LDAP server or another RADIUS server.
You can specify one of the following services when you want to use a particular remote server:
•
•
•
Note
Cisco Access Registrar User Guide.Table 5-4 provides an overview of the process. The following sections describe the process in more detail.
Configuring the Remote Server
The RemoteServer object allows you to specify the properties of the remote server to which Services proxy requests. The remote servers you specify at this level are referenced by name from the RemoteServers list in the Services objects.
Creating a RemoteServer
Step 1
aregcmd
Step 2
cd /Radius/RemoteServers
Step 3
add QuickExample
Step 4
cd /Radius/RemoteServers/QuickExample
Step 5
set protocol ldap
Step 6
At the very least you must specify:
•
•
•
•
•
•
set IPAddress 196.168.1.5
set Port 389
set HostName ldap1.QuickExample.com
set SearchPath "o=Ace Industry, c=US"
set Filter (uid=%s)
set UserPasswordAttribute password
For descriptions of the other LDAP properties, see the Cisco Access Registrar User Guide.
Configuring Services
In order to use LDAP for authorization and/or authentication, you must configure a Services object.
Creating Services
Step 1
aregcmd
Step 2
cd /Radius/Services
Step 3
add remote-ldap "Remote LDAP Service"
Step 4
cd /Radius/Services/remote-ldap
Step 5
set type ldap
Step 6
cd /Radius/Services/remote-ldap/RemoteServers
Step 7
The following example sets the first remote server to the server QuickExample:
set 1 QuickExample
The MultipleServersPolicy determines how Cisco Access Registrar 3.5 handles multiple remote servers.
•
•
Configuring the RADIUS Server
In the default Cisco Access Registrar 3.5 configuration, authentication and authorization are handled through the local-users Service object. This causes Cisco Access Registrar 3.5 to match requesting users with the names in its own database. When you select LDAP as a remote server for authentication and authorization, Cisco Access Registrar 3.5 looks to that server for user information.
To have Cisco Access Registrar 3.5 perform authentication and authorization against information from the LDAP server, you must change the DefaultAuthenticationService and DefaultAuthorizationService at the Radius level.
Changing the Authentication and Authorization Defaults
Step 1
aregcmd
Step 2
cd /Radius
Step 3
set DefaultAuthentication remote-ldap
Step 4
set DefaultAuthorization remote-ldap
Step 5
save
Step 6
reload
Configuring Multiple Remote Servers
All of the sites described so far in this chapter have used a single server for authentication and authorization; either the local RADIUS server or a remote LDAP server.
You can configure multiple remote servers to use the same Service, or multiple remote servers to use different Services. Figure 5-2 shows how to use multiple servers for authentication and authorization, and how to employ a script to determine which one to use.
Figure 5-2 Using a Script to Choose a Remote Server
Table 5-5 provides an overview of the process. The following sections describe the process in more detail. Repeat for each RemoteServer you want to configure.
Configuring Two Remote Servers
Configure each remote server you want to use for authentication and authorization. The following example shows the North remote server.
Creating RemoteServers
Step 1
aregcmd
Step 2
cd /Radius/RemoteServers
Step 3
add North
Step 4
cd /Radius/RemoteServers/North
Step 5
set protocol radius
Step 6
set SharedSecret 789
Step 7
Configuring Services
In order to use multiple remote servers for authorization and/or authentication you must configure the corresponding Services.
Creating the Services
Step 1
> aregcmd
Step 2
cd /Radius/Services
Step 3
add NorthUsers-radius "NorthRemote server"
Step 4
cd /Radius/Services/NorthUsers-radius
Step 5
set type radius
Step 6
The following example sets the first remote server to the server North and the second remote server to North2:
set RemoteServers/1 North
set RemoteServers/2 North2
Step 7
Configuring the Script
When you have multiple RemoteServers, you need a script that determines the authentication and/or authorization Service, which in turn specifies the RemoteServer to check when a user makes an Access-Request. If you want the script to apply to all users, irrespective of the NAS they are using, place the script at the Radius level.
Note
Choosing the Scripting Point
Step 1
> aregcmd
Step 2
cd /Radius/Scripts
Step 3
The following example specifies the name ParseRemoteServers, the language Rex, the file name libParseRemoteServers.so, and the entry point ParseRemoteServers:
add ParseRemoteServers "" RexlibParseRemoteServers.so ParseRemoteServers
Step 4
cd /Radius
Step 5
set IncomingScript ParseRemoteServers
Step 6
save
Step 7
reload
Configuring Session Management
You can use session management to track user sessions, and/or allocate dynamic resources to users for the lifetime of their sessions. You can define one or more Session Managers, and have each one manage the sessions for a particular group or company.
Configuring a Resource Manager
Session Managers use Resource Managers, which in turn manage a pool of resources of a particular type. The Resource Managers have the following types:
•
•
•
•
•
•
Each Resource Manager is responsible for examining the request and deciding whether to allocate a resource for the user, pass the request through, or cause Cisco Access Registrar 3.5 to reject the request.
Table 5-6 provides an overview of the process. The following sections describe the process in more detail.
Creating a Resource Manager
You can use the default Resource Managers as models for any new Resource Managers you want to create. The following describes how to create a Resource Manager that limits the number of users to 100 or less at any one time.
Step 1
aregcmd
Step 2
cd /Radius/ResourceManagers
Step 3
add rm-100
Step 4
cd rm-100
Step 5
set type Group-Session-Limit
Step 6
set GroupSessionLimit 100
Configuring a Session Manager
Now that you have created a Resource Manager, you must associate it with the appropriate Session Manager.
Creating a Session Manager
Step 1
aregcmd
Step 2
cd /Radius/SessionManagers
Step 3
add sm-1
Step 4
cd sm-1/ResourceManagers
Step 5
set 1 rm-100
Enabling Session Management
Cisco Access Registrar 3.5, by default, comes configured with the sample SessionManagement session-mgr-1. You can modify it or change it to the new SessionManager you have created.
Note
Configuring Session Management
Step 1
aregcmd
Step 2
cd /Radius
Step 3
set DefaultSessionManager sm-1
Step 4
save
Step 5
reload