Feedback
Table Of Contents
Configuring Cisco Access Registrar 3.5
Changing the Administrator's Password
Creating Additional Administrators
Checking the System-Level Defaults
Displaying the Default UserList
Adding Multiple Cisco AV Pairs
Validating and Using Your Changes
Troubleshooting Your Configuration
Enabling SNMP in the Cisco AR Server
Configuring Packet of Disconnect
Configuring a Resource Manager for POD
Proxying POD Requests from External Servers
Testing Dynamic DNS with radclient
Configuring Cisco Access Registrar 3.5
This chapter describes how to configure a site. Cisco Access Registrar 3.5 is very flexible. You can choose to configure it in many different ways. In addition, you can write scripts that can be invoked at different points during the processing of incoming requests and/or outgoing responses.
Before you can take advantage of this flexibility, it helps to configure a simple site. This chapter describes that process. It specifically describes a site that has the following characteristics:
•
Uses a single user list for all of its users
•
•
This chapter has the following major sections:
•
•
•
Using aregcmd
To configure Cisco Access Registrar 3.5, use the aregcmd commands, which are command-line based configuration tools. These commands allow you to set any Cisco Access Registrar 3.5 configuration option, as well as, start and stop the Cisco Access Registrar 3.5 RADIUS server and check its statistics.
General Command Syntax
Cisco Access Registrar 3.5 stores its configuration information in a hierarchy. Using the aregcmd command cd (change directory), you can move through this information in the same manner as you would through a hierarchical file system. Or you can supply full path names to these commands to affect another part of the hierarchy, and thus avoid explicitly using the cd command to change to that part of the tree.
The aregcmd commands are case insensitive, which means that you can use upper or lowercase letters to designate elements. In addition, when you reference existing elements in the configuration, you only need to specify enough of the element's name to distinguish it from the other elements at that level. For example, instead of typing cd Administrators, you can type cd ad if no other element at the current level begins with ad.
You can use Cisco AR's command completion feature to see what commands are possible from your current directory location in the Cisco AR server hierarchy by pressing the Tab key. You can also press the tab key after entering a command to see which objects you might want to manage.
The aregcmd commands are command-line order dependent; that is, the arguments are interpreted based on their position on the command line. To indicate an empty string as a place holder on the command line, use either two single quotes (") or two double quotes (""). In addition, if you use any arguments that contain spaces, make sure to quote the arguments.
aregcmd Commands
The aregcmd commands can be grouped into the following categories:
•
•
•
•
•
•
This chapter uses only a few of the above commands to configure the Cisco Access Registrar 3.5 RADIUS server. For more information about all the aregcmd commands, see Chapter 2, Using the aregcmd Commands, in the Cisco Access Registrar User Guide.
Configuring a Basic Site
The simplest RADIUS server configuration is a site that uses a single user list for all its users, writes its accounting information to a file, and does not use session management to allocate dynamic resources.
To configure such a site, do the following:
1.
2.
3.
4.
5.
6.
Running aregcmd
aregcmd is the command-line interface program used to configure the Cisco Access Registrar 3.5 server. The aregcmd program is located in $INSTALL/usrbin.
Step 1
aregcmd
Step 2
Step 3
When you install Cisco AR software, the installation process creates a default administrator called admin with the password aicuser.
Changing the Administrator's Password
The administrator ID admin and password aicuser are default settings for all releases of Cisco Access Registrar software. For security purposes, you should change the password for admin at your earliest convenience.To change the administrator's password, complete the following steps:
Step 1
cd //localhost/Administrators
Step 2
cd admin
[ //localhost/Administrators ]Entries 1 to 1 from 1 total entriesCurrent filter: <all>admin/Step 3
The following example changes the password to 345. You are asked to retype it for confirmation.
set Password 345
Optionally, use the set command to change the description of the admin administrator.
set Description local
Step 4
ls
Creating Additional Administrators
Use the add command to add additional administrators.
Step 1
cd /Administrators
Step 2
The following example adds the administrator jane, description testadmin, and password 123:
add jane testadmin 123
Step 3
ls
Configuring the RADIUS Server
The top level of the Cisco Access Registrar 3.5 RADIUS server is the Radius object itself. It specifies the name of the server and other parameters. In configuring this site, you only need to change a few of these properties.
[ //localhost/Radius ]Name = RadiusDescription =Version = 1.3IncomingScript =OutgoingScript =DefaultAuthenticationService = local-usersDefaultAuthorizationService = local-usersDefaultAccountingService = local-fileDefaultSessionManager = session-mgr-1UserLists/UserGroups/Clients/Vendors/Scripts/Services/SessionManagers/ResourceManagers/Profiles/RemoteServers/Advanced/Checking the System-Level Defaults
Because this site does not use incoming or outgoing scripts, you do not need to change the scripts' properties (IncomingScript and OutgoingScript).
Since the default authentication and authorization properties specify a single user list, you can leave these unchanged as well (DefaultAuthenticationService and DefaultAuthorizationService). And because you have decided to use a file for accounting information, you can leave this property unchanged (DefaultAccountingService).
Session management, however, is on by default (DefaultSessionManager). As you do not want to use session management, you must disable it. Use the set command, type DefaultSessionManager, then specify an empty string by typing a set of double quotes:
set DefaultSessionManager ""
Note
You have now configured some of the properties for the RADIUS server. The next step is to add users.
Checking the Server's Health
To check the server's health, use the aregcmd command status. The following issues decrement the server's health:
•
Note
•
•
•
•
•
Cisco Access Registrar 3.5 logs all of these conditions. Sending a successful response to any packet increments the server's health.
Selecting Ports to Use
By default, Cisco AR uses well-known ports 1645 and 1646 for TCP/IP communications. Access Registrar can be configured to use other ports, if necessary. If you add additional ports, however, Access Registrar will use the added ports and no longer use ports 1645 and 1646. These ports can still be used by adding them to the list of ports to use.
To configure Cisco AR to use ports other than the default ports, complete the following steps:
Step 1
cd /Radius/Advanced/Ports
[ //localhost/Radius/Advanced/Ports ]
<no ports specified, will be using the well-known ports, 1645, 1646>
Step 2
add 1812
add 1813
ls
[ //localhost/Radius/Advanced/Ports ]
Entries 1 to 2 from 2 total entries
Current filter: <all>
1812/
1813/
Note
Step 3
save
Validating //localhost...
Saving //localhost...
reload
Reloading Server 'Radius'...
Server 'Radius' is Running, its health is 10 out of 10
Displaying the UserLists
The first subobject in the RADIUS hierarchy that you can configure is the Userlists. The UserLists object contains all of the individual UserLists, which in turn contain the specific users.
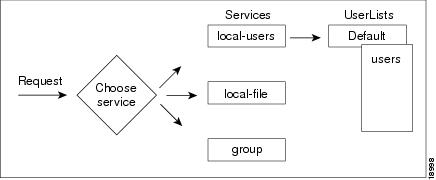
When Cisco Access Registrar 3.5 receives an Access-Request, it directs it to an authentication and/or authorization Service. If the Service has its type set to local, the Service looks up the user's entry in the specific UserList, and authenticates and/or authorizes the user.
Cisco Access Registrar 3.5, by default, specifies a Service called local-users that has the type local and uses the Default UserList (Figure 4-1).
Figure 4-1 Choosing Appropriate Services
Displaying the Default UserList
Step 1
cd /Radius/Userlists/Default
Step 2
ls -R
Cisco AR displays the three sample users:
•
•
•
Adding Users to UserLists
Use the aregcmd command add to create a user under a UserList. The following lists the steps required to add a user:
Step 1
cd /Radius/Userl
[ //localhost/Radius/UserLists ]
Entries x to x from x total entries
Current filter: <all>
localUsers
Step 2
cd localUsers
[ //localhost/Radius/UserLists/localUsers ]
Entries 0 to 0 from 0 total entries
Current filter: <all>
Name = localUsers
Description =
Step 3
add jane
Added jane
Step 4
cd jane
[ //localhost/Radius/UserLists/localUsers/jane ]
Name = jane
Description =
Password =
Enabled = TRUE
Group~ =
BaseProfile~ =
AuthenticationScript~ =
AuthorizationScript~ =
UserDefined1 =
AllowNullPassword = FALSE
Step 5
set p password
Retype password to confirm:
Set Password <encrypted>
Note
Deleting Users
To delete the sample users, or if you want to remove a user you have added, use the delete command.
From the appropriate UserList, use the delete command, and specify the name of the user you want to delete. For example, to delete user beth from the Default UserList, type:
cd /Radius/UserLists/Default
delete beth
Displaying UserGroups
The UserGroups object contains the specific UserGroups. Specific UserGroups allow you to maintain common authentication and authorization attributes in one location, and then have users reference them. By having a central location for attributes, you can make modifications in one place instead of having to make individual changes throughout your user community.
Cisco Access Registrar 3.5 has three default UserGroups:
•
•
•
For this basic site, you do not need to change these UserGroups. You can, however, use the add or delete commands to add or delete groups.
Configuring Clients
The Clients object contains all NASs and proxies that communicate directly with Cisco Access Registrar 3.5. Each client must have an entry in the Clients list, because each NAS and proxy share a secret with the RADIUS server, which is used to encrypt passwords and to sign responses.
Note
Adding a NAS
You must configure your specific NAS from both ends of the connection. That is, you must configure Cisco Access Registrar 3.5 for your NAS, and you must configure your NAS for Cisco Access Registrar 3.5.
Step 1
cd /Radius/Clients
Step 2
add QuickExampleNAS
Step 3
cd /Radius/Clients/QuickExampleNAS
Step 4
set Description WestOffice
set IPAddress 209.165.200.225
set SharedSecret xyz
set Type NAS
set Vendor USR
set IncomingScript ParseServiceHints
The script, ParseServiceHints, checks the username for %PPP or %SLIP. It uses these tags to modify the request so it appears to the RADIUS server that the NAS requested that service.
Note
Configure your NAS, using your vendor's documentation. Make sure both your NAS and the Client specification have the same shared secret.
Configuring Profiles
The Profiles object allows you to set specific RFC-defined attributes that Cisco Access Registrar 3.5 returns in the Access-Accept response. You can use profiles to group attributes that belong together, such as attributes that are appropriate for a particular class of PPP or Telnet user. You can reference profiles by name from either the UserGroup or the user properties. The sample users, mentioned earlier in this chapter, reference the following Cisco Access Registrar 3.5 profiles:
•
•
•
Setting RADIUS Attributes
When you want to set an attribute to a profile, use the following command syntax:
set attribute value
This syntax assigns a new value to the named attribute. The following example sets the attribute Service-Type to Framed:
Step 1
cd /Radius/Profiles/Default-Telnet-users/attributes
Step 2
set Service-Type Framed
When you need to set an attribute to a value that includes a space, you must double-quote the value, as in the following:
set Framed-Route "192.168.1.0/24 192.168.1.1"
Adding Multiple Cisco AV Pairs
When you want to add multiple values to the same attribute in a profile, use the following command syntax:
set attribute value1 value2 value3
The AV pairs cannot be added one at a time or each subsequent command will overwrite the previous value. For example, consider the following command entry:
set Cisco-AVpair "vpdn:12tp-tunnel-password=XYZ" "vpdn:tunnel-type=12tp" "vpdn:tunnel-id=telemar" "vpdn:ip-addresses=209.165.200.225"
ls
Cisco-Avpair = vpdn:12tp-tunnel-password=XYZCisco-Avpair = vpdn:tunnel-type=12tpCisco-Avpair = vpdn:tunnel-id=telemarCisco-Avpair = vpdn:ip-addresses=209.165.200.225
Note
Validating and Using Your Changes
After you have finished configuring your Cisco Access Registrar 3.5 server, you must save your changes. Saving your changes causes Cisco Access Registrar 3.5 to validate your changes and, if there were no errors, commit them to the configuration database.
Using the save command, however, does not automatically update your server. To update your server you must use the reload command. The reload command stops your server if it is running, and then restarts the server, which causes Cisco Access Registrar 3.5 to reread the configuration database.
You must save and reload your configuration changes in order for them to take effect in the Cisco Access Registrar 3.5 server.
Saving and Reloading
From anywhere in the radius object hierarchy, type the save and reload commands.
Step 1
save
Step 2
reload
Testing Your Configuration
Now that you have configured some users and a NAS, you are ready to test your configuration. There are two ways you can test your site:
1.
2.
Using radclient
You can use the radclient command simple to create and send a packet. The following example creates an Access-Request packet for user john with password john, and the packet identifier p001. It displays the packet before sending it. It uses the send command to send the packet, which displays the response packet object identifier, p002. Then, the example shows how to display the contents of the response packet.
Step 1
radclient
Step 2
Access Registrar RADIUS Test Client Version 1.3Copyright (C) 1995-1998 by American Internet Corporation, and 1999 by Cisco Systems, Inc. All rights reserved.Logging in to localhost... done.Step 3
simple john john
p001The radclient command displays the ID of the packet p001.
Step 4
p001
Packet: code = Access-Request, id = 0, length = 0, attributes =User-Name = johnUser-Password = johnNAS-Identifier = localhostNAS-Port = 0Step 5
p001 send
p002Step 6
p002
Packet: code = Access-Accept, id = 1,\
length = 38, attributes =
Login-IP-Host = 196.168.1.94
Login-Service = Telnet
Login-TCP-Port = 541Troubleshooting Your Configuration
If you are unable to receive an Access-Accept packet from the Cisco Access Registrar 3.5 server, you can use the aregcmd command trace to troubleshoot your problem.
The trace command allows you to set the trace level on your server, which governs how much information the server logs about the contents of each packet. You can set the trace levels from zero to four. The system default is zero, which means that no information is logged.
Setting the Trace Level
Step 1
> aregcmd
Step 2
trace 2
Step 3
Step 4
host% tail -f /opt/CSCOar/logs/name_radius_1_trace
Step 5
Configuring Accounting
To configure Cisco Access Registrar 3.5 to perform accounting, you must do the following:
1.
2.
3.
After you save and reload the Cisco AR server configuration, the Cisco AR server writes accounting messages to the accounting.log file in the /opt/CSCOar/logs directory. The Cisco AR server stores information in the accounting.log file until a rollover event occurs. A rollover event is caused by the accounting.log file exceeding a pre-set size, a period of time transpiring, or on a scheduled date.
When the rollover event occurs, the data in accounting.log is stored in a file named by the prefix accounting, a date stamp (yyyymmdd), and the number of rollovers for that day. For example, accounting-20010619-14 would be the 14th rollover on June 19, 2001.
The following shows the properties for a service called CiscoAccounting:
[ //localhost/Radius/Services/CiscoAccounting ]Name = CiscoAccountingDescription =Type = fileIncomingScript~ =OutgoingScript~ =OutagePolicy~ = RejectAllOutageScript~ =FilenamePrefix = accountingMaxFileSize = "10 Megabytes"MaxFileAge = "1 Day"RolloverSchedule =UseLocalTimeZone = FALSEConfiguring SNMP
Before you can perform SNMP configuration, you must first stop the SNMP master agent, then configure your local snmpd.conf file. The snmpd.conf file is the configuration file which defines how the AR server's SNMP agent operates. The snmpd.conf file might contain any of the directives found in the DIRECTIVES section.
Enabling SNMP in the Cisco AR Server
To enable SNMP on the Cisco AR server, launch aregcmd and set the /Radius/Advanced/SNMP/Enabled property to TRUE.
aregcmd
cd /Radius/Advanced/SNMP
[ //localhost/Radius/Advanced/SNMP ]Enabled = FALSETracingEnabled = FALSEInputQueueHighThreshold = 90InputQueueLowThreshold = 60MasterAgentEnabled = TRUEset Enabled TRUE
Stopping the Master Agent
You stop the Cisco AR SNMP master agent by stopping the Cisco Access Registrar server.
/opt/CSCOar/bin/arserver stop
Modifying the snmpd.conf File
The path to the snmpd.conf file is /cisco-ar/ucd-snmp/share/snmp. Use vi (or another text editor) to edit the snmpd.conf file. There are three parts of this file to modify:
•
•
•
Access Control
Access control defines who can query the system. By default, the agent responds to the public community for read-only access, if run without any configuration file in place.
The following example from the default snmpd.conf file shows how to configure the agent so that you can change the community names, and give yourself write access as well.
Complete the following steps to modify the snmpd.conf file.
Step 1
###############################################################################
# Access Control
###############################################################################
Step 2
# sec.name source community
com2sec local localhost private
com2sec mynetwork 10.1.9.0/24 public
The names are tokens that you define arbitrarily.
Step 3
# sec.model sec.name
group MyRWGroup v1 local
group MyRWGroup v2c local
group MyRWGroup usm local
group MyROGroup v1 mynetwork
group MyROGroup v2c mynetwork
group MyROGroup usm mynetwork
Step 4
# incl/excl subtree mask
view all included .1 80
Step 5
# context sec.model sec.level match read write notif
access MyROGroup "" any noauth exact all none none
access MyRWGroup "" any noauth exact all all none
Trap Recipient
The following example shows the default configuration that sets up trap recipients for SNMP versions v1 and v2c.
Note
# -----------------------------------------------------------------------------
trapcommunity trapcom
trapsink zubat trapcom 162
trap2sink ponyta trapcom 162
###############################################################################
Note
trapcommunity defines the default community string to be used when sending traps. This command must appear prior to trapsink or trap2sink which use this community string.
trapsink and trap2sink are defined as follows:
trapsink hostname community port
trap2sink hostname community port
System Contact Information
System contact information is provided in two variables through the snmpd.conf file, syslocation and syscontact.
Look for the following lines in the snmpd.conf file:
###############################################################################
# System contact information
#
#
syslocation Your Location, A Building, 8th Floor
syscontact A. Person <someone@somewhere.org>
Restarting the Master Agent
You restart the Cisco AR SNMP master agent by restarting the Cisco Access Registrar server.
/opt/CSCOar/bin/arserver start
Configuring Prepaid Billing
This section describes the configuration required before you can use the prepaid billing feature with Cisco Access Registrar 3.5. The Cisco Access Registrar 3.5 Concepts and Reference Guide provides detailed information about the prepaid billing feature.
Cisco Access Registrar 3.5 supports two types of prepaid billing, prepaid-is835c and prepaid-crb.
T o use the prepaid billing feature of Cisco Access Registrar 3.5, you must configure a new prepaid service type and reference a RemoteServer with its protocol set to either prepaid-is835c or prepaid-crb. The following lists the prepaid service properties:
[ //localhost/Radius/Services/prepaid-api ]Name = prepaid-api (for example)Description =Type = prepaidIncomingScript~ =OutgoingScript~ =OutagePolicy~ = RejectAllOutageScript~ =MultipleServersPolicy = FailoverRemoteServers/Prepaid Billing Services
You can configure up to five services to use the prepaid billing feature:
•
•
•
•
Prepaid Service
If you use the Cisco AR 3.5 server in your prepaid billing solution, you must configure a service of type prepaid as shown in Configuring Prepaid Billing, for example prepaid-api. The prepaid service is a new service type for Cisco AR 3.5 that mediates between the client NAS and the prepaid billing server.
The prepaid service must receive accounting requests to accurately charge the prepaid billing user. You can also set the prepaid service in a group service to log accounting requests locally or to proxy the accounting requests to another service or to both locations.
AA Service
If you use the Cisco AR 3.5 server for authentication and authorization in your prepaid billing solution, you might want to configure an AA service. For example, you might configure a service similar to local-users (in the example configuration) for authentication and authorization of local users.
If some of the users are non-prepaid users or if the prepaid users need to have RADIUS authorization attributes returned, you should configure an AA service to perform that authentication and authorization.
If all of the users in a realm are prepaid users and the prepaid billing client does not require normal RADIUS authorization attributes, an AA service is not necessary.
Accounting Service
If you want to use the Cisco AR 3.5 server to record the accounting records locally or to forward the accounting records to another RADIUS server, you must configure an accounting service. You might configure a service similar to local-file (in the example configuration) for accounting requests. Accounting requests can be logged locally (with an accounting service) or remotely (with a RADIUS service).
If you use the prepaid billing server to generate the accounting records, an accounting service is not necessary.
Group Services
Your prepaid billing solution might require a group service to tie together an AA service with a prepaid service, a group service to tie together an accounting service with a prepaid service, or both.
If you are using an AA service with your prepaid billing solution, you must configure a group service, for example prepaid-users, that ties the requests to the AA service (local-users in our example) with the prepaid service.
If you are using Cisco AR 3.5 for an accounting service with your prepaid billing solution, you must configure a group service, for example prepaid-file, that ties accounting requests to both the regular accounting service (local-file in our example) and the prepaid service.
Group Services for Prepaid User Authentication and Authorization
You must configure a prepaid-users-like service if you have some users who use prepaid billing and some users who are not. If this is the case, you can configure users by setting a user-specific attribute of Cisco-AVPair=crb-entity-type=2 if the subscriber is postpaid with no credit limit and Cisco-AVPair=crb-entity-type=3 if the subscriber is postpaid with a credit limit. In either case, Cisco Access Registrar does not call out to the prepaid billing server for the initial authentication.
Use the following steps to create and configure the prepaid-users service.
Step 1
[ //localhost/Radius/Services/prepaid-users ]Name = prepaid-usersDescription =Type =IncomingScript~ =OutgoingScript~ =Step 2
set type group
Set Type groupls
[ //localhost/Radius/Services/prepaid-users ]Name = prepaid-usersDescription =Type = groupIncomingScript~ =OutgoingScript~ =ResultRule = ANDGroupServices/Step 3
cd groupservices
[ //localhost/Radius/Services/prepaid-users/GroupServices ]set 1 local-users
Set 1 local-fileset 2 prepaid-api
Set 2 prepaid-apils
[ //localhost/Radius/Services/prepaid-users/GroupServices ]1. local-users2. prepaid-api
Group Services for Prepaid Accounting
You can configure a group service, such as prepaid-file, that directs requests to both the regular accounting service (local-file in this example) and the prepaid service. You must configure the prepaid-file service if you want to log accounting requests locally or to proxy the accounting requests to another service or to both locations.
Complete the following steps to create and configure the prepaid accounting group service.
Step 1
[ //localhost/Radius/Services/prepaid-file ]Name = prepaid-fileDescription =Type =IncomingScript~ =OutgoingScript~ =Step 2
set type group
Set Type groupls
[ //localhost/Radius/Services/prepaid-file ]Name = prepaid-usersDescription =Type = groupIncomingScript~ =OutgoingScript~ =ResultRule = ANDGroupServices/Step 3
cd groupservices
[ //localhost/Radius/Services/prepaid-file/GroupServices ]set 1 local-file
Set 1 local-fileset 2 prepaid-api
Set 2 prepaid-apils
[ //localhost/Radius/Services/prepaid-file/GroupServices ]1. local-file2. prepaid-api
RemoteServers
Prepaid billing also requires you to configure a RemoteServer with its protocol set to either prepaid-is835c or prepaid-crb.
Prepaid-CRB
The following is the default configuration of a prepaid-crb RemoteServer.
[ //localhost/Radius/RemoteServers/prepaid-crb ]Name = prepaid-crbDescription =Protocol = prepaid-crbIPAddress =Port = 0Filename =Connections = 8Prepaid-IS835C
The following is the default configuration of a prepaid-is835c RemoteServer.
[ //localhost/Radius/RemoteServers/prepaid-is835c ]Name = prepaid-is835cDescription =Protocol = prepaid-is835cIPAddress =Port = 0Filename =Connections = 8Configuring Packet of Disconnect
Cisco Access Registrar 3.5 adds support for the Packet of Disconnect (POD). The POD feature enables Cisco AR to send disconnect requests (PODs) to a NAS so that all the session information and the resources associated with the user sessions can be released. Cisco AR can also determine when to trigger and send the POD.
For example, when a PDSN handoff occurs during a mobile session, the new PDSN sends out a new access-request packet to Cisco AR for the same user. Cisco AR should detect this handoff by the change in NAS-Identifier in the new request and trigger sending a POD to the old PDSN if it supports POD. Cisco AR also provides an option for administrator to initiate sending POD requests through the command-line interface (CLI) for any user session. Cisco AR forwards POD requests from external servers to the destination NAS.
Configuring the Client Object
You should enable POD for each client object that might want to send disconnect requests to those clients. You enable POD in a client object using the EnablePOD property. This property is set to FALSE by default when you create a client object. The following example shows the default configuration for a new client object, NAS1.
[ //localhost/Radius/Clients/NAS1 ]Name = nas1Description =IPAddress =SharedSecret =Type = NASVendor =IncomingScript~ =OutgoingScript~ =EnablePOD = FALSEIf the Cisco AR server might send a POD to this client, set the EnablePOD property to TRUE. When you set this property to TRUE, the Cisco AR server creates a POD subdirectory under the client object. The following example shows a newly created POD subdirectory:
[ //localhost/Radius/Clients/NAS1/POD ]Port = 3799PODSecret =InitialTimeout = 5000MaxTries = 3AttributesToBeSent = DefaultThe default POD port is 3799. You can change the POD port, if desired.
The property PODSecret is initially set to the same as value as the client's SharedSecret property when you set EnablePOD to TRUE. You can chose to configure a different secret for POD in this subdirectory.
The InitialTimeout property represents the number of milliseconds used as a timeout for the first attempt to send a POD packet to a remote server. For each successive retry on the same packet, the previous timeout value used is doubled. You must specify a number greater than zero, and the default value is 5000 (or 5 seconds).
The MaxTries property represents the number of times to send a proxy request to a remote server before deciding the server is off-line. You must specify a number greater than zero, and the default is 3.
The AttributesToBeSent property points to a group of attributes to be included in a disconnect-request packet sent to this Client.
You can create and configure the POD attribute groups under PODAttributes subdirectory in /Radius/Advanced. The Default group contains commonly used POD attributes. The following is an example of the PODAttributes subdirectory:
[ //localhost/Radius/Advanced/PODAttributes/ ]Default/Name = DefaultDescription =Attributes/1. Calling-Station-Id2. Framed-IP-Address3. Acct-Multi-Session-IdConfiguring a Resource Manager for POD
Cisco Access Registrar 3.5 adds a new resource manager type called session-cache. When you set a resource manager to session-cache, the resource manager's configuration contains a subdirectory called AttributesToBeCached. The following is an example Resource Manager set to type session-cache:
[ //localhost/Radius/ResourceManagers/PODresourceMgr ]Name = PODresourceMgrDescription =Type = session-cacheOverwriteAttributes = FALSEAttributesToBeCached/The attributes you configure under the AttributesToBeCached directory are cached in the session record during session management. The cached attributes are then sent in the disconnect-request for this session.
The OverwriteAttributes property indicates whether to overwrite the existing attributes if there are any in the session record. Since this resource manager can be invoked during Access-Request as well as Accounting-Start processing, the OverwriteAttributes can be used to control if the attributes cached during Access-Request processing can be overwritten with the attributes available during Accounting-Start processing.
The following is an example of a typical session-cache resource manager:
[ //localhost/Radius/ResourceManagers/RM-New ]Name = RM-NewDescription =Type = session-cacheOverwriteAttributes = TRUEAttributesToBeCached/1. Framed-IP-Address2. CDMA-Correlation-IDThe attributes used in the example can be added as an indexed list using add or set commands (in any order).
Proxying POD Requests from External Servers
Cisco AR can also proxy the disconnect requests received from external servers. To make Cisco AR listen for external POD requests, the ListenForPOD property under /Radius/Advanced should be set to TRUE. The default value for this is FALSE. The default POD listening port is 3799. However this can be changed by configuring a new port of type pod under /Radius/Advanced/Ports and setting the new port number accordingly.
For security reasons, the source of a POD request should be configured as a remote server in Cisco AR and the remote server should be configured to accept PODs. The property AcceptPOD can be set to TRUE to do this. The default for this is FALSE. POD requests from unauthorized sources are silently discarded.
CLI Options for POD
Cisco Access Registrar 3.5 provides new options for the query-sessions and release-sessions CLI commands. One new option enables querying or releasing sessions based on the session's age. The other option enables for querying or releasing sessions based on any valid RADIUS attribute available in the user's session record.
query-sessions
The syntax for using query-sessions with-Age option is the following:
query-sessions <path> with-Age <value>
Where <path> is the path to the server, session-manager or resource manager and <value> is the minimum age of the session specified in minutes or hours with options M, Minutes, H or Hours. This command returns all sessions that are older than the given age value.
The syntax for using query-sessions with-Attribute option is the following:
query-sessions <path> with-Attribute <name> <value>
Where <name> is the RADIUS attribute name and <value> is the value of the attribute to be matched. This command returns the sessions where a session record contains and matches the attribute value specified in <value> field.
release-sessions
The syntax for using release-sessions with-Age option is the following:
release-sessions <path> with-Age <value>
Where <path> is the path to the server, session-manager or resource manager and <value> is the minimum age of the session specified in minutes or hours with options M, Minutes, H or Hours. This command returns all sessions that are older than the given age value.
The syntax for using release-sessions with-Attribute option is the following:
release-sessions <path> with-Attribute <name> <value>
Where <name> is the RADIUS attribute name and <value> is the value of the attribute to be matched. This command returns the sessions where a session record contains and matches the attribute value specified in <value> field.
A new option is also available for release-sessions command to enable an administrator to trigger sending a POD for a user after the session is released.
release-sessions <path> with-<type> <value> [send-pod]
Where <path> is the path to the server, Session Manager, or Resource Manager and with-<type> is one of the following: with-NAS, with-User, with-IP-Address with-ID, or with-Age. The release-sessions command with an optional [send-pod] at the end results in Cisco AR sending a POD to the NAS (as determined from the session record) after the session is actually released.
Configuring Dynamic DNS
Cisco Access Registrar 3.5 supports the the Dynamic DNS protocol providing the ability to update DNS servers. The dynamic DNS updates contain the hostname/IP Address mapping for sessions managed by Cisco AR.
You enable dynamic DNS updates by creating and configuring new Resource Managers and new RemoteServers, both of type dynamic-dns. The dynamic-dns Resource Managers specify which zones to use for the forward and reverse zones and which Remote Servers to use for those zones. The dynamic-dns Remote Servers specify how to access the DNS Servers.
Before you configure Cisco AR you need to gather information about your DNS environment. For a given Resource Manager you must decide which forward zone you will be updating for sessions the resource manager will manage. Given that forward zone, you must determine the IP address of the primary DNS server for that zone. If the dynamic DNS updates will be protected with TSIG keys, you must find out the name and the base64 encoded value of the secret for the TSIG key. If the resource manager should also update the reverse zone (ip address to host mapping) for sessions, you will also need to determine the same information about the primary DNS server for the reverse zone (IP address and TSIG key).
If using TSIG keys, use aregcmd to create and configure the keys. You should set the key in the Remote Server or the Resource Manager, but not both. Set the key on the Remote Server if you want to use the same key for all of the zones accessed through that Remote Server. Otherwise, set the key on the Resource Manager. That key will be used only for the zone specified in the Resource Manager.
To configure Dynamic DNS, complete the following steps:
Step 1
Step 2
cd /Radius/Advanced/DDNS/TSIGKeys
add foo.com
This example named the TSIG Key, foo.com, which is related to name of the example DNS server we use. You should choose a name for TSIG keys that reflects the DDNS client-server pair (for example, foo.bar if the client is foo and the server is bar), but you should use the name of the TSIG Key as defined in the DNS server.
Step 3
cd foo.com
set Secret <base64-encoded string>
The Secret should be set to the same base64-encoded string as defined in the DNS server. If there is a second TSIG Key for the primary server of the reverse zone, follow these steps to add it, too.
Step 4
Step 5
cd /Radius/RemoteServers
add ddns
This example named the remote server ddns which is the related to the remote server type. You can use any valid name for your remote server.
Step 6
cd ddns
set Protocol dynamic-dns
set IPAddress 10.10.10.1 (ip address of primary dns server for zone)
set ForwardZoneTSIGKey foo.com
set ReverseZoneTSIGKey foo.com
If the reverse zone will be updated and if the primary server for the reverse zone is different than the primary server for the forward zone, you will need to add another Remote Server. Follow the previous two steps to do so. Note that the IP Address and the TSIG Key will be different.
You can now use aregcmd to create and configure a resource manager of type dynamic-dns.
Step 7
cd /Radius/ResourceManagers
add ddns
This example named the service ddns which is the related to the resource manager type but you can use any valid name for your resource manager.
Step 8
cd ddns
set Type dynamic-dns
set ForwardZone foo.com
set ForwardZoneServer DDNS
Finally, reference the new resource manager from a session manager. Assuming that the example configuration was installed, the following step will accomplish this. If you have a different session manager defined you can add it there if that is appropriate.
Step 9
cd /Radius/SessionManagers/session-mgr-1/ResourceManagers
set 5 DDNS
Note
Step 10
Testing Dynamic DNS with radclient
After the Resource Manager has been defined it must be referenced from the appropriate Session Manager. You can use radclient to confirm that dynamic DNS has been properly configured and is operational.
To test Dynamic DNS using radclient, follow these steps:
Step 1
cd /opt/CSCOar/bin
aregcmd
Step 2
trace 4
Step 3
cd /opt/CSCOar/bin
radclient
Step 4
acct_request Start username
Example:
set p [ acct_request Start bob ]
Step 5
Step 6
$p send
Step 7