-
Cisco IOS Tcl IVR and VoiceXML Application Guide - 12.3(14)T and later
-
Title
-
Cisco IOS Tcl IVR and VoiceXML Feature Roadmap
-
Tcl IVR and VoiceXML Applications Overview
-
Configuring Basic Functionality for Tcl and VoiceXML Applications
-
Configuring Audio File Properties for Tcl and VoiceXML Applications
-
Configuring VoiceXML Voice Store and Forward
-
Configuring ASR and TTS Properties
-
Configuring Fax Detection for VoiceXML
-
Configuring Media Inactive Call Detection
-
Configuring Tcl IVR 2.0 Session Interaction
-
Configuring Telephony Call-Redirect Features
-
Configuring SIP and TEL URL Support
-
Monitoring and Troubleshooting Voice Applications
-
MGCP Scripting for VoiceXML
-
Index
-
 Feedback
Table Of Contents
Configuring Telephony Call-Redirect Features
Information About Telephony Call-Redirect Features
How to Configure Telephony Call-Redirect Features
Configuring Call-Transfer Method for Voice Applications
Configuring the Parameter Routing Method
Configuring the Call Rerouting Method
Verifying the Call-Transfer Method for Voice Applications
Enabling TBCT for Trunk Groups
Configuring Outbound Dial Peer for TBCT Calls
Terminating Billing for Active TBCT Calls
TBCT with Notify on Clear Example
Configuring Telephony Call-Redirect Features
Call-redirect features enable call transfer, call forwarding, and call disconnect capabilities on Cisco voice gateways. Voice applications support the Release-to-Pivot (RTPvt) and ISDN Two B-Channel Transfer (TBCT) call-redirect features, and have expanded abilities to receive and send generic transparency descriptor (GTD) information. These features are grouped under the feature name "Voice Application Call Control Enhancements."
For more information about this and related Cisco IOS voice features, see the following:
•
Overview of Cisco IOS Tcl IVR and VoiceXML Applications
•
Note
Feature History for Telephony Call-Redirect Features
Contents
•
•
Prerequisites
General
•
•
RTPvt
•
TBCT
•
•
•
•
GTDs
•
–
–
Restrictions
•
•
•
Information About Telephony Call-Redirect Features
To configure call-control features, you should understand the following concepts:
Benefits
•
•
•
•
GTD Parameters
GTD objects are used to represent ISDN User Part (ISUP) messages, parameters, and R2 signals. These objects are encapsulated into existing signaling protocols (for example, H.225), facilitating end-to-end transport. Using GTD as a transport mechanism for signaling data in Cisco IOS software provides a common format for sharing signaling data among various components in a network and for interworking various signaling protocols.
GTD enhancements introduced in this feature include the following:
•
•
•
For detailed information about GTD parameters and how to implement them in a voice application, see the following resources:
•
•
Release-to-Pivot
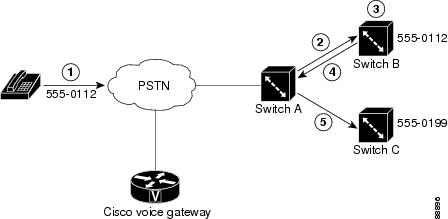
Release-to-Pivot (RTPvt) is a call-redirect method for SS7 networks. It allows a switch to release a call to another switch located earlier in the call path when the originating switch determines that the call should be connected to a new destination number. The preceding switch reoriginates the call directly to the new destination address.
RTPvt provides optimal rerouting capabilities. It frees up trunking and switching resources by rerouting calls that would otherwise be hair-pinned. Hairpinning occurs when an incoming PSTN call cannot be delivered over IP so the call is looped back out to the PSTN. RTPvt is equivalent to the ISDN PRI Two B-Channel Transfer standard.
The following describes the call flow for a release to pivot scenario:
1.
2.
3.
4.
5.
Figure 9-1 illustrates the preceding call-flow scenario:
Figure 9-1 Release-To-Pivot Example
For a TCL application, RTPvt can be invoked at different stages of the call flow, depending on the redirect capability of the originating switch. For a VoiceXML application, RTPvt can be invoked only after the call is answered.
Two B-Channel Transfer
Two B-Channel Transfer (TBCT) is a call-transfer standard for ISDN interfaces. This feature enables a Cisco voice gateway to request an NI-2 switch to directly connect two independent calls. The two calls can be served by the same PRI or by two different PRIs on the gateway. This feature is based on Telcordia GR-2865-CORE.
TBCT makes efficient use of resources by releasing two B channels after a call transfer. Blind transfer of PSTN calls can happen outside the Cisco gateway without tying up gateway resources.
Although the gateway is not involved after calls are transferred, billing continues as though the calls are still connected to the gateway. Customers using this feature need to have special agreements with their ISDN service provider regarding billing, or optionally, the gateway can subscribe to get notification from the switch when a transferred call clears.
To use TBCT, the following conditions must be met:
•
•
•
•
•
ETSI Call Transfer
Support is provided for European Telecommunications Standards Institute (ETSI) explicit call transfer functionality on Cisco IOS gateways. The ECT supplementary service enables a user who has two calls, each of which can be either an incoming call or an outgoing call, to connect one of the active calls to another active or alerting call.
Note
ETSI call transfer is enabled using the TBCT for Trunk Groups feature. See Enabling TBCT for Trunk Groups for more information.
How to Configure Telephony Call-Redirect Features
See the following sections for configuration tasks for call-control features.
•
•
•
•
•
•
•
Configuring Call-Transfer Method for Voice Applications
You can configure the call-transfer method on the gateway or through properties in the VoiceXML document or Tcl script. For information on configuring the call-transfer method by using VoiceXML or Tcl properties, see the Cisco VoiceXML Programmer's Guide or Tcl IVR API Version 2.0 Programmer's Guide, respectively.
Note
Configuring the Parameter Routing Method
The param mode command is used to configure the default behavior of the callsetup package during the initial attempt to place a call to the specified destination. The callsetup package is used by applications and other packages to place outbound call legs and interwork them with incoming call legs.
To configure the parameter routing method, perform the following steps:
SUMMARY STEPS
1.
2.
3.
4.
5.
6.
7.
8.
DETAILED STEPS
Step 1
enableExample: Router> enableEnter your password if prompted.
Step 2
configure terminalExample: Router# configure terminalStep 3
applicationExample: Router(config)# applicationStep 4
service service-nameExample: Router(config-app)# service fax_detectStep 5
paramspace callsetup mode {redirect | redirect-at-alert | redirect-at-connect |
redirect-rotary | rotary}
Example: Router(config-app-param)# paramspace callsetup mode redirect-rotary
Step 6
exitExample: Router(config-app-param)# exit
Step 7
package callsetupExample: Router(config-app)# package callsetupStep 8
param mode {redirect | redirect-at-alert | redirect-at-connect | redirect-rotary |
rotary}
Example: Router(config-app-param)# param mode redirect
Configuring the Call Rerouting Method
The param reroutemode command is used to configure the default behavior of the callsetup package during the redirect attempt to place a call to the specified destination.This scenario occurs when the initial attempt at placing a call to the original destination is redirected by the destination endpoint to a new endpoint.
To configure the call rerouting method, perform the following steps:
SUMMARY STEPS
1.
2.
3.
4.
5.
6.
7.
8.
DETAILED STEPS
Step 1
enableExample: Router> enableEnter your password if prompted.
Step 2
configure terminalExample: Router# configure terminalStep 3
applicationExample: Router(config)# applicationStep 4
service service-nameExample: Router(config-app)# service fax_detectStep 5
{redirect | redirect-at-alert | redirect-at-connect | redirect-rotary | rotary}Example: Router(config-app-param)# paramspace callsetup reroutemode redirect-rotary
Step 6
exitExample: Router(config-app-param)# exit
Step 7
package callsetupExample: Router(config-app)# package callsetupStep 8
param reroutemode {redirect | redirect-at-alert | redirect-at-connect |
redirect-rotary | rotary}
Example: Router(config-app-param)# param reroutemode redirect
Verifying the Call-Transfer Method for Voice Applications
To verify the call-transfer method for voice applications, use the show running-config command.
application...!package callsetupparam mode redirect-rotaryparam reroutemode redirect...service fax_detect flash:app_fax_detect.2.1.2.2.tclparamspace callsetup mode redirect-rotaryparam pin-len 4paramspace app_debitcard warning-time 60...Troubleshooting Tips
If the call-transfer configuration is not successful, verify the following:
•
•
Enabling RTPvt
No additional Cisco IOS configuration is required on the gateway to implement RTPvt, other than configuring the call-transfer method as described in the "Configuring Call-Transfer Method for Voice Applications" section. A TCL IVR script or VoiceXML document triggers RTPvt in response to the GTD Redirect Capability (RDC) parameter.
For detailed information on triggering RTPvt through a TCL IVR script or VoiceXML document, see the following documentation:
•
•
Enabling TBCT for Trunk Groups
To enable TBCT on multiple PRIs, all PRIs must be configured as part of the same trunk group. To create the trunk group and enable TBCT, perform the following steps.
SUMMARY STEPS
1.
2.
3.
4.
5.
6.
7.
8.
9.
10.
11.
DETAILED STEPS
Step 1
enable
Example: Router> enable
Enter your password if prompted.
Step 2
configure terminal
Example: Router# configure terminal
Step 3
isdn switch-type switch-type
Example: Router(config)# isdn switch-type primary-ni
To support TBCT, the switch type must conform to the NI-2 standard. For ETSI Call Transfer, the switch type should be primary-net5.
Step 4
trunk group name
Example: Router(config)# trunk group 1
Step 5
carrier-id name [cic]
Example: Router(config-trunk-group)# carrier-id north1
Step 6
isdn supp-service tbct [notify-on-clear]
Example: Router(config-trunk-group)# isdn supp-service tbct notify-on-clear
Note
Step 7
exit
Example: Router(config-trunk-group)# exit
Step 8
interface serial controller:timeslot
Example: Router(config)# interface serial 0:23
Note
Step 9
trunk-group name [preference_num]
Example: Router(config-if)# trunk-group 1
Use the name of the trunk group that was defined by using the trunk group command in Step 4.
Step 10
exit
Example: Router(config-if)# exit
Step 11
Configuring Outbound Dial Peer for TBCT Calls
The gateway must send an outgoing TBCT call over the same trunk as the incoming call. To assign the trunk group to an outbound dial peer and select the outbound dial peer based on the carrier ID, perform the following steps.
Note
SUMMARY STEPS
1.
2.
3.
4.
5.
6.
DETAILED STEPS
Step 1
enable
Example: Router> enable
Enter your password if prompted.
Step 2
configure terminal
Example: Router# configure terminal
Step 3
dial-peer voice number pots
Example: Router(config)# dial-peer voice 100 pots
Step 4
trunkgroup name
Example: Router(config-dial-peer)# trunkgroup 1
Use the name of the trunk group that was defined by using the trunk group command in Step 4 of the "Enabling TBCT for Trunk Groups" section.
Step 5
carrier-id target name
Example: Router(config-dial-peer)# carrier-id target north1
Set this target carrier ID to match the source carrier ID that was specified in Step 5 of the "Enabling TBCT for Trunk Groups" section.
Step 6
exit
Example: Router(config-trunk-group)# exit
Configuring TBCT Call Limits
This section includes the commands for setting limits on the number and duration of active TBCT calls that the gateway tracks.
Note
SUMMARY STEPS
1.
2.
3.
4.
DETAILED STEPS
Step 1
enable
Example: Router> enable
Enter your password if prompted.
Step 2
configure terminal
Example: Router# configure terminal
Step 3
tbct max calls number
Example: Router(config)# tbct max calls 50
Step 4
tbct max call duration minutes
Example: Router(config)# tbct max call duration 10
Terminating Billing for Active TBCT Calls
SUMMARY STEPS
1.
2.
DETAILED STEPS
Step 1
enable
Example: Router> enable
Enter your password if prompted.
Step 2
tbct clear call {all | interface [call-tag]}
Example: Router# tbct clear call T1-6/0
Verifying TBCT
SUMMARY STEPS
1.
2.
3.
DETAILED STEPS
Step 1
Router# show running-config...!applicationservice callme tftp://10.10.10.1/scripts/call.vxmlparamspace callsetup mode redirect!Step 2
Router# show call application voice callmeVXML Application callmeURL=tftp://10.10.10.1/scripts/call.vxmlSecurity not trustedNo languages configuredIt has: 0 calls active.0 incoming calls0 calls handed off to it0 call transfers initiated0 pages loaded, 0 successful0 prompts played0 recorded messagesThe transfer mode is 'redirect'Interpreted by Voice Browser Version 2.0 for VoiceXML 1.0 & 2.0.The VXML Script is:------------------<?xml version="1.0"?><vxml version="1.0"><form id="record_to_ram"><record name="myrec"beep="true"maxtime="10s"--More--Translating "Program"dtmfterm="true"finalsilence="10ms"type="audio/basic;codec=g711ulaw"><prompt><audio src="flash:record.au"/></prompt><filled namelist="myrec"><prompt><value expr="myrec"/></prompt><clear namelist="myrec"/></filled></record></form></vxml>Step 3
Router# show call active voice redirect tbctTBCT:Maximum no. of TBCT calls allowed:No limitMaximum TBCT call duration:No limitTotal number TBCT calls currently being monitored = 1ctrl name=T1-2/0, tag=13, call-ids=(7, 8), start_time=*00:12:25.985 UTC Mon Mar 1 1993
Tip
Enabling ETSI Call Transfer
To enable support for ETSI call transfer for multiple PRIs, you must configure the PRIs as part of the same trunk group on the gateway. To create the trunk groups and enable ETSI call transfer, perform the following steps.
SUMMARY STEPS
1.
2.
3.
4.
5.
6.
7.
8.
9.
10.
11.
12.
13.
14.
DETAILED STEPS
Step 1
enable
Example: Router> enable
Enter your password if prompted.
Step 2
configure terminal
Example: Router# configure terminal
Step 3
isdn switch-type switch-type
Example: Router(config)# isdn switch-type primary-net5
Step 4
trunk group name
Example: Router(config)# trunk group 1
Step 5
isdn supp-service tbct
Example: Router(config-trunk-group)# isdn supp-service tbct
Note
Step 6
exit
Example: Router(config-trunk-group)# exit
Step 7
dial-peer voice number pots
Example: Router(config)# dial-peer voice 100 pots
Step 8
destination-pattern [+] string [T]Example: Router(config-dial-peer)# destination-pattern +5557922Step 9
trunkgroup name
Example: Router(config-dial-peer)# trunkgroup 1
Step 10
exit
Example: Router(config)# exitStep 11
interface serial controller:timeslot
Example: Router(config)# interface serial 0:23
Note
Step 12
trunk-group name [preference_num]
Example: Router(config-if)# trunk-group 1
Use the name of the trunk group that was defined by using the trunk group command in Step 4.
Step 13
exit
Example: Router(config-if)# exit
Step 14
Configuration Examples
This section provides the following configuration examples:
•
TBCT Trunk Group Example
!isdn switch-type primary-ni!!trunk group 1carrier-id north1isdn supp-service tbct!trunk group 2carrier-id south2isdn supp-service tbct...controller T1 1/0framing esfclock source line primarylinecode b8zspri-group timeslots 1-24!controller T1 1/1framing esfclock source line secondary 1linecode b8zspri-group timeslots 1-24!interface Serial1/0:23no ip addressno logging event link-statusisdn switch-type primary-niisdn incoming-voice modemtrunk-group 1no cdp enable!interface Serial1/1:23no ip addressno logging event link-statusisdn switch-type primary-niisdn incoming-voice modemtrunk-group 2no cdp enable...applicationservice tbct-app tftp://server1/scripts/TBCTalert.vxml!dial-peer voice 100 potsservice tbct-appincoming called-number 5550112direct-inward-dialport 1/1:23!dial-peer voice 101 potstrunkgroup 1carrier-id target north1!dial-peer voice 102 potstrunkgroup 2carrier-id target south2!TBCT with Notify on Clear Example
...interface Serial1/1:23no ip addressisdn supp-service tbct notify-on-clearisdn switch-type primary-niisdn incoming-voice modem!ETSI Call Transfer Example
The following is a sample configuration of the ETSI Call Transfer Feature:
Trunk Group Configuration
...trunk group 1isdn supp-service tbct...dial-peer voip 10 pots! Configures the POTS dial peer and points it to trunk group 1...destination-pattern 000000001trunkgroup 1...int s0:23trunk-group 1! Includes interface s0:23 in trunk group 1...int s1:23trunk-group 1! Includes interface s1:23 in trunk group 1...int s2:23trunk-group 2! Includes interface s2:23 in trunk group 2...
PRI Configuration
...int s0:23isdn supp-service tbct...dial-peer voice 20 pots! Configures the POTS dial peer and points it to trunk group 1...destination-pattern 000000002port 0:D! Points interface s0:23 to this dial peer...Where to Go Next
•
•
•
•
•
•
•
Additional References
•
•