-
Cisco IOS Switching Services Configuration Guide, Release 12.2
-
About the Cisco IOS Software Documentation
-
Using Cisco IOS Software
-
Cisco IOS Switching Services Overview
- Part 1: Cisco IOS Switching Paths
- Part 2: NetFlow
- Part 3: Multiprotocol Label Switching
- Part 4: Multilayer Switching
- Part 5: Multicast Distributed Switching
- Part 6: Virtual LANs
- Part 7: LAN Emulation
-
 Feedback
Table Of Contents
Fast Switching Configuration Task List
Enabling AppleTalk Fast Switching
Enabling Fast Switching on the Same IP Interface
Enabling Fast Switching of IPX Directed Broadcast Packets
Disabling Fast Switching for Troubleshooting
Disabling AppleTalk Fast Switching
Disabling Banyan VINES Fast Switching
Disabling DECnet Fast Switching
Disabling ISO CLNS Fast Switching Through the Cache
Controlling Route Cache Invalidation for IP
Displaying System and Network Statistics
Adjusting the Route Cache for IPX
Controlling IPX Route Cache Size
Controlling IPX Route Cache Invalidation
Padding Odd-Length IPX Packets
Configuring Fast Switching
This chapter describes how to configure fast switching on Cisco IOS devices. It provides configuration guidelines for switching paths and tuning guidelines.
For a complete description of the commands in this chapter, refer to the the Cisco IOS Switching Services Command Reference. To locate documentation of other commands that appear in this chapter, use the command reference master index or search online.
To identify the hardware platform or software image information associated with a feature, use the Feature Navigator on Cisco.com to search for information about the feature or refer to the software release notes for a specific release. For more information, see the section "Identifying Supported Platforms" in the chapter "Using Cisco IOS Software."
Fast Switching Configuration Task List
Fast switching allows higher throughput by switching a packet using a cache created by the initial packet sent to a particular destination. Destination addresses are stored in the high-speed cache to expedite forwarding. Routers offer better packet-transfer performance when fast switching is enabled. Fast switching is enabled by default on all interfaces that support fast switching.
To configure fast switching, perform the tasks described in the following sections:
•
Enabling AppleTalk Fast Switching
•
•
Fast switching is not supported for the X.25 encapsulations.
Enabling AppleTalk Fast Switching
AppleTalk access lists are automatically fast switched. Access list fast switching improves the performance of AppleTalk traffic when access lists are defined on an interface. Refer to the "Configuring AppleTalk" chapter in the Cisco IOS AppleTalk and Novell IPX Configuration Guide for guidelines on creating and using access lists and configuring AppleTalk.
Enabling IP Fast Switching
Fast switching involves the use of a high-speed switching cache for IP routing. Destination IP addresses are stored in the high-speed cache to expedite packet forwarding. In some cases, fast switching is inappropriate, such as when slow-speed serial links (64K and below) are being fed from higher-speed media such as T1 or Ethernet. In such a case, disabling fast switching can reduce the packet drop rate to some extent. Fast switching allows outgoing packets to be load balanced on a per-destination basis.
To enable or disable fast switching, use the following commands in interface configuration mode:
Enabling Fast Switching on the Same IP Interface
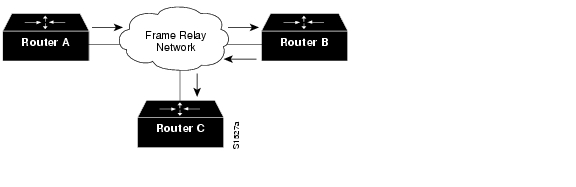
You can enable IP fast switching when the input and output interfaces are the same interface. This normally is not recommended, though it is useful when you have partially meshed media such as Frame Relay. You could use this feature on other interfaces, although it is not recommended because it would interfere with redirection.
Figure 7 illustrates a scenario where enabling fast switching on the same IP interface is desirable. Router A has a data-link connection identifier (DLCI) to Router B, and Router B has a DLCI to Router C. There is no DLCI between Routers A and C; traffic between them must go in and out of Router B through the same interface.
Figure 7 IP Fast Switching on the Same Interface
To allow IP fast switching on the same interface, use the following command in interface configuration mode:
Router(config-if)# ip route-cache same-interface
Enables the fast switching of packets out of the same interface on which they arrived.
Enabling Fast Switching of IPX Directed Broadcast Packets
By default, Cisco IOS software switches IPX packets that have been directed to the broadcast address. To enable fast switching of these IPX-directed broadcast packets, use the following command in global configuration mode:
Router(config)# ipx broadcast-fastswitching
Enables fast switching of IPX directed broadcast packets.
Enabling SMDS Fast Switching
SMDS fast switching of IP, IPX, and AppleTalk packets provides faster packet transfer on serial links with speeds above 56 kbps. Use fast switching if you use high-speed, packet-switched, datagram-based WAN technologies such as Frame Relay offered by service providers.
By default, SMDS fast switching is enabled.
To reenable fast switching if it has been disabled, use the following commands in interface configuration mode:
Disabling Fast Switching for Troubleshooting
Fast switching uses a cache created by previous packets to achieve a higher packet throughput. Packet transfer performance is generally better when fast switching is enabled. Fast switching also provides load sharing on a per-destination basis.
By default, fast switching is enabled on all interfaces that support fast switching. However, you may want to disable fast switching to save memory space on interface cards and to help avoid congestion when high-bandwidth interfaces are writing large amounts of information to low-bandwidth interfaces. This is especially important when using rates slower than T1.
Fast switching is not supported on serial interfaces using encapsulations other than HDLC.
Note
For some diagnostics, such as debugging and packet-level tracing, you will need to disable fast switching. Disabling fast switching causes the router to fall back to process switching the packets. If fast switching is running, you might only see the first packet to each destination in the output of any packet-level debugging commands. Subsequent packets to the same destination will be fast switched. Many packet level debugging commands cannot process packets that are fast switched. You might want to turn off fast switching temporarily to use process switching instead while you are trying to capture information to diagnose a problem.
To disable fast switching, perform the tasks described in the following sections:
•
•
•
•
Disabling AppleTalk Fast Switching
To disable AppleTalk fast switching on an interface, use the following command in interface configuration mode:
Disabling Banyan VINES Fast Switching
Fast switching is enabled by default on all interfaces on which it is supported.
To disable fast switching on an interface, use the following command in interface configuration mode:
Disabling DECnet Fast Switching
By default, DECnet routing software implements fast switching of DECnet packets.
To disable fast switching of DECnet packets, use the following command in interface configuration mode:
Router(config-if)# no decnet route-cache
Disables fast switching of DECnet packets on a per-interface basis.
Disabling IPX Fast Switching
To disable IPX fast switching, use the following command in interface configuration mode:
Disabling ISO CLNS Fast Switching Through the Cache
ISO CLNS fast switching through the cache is enabled by default for all supported interfaces. To disable fast switching, use the following command in interface configuration mode:
Note
Disabling XNS Fast Switching
To disable XNS fast switching on an interface, use the following command in interface configuration mode:
Controlling the Route Cache
The high-speed route cache used by IP fast switching is invalidated when the IP routing table changes. By default, the invalidation of the cache is delayed slightly to avoid excessive CPU load while the routing table is changing. To control the route cache, perform the tasks described in the following sections:
•
•
•
•
Controlling Route Cache Invalidation for IP
To control route cache invalidation, use the following commands in global configuration mode as needed for your network:
Caution
Displaying System and Network Statistics
You can display the contents of IP routing tables and caches. The resulting information can be used to determine resource utilization and to solve network problems.
To display system and network statistics, use the following command in privileged EXEC mode:
Router# show ip cache [prefix mask] [type number]
Displays the routing table cache used to fast switch IP traffic.
Adjusting the Route Cache for IPX
Adjusting the route cache allows you to control the size of the route cache, reduce memory consumption, and improve router performance. You accomplish these tasks by controlling the route cache size and route cache invalidation. The following sections describe these optional tasks:
•
•
Controlling IPX Route Cache Size
You can limit the number of entries stored in the IPX route cache to free up router memory and aid router processing.
Storing too many entries in the route cache can use a substantial amount of router memory, causing router processing to slow. This situation is most common on large networks that run network management applications for NetWare.
For example, if a network management station is responsible for managing all clients and servers in a very large (greater than 50,000 nodes) Novell network, the routers on the local segment can become inundated with route cache entries. You can set a maximum number of route cache entries on these routers to free up router memory and aid router processing.
To set a maximum limit on the number of entries in the IPX route cache, use the following command in global configuration mode:
Router(config)# ipx route-cache max-size size
Sets a maximum limit on the number of entries in the IPX route cache.
If the route cache has more entries than the specified limit, the extra entries are not deleted. However, they may be removed if route cache invalidation is in use. See the "Controlling IPX Route Cache Invalidation" section in this chapter for more information on invalidating route cache entries.
Controlling IPX Route Cache Invalidation
You can configure the router to invalidate inactive fast-switch cache entries. If these entries remain invalidated for 1 minute, the router purges the entries from the route cache.
Purging invalidated entries reduces the size of the route cache, reduces memory consumption, and improves router performance. Purging entries also helps ensure accurate route cache information.
You specify the period of time that valid fast switch cache entries must be inactive before the router invalidates them. You can also specify the number of cache entries that the router can invalidate per minute.
To configure the router to invalidate fast-switch cache entries that are inactive, use the following command in global configuration mode:
Router(config)# ipx route-cache inactivity-timeout period [rate]
Invalidates fast switch cache entries that are inactive.
When you use the ipx route-cache inactivity-timeout command with the ipx route-cache max-size global configuration command, you can ensure a small route cache with fresh entries.
Padding Odd-Length IPX Packets
Some IPX end hosts accept only even-length Ethernet packets. If the length of a packet is odd, the packet must be padded with an extra byte so that end host can receive it. By default, Cisco IOS software pads odd-length Ethernet packets.
However, there are cases in certain topologies where nonpadded Ethernet packets are forwarded onto a remote Ethernet network. Under specific conditions, you can enable padding on intermediate media as a temporary workaround for this problem. Note that you should perform this task only under the guidance of a customer engineer or other service representative.
To enable the padding of odd-length packets, use the following commands in interface configuration mode:
Step 1
Router(config-if)# no ipx route-cache
Disables fast switching.
Step 2
Router(config-if)# ipx pad-process-switched-packets
Enables the padding of odd-length packets.