Feedback
Table Of Contents
Managing Connections, Menus, and System Banners
Managing Connections, Menus, and System Banners Task List
Displaying Current Terminal Characteristics
Escaping Terminal Sessions and Switching to Other Connections
Assigning a Logical Name to a Connection
Sending Messages to Other Terminals
Exiting a Session Started from a Router
Configuring an Idle Terminal Message
Configuring a "Line in Use" Message
Configuring a "Host Failed" Message
Configuring a Message-of-the-Day Banner
Configuring an Incoming Banner
Configuring a SLIP-PPP Banner Message
Enabling or Disabling the Display of Banners
Specifying the Underlying Command for the Menu Item
Specifying the Default Command for the Menu
Specifying Menu Display Configuration Options
Displaying Single-Spaced Menus
Displaying an Informational Status Line
Specifying per-Item Menu Options
Deleting the Menu from the Configuration
Connection Management, System Banner, and User Menu Configuration Examples
Sending Messages to Other Terminals Example
Clearing a TCP/IP Connection Example
Setting a SLIP-PPP Banner with Banner Tokens Example
Managing Connections, Menus, and System Banners
This chapter describes how to manage connections to other hosts, set banner messages for router users, and create menus of specific user tasks.
For a complete description of the connections, menu, and system banner commands in this chapter, refer to the "Connection, Menu, and System Banner Commands" chapter in the Release 12.2 Cisco IOS Configuration Fundamentals Command Reference. To locate documentation of other commands that appear in this chapter, use the Cisco IOS Command Reference Master Index or search online
To identify hardware or software image support for a specific feature, use Feature Navigator on Cisco.com to search for information about the feature or refer to the software release notes for a specific release. For more information, see the "Identifying Platform Support for Cisco IOS Software Features" section in the "About Cisco IOS Software Documentation" chapter.
Managing Connections, Menus, and System Banners Task List
To manage connections, configure messages and banners, and create user menus, perform any of the tasks described in the following sections, as needed. All tasks in this chapter are optional.
•
Configuring Terminal Messages
Examples for these sections can be found at the end of the chapter in the "Connection Management, System Banner, and User Menu Configuration Examples" section.
Managing Connections
To configure connection-management activities that apply to all supported connection protocols, perform the tasks described in the following sections. All tasks are optional.
•
•
•
•
•
Displaying Current Terminal Characteristics
To display the current settings for the terminal line connection, use the following command in EXEC mode:
The following example shows sample output:
AccessServer1> show terminalLine 2, Location: "", Type: "VT220"Length: 24 lines, Width: 80 columnsBaud rate (TX/RX) is 9600/9600Status: PSI Enabled, Ready, Active, No Exit BannerCapabilities: noneModem state: ReadyGroup codes: 0Special Chars: Escape Hold Stop Start Disconnect Activation^^x none - - noneTimeouts: Idle EXEC Idle Session Modem Answer Session Dispatch00:10:00 never none not setIdle Session Disconnect WarningneverLogin-sequence User Response00:00:30Autoselect Initial Waitnot setModem type is unknown.Session limit is not set.Time since activation: 00:01:07Editing is enabled.History is enabled, history size is 10.DNS resolution in show commands is enabledFull user help is disabledAllowed transports are lat pad v120 mop telnet rlogin nasi. Preferred is lat.No output characters are paddedNo special data dispatching charactersEscaping Terminal Sessions and Switching to Other Connections
After you have started a connection, you can escape out of the current terminal session by using the escape key sequence (Ctrl-Shift-6 then X by default). You can type the command character as you hold down the Ctrl key or with the Ctrl key released; you can type either uppercase or lowercase letters.
Note
By default, the escape key sequence is Ctrl-Shift-6, X. However, the escape key sequence can be changed using the escape-character line configuration command. To determine the current setting for the escape character, use the show terminal EXEC command.
You can have several concurrent sessions open and switch back and forth between them.
The number of sessions that can be open at one time is defined by the session-limit command.
To switch between sessions by escaping one session and resuming a previously opened session, perform the following steps:
Step 1
Step 2
Step 3
You also can resume the previous session by pressing the Return key.
The Ctrl^, X key combination and the where and resume EXEC commands are available with all supported connection protocols (for example, Telnet).
Assigning a Logical Name to a Connection
To assign a logical name to a connection, use the following command in EXEC mode:
The logical name can be useful for keeping track of multiple connections.
You are prompted for the connection number and name to assign. The where EXEC command displays a list of the assigned logical connection names.
Changing a Login Name
You can change your login username if you must match outgoing access list requirements or other login prompt requirements. A login server must be running and available to use this command. To change a login username, use the following command in user EXEC mode:
Router> login
Allows you to log in to the system a second time for the purposes of changing your login name.
When you enter this command, the system prompts you for a username and password. Enter the new username and the original password. If the username does not match, but the password does, the Cisco IOS software updates the session with the new username used by the login command attempt. For example, assume that a user logged in as user1 needs to change the login name to user2:
Router> loginUsername: user2Password: <letmein>Router>In this example, the password letmein is the same password used at the initial login. (The angle brackets in the example indicate that the password is not displayed on the screen when entered.) At the second Router> prompt, the user is now logged in as user2.
If no username and password prompts appear, the network administrator did not specify that a username and password be required at login time. If both the username and password are entered correctly, the session becomes associated with the specified username.
To access a system with Terminal Access Controller Access Control System (TACACS) security, enter your login name or specify a TACACS server by using the user@tacacs-server syntax when the "Username:" prompt appears, as shown in the following steps:
Only the specified host (tacacs-server) is accessed for user authentication information.
In the following example, user2 specifies the TACACS host host1 to authenticate the password:
Router> login
Username: user2@host1
Translating "HOST1"...domain server (131.108.1.111) [OK]
Password: <letmein2>
If you do not specify a host, the router tries each of the TACACS servers in the list until it receives a response. If you specify a host that does not respond, no other TACACS server will be queried. The router either will deny access or function, according to the action specified by the tacacs-server last-resort global configuration command, if it is configured. If you specified a TACACS server host with the user@tacacs-server argument, the TACACS server specified is used for all subsequent authentication or notification queries, with the possible exception of Serial Line Internet Protocol (SLIP) address queries.
For more information on configuring TACACS, refer to the tacacs-server host global configuration command in the "TACACS, Extended TACACS, and TACACS+ Commands" chapter of the Cisco IOS Security Command Reference.
For an example of changing a login name, see the "Changing a Login Name Example" section at the end of this chapter.
Locking Access to a Terminal
You can prevent access to your terminal session while keeping your connection open by setting a temporary password. For this temporary locking feature to work, the line must first be configured to allow locking (using the lockable line-configuration mode command). To lock access to the terminal, perform the following steps:
Step 1
When you issue this command, the system will prompt you for a password.
Step 2
Step 3
The Cisco IOS software honors session timeouts on locked lines. You must clear the line to remove this feature.
The following is an example of the prompts displayed after the lock command is entered. Note that the entered password does not appear on screen.
Router# lockPassword:Again:LockedPassword:Router#Sending Messages to Other Terminals
You can send messages to one or all terminal lines. A common reason for doing this is to inform users of an impending shutdown. To send a message to other terminals, use the following command in EXEC mode:
The system prompts for the message, which can be up to 500 characters long. Press Ctrl-Z to end the message. Press Ctrl-C to abort the command.
Clearing TCP Connections
To clear a Transmission Control Protocol (TCP) connection, use the following command in privileged EXEC mode:
Router# clear tcp {line line-number | local host-name port remote host-name port | tcb tcb-address}
Clears a TCP connection.
The clear tcp command is particularly useful for clearing hung TCP connections.
The clear tcp line line-number command terminates the TCP connection on the specified tty line. All TCP sessions initiated from that tty line are also terminated.
The clear tcp local host-name port remote host-name port command terminates the specific TCP connection identified by the host name/port pair of the local and remote router.
Exiting a Session Started from a Router
The protocol used to initiate a session determines how you exit that session.
To exit from SLIP and PPP connections, you must hang up the dial-in connection, usually with a command that your dial-in software supports.
To exit a local area transport (LAT), Telnet, rlogin, TN3270, or X.3 packet assembler/disassembler (PAD) session begun from the router to a remote device, press the escape key sequence (Ctrl-Shift-6 then X [Ctrl^X] by default for some systems, Ctrl-Z by default for other systems) and enter the disconnect command at the EXEC prompt. You can also log out of the remote system.
You can use either the exit or logout command in EXEC mode to terminate an active terminal session.
To exit a Telnet session to a router, see the "Logging Out of a Router" section, which follows.
Logging Out of a Router
The method you use to disconnect from a router depends on where you are located in relation to the router, and the port on the router to which you log in.
If your terminal or computer running a terminal-emulation application is remotely connected to the console port of the router, you disconnect by issuing the command or key sequence used by your terminal-emulation package. For example, if you are on a Macintosh computer running the application TCP/Connect from InterCon Corporation, you would press Ctrl-] at the user or privileged EXEC prompt to disconnect.
If you are on a remote terminal and connect to a vty through a synchronous interface on the router, you can issue one of the following commands in EXEC mode to log out:
•
•
Disconnecting a Line
Note
To disconnect a line, use the following command in EXEC mode:
If your terminal or computer running a terminal-emulation application is connected physically to the console port of the router, you can also disconnect from the router by physically disconnecting the cable from the console port of the router.
Configuring Terminal Messages
To configure messages that can be displayed to terminal users that connect to the system, perform any of the tasks found in the following sections. All tasks are optional.
•
•
•
Configuring an Idle Terminal Message
You can configure the system to display a message when a console or terminal not in use. Also called a vacant message, this message is different from the banner message displayed when a user logs in to the system. To enable the idle terminal message, use the following command in line configuration mode:
Router(config-line)# vacant-message [d message d]
Configures the system to display an idle terminal message. The argument d indicates any delimiting character.
Tips
Configuring a "Line in Use" Message
To configure the system to display a "line in use" message when an incoming connection is attempted and all rotary group or other lines are in use, use the following command in line configuration mode:
Router(config-line)# refuse-message d message d
Configures the system to display a "line in use" message. The argument d indicates any delimiting character.
If you do not define such a message, the user receives a system-generated error message when all lines are in use. You also can use this message to provide the user with further instructions.
Configuring a "Host Failed" Message
To configure the system to display a "host failed" message when a Telnet connection with a specific host fails, use the following command in line configuration mode:
Router(config-line)# busy-message hostname d message d
Configures the system to display a "host failed" message. The argument d indicates any delimiting character.
Configuring Terminal Banners
Banners are informational messages that can be displayed to users. To enable terminal banners, perform any of the tasks in the following sections. All tasks are optional.
•
•
•
•
For an example of displaying terminal banner messages, see the "Configuring Banners Example" section at the end of this chapter.
Using Banner Tokens
Banners can be customized with the use of banner tokens. Tokens are keywords in the form $(token) that, when used in a banner message, display the currently configured value of the token argument (for example, the router host name, domain name, or IP address). Using these tokens, you can design your own banners that will display current Cisco IOS configuration variables. Only Cisco IOS supported tokens may be used. There is no facility for you to define your own tokens.
Table 10 lists the tokens supported by the different banner commands.
Configuring a Message-of-the-Day Banner
You can configure a message-of-the-day (MOTD) banner to be displayed on all connected terminals. This banner is displayed at login and is useful for sending messages that affect all network users (such as impending system shutdowns). To do so, use the following command in global configuration mode:
Router(config)# banner motd d message d
Configures the system to display a message-of-the-day banner. The argument d indicates any delimiting character.
Configuring a Login Banner
You can configure a login banner to be displayed on all connected terminals. This banner is displayed after the MOTD banner appears and before the login prompts.
To configure a login banner, use the following command in global configuration mode:
Router(config)# banner login d message d
Configures the system to display a banner before the username and password login prompts. The argument d indicates any delimiting character.
The login banner cannot be disabled on a per-line basis. To globally disable the login banner, you must delete the login banner with the no banner login command.
Configuring an EXEC Banner
You can configure a banner to be displayed whenever a EXEC process is initiated. For example, this banner will be displayed to a user Telneting to the system after entering their username and password, but before the user EXEC mode prompt is displayed. To configure an EXEC banner, use the following command in global configuration mode:
Router(config)# banner exec d message d
Configures the system to display a banner whenever an EXEC process is initiated. The argument d indicates any delimiting character.
Configuring an Incoming Banner
You can configure a banner to be displayed on terminals connected to reverse Telnet lines. This banner is useful for providing instructions to users of these types of connections. Reverse Telnet connections are described in more detail in the "Configuring and Managing External Modems" chapter of the Release 12.2 Cisco IOS Dial Technologies Configuration Guide.
To configure a banner that is sent on incoming connections, use the following command in global configuration mode:
Configuring a SLIP-PPP Banner Message
Default banner messages have been known to cause connectivity problems in some non-Cisco SLIP and PPP dialup software. You can now customize the SLIP-PPP banner message to make Cisco SLIP and PPP compatible with non-Cisco dialup software. To configure a SLIP-PPP banner message, use the following command in global configuration mode:
Router(config)# banner slip-ppp d message d
Configures a SLIP-PPP banner to display a customized message. The argument d indicates any delimiting character.
Enabling or Disabling the Display of Banners
You can control display of the MOTD and line-activation (EXEC) banners. By default, these banners are displayed on all lines. To suppress or reinstate the display of such banners, use the following commands in line configuration mode, as needed:
These commands determine whether the router will display the EXEC banner and the MOTD banner when an EXEC session is created. These banners are defined with the banner motd and banner exec global configuration commands. By default, the MOTD banner and the EXEC banner are enabled on all lines.
Disable the EXEC and MOTD banners using the no exec-banner command.
The MOTD banners can also be disabled by the no motd-banner line configuration command, which disables MOTD banners on a line. If the no exec-banner command is configured on a line, the MOTD banner will be disabled regardless of whether the motd-banner command is enabled or disabled. Table 11 summarizes the effects of the combination of the exec-banner command and the motd-banner command.
Table 11 Banners Displayed by exec-banner and motd-banner Command Combinations
MOTD banner
EXEC banner
None
EXEC banner
None
For reverse Telnet connections, the EXEC banner is never displayed. Instead, the incoming banner is displayed. The MOTD banner is displayed by default, but it is disabled if either the no exec-banner command or no motd-banner command is configured. Table 12 summarizes the effects of the combination of the exec-banner command and the motd-banner command for reverse Telnet connections.
Creating Menus
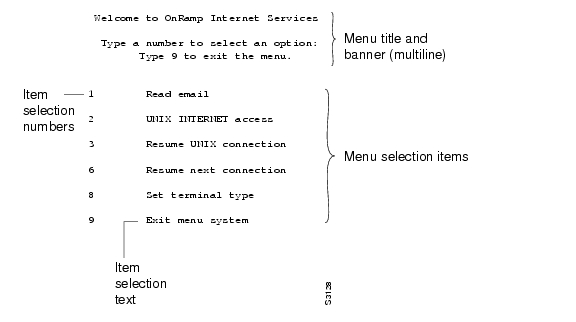
A menu is a displayed list of actions from which a user can select without needing to know anything about the underlying command-level details. A menu system (also known as a user menu) effectively controls the functions a user can access. Figure 6 illustrates the parts that make up a typical menu.
Figure 6 Typical Menu Example
Any user that can enter configuration mode can create menus. Remember the following guidelines when you create menus:
•
•
•
•
•
The exec-timeout line configuration command can be used to close and clean up an idle menu; the session-timeout command can be used to clean up a menu with an open connection.
Creating a Menu Task List
To create menus, perform the tasks described in the following sections:
•
•
•
•
•
•
•
•
•
•
•
Specifying the Menu Title
You can specify an identifying title for the menu. To specify the menu title, use the following command in global configuration mode:
Router(config)# menu menu-name title d title d
Specifies the title for the menu. The argument d indicates any delimiting character.
The following example specifies the title that is displayed when the OnRamp menu is selected. The following four main elements create the title:
•
•
•
•
The following example shows the command used to create the title for the menu shown in Figure 6:
Router(config)# menu OnRamp title %^[[H^[[JEnter TEXT message. End with the character '%'.Welcome to OnRamp Internet ServicesType a number to select an option;Type 9 to exit the menu.%Router(config)#You can position the title of the menu horizontally by preceding the title text with blank characters. You can also add lines of space above and below the title by pressing Enter.
In this example, the title text consists of the following elements:
•
•
•
Title text must be enclosed within text delimiter characters—the percent sign character (%) in this example. Title text delimiters are characters that do not ordinarily appear within the text of a title, such as slash (/), double quote ("), or tilde (~). You can use any character that is not likely to be used within the text of the title as delimiter characters. Ctrl-C is reserved for special use and should not be used in the text of the title.
This title text example also includes an escape character sequence to clear the screen before displaying the menu. In this case the string ^[[H^[[J is an escape string used by many VT100-compatible terminals to clear the screen. To enter it, you must enter Ctrl-V before each escape character (^[).
You can also use the menu clear-screen global configuration command to clear the screen before displaying menus and submenus, instead of embedding a terminal-specific string in the menu title. This option uses a terminal-independent mechanism based on termcap entries defined in the router and the terminal type configured for the user terminal. The menu clear-screen command allows the same menu to be used on multiple types of terminals instead of terminal-specific strings being embedded within menu titles. If the termcap entry does not contain a clear string, the menu system inserts 24 new lines, causing all existing text to scroll off the top of the terminal screen.
To clear the screen before displaying the menu, use the following command in global configuration mode:
Router(config)# menu menu-name clear-screen
Specifies screen clearing before displaying menus and submenus.
The following example clears the screen before displacing the OnRamp menu or a submenu:
Router(config)# menu OnRamp clear-screenSpecifying the Menu Prompt
To specify a menu prompt, use the following command in global configuration mode:
Router(config)# menu menu-name prompt d prompt d
Specifies the prompt for the menu. The argument d indicates any delimiting character.
Specifying the Menu Item Text
Each displayed menu entry consists of the selection key (number, letter, or string) and the text describing the action to be performed. You can specify descriptive text for a maximum number of 18 menu items. Because each menu entry represents a single user interface command, you must specify the menu item text one entry at a time. To specify the menu item text, use the following command in global configuration mode:
Router(config)# menu menu-name text menu-item menu-text
Specifies the text for the menu item.
The following example specifies the text that is displayed for the three entries in the OnRamp menu:
Router(config)# menu OnRamp text 1 Read emailRouter(config)# menu OnRamp text 2 UNIX Internet AccessRouter(config)# menu OnRamp text 9 Exit menu systemYou can provide access to context-sensitive help by creating a "help server" host and using a menu entry to make a connection to that host.
Menu selection keys need not be contiguous. You can provide consistency across menus by assigning a particular number, letter, or string to a special function—such as Help or Exit—regardless of the number of menu entries in a given menu. For example, menu entry H could be reserved for help across all menus.
When more than nine menu items are defined in a menu, the menu line-mode and menu single-space global configuration commands are activated automatically. The commands can be configured explicitly for menus of nine items or fewer. For more information on these commands, see the section "Specifying Menu Display Configuration Options" later in this chapter.
Specifying the Underlying Command for the Menu Item
Each displayed menu entry issues a user interface command when the user enters its key. Each menu entry can have only a single command associated with it. To specify the underlying menu item command, use the following command in global configuration mode:
Router(config)# menu menu-name command menu-item command
Specifies the command to be performed when the menu item is selected.
The following example specifies the commands that are associated with the three entries in the OnRamp menu:
Router(config)# menu OnRamp command 1 rlogin mailsysRouter(config)# menu OnRamp command 2 rlogin unix.cisco.comRouter(config)# menu OnRamp command 9 menu-exitThe menu-exit command is available only from within menus. This command provides a way to return to a higher-level menu or to exit the menu system.
When a menu item allows you to make a connection, the menu item should also contain entries that can be used to resume connections; otherwise, when you try to escape from a connection and return to the menu, there is no way to resume the session. It will sit idle until you log out.
You can build the resume connection EXEC command into a menu entry so that the user can resume a connection, or you can configure the line using the escape-char none command to prevent users from escaping their sessions.
To specify connection resumption as part of the menu item command, use the following command in global configuration mode:
Router(config)# menu menu-name command menu-item resume [connection] /connect [connect string]
Specifies that the resume command will be performed when the menu item is selected.
Embedding the resume command within the menu command permits a user to resume the named connection or make another connection using the specified name, if there is no active connection by that name. As an option, you can also supply the connect string needed to connect initially. When you do not supply this connect string, the command uses the specified connection name.
You can use the resume command in the following menu entries:
•
•
•
In the following example, the resume command is embedded in the menu command so that selecting the menu item either starts the specified connection session (if one is not already open) or resumes the session (if one is already open):
Router(config)# menu Duluth text 1 Read emailRouter(config)# menu Duluth command 1 resume mailsys /connect rlogin mailsysIn the following example, the resume command is used in a separate menu entry (entry 3) to resume a specific connection:
Router(config)# menu Duluth text 3 Resume UNIX Internet AccessRouter(config)# menu Duluth command 3 resume unix.cisco.comYou use the resume/next command to resume the next open connection in the user list of connections. This command allows you to create a single menu entry that advances through all of the user connections. To specify resume/next connection resumption as part of the menu item command, use the following command in global configuration mode:
Router(config)# menu menu-name command menu-item resume/next
Specifies resume/next connection resumption.
The following example shows a menu entry (entry 6) created to advance through all of the user connections:
Router(config)# menu Duluth text 6 Resume next connectionRouter(config)# menu Duluth command 6 resume/nextSpecifying the Default Command for the Menu
When a user presses Enter without specifying an item, the router performs the command for the default item. To specify the default item, use the following command in global configuration mode:
Router(config)# menu menu-name default menu-item
Specifies the command to be performed when the menu users does not select a menu item.
Creating a Submenu
To create submenus that are opened by selecting a higher-level menu entry, use the menu command to invoke a menu in a line menu entry. To specify a submenu item command, use the following commands in global configuration mode:
The following example specifies that the menu item (entry 8) activates the submenu in the OnRamp menu:
Router(config)# menu OnRamp text 8 Set terminal typeThe following example specifies the command that is performed when the menu item (entry 8) is selected in the OnRamp menu:
Router(config)# menu OnRamp command 8 menu TerminalsThe following example specifies the title for the Terminals submenu:
Router(config)# menu Terminals title /Supported Terminal TypesType a number to select an option;Type 9 to return to the previous menu.The following example specifies the submenu items for the Terminals submenu:
Router(config)# menu Terminals text 1 DEC VT420 or similarRouter(config)# menu Terminals text 2 Heath H-19Router(config)# menu Terminals text 3 IBM 3051 or equivalentRouter(config)# menu Terminals text 4 Macintosh with gterm emulatorRouter(config)# menu Terminals text 9 Return to previous menuThe following example specifies the commands associated with the items in the Terminals submenu:
Router(config)# menu Terminals command 1 term terminal-type vt420Router(config)# menu Terminals command 2 term terminal-type h19Router(config)# menu Terminals command 3 term terminal-type ibm3051Router(config)# menu Terminals command 4 term terminal-type gtermRouter(config)# menu Terminals command 9 menu-exitWhen you select entry 8 on the main menu, the following Terminals submenu appears:
Supported Terminal TypesType a number to select an option;Type 9 to return to the previous menu.1 DEC VT420 or similar2 Heath H-193 IBM 3051 or equivalent4 Macintosh with gterm emulator9 Return to previous menu
Note
Creating Hidden Menu Entries
A hidden menu entry is a menu item that contains a selection key but no associated text describing the action to be performed. Include this type of menu entry to aid system administrators that provide help to users. The normal procedure is to specify a menu command but omit specifying any text for the item. To specify a hidden menu item, use the following command in global configuration mode:
Router(config)# menu menu-name command menu-item command
Specifies the command to be used when the hidden menu entry is selected.
The following example shows the command associated with the submenu entry in the OnRamp menu:
Router(config)# menu OnRamp command 7 show whoamiIf additional text is appended to the show whoami command, that text is displayed as part of the data about the line. For example, the hidden menu entry created by the command
Router(config)# menu OnRamp command 7 show whoami Terminals submenu of OnRamp Internet
Access menu
will display information similar to the following:
Comm Server "cs101", Line 0 at 0 bps. Location "Second floor, West"Additional data: Terminals submenu of OnRamp Internet Access menuTo prevent the information from being lost if the menu display clears the screen, this command always displays a --More-- prompt before returning.
Specifying Menu Display Configuration Options
In addition to the menu clear-screen global configuration command (described in the "Specifying the Menu Title" section) the following are the three other menu commands that define menu functions:
•
•
•
Using Line Mode in Menus
In a menu of nine or fewer items, you ordinarily select a menu item by entering the item number or a letter. In line mode, you select a menu entry by entering the item key and pressing Enter. The line mode allows you to backspace over the selection and enter another before pressing Enter to issue the command. This function allows you to change the selection before you invoke the command.
To configure the menu to operate in line mode, use the following command in global configuration mode:
Router(config)# menu menu-name line-mode
Configures the menu to use line mode for entering menu items.
The line-mode option is invoked automatically when more than nine menu items are defined, but it can also be configured explicitly for menus of nine items or fewer.
In order to use strings as selection keys, you must enable the menu line-mode command.
Displaying Single-Spaced Menus
If there are nine or fewer menu items, the Cisco IOS software ordinarily displays the menu items double-spaced. In a menu of more than nine items, the single-space option is activated automatically to fit the menu into a normal 24-line terminal screen. However, the single-space option also can be configured explicitly for menus of nine or fewer items.
To invoke the single-space option, use the following command in global configuration mode:
Router(config)# menu menu-name single-space
Configures the specified menu to display single-spaced.
Displaying an Informational Status Line
The status-line option displays a line of status information about the current user at the top of the terminal screen before the menu title is displayed. This status line includes the router host name, the user line number, and the current terminal type and keymap type (if any).
To display the status-line option, use the following command in global configuration mode:
Router(config)# menu menu-name status-line
Configures the specified menu to display a status line.
Specifying per-Item Menu Options
To configure per-item options, use the following commands in global configuration mode, as needed:
Invoking the Menu
To invoke (access) a configured menu, use the following command in EXEC mode:
You can define menus containing privileged EXEC commands, but users must have privileged access when they start up the menu.
To ensure that a menu is automatically invoked on a line, make sure the menu does not have any exit paths that leave users in an interface they cannot operate, then configure that line with the autocommand menu menu-name line configuration command. (The autocommand menu menu-name command configures the line to automatically execute the menu menu-name command when a user initiates a connection over that line.)
Menus also can be invoked on a per-user basis by defining an autocommand command for that local username.
In the following example, the OnRamp menu is invoked:
Router# menu OnRampWelcome to OnRamp Internet ServicesType a number to select an option;Type 9 to exit the menu.1 Read email2 UNIX Internet access3 Resume UNIX connection6 Resume next connection9 Exit menu systemDeleting the Menu from the Configuration
To delete the menu from the configuration, use the following command in global configuration mode:
In order to use the menu again, you must reconfigure the entire menu.
The following example deletes the OnRamp menu from the configuration:
Router(config)# no menu OnRampConnection Management, System Banner, and User Menu Configuration Examples
This section provides the following examples:
•
•
•
•
Changing a Login Name Example
The following example shows how login usernames and passwords can be changed. In this example, a user currently logged in under the username user1 attempts to change that login name to user2. After entering the login command, the user enters the new username, but enters an incorrect password. Because the password does not match the original password, the system rejects the attempt to change the username.
Router> loginUsername: user2Password:% Access deniedStill logged in as "user1"Next, the user attempts the login change again, with the username user2, but enters the correct (original) password. This time the password matches the current login information, the login username is changed to user2, and the user is allowed access to the EXEC at the user-level.
Router> loginUsername: user2Password:Router>Sending Messages to Other Terminals Example
The following example shows the process of sending a message to all terminal connections on the
router:
Router# send *Enter message, end with CTRL/Z; abort with CTRL/C:this is a message^ZSend message? [confirm]Router#********* Message from tty50 to all terminals:***this is a messageRouter#Clearing a TCP/IP Connection Example
The following example clears a TCP connection using its tty line number. The show tcp EXEC command displays the line number (tty2) that is used in the clear tcp EXEC command.
Router# show tcptty2, virtual tty from host router20.cisco.comConnection state is ESTAB, I/O status: 1, unread input bytes: 0Local host: 171.69.233.7, Local port: 23Foreign host: 171.69.61.75, Foreign port: 1058Enqueued packets for retransmit: 0, input: 0, saved: 0Event Timers (current time is 0x36144):Timer Starts Wakeups NextRetrans 4 0 0x0TimeWait 0 0 0x0AckHold 7 4 0x0SendWnd 0 0 0x0KeepAlive 0 0 0x0GiveUp 0 0 0x0PmtuAger 0 0 0x0iss: 4151109680 snduna: 4151109752 sndnxt: 4151109752 sndwnd: 24576irs: 1249472001 rcvnxt: 1249472032 rcvwnd: 4258 delrcvwnd: 30SRTT: 710 ms, RTTO: 4442 ms, RTV: 1511 ms, KRTT: 0 msminRTT: 0 ms, maxRTT: 300 ms, ACK hold: 300 msRouter# clear tcp line 2[confirm][OK]The following example clears a TCP connection by specifying its local router host name and port and its remote router host name and port. The show tcp brief EXEC command displays the local (Local Address) and remote (Foreign Address) host names and ports to use in the clear tcp EXEC command.
Router# show tcp briefTCB Local Address Foreign Address (state)60A34E9C router1.cisco.com.23 router20.cisco.1055 ESTABRouter# clear tcp local router1 23 remote router20 1055[confirm][OK]The following example clears a TCP connection using its TCB address. The show tcp brief EXEC command displays the TCB address to use in the clear tcp EXEC command.
Router# show tcp briefTCB Local Address Foreign Address (state)60B75E48 router1.cisco.com.23 router20.cisco.1054 ESTABRouter# clear tcp tcb 60B75E48[confirm][OK]Configuring Banners Example
The following example shows how to use the banner global configuration commands to notify your users that the server will be reloaded with new software. The no exec-banner line configuration command is used to disable EXEC banners and message-of-the-day banners on the vty lines.
!line vty 0 4no exec-banner!banner exec /This is Cisco Systems training group router.Unauthorized access prohibited./!banner incoming /You are connected to a Hayes-compatible modem.Enter the appropriate AT commands.Remember to reset anything you have changed before disconnecting./!banner motd /The router will go down at 6pm today for a software upgrade/When someone connects to the router, the MOTD banner appears before the login prompt. After the user logs in to the router, the router will display the EXEC banner or incoming banner, depending on the type of connection. For a reverse Telnet login, the router will display the incoming banner. For all other connections, the router will display the EXEC banner.
Setting a SLIP-PPP Banner with Banner Tokens Example
The following example sets the SLIP-PPP banner using several tokens and the percent sign (%) as the delimiting character:
Router(config)# banner slip-ppp %
Enter TEXT message.  End with the character '%'.
Starting $(encap) connection from $(gate-ip) to $(peer-ip) using a maximum packet size of
$(mtu) bytes... %
When a user enters the slip command, that user will see the following banner. Notice that the $(token) syntax is replaced by the corresponding configuration variable.
Starting SLIP connection from 192.168.69.96 to 172.16.80.8 using a maximum packet size of
1500 bytes...
Configuring a Menu Example
The following example allows menu users to use Telnet to access one of three different machines. The user also can view the output of the show user EXEC command and exit the menu. One hidden menu item (configured as menu new command here show version) allows system administrators to display the current software version.
menu new title ^CTelnet Menu^Cmenu new prompt ^CPlease enter your selection: ^Cmenu new text 1 telnet system1menu new command 1 telnet system1menu new options 1 pausemenu new text 2 telnet system2menu new command 2 telnet system2menu new options 2 pausemenu new text b telnet systembluemenu new command b telnet systembluemenu new options b pausemenu new text me show usermenu new command me show usermenu new options me pausemenu new command here show versionmenu new text Exit Exitmenu new command Exit menu-exitmenu new clear-screenmenu new status-linemenu new default memenu new line-mode!