Feedback
Table Of Contents
Preparing a Configuration File
AutoInstall over LAN Interfaces
AutoInstall over Serial Interfaces
AutoInstall Configuration Task List
Configuring a Cisco Router as a RARP Server
Configuring a Cisco Router as a DHCP Server
Monitoring and Completing the AutoInstall Process
AutoInstall Configuration Examples
Network Configuration for DHCP-Based AutoInstall Example
Using Setup After First-Time Startup
Using Configuration Applications
Using AutoInstall and Setup
The Cisco IOS software includes two features that simplify or automate the configuration of Cisco devices. AutoInstall allows a network manager to load configuration files onto new Cisco devices automatically. Setup is a Cisco IOS software feature that guides a user through the first-time configuration of a Cisco device. This chapter describes AutoInstall, Setup, and provides a brief summary of external configuration applications. It include the following sections:
•
Using Configuration Applications
For a complete description of the setup command, refer to the Setup command reference page in the Release 12.2 Cisco IOS Configuration Fundamentals Command Reference. To locate documentation of other commands that appear in this chapter, use the Cisco IOS Command Reference Master Index or search online.
To identify hardware or software image support for a specific feature, use Feature Navigator on Cisco.com to search for information about the feature or refer to the software release notes for a specific release. For more information, see the "Identifying Platform Support for Cisco IOS Software Features" section in the "About Cisco IOS Software Documentation" chapter.
Note
Using AutoInstall
This section provides the following information about the AutoInstall feature in Cisco IOS software:
•
•
•
AutoInstall allows you to connect a new router to the network, turn on the new router, and have it configured automatically from a preexisting configuration file. This process was designed to facilitate the centralized management of router installation.
The AutoInstall process begins any time a Cisco IOS software-based device is turned on and a valid configuration file is not found in nonvolatile random-access memory (NVRAM). A configuration file is typically not available when a router is turned on for the first time, or when the configuration file has been manually deleted from NVRAM.
Note
The following sections describes the options available to prepare your network for the AutoInstall process. Network set up for AutoInstall can also be performed with network management applications such as the AutoInstall Manager in CiscoWorks software. For details on other ways to set up the AutoInstall process, refer to the documentation for your application, or search for Network Management information on Cisco.com.
Understanding AutoInstall
There are two basic approaches to preparing your network for AutoInstall. One approach is to create a minimal configuration file that provides just enough configuration information to allow you to Telnet to the new router and configure it manually. The other approach is to create a host-specific configuration file for each new router containing all of the necessary configuration information. In each case, the configuration file should be created and stored on a TFTP server on the network prior to connecting the new router.
Before the new router can attempt to download a configuration file, however, it must acquire an IP address. This means that a service must be available on the network to provide an IP address to the new router. Your choice of service will determine which interface port on the new router should be connected to the network.
AutoInstall is supported over Ethernet, Token Ring, and FDDI interfaces for LANs and serial interfaces with High-Level Data Link Control (HDLC) encapsulation or serial interfaces with Frame Relay encapsulation for WANs. If a LAN interface is used, AutoInstall will attempt to acquire an IP address for the attached interface using Dynamic Host Configuration Protocol (DHCP) requests, Bootstrap Protocol (BOOTP) requests, or Reverse Address Resolution Protocol (RARP) requests. If a serial interface with HDLC encapsulation is connected, AutoInstall will attempt to acquire an IP address for the attached interface using Serial Line Address Resolution Protocol (SLARP). Table 8 summarizes this information.
Note
When the AutoInstall process begins, the new router will send DHCP, BOOTP, and RARP requests out any attached interfaces. AutoInstall will use the first available method for configuration. If all LAN interface requests fail, AutoInstall will attempt to configure an available serial interface using SLARP.
Note
In addition to a TFTP server, and a DHCP, BOOTP, RARP, or SLARP server, you may need to configure other elements in your network to enable AutoInstall, as follows:
•
•
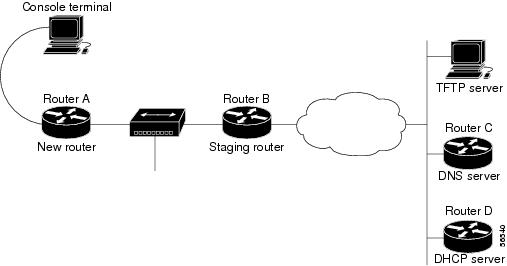
Figure 2 shows a hypothetical network topology that utilizes these various elements and shows an example of the AutoInstall process.
Figure 2 Hypothetical Network Topology for AutoInstall over an Ethernet Interface
The following steps outline an example of the AutoInstall process that would be used for the topology in Figure 2:
1.
2.
3.
4.
5.
6.
7.
8.
Note that these steps are simplified to give an impression of the process flow (for example, the DHCP request forwarding in steps 1 and 2 actually consist of multiple discover, offer, and request messages).
Note
In this example, the TFTP, DNS, and DHCP services are provided by different devices. However, more than one service may be enabled on any particular device. For example, the Cisco Server Suite 1000 includes a DHCP/BOOTP server, a DNS server, and a TFTP server all on one platform. Note that you can enable more than one service (such as a TFTP server and a DNS server) on a Cisco router. The example in Figure 2 also shows Cisco routers acting as DNS and DHCP servers, but these services can be provided by any standard workstation. For information on the configuration of this example, see the "Network Configuration for DHCP-Based AutoInstall Example" section.
Tip
Specifying a Staging Router
For those network topologies in which the servers used in the AutoInstall process are not on the same LAN segment as the new router, a staging router is typically needed.
For AutoInstall over serial interfaces, a staging router is always required, because the proper encapsulation must be configured on the interface that will be connected to the new router. Because the address of the staging router can not be specified to the new router, you should have a direct connection from the new router to the staging router.
The staging router must have an ip helper address command configured on the appropriate interface for each server to enable unicast requests from the staging router. For example, you may want to configure a helper address for the TFTP server, the DNS server, and the DHCP server on the staging router for AutoInstall over LAN interfaces. For AutoInstall over a Frame Relay encapsulated interface, the staging router will require a helper address for the TFTP server and a Frame Relay map pointing back to the new router. For more information, see the "Configuring a Staging Router" section.
For AutoInstall over HDLC-encapsulated serial interfaces using SLARP, the interface on the staging router must be configured with an IP address whose host portion has the value 1 or 2. AutoInstall over Frame Relay does not have this address constraint. Subnet masks of any size are supported. For more information, see the "AutoInstall over Serial Interfaces" section.
Specifying a Default Router
In some network topologies it may be necessary to specify the "default" router through which AutoInstall TFTP requests should be forwarded. The IP address of a default router can be specified as the value of the option 3 field of the DHCP response to the new router. For information on specifying the values for the option fields of DHCP responses, see the "Configuring a Cisco Router as a DHCP Server" section. For more information on the BOOTP and DHCP fields and options discussed in this chapter, refer to RFC 2132, DHCP Option and BOOTP Vendor Extensions.
Note
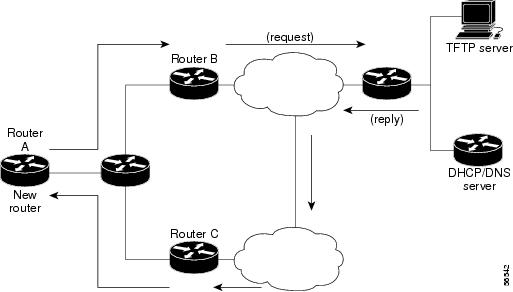
Figure 3 shows an example of a network topology in which a default router needs to be specified.
Figure 3 Specifying a Default Router for AutoInstall Requests
In the example shown in Figure 3, there are multiple routers on the same LAN as the interface performing Autoinstall. Router C is the router forwarding the TFTP packets from the TFTP server to the new router, but only Router B is capable of forwarding the TFTP request from the new router to the TFTP server. In this case, the IP address of Router B should be configured as the default router, using option 3 in the DHCP configuration. The new router will interpret the value of option 3 (specified in the DHCP configuration) as the next-hop toward the TFTP server during Autoinstall. Option 3 will take effect only if information (hostname or IP address) for the TFTP server is also returned in the DHCP/BOOTP reply.
Note that option 3 cannot be used to specify the default router for DNS requests. For configuration details, see the "Specifying the Default Router on a Cisco DHCP Server" section.
Preparing a Configuration File
Your choice of configuration file will determine many aspects of how you set up the network for AutoInstall. There are three types of configuration files you can make available on a TFTP server:
•
•
•
The syntax of the configuration file-name will depend on the host of the TFTP server. UNIX-based or DOS-based configuration files are saved using the 8.3 naming convention and use ".cfg". Any hostname longer than eight characters is truncated to eight characters. For example, a router with a hostname "australia" will be treated as "australi" and AutoInstall will attempt to download "australi.cfg".
Tip
Default network configuration files should have IP address to hostname mappings (using ip host ip address hostname command line entries).
In general, AutoInstall will attempt to download "-confg" files first, then ".cfg" files. AutoInstall will attempt to download default configuration files in the following order:
•
•
•
•
•
The request cycle is repeated three times.
AutoInstall over LAN Interfaces
The process used for AutoInstall over an Ethernet, Token Ring, or FDDI interface, and is divided into two phases, which are described in the following sections:
•
•
IP Address Acquisition for LAN Interfaces
When the AutoInstall process begins, the new router will attempt to acquire an IP address for the connected interface.
The new router will send DHCP discover packets out all attached LAN interfaces to determine if a DHCP server is available. If an offer is returned from a DHCP server, the new router will act as a DHCP client and send a DHCP request. If more than one offer is returned, the first is used.
If a response is returned first from a BOOTP server, or a DHCP server is not available, the DHCP client in AutoInstall will use the BOOTP information to continue the AutoInstall process. Because DHCP is an extension to BOOTP, the DHCP client in AutoInstall can interpret BOOTP replies. Prior to Cisco IOS Release 12.1(5)T, the TFTP identifier (specified in the siaddr or sname field) and bootfile name (specified in the file field) in BOOTP server replies were ignored. If you have configured the TFTP identifier and bootfile name to be provided by the BOOTP server, this information can now be used by the DHCP AutoInstall process to perform unicast TFTP uploading of configuration files.
Note
If a DHCP server responds, any or all of the following information can be returned to the new router:
•
interface <type><number>ip address dhcp•
•
•
•
•
•
The TFTP server IP address can be deduced from the following sources, from the highest priority to the lowest: the sname field, option 66, option 150, or the siaddr field. If only the sname or option 66 values are returned to the new router, a DNS server must be available to resolve the IP address.
Tip
If a DHCP server is not available on the network and the sname or siaddr information is not available from a BOOTP server, the new router will use the BOOTP-based AutoInstall process described in the Release 12.1 Cisco IOS Configuration Fundamentals Configuration Guide.
After an IP address is assigned to the interface on the new router, the AutoInstall process will send a DNS request for the corresponding hostname. Likewise, if the new router is assigned a hostname, the AutoInstall process will send a DNS request for the corresponding IP address.
Using RARP for LAN-based AutoInstall
Although DHCP and BOOTP are the recommended protocols for LAN-based AutoInstall, Reverse Address Resolution Protocol (RARP) also remains supported. RARP requests send the local data-link (MAC) address to the RARP server and requests the IP address associated with that physical address. Use of RARP requires a RARP server on the same network segment as the router interface. RARP is typically used for devices (such as new routers or diskless workstations) that do not know their IP addresses when they boot. RARP relies on the presence of a RARP server with table entries of MAC-layer-to-IP address mappings. You should directly connect the new router to the device providing RARP services if using RARP for AutoInstall.
Configuration File Downloading for LAN Interfaces
After acquiring an IP address for the interface on the new router, the AutoInstall process will initiate attempts to download a configuration file. This is the second phase of the AutoInstall process for LAN interfaces.
The new router will automatically attempt to download a configuration file using one of the following methods:
•
•
Note
Table 9 shows the type of TFTP requests made by the new router using AutoInstall. The type of TFTP request depends on the availability of the TFTP server name or address and the host-specific configuration filename.
Essentially, if the TFTP address is known, the router can send a unicast TFTP request for a configuration file, and if the host-specific configuration filename is known, the router can request the host-specific configuration file from the TFTP server. If the TFTP address is not known, the router can send a broadcast TFTP request, and if the configuration filename is not known, the router can request the default configuration file.
The TFTP server address can be deduced from the following sources:
•
•
•
•
This list above reflects the priority in which the information is inspected by the DHCP client. For the first two options, in which only the TFTP server name is given, a DNS server must be available to resolve the IP address.
The host-specific router configuration filename is deduced from the boot file (file) field of DHCP or BOOTP responses. The host-specific filename can also be specified in a "network-confg" or "network.cfg" file on a TFTP server for those cases in which a general network configuration file is downloaded before the host-specific configuration file. AutoInstall can also determine the host-specific filename from a DNS IP address to hostname mapping.
AutoInstall over Serial Interfaces
AutoInstall is supported over serial interfaces with HDLC encapsulation or Frame Relay encapsulation. HDLC is the default serial encapsulation. If the AutoInstall process fails over HDLC, it is attempted using Frame Relay encapsulation.
IP Address Acquisition for Serial Interfaces
For AutoInstall over a serial interface, a staging router must be directly connected to the new router using the serial 0 (S0) interface port.
AutoInstall using HDLC
If the new router is connected by an HDLC-encapsulated serial line to the staging router, AutoInstall will send a SLARP request.
In response to a SLARP request, the staging router will send a SLARP reply packet to the new router.
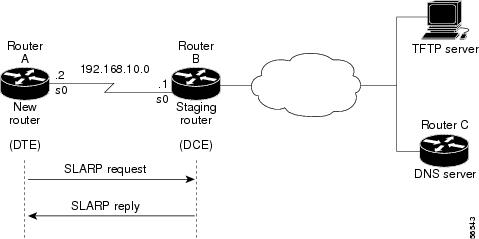
The reply packet contains the IP address and netmask of the staging router's serial interface. If the host portion of the IP address in the SLARP response is 1, AutoInstall will configure the interface of the new router using the value 2 as the host portion of its IP address. If the host portion of the IP address in the SLARP response is 2, AutoInstall will configure the interface of the new router using the value 2 as the host portion of its IP address. Figure 4 shows an example of this address assignment.
Figure 4 Using SLARP to Assign an IP Address to a New Router
In Figure 4, the IP address of the Serial 0 interface on the staging router (Router B) is 192.168.10.1. AutoInstall therefore assigns the IP address 192.168.10.2 to the Serial 0 interface of the new router.
Note
AutoInstall Using Frame Relay
If the new router is connected by a Frame Relay-encapsulated serial interface, AutoInstall will send a BOOTP request over the lowest numbered serial or HSSI interface. (The attempt to run AutoInstall over Frame Relay is performed only after attempts are made using SLARP over HDLC, DHCP, and RARP.)
The broadcast BOOTP request sent by the new router will contain the MAC address of the new router's interface. The staging router should be configured to forward the request using a helper address. A DHCP or BOOTP server will then return the IP address assigned to that MAC address. (Note that either a DHCP or BOOTP service can respond to the BOOTP request.)
AutoInstall using Frame Relay can be initiated over only the first serial interface on the new router. Specifically, Autoinstall over Frame Relay can be initiated over Serial 0 (S0), or Serial 1/0 (S1/0). For example, if the new router has serial interfaces S1/0 through S1/3 and S4/0 through S4/3, AutoInstall will be attempted over S1/0 only and cannot be forced to be initiated from S4/0. If AutoInstall over S1/0 fails, an Frame Relay attempt will not be made from any other serial port.
Only a helper address and a Frame Relay map need to be configured on the staging router. No MAC-to-IP address map is needed on the staging router. For configuration details, see the "Configuring a Frame Relay-Encapsulated Serial Interface Connection" section.
Configuration File Downloading for Serial Interfaces
After acquiring an IP address acquired from the RARP, DHCP, or BOOTP server, the new router will attempt to resolve its hostname from a network configuration file or from a DNS service.
The new router will first attempt to resolves its IP address-to-hostname mapping by sending a TFTP broadcast requesting the file "network-confg" or "cisconet.cfg".
The network configuration file is a configuration file generally shared by several routers. In this case, it is used to map the IP address of the new router to the name of the new router. The network configuration file must reside on a reachable TFTP server and must be globally readable. For example, to assign a hostname of "rtr1" to a new router with the address 192.168.10.2, the following line must appear in the network configuration file:
ip host rtr1 192.168.10.2If the new router cannot locate and download a "network-confg" or a "cisconet.cfg" file, or if the IP address-to-hostname mapping does not match the newly acquired IP address, the new router sends a DNS broadcast request. If a DNS server is available and has an entry that maps the acquired IP address of the new router to its name, the new router successfully resolves its name.
If DNS does not have an entry that maps the new router's address to its name, the new router cannot resolve its hostname. The new router will then attempt to download a default configuration file ("router-confg", "router.cfg", or "ciscortr.cfg") from the TFTP server. If this attempt also fails, the router will enter Setup mode, or, if using Frame Relay-based AutoInstall, will enter user EXEC mode.
AutoInstall Configuration Task List
Because AutoInstall is an automated process, no configuration is required on the routing device that will perform AutoInstall. However, you must configure the other systems on the network to provide the necessary elements for the AutoInstall process to work. To configure the network for AutoInstall, perform the tasks described in the following sections. Tasks are identified as required or optional.
•
•
•
•
These sections are followed by an example of preparing the network for AutoInstall in the "AutoInstall Configuration Examples" section.
Configuring a Staging Router
In most cases you will need to configure a staging router through which the new router running AutoInstall should send TFTP, BOOTP, and DNS requests. This staging router is used to forward broadcast TFTP and DNS requests.
Assuming that the proper protocol is already configured on the interface that will be connected to the new router, the minimum configuration you will need to perform on the staging router is to use the ip helper-address address interface configuration mode command, where the address argument is the IP address of the TFTP server to be used during the AutoInstall process.
The following sections go into more detail on configuring the proper protocol for each interface type:
•
•
•
Configuring a LAN Interface Connection on the Staging Router
To set up AutoInstall using an Ethernet, Token Ring, or FDDI interface, you must modify the configuration of the staging router. To configure the staging router to forward requests from the new router using a LAN interface connection, use the following commands beginning in global configuration mode:
Typically, the LAN interface and IP address are already configured on the existing router.
In the following example, the configuration file for the staging router contains the commands needed to configure the router for AutoInstall on an Ethernet interface:
Router# show running-config...interface Ethernet 0ip address 172.31.10.1 255.255.255.0ip helper-address 172.31.20.5...Configuring an HDLC-Encapsulated Serial Interface Connection
To set up AutoInstall to use a serial line with HDLC encapsulation (the default for serial interfaces), you must configure the staging router. To configure the staging router to forward requests from the new router using a HDLC-encapsulated serial interface connection, use the following commands beginning in global configuration mode:
In the following example, the configuration file for the staging router contains the commands needed to configure the router for AutoInstall on a serial line using HDLC encapsulation:
Router# show running-config...interface serial 0ip address 172.31.10.1 255.255.255.0ip helper-address 172.31.20.5...Configuring a Frame Relay-Encapsulated Serial Interface Connection
To set up AutoInstall to use a serial line with Frame Relay encapsulation, you must configure the staging router. To configure the staging router to forward requests from the new router using a Frame Relay-encapsulated serial interface connection, use the following commands beginning in global configuration mode:
You must use a DTE interface on the new router because the network always provides the clock signal.
In the following example, the configuration file for the staging router contains the commands needed to configure the router for Frame Relay-based AutoInstall on a serial line:
Router# show running-config...interface serial 0ip address 172.31.20.20 255.255.255.0encapsulation frame-relay!In the following command, 172.31.10.1 is the IP address of the new router's interface!and 48 is the PVC identifierframe-relay map ip 172.31.10.1 255.255.255.0 48 dlciip helper-address 172.31.20.5...Configuring a Cisco Router as a RARP Server
Use the ip rarp-server ip-address interface configuration command to enable the RARP service on a Cisco router, where ip-address is the IP address of the TFTP server. Use the arp ip-address MAC-address arpa global configuration command to map the MAC address of the new router to a specific IP address.
The following is an example of a static ARP entry in a configuration file for a typical Ethernet host:
arp 192.168.7.19 0800.0900.1834 arpaConfiguring a Cisco Router as a DHCP Server
The following sections describe how to configure a Cisco routing device to function as a DHCP server and provide the desired information to routers performing AutoInstall. The last section also describes the commands necessary to use another router to forward AutoInstall requests.
•
•
•
•
•
You do not have to use a Cisco device as the DHCP server; any DHCP server can provide the required information to the new router.
Note
Configuring a Configuration Filename on a Cisco DHCP Server
You have the option of configuring the DHCP server to provide a specific configuration filename to be used by the DHCP client during the AutoInstall process. When you associate the MAC address of a new router with a specific configuration file, AutoInstall will be able to request this file from the TFTP server. To determine the name of the specific configuration file, the DHCP client will examine the "file" field of the DHCP/BOOTP reply, or, if there is an option overload of the "file" field, at the value of option 67. When a configuration file (bootfile) is specified, this configuration file should be in the /tftpboot directory of the TFTP server.
Tip
To specify the name of the configuration file to be used by the DHCP client, use the following commands on the Cisco routing device running the DHCP server beginning in global configuration mode:
Configuring the IP Address of the TFTP Server on a Cisco DHCP Server
There are two ways of configuring the DHCP server to return the IP address of the TFTP server to be used by the DHCP client during AutoInstall: by specifying the siaddr field or option 150. The recommended method is to configure the DHCP server to return a value for option 150.
To configure the value for option 150, use the following commands on the Cisco routing device running the DHCP server beginning in global configuration mode:
To configure the value to be returned in the siaddr field, use the following commands on the Cisco routing device running the DHCP server beginning in global configuration mode:
Configuring the TFTP Server Name on a Cisco DHCP Server
The alternative to specifying the IP address of the TFTP server to be used during AutoInstall is to specify the hostname of the TFTP server. This information can be returned to the DHCP client in the sname field of a BOOTP reply or in the option 66 field of a DHCP reply. If only the TFTP server name is to returned, a DNS server must be available to the new router to translate the TFTP server name to an IP address.
To configure the DHCP server to return the TFTP server name as option 66, use the following commands on the Cisco routing device running the DHCP server, beginning in global configuration mode:
Configuring the DNS Server Address on a Cisco DHCP Server
To specify the DNS sever that should be used during the AutoInstall process, use the following command on the DHCP server in DHCP pool configuration mode:
Router(dhcp-config)# dns-server address
Specifies the IP address of the DNS server to use to resolve hostnames during the AutoInstall process.
Specifying the Default Router on a Cisco DHCP Server
In cases where more than one router is connected to new router, you may need to specify a default router through which the new router running AutoInstall should send TFTP and DNS requests. To configure the DHCP server to return this information to the DHCP client, use the following command on the DHCP server in DHCP pool configuration mode:
Router(dhcp-config)# default-router address
Specifies the IP address of the router to use as the first hop for AutoInstall unicast requests.
If the TFTP server IP address can be deduced by AutoInstall and if the default router option is provided, Autoinstall will recognize that the default router is the first hop toward the TFTP server. If the TFTP server IP address cannot be deduced, the default router option (if present) will be ignored.
In the following example, the address 10.0.20.20 is specified as the next hop toward the TFTP server with the address 172.16.1.1:
ip dhcp pool 1host 10.0.20.54 255.255.255.240hardware-address 0000.0c59.fcb0bootfile R1-confg!option 150 specifies the TFTP server addressoption 150 ip 172.16.1.1default-router 10.0.20.20Monitoring and Completing the AutoInstall Process
To monitor the progress of the AutoInstall process, you have the option of attaching a terminal directly to the system console port of the new router before turning it on. Note that this monitoring is optional; AutoInstall will start without user input after a short period of time. When a router boots for the first time, the CLI begins in Setup mode. Setup mode prompts you for manual configuration of the Cisco IOS software at the console. (For more information on Setup mode, see the "Using Setup" section in this chapter.)
For most platforms, you will see prompts similar to the following. You should respond to these prompts as indicated by the bold text:
Would you like to enter the initial configuration dialog? [yes]: noWould you like to terminate autoinstall? [yes]: no
Note
You will see the following display as the AutoInstall operation is in progress:
Please Wait. AutoInstall being attempted!!!!!!!!!!!!!!!!!!!Typically, additional notifications will be displayed as the process goes through the steps outlined earlier in this chapter. If the AutoInstall succeeds, and the configuration file contains all of the required configuration information, the CLI will enter user EXEC mode. After the AutoInstall process is completed, you should verify that the entire configuration file was downloaded, and that the file is uncorrupted. This verification can be performed from the console terminal, or by using a Telnet connection from an external host on the network. You can view the running configuration file using the show running-config or more system:running-config EXEC mode commands.
After verifying the running configuration, you should save it as the start-up configuration using the copy running-config startup-config or copy system:running-config nvram:startup-config EXEC mode command.
If the AutoInstall process fails, or if the configuration file does not contain all of the required configuration information, the router will remain in Setup mode to allow you to complete the configuration process. If no input is entered, the new router will continue to issue AutoInstall broadcast requests to attempt to learn its hostname and acquire IP addresses. The broadcast frequency will dwindle to every 10 minutes after several attempts.
AutoInstall Configuration Examples
This section contains an example of configuring network elements for DHCP-based AutoInstall.
Network Configuration for DHCP-Based AutoInstall Example
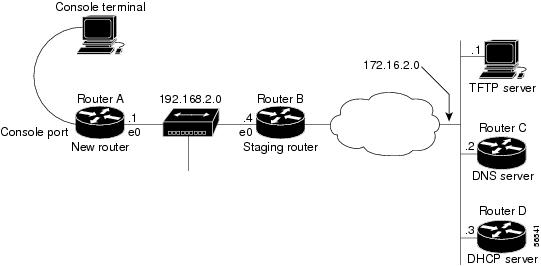
For this example, the hypothetical network topology introduced in the "Understanding AutoInstall" section is used to show the configuration options on the various hosts. Figure 5 shows the network topology with IP addresses. Note that the TFTP, DNS, and DHCP servers are shown to be on different devices for illustrational purposes only. In the sample output for the routers, only the commands relevant to the AutoInstall process are shown.
Figure 5 Example of AutoInstall Using an Ethernet Interface
Configuration for Router A
Router A is the new router. No manual configuration is needed. Prior to turning the router on, the user connects only the console port and the ethernet 0 (e0) port.
Configuration for Router B
Router B is the staging router. In this example, AutoInstall is performed over an Ethernet interface.
interface e0!specify the address for the TFTP serverip helper-address 172.16.2.1!specify the address for the DNS serverip helper-address 172.16.2.2!specify the address for the DHCP serverip helper-address 172.16.2.3Configuration for Router C
Router C is a Cisco router running a DNS service. DNS is enabled by default.
!assign the hostname "rtr1" to Router Aip host rtr1 192.168.2.1!specify the TFTP address to hostname mappingip host tftpserv 172.16.2.1Configuration for Router D
Router D is a Cisco router running a DHCP service. This example uses a static DHCP pool with manual bindings. (To configure a dynamic pool, the network and lease DHCP pool configuration commands should be used.)
ip dhcp pool 1!specify the IP address that will be assigned to the new routerhost 192.168.2.1!specify the hardware (MAC) address of the new routerhardware-address 0000.0c59.fcb0!specify the address of the DNS serverdns-server 172.16.2.2!specify the TFTP server address (DHCP option 10)option 150 ip 172.16.1.1!specify the configuration file that AutoInstall should get from the TFTP serverbootfile rtr1-confgUsing Setup
Setup (also known as the System Configuration Dialog) is an interactive CLI mode that guides you through first-time configuration by prompting you for the details needed to start your router functioning in the network. While Setup mode is a quick and easy way to perform first-time configuration of a router, you can also use it after first-time startup to perform basic configuration changes, as described in the following sections:
•
Before using Setup, you should have the following information so that you can configure the system properly:
•
•
•
•
•
Note
Using Setup After First-Time Startup
The Cisco IOS command-line interface (CLI) allows you to make very detailed changes to your system configuration. However, some major configuration changes do not require the granularity provided by the CLI. You can use Setup to configure general characteristics of the system. For example, you might want to use Setup to add a protocol suite, to make major addressing scheme changes, or to configure a newly installed interface. Although you can use the configuration modes available though the CLI to make these changes, the Setup mode provides you with a high-level view of the configuration and guides you through the configuration process.
If you are not familiar with Cisco products and the CLI, Setup is a particularly valuable tool because it prompts you for the specific information required to configure your system.
Note
To enter Setup mode, use the following command in privileged EXEC mode:
When you enter the setup EXEC command after first-time startup, an interactive dialog called the System Configuration Dialog appears on the system console screen. The System Configuration Dialog guides you through the configuration process. It prompts you first for global parameters and then for interface parameters. The values shown in brackets next to each prompt reflect either the default settings or the last configured setting.
You must progress through the System Configuration Dialog until you come to the item that you intend to change. To accept default settings for items that you do not want to change, press the Return or Enter key. The default choice is indicated by square brackets (for example, [yes]) before the prompt colon (:).
To exit Setup and return to privileged EXEC mode without making changes and without progressing through the entire System Configuration Dialog, press Ctrl-C.
The facility also provides help text for each prompt. To access help text, press the question mark (?) key at a prompt.
When you complete your changes, the system will automatically display the configuration file that was created during the Setup session. It also asks you if you want to use this configuration. If you answer Yes, the configuration is saved to NVRAM as the startup configuration file. If you answer No, the configuration is not saved and the process begins again. There is no default for this prompt; you must answer either Yes or No.
Note
In the following example Setup is used to configure interface serial 0 and to add ARAP and IP/IPX PPP support on the asynchronous interfaces. Note that prompts and the order in which they appear on the screen vary depending on the platform and the interfaces installed in the device.
Router# setup--- System Configuration Dialog ---At any point you may enter a question mark '?' for help.Use ctrl-c to abort configuration dialog at any prompt.Default settings are in square brackets '[]'.Continue with configuration dialog? [yes]:First, would you like to see the current interface summary? [yes]:Interface IP-Address OK? Method Status ProtocolEthernet0 172.16.72.2 YES manual up upSerial0 unassigned YES not set administratively down downSerial1 172.16.72.2 YES not set up upConfiguring global parameters:Enter host name [Router]:The enable secret is a one-way cryptographic secret usedinstead of the enable password when it exists.Enter enable secret [<Use current secret>]:The enable password is used when there is no enable secretand when using older software and some boot images.Enter enable password [ww]:Enter virtual terminal password [ww]:Configure SNMP Network Management? [yes]:Community string [public]:Configure DECnet? [no]:Configure AppleTalk? [yes]:Multizone networks? [no]: yesConfigure IPX? [yes]:Configure IP? [yes]:Configure IGRP routing? [yes]:Your IGRP autonomous system number [15]:Configure Async lines? [yes]:Async line speed [9600]: 57600Configure for HW flow control? [yes]:Configure for modems? [yes/no]: yesConfigure for default chat script? [yes]: noConfigure for Dial-in IP SLIP/PPP access? [no]: yesConfigure for Dynamic IP addresses? [yes]: noConfigure Default IP addresses? [no]: yesConfigure for TCP Header Compression? [yes]: noConfigure for routing updates on async links? [no]:Configure for Async IPX? [yes]:Configure for Appletalk Remote Access? [yes]:AppleTalk Network for ARAP clients [1]: 20Zone name for ARAP clients [ARA Dialins]:Configuring interface parameters:Configuring interface Ethernet0:Is this interface in use? [yes]:Configure IP on this interface? [yes]:IP address for this interface [172.16.72.2]:Number of bits in subnet field [8]:Class B network is 172.16.0.0, 8 subnet bits; mask is /24Configure AppleTalk on this interface? [yes]:Extended AppleTalk network? [yes]:AppleTalk starting cable range [1]:AppleTalk ending cable range [1]:AppleTalk zone name [Sales]:AppleTalk additional zone name:Configure IPX on this interface? [yes]:IPX network number [1]:Configuring interface Serial0:Is this interface in use? [no]: yesConfigure IP on this interface? [no]: yesConfigure IP unnumbered on this interface? [no]: yesAssign to which interface [Ethernet0]:Configure AppleTalk on this interface? [no]: yesExtended AppleTalk network? [yes]:AppleTalk starting cable range [2]: 3AppleTalk ending cable range [3]: 3AppleTalk zone name [myzone]: ZZ SerialAppleTalk additional zone name:Configure IPX on this interface? [no]: yesIPX network number [2]: 3Configuring interface Serial1:Is this interface in use? [yes]:Configure IP on this interface? [yes]:Configure IP unnumbered on this interface? [yes]:Assign to which interface [Ethernet0]:Configure AppleTalk on this interface? [yes]:Extended AppleTalk network? [yes]:AppleTalk starting cable range [2]:AppleTalk ending cable range [2]:AppleTalk zone name [ZZ Serial]:AppleTalk additional zone name:Configure IPX on this interface? [yes]:IPX network number [2]:Configuring interface Async1:IPX network number [4]:Default client IP address for this interface [none]: 172.16.72.4Configuring interface Async2:IPX network number [5]:Default client IP address for this interface [172.16.72.5]:Configuring interface Async3:IPX network number [6]:Default client IP address for this interface [172.16.72.6]:Configuring interface Async4:IPX network number [7]:Default client IP address for this interface [172.16.72.7]:Configuring interface Async5:IPX network number [8]:Default client IP address for this interface [172.16.72.8]:Configuring interface Async6:IPX network number [9]:Default client IP address for this interface [172.16.72.9]:Configuring interface Async7:IPX network number [A]:Default client IP address for this interface [172.16.72.10]:Configuring interface Async8:IPX network number [B]:Default client IP address for this interface [172.16.72.11]:Configuring interface Async9:IPX network number [C]:Default client IP address for this interface [172.16.72.12]:Configuring interface Async10:IPX network number [D]:Default client IP address for this interface [172.16.72.13]:Configuring interface Async11:IPX network number [E]:Default client IP address for this interface [172.16.72.14]:Configuring interface Async12:IPX network number [F]:Default client IP address for this interface [172.16.72.15]:Configuring interface Async13:IPX network number [10]:Default client IP address for this interface [172.16.72.16]:Configuring interface Async14:IPX network number [11]:Default client IP address for this interface [172.16.72.17]:Configuring interface Async15:IPX network number [12]:Default client IP address for this interface [172.16.72.18]:Configuring interface Async16:IPX network number [13]:Default client IP address for this interface [172.16.72.19]:The following configuration command script was created:!!This is the running configuration file that will be used!if you answer yes to the prompt which follows!hostname Routerenable secret 5 $1$krIg$emfYm/1OwHVspDuS8Gy0K1enable password wwline vty 0 4password wwsnmp-server community public!no decnet routingappletalk routingipx routingip routing!line 1 16speed 57600flowcontrol hardwaremodem inout!arap network 20 ARA Dialinsline 1 16arap enableautoselect!! Turn off IPX to prevent network conflicts.interface Ethernet0no ipx networkinterface Serial0no ipx networkinterface Serial1no ipx network!interface Ethernet0ip address 172.16.72.2 255.255.255.0appletalk cable-range 1-1 1.204appletalk zone Salesipx network 1no mop enabled!interface Serial0no shutdownno ip addressip unnumbered Ethernet0appletalk cable-range 3-3appletalk zone ZZ Serialipx network 3no mop enabled!interface Serial1no ip addressip unnumbered Ethernet0appletalk cable-range 2-2 2.2appletalk zone ZZ Serialipx network 2no mop enabled!Interface Async1ipx network 4ip unnumbered Ethernet0peer default ip address 172.16.72.4async mode interactive!Interface Async2ipx network 5ip unnumbered Ethernet0peer default ip address 172.16.72.5async mode interactive!Interface Async3ipx network 6ip unnumbered Ethernet0peer default ip address 172.16.72.6async mode interactive!Interface Async4ipx network 7ip unnumbered Ethernet0peer default ip address 172.16.72.7async mode interactiveasync dynamic address!Interface Async5ipx network 8ip unnumbered Ethernet0peer default ip address 172.16.72.8async mode interactive!Interface Async6ipx network 9ip unnumbered Ethernet0peer default ip address 172.16.72.9async mode interactive!Interface Async7ipx network Aip unnumbered Ethernet0peer default ip address 172.16.72.10async mode interactive!Interface Async8ipx network Bip unnumbered Ethernet0peer default ip address 172.16.72.11async mode interactive!Interface Async9ipx network Cip unnumbered Ethernet0peer default ip address 172.16.72.12async mode interactive!Interface Async10ipx network Dip unnumbered Ethernet0peer default ip address 172.16.72.13async mode interactive!Interface Async11ipx network Eip unnumbered Ethernet0peer default ip address 172.16.72.14async mode interactive!Interface Async12ipx network Fip unnumbered Ethernet0peer default ip address 172.16.72.15async mode interactive!Interface Async13ipx network 10ip unnumbered Ethernet0peer default ip address 172.16.72.16async mode interactive!Interface Async14ipx network 11ip unnumbered Ethernet0peer default ip address 172.16.72.17async mode interactive!Interface Async15ipx network 12ip unnumbered Ethernet0peer default ip address 172.16.72.18async mode interactive!Interface Async16ipx network 13ip unnumbered Ethernet0peer default ip address 172.16.72.19async mode interactive!router igrp 15network 172.16.0.0!endUse this configuration? [yes/no]: yesBuilding configuration...Use the enabled mode 'configure' command to modify this configuration.Router#Using Streamlined Setup
The streamlined setup mode permits your router to load a system image from a network server when there are problems with the startup configuration. If RXBOOT is on your system, the system automatically enters the streamlined Setup mode when your router is rebooted (or you are attempting to load a system image from a network server) under any of the following circumstances:
•
•
•
•
•
Note that these conditions are the same as for entering standard ROM monitor mode.
Note
The streamlined Setup mode differs from the standard Setup mode because streamlined Setup does not ask you to configure global router parameters. You are prompted only to configure interface parameters, which permit your router to boot.
As with ROM monitor mode, the configuration information you provide in RXBOOT setup mode is temporary and exists only so that you can proceed with booting your system. When you reload the system, your original configuration is left intact. If your startup configuration is corrupted, enter the setup EXEC command, and configure the basic parameters. Then issue the copy running-config startup-config EXEC command to write this configuration to NVRAM.
The following example shows a router entering streamlined Setup mode:
--- System Configuration Dialog ---Default settings are in square brackets '[]'.Configuring interface IP parameters for netbooting:
Note
The streamlined Setup mode continues by prompting you for interface parameters for each installed interface. The facility asks if an interface is in use. If so, the facility then prompts you to provide an IP address and subnet mask bits for the interface. Enter the subnet mask bits as a decimal value, such as 5.
The following example shows the portion of the streamlined Setup mode that prompts for interface parameters. In the example, the streamlined Setup mode is prompting for Ethernet 0 interface parameters and Serial 0 interface parameters:
Configuring interface Ethernet0:Is this interface in use? [yes]:Configure IP on this interface? [yes]:IP address for this interface: 192.168.78.50Number of bits in subnet field [0]: 5Class C network is 192.168.78.0, 5 subnet bits; mask is 255.255.255.248Configuring interface Serial0:Is this interface in use? [yes]:Configure IP on this interface? [yes]:IP address for this interface: 192.169.78.34Number of bits in subnet field [5]:Class C network is 192.168.78.0, 5 subnet bits; mask is 255.255.255.248Using Configuration Applications
You can also configure Cisco IOS software-based devices using the Cisco ConfigMaker application.
For more information on configuration tools, go to Cisco.com.
Cisco ConfigMaker
Cisco ConfigMaker is an easy-to-use Microsoft Windows (95/98/NT) application used to configure a small network of Cisco routers (800, 1000, 1600, 1700, 2500, 2600, 3600, and 4000 series), switches, hubs, and other network devices from a single PC. Using Cisco ConfigMaker does not require knowledge of the Cisco IOS software command-line interface. Cisco ConfigMaker is designed for resellers and network administrators of small to medium-sized businesses that are familiar with LAN and WAN fundamentals and basic network design.
ConfigMaker makes configuring an HDLC, Frame Relay, or ISDN wide-area network connection between routers or the Internet as easy as drawing a network diagram. The tool guides users step-by-step through network design and addressing tasks and automatically delivers configuration files to individual routers on the network. ConfigMaker provides a graphical view of the entire network and lets the user build network diagrams using standard copy/paste, drag/drop, and online editing functions. ConfigMaker enables the user to monitor router and network configuration status at a glance with simple color codes.
The Cisco ConfigMaker software download is made available to customers free of charge. For details about the Cisco ConfigMaker application, and to download a copy of the software, go to http://www.cisco.com/go/configmaker.
This document first published April 2001. Last updated September 2003.