Downloads |
Scope of Document
This deployment guide provides detailed information on configuring the Cisco® Virtual Office headend devices and ManageExpress® Virtual Office. It also presents the end-user provisioning process performed to deploy new Cisco Virtual Office spoke routers.
Please refer to the Cisco Virtual Office overview (http://www.cisco.com/go/cvo) for more information about the solution, its architecture, and all of its components.
Cisco Virtual Office Architecture
Figure 1. Cisco Virtual Office Architecture
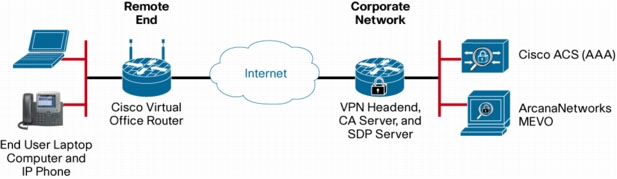
• VPN headend router serving as the VPN termination point
• Certificate authority (CA) server to issue certificates for both remote and headend routers
• Secure device provisioning (SDP) server for provisioning the remote routers
• Authentication, authorization, and accounting (AAA) server for device and user authentication: Typically a Cisco Secure Access Control Server (ACS)
• ArcanaNetworks MEVO on a Microsoft Windows 2008/2008R2 server for Cisco Virtual Office management and provisioning
• Cisco Virtual Office router: Typically a Cisco Integrated Services Routers Generation 2 (ISR G2)
• IP phone if voice is required
• Possibly a video endpoint
• Laptop computer for connecting to the corporate network; provided by the end user or employer
Zero-Touch Deployment
Platforms and Images
MEVO Requirements
Setting Up Cisco Virtual Office
• Headend configuration
– CA server
– SDP server
– DMVPN headend
• ArcanaNetworks' MEVO
Headend Configuration
CA and SDP Server Configuration
1. Configure the certificate server.
1. Configure the AAA server for user authentication.
1. Configure the SDP server.
DMVPN Configuration
1. Configure the AAA server for device authorization (PKI-AAA, optional).
1. Configure public key infrastructure (PKI) trustpoint for Internet Security Association and Key Management Protocol (ISAKMP) authentication (if being used).
1. Authenticate and enroll the certificate.
1. Configure cryptography policies.
1. Enable the DMVPN server.
1. Enable routing.
ArcanaNetworks' MEVO Configuration
• User: This role includes teleworkers, mobile workers, and individuals working at remote and branch offices. In the case of a branch-office deployment, the end user may also be the technician who configures the branch router for the office or the branch offices's name.
• Approver: This role approves or declines a user's request for Cisco Virtual Office in the typical Cisco Virtual Office deployment workflow.
• Administrator: This role configures and maintains ArcanaNetworks MEVO server. This role may also manage users, create requests, and approve requests. If the Administrator requests Cisco Virtual Office service on behalf of the user, a manager approval is not required.
• User Administrator: This role can be used to manage a group of users based on User Classes. This role does not have access to change the MEVO server configuration.This role can create requests, approve requests, and disconnect spokes..
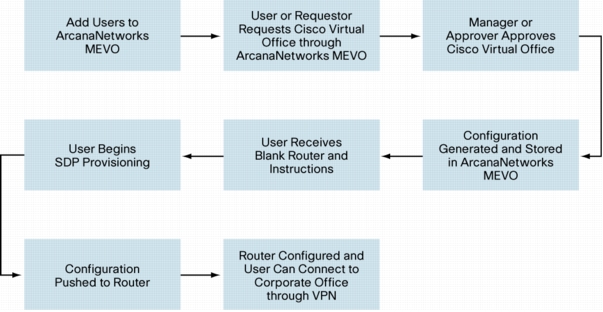
Figure 2. Sample MEVO State Full Business Workflow with Cisco Virtual Office
Administrator Tasks: Configuring ArcanaNetworks MEVO
Step 1: Logging In for the First Time
1. Open a browser and enter http://<ip-address-or-domain-name>/mevo to access the ArcanaNetworks MEVO GUI (Figure 3). (For example, enter http://cvoarcana.cisco.com/mevo).
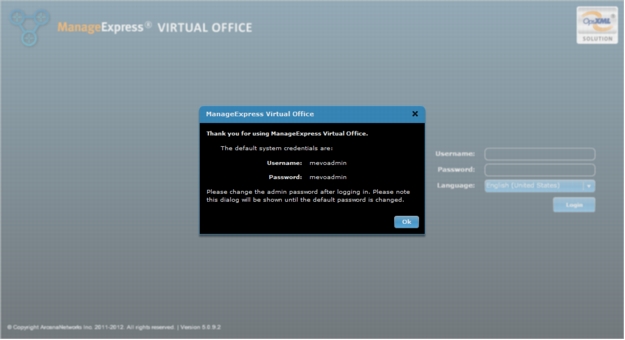
Figure 3. MEVO GUI initial login screen.
1.
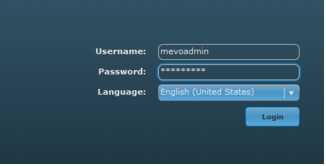
2. Log in using the default credentials (username and password: mevoadmin and mevoadmin). Change the default password to a new password if this is the first time ArcanaNetworks MEVO is being used (Figure 4).
Figure 4. Login with username: mevoadmin and password: mevoadmin as default. Change the default password upon login.
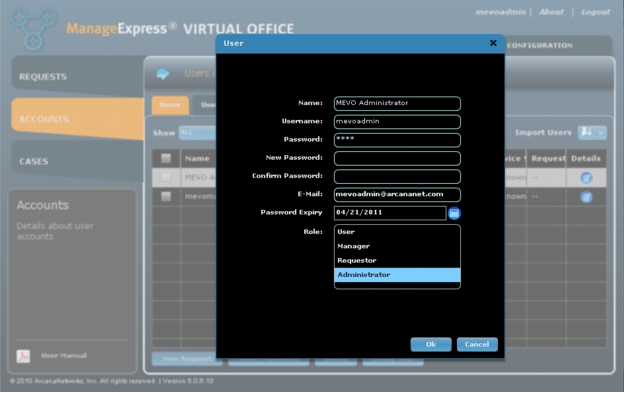
3. Change the mevoadmin account password by clicking on the Accounts tab in the left column and then click the Users tab. Click the icon in the Details column for the MEVO Administrator account and set a new password and add an email address (Figure 5).
Figure 5. Change the default ArcanaNetworks MEVO admin credentials.
Step 2: Configuring the Headend
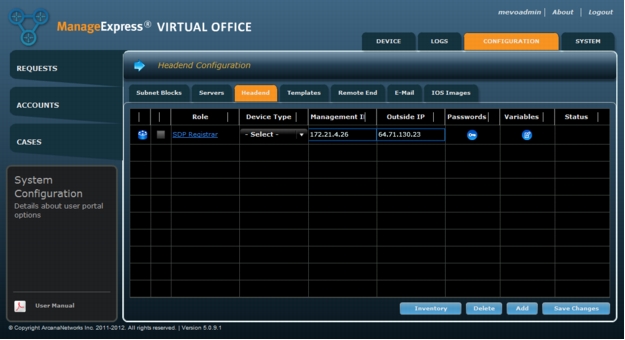
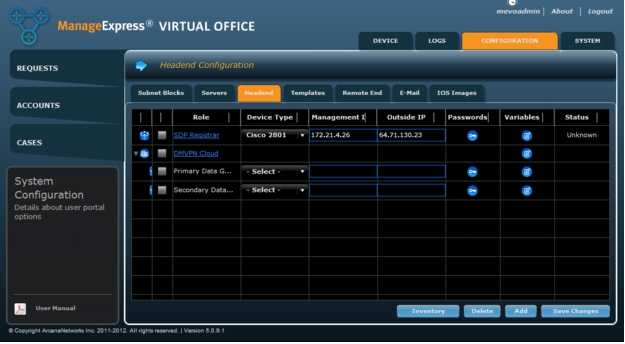
1. Go to the Configuration tab and click on the Headend sub-tab. For the SDP Registrar select the Device Type and enter the Management IP and Outside IP values (Figure 6).
a. Device Type: For informational purposes only
b. Management IP: IP address accessible from ArcanaNetworks MEVO
c. Outside IP: IP address accessible from the Internet; end users will start the SDP process using this address.
Figure 6. Enter device type and IP addresses for SDP server.
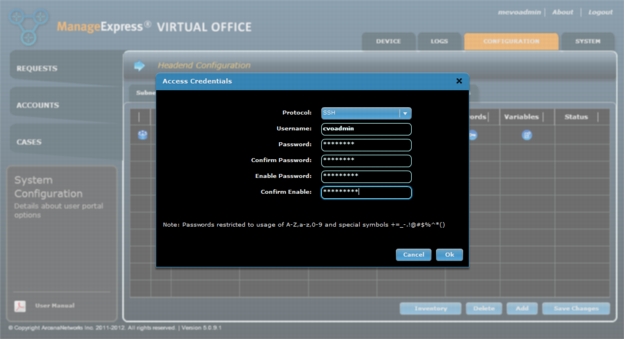
1. Click the icon in the Passwords column and enter the access credentials to allow Secure Shell (SSH) Protocol access from MEVO to the SDP server (Figure 7).
Figure 7. Enter access credentials for the SDP server.
If the SDP router has already been configured run the "Inventory" operation to populate the SDP information. The Certificate Authority HTTP Port will be automatically parsed and populated. The Archive Password will need to be manually configured after inventory completes. It currently takes approximately 30 seconds before the user interface is updated after Inventory completes.
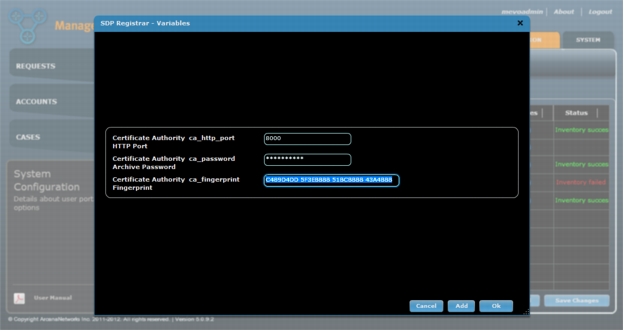
2. Click the icon in the Variables field and enter the Certificate Authority information as listed here. Click Ok when you are finished (Figure 8).
a. Certificate Authority HTTP Port: HTTP port used for SCEP for certificate enrollment. This should be automatically populated after inventory completes, but should be verified.
b. Certification Authority Archive Password: PKI server archive password; used locally on the SDP server only. This password needs to be manually entered.
Figure 8. Enter SDP Registrar Variables for the SDP server.
3. At the bottom right of the screen, click Save Changes. ArcanaNetworks MEVO will then try to use SSH or Telnet to reach the router. The resulting status will not affect provisioning (Figure 9).
Figure 9. MEVO tries to reach the router after SDP server is added. Status will show "Passed" if test is succesful.

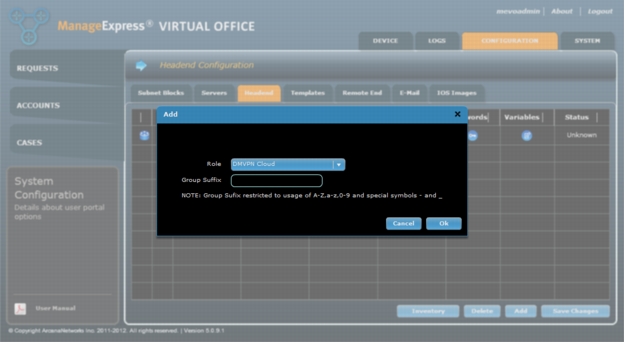
4. Click Add to add a new DMVPN cloud. No Group Suffix should be used for the first cloud (Figure 10).
Figure 10. Add a new DMVPN Cloud.
1. Enter Device Type, Management IP, and Outside IP values for the primary and secondary data gateways. If you do not need the secondary gateway, select it and click Delete (Figure 11).
Figure 11. Enter device type and IP addresses for DMVPN Gateway(s).
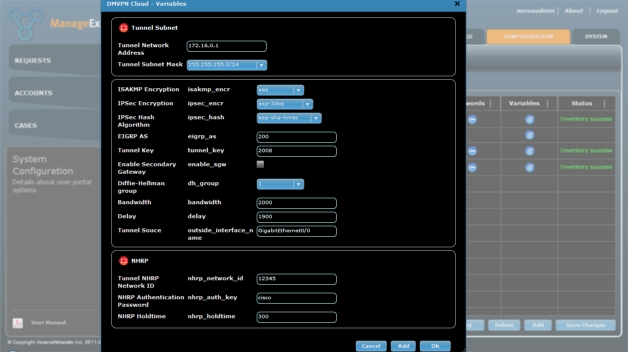
1. For the DMVPN Cloud, click the icon in the Variables field and enter the information as listed below. These variables should match the configuration on the DMVPN hub (Figure 12). If the inventory operation is run for an existing headend, many of these values may be populated. Passwords ALWAYS require manual entry. It is CRITICAL that all information be complete and verified as correct.
a. Tunnel Network Address: DMVPN multipoint generic routing encapsulation (mGRE) tunnel network address; these addresses will be passed to the spoke routers
b. Tunnel Subnet Mask: DMVPN mGRE tunnel subnet mask
c. ISAKMP Encryption, IPsec Encryption, IPsec Hash Algorithm, and Diffie-Hellman Group: Cryptographic policies; these policies should match on hubs and spokes
d. EIGRP AS: Autonomous system (AS) number for Enhanced Interior Gateway Routing Protocol (EIGRP); this protocol is the preferred routing protocol for DMVPN
e. Tunnel Bandwidth and Tunnel Delay: Parameters used by EIGRP for routing metrics
f. Tunnel Key: DMVPN mGRE tunnel key; this value should match on hubs and spokes
g. Enable Secondary Gateway: Check the box if a secondary gateway is used
h. NHRP Network ID, Authentication Password, and Holdtime: Next-Hop Resolution Protocol (NHRP) parameters; the authentication password should match on hubs and spokes
When you are done, click Ok to save the settings.
Figure 12. Enter and save variables for the DMVPN cloud.
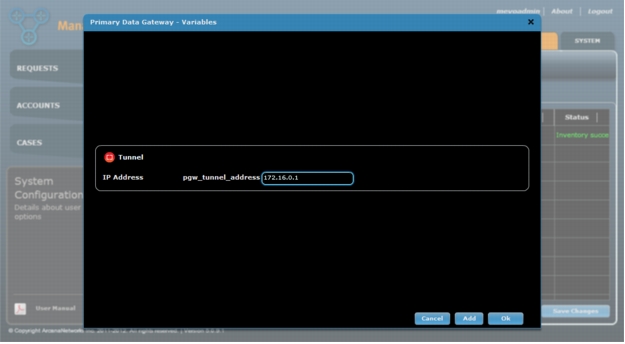
1. For Primary (and Secondary) Data Gateway, click the icon in the Variables field and enter the DMVPN mGRE tunnel IP addresses for each hub. Click Ok when done (Figure 13).
Figure 13. Enter a tunnel IP address for the Primary (and Secondary) Gateway.
1. Add a PKI-AAA server (optional).
While optional, PKI-AAA is HIGHLY recommended. It provides the only means for MEVO to completely automate the disconnect process. With PKI-AAA MEVO can remove the spoke account used for authorizing the spoke certificate used to build the VPN tunnel, in addition to revocation checking. Without PKI-AAA, certificate revocation is the sole means to prevent a device from establishing a vpn tunnel.
Cisco ACS 5.3 is the preferred software version although ACS 4.x can still be used with a third party commerical SSH service. If you wish to use ACS 4.x please contact mevo-support@arcananet.com for more details on its configuration.
Note: The ACS 5.x API uses both SSH and FTP while ACS 5.3 can be configured to use the more secure option of SSH and HTTPS
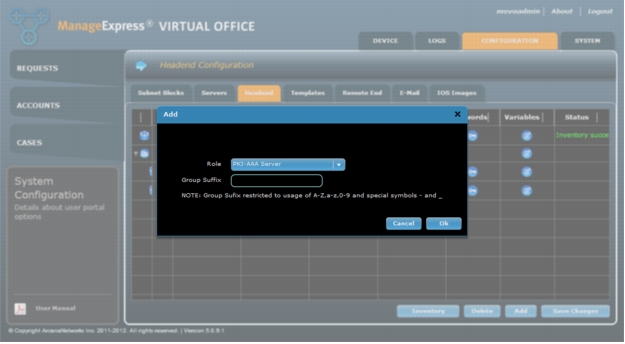
a. Click Add and select PKI-AAA Server from the Role drop-down menu.
Leave the Group Suffix field empty for the first PKI-AAA server (Figure 14).
Figure 14. Add a new PKI-AAA Server
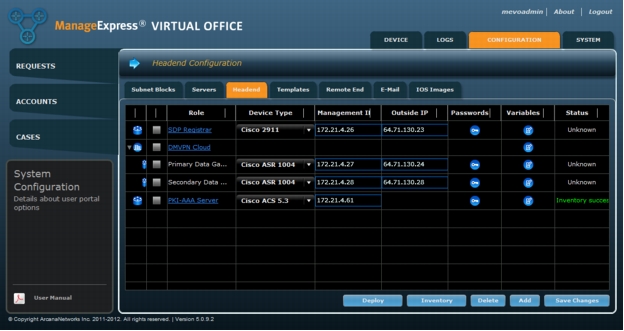
a. Select the Device Type (Cisco Access Control Server) and Management IP for the PKI-AAA server (Figure 15). The Cisco ACS 5.x option uses SSH and FTP for access and file copying. The Cisco ACS 5.3 option allows the ability to use SSH and HTTPS for access and file copying.
Figure 15. Enter device type and IP address for the PKI-AAA server.
a. Click the icon in the Passwords field and enter the access credentials to allow Secure Shell (SSH) Protocol access to the PKI-AAA server. Click Ok when done (Figure 16).
Figure 16. Enter access credentials for the PKI-AAA server.

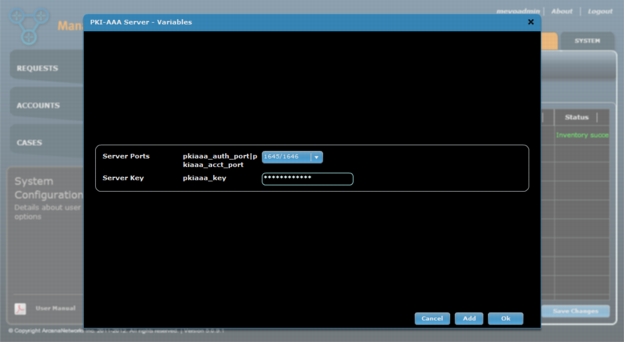
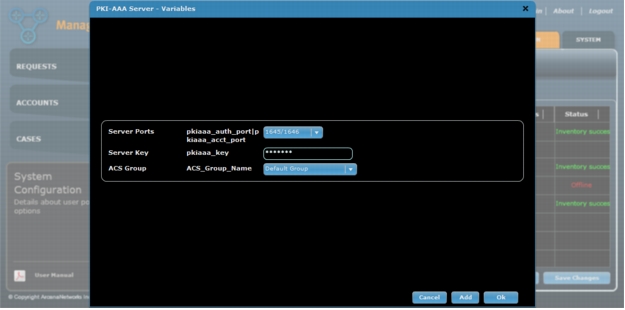
a. Click the icon in the PKI-AAA Variables field. Select the Server Ports from the drop-down menu, and enter the Server Key. Click Ok when done (Figure 17).
Figure 17. Enter PKI-AAA server variables.
b. Click Save Changes for the Headend configuration, and then put a check by the PKI-AAA Server and click on the Inventory button.
c. After successfully running an inventory on the ACS server you will need to go back into the PKI-AAA Server's Variables and select the appropriate "ACS Group" value (Figure 18). This is the group where MEVO will add the PKI-AAA device accounts.
Figure 18. Select the ACS Group from PKI-AAA server variables after running Inventory
1. Click Save Changes to save all headend settings.
Note: Status will not affect provisioning, but an Offline status generally means ArcanaNetworks MEVO cannot communicate with the headend, SDP server, or PKI-AAA server.
Step 3: Configuring ArcanaNetworks MEVO - Remote-End Variables
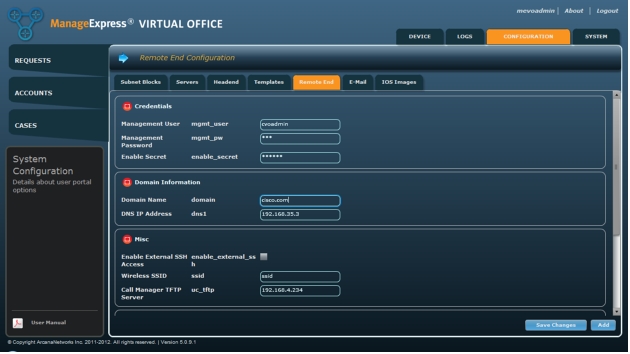
1. Click Remote End and enter the information as listed here (Figure 19).
a. Credentials for spoke routers: Management User, Management Password, and Enable Secret.
b. Domain Information: Name and DNS IP Address. Enter the domain name in the format: <domain>.com|org|edu
c. Miscellaneous: Enable External SSH Access to the spoke routers, Wireless SSID for an autonomous access point, and Cisco Unified Communications Manager TFTP Server for IP Phones.
d. SNMP Read Community
e. Time Settings: Time Zone, Enable Daylight Savings Time, and NTP IP Address
Note: All Remote-End Variables are required. If you are not using a variable, enter a placeholder value.
You can also add custom variables, such as an additional DNS server, by clicking on the "Add" button and filling in the required information. For more details, you can refer to the full User Guide available on the ArcanaNetworks download site: http://downloads.arcananet.com/mevo
Figure 19. Enter Remote End variables.
Step 4: Configuring Subnet Blocks
1. Choose Configuration > Subnet Blocks > Add to add a subnet block (Figure 20).
Figure 20. Add a subnet block.
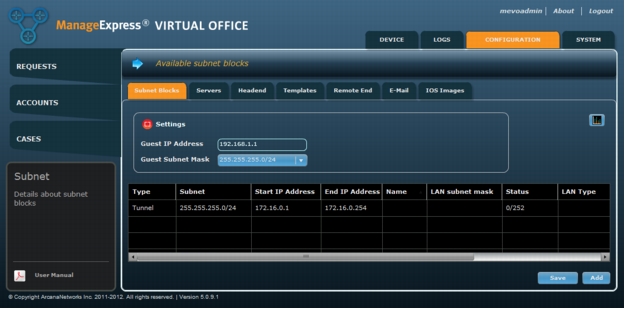
Note: The Settings fields are for globally configuring the details for the guest networkthat bypasses the VPN on the spoke routers and is NAT'ed to the internet. The Tunnel subnet will be automatically populated from the DMVPN Cloud variables specified during Step 2.
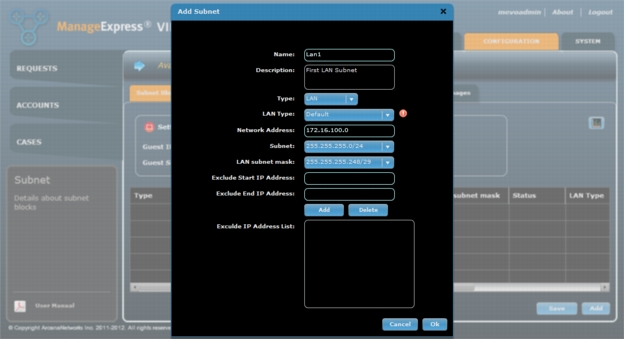
2. Click Add to configure a LAN subnet for the spoke routers. This LAN subnet should be network-routable and assigned uniquely to the Cisco Virtual Office spoke routers.
- In the Name field, enter the name of the subnet. This name should be uniquely defined. This name will be used as a key to be associated with a user class as discussed later in this document.
- The Type should be LAN, and the LAN Type should be left as "Default".
- In the Network Address field, enter the starting network address of your LAN subnet. Select the subnet size for this network from the Subnet drop-down menu. The range of IP addresses in the Network Address and Subnet fields will be automatically divided and assigned sequentially to each spoke based on the chosen LAN Subnet Mask.
- Enter any Subnet IP address ranges that should be excluded in the Exclude Start IP Address and Exclude End IP Address field and click Add to add them to the Exclude IP Address List. Click Delete to remove IP addresses from the Exclude IP Address List.
- Click Ok when you are finished (Figure 21).
Figure 21. Enter naming and IP addressing details to add a subnet.
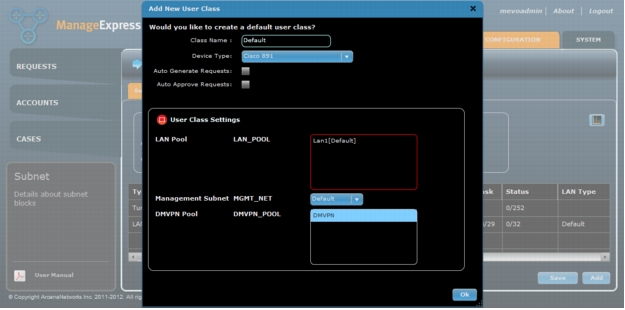
3. Once the LAN is saved you will be prompted to create a default User Class. Leave the "Default" class name, select the appropriate Device Type and click on the name of your subnet block in LAN Pool and click on "Ok" (Figure 22). For a description of User Class see the "User Classes and Users" section in this document. For more detailed information about User Classes please refer to the full User Guide available from the ArcanaNetworks download site.
Figure 22. Add new Default User Class
Step 5: Configuring ArcanaNetworks MEVO - Templates Selection
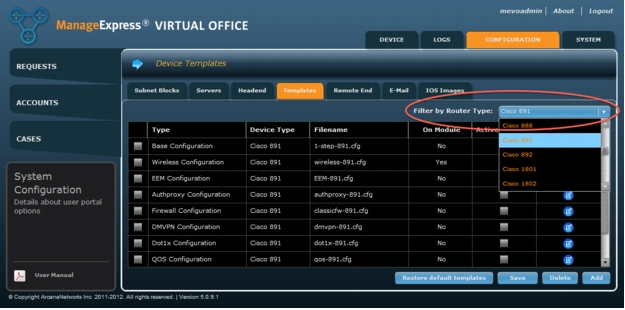
1. Click on the Templates tab and choose the correct model from the Filter by Router Type dropdown. (Figure 24).
Figure 23. Choose a Router Type to select Templates for.
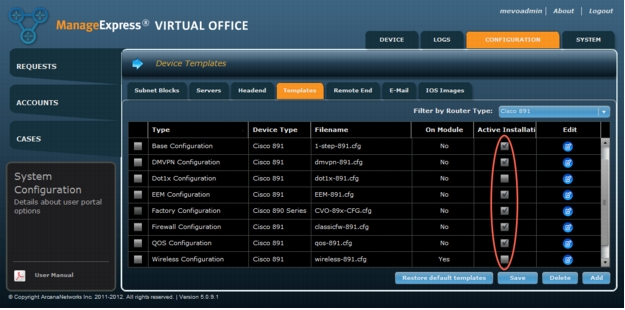
2. The minimum set of "Active" templates should be: Base, EEM, Firewall, DMVPN, , and Factory Configuration (Figure 25).
Figure 24. Select templates to be deployed to remote routers.
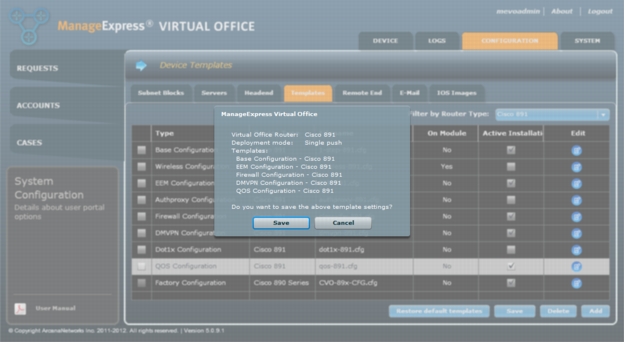
3. Save the Active templates for the selected router type by clicking on "Save". Verify that the selected Templates are correct in the popup and click on "Save". (Figure 26).
Figure 25. Verify the list of templates before clicking Save.
Step 6: Configuring Email
1. Click Email and for the Simple Mail Transfer Protocol (SMTP) server, enter the hostname or IP address and the sender email address (Figure 27).
Figure 26. Configure email settings.

Administrator Tasks: User Classes and Users
Note: "Users" in this section do not include Administrators or User Administrators which can be added at any time.
Adding User Accounts
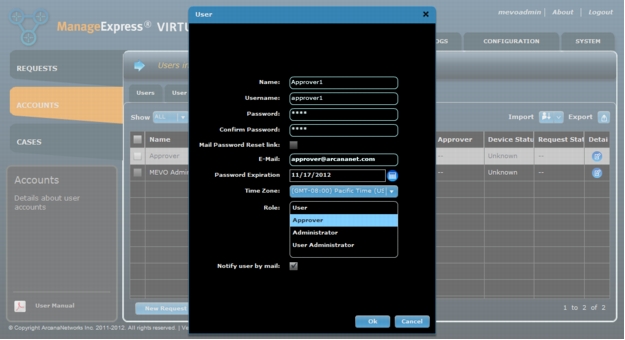
1. You must first add an "Approver" privileged account before you can create a regular User. To add an individual user go to Accounts > Users and click on "Create User" at the bottom of the screen and enter the required information. When you are finished, click Ok (Figure 28). The steps are the same regardless of the type of user being added. Simply be sure to add an Approver account prior to adding a normal user.
Figure 27. Adding an individual user manually.
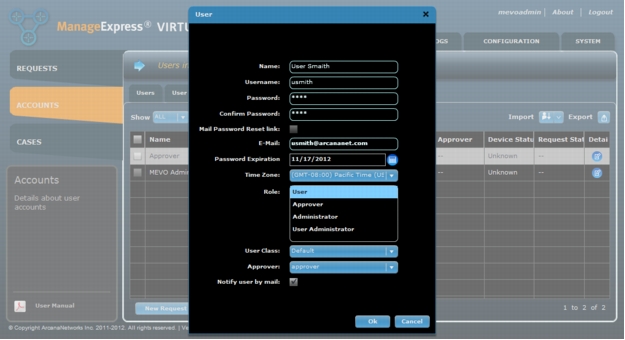
2. After creating your "Approver" you can then add your regluar end user accounts used for Cisco Virtual Office provisioning (Figure 29). When the Role "User" is selected the default User Class created while adding the LAN Subnet and the Approver created in Step 1 will be automatically populated.
Figure 28. Adding an end user account
Note: MEVO has the ability to import Users in bulk from a CSV file, or add users transparently from an external authentication server to the MEVO database upon login. To learn how to import users from CSV or transparently, please refer the full User Guide available from the ArcanaNetworks MEVO download site: http://downloads.arcananet.com/mevo.
Requesting Cisco Virtual Office
Requesting Cisco Virtual Office on behalf of a user
1. Open a web browser, type the same URL as you entered when you first logged in (http://<ip-address-or-domain-name>/mevo), and log in with the admin credentials.
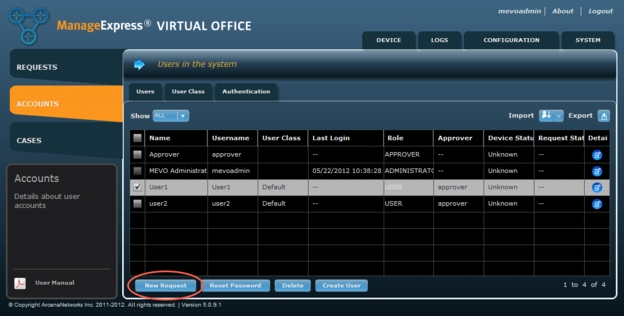
2. Go to the Accounts tab and select the Users tab. The admin will see the list of all users.
3. Select the user(s) that need Cisco Virtual Office and click New Request (Figure 29).
Figure 29. Create a New Request as Administrator.
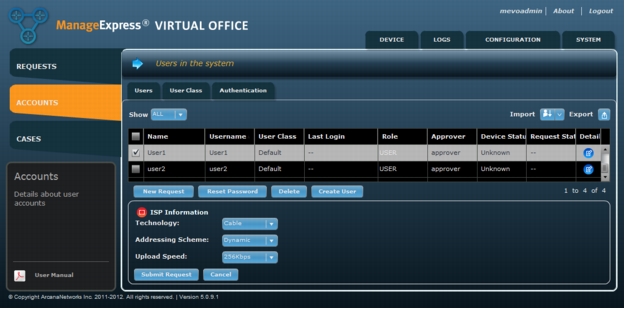
Note: Upload Speed is used to adjust the QoS settings on the spoke router (Figure 30).
Figure 30. Enter ISP information for the end user(s).
End-User Provisioning
1. Set up the router according to Figure 31.
Figure 31. Router setup.
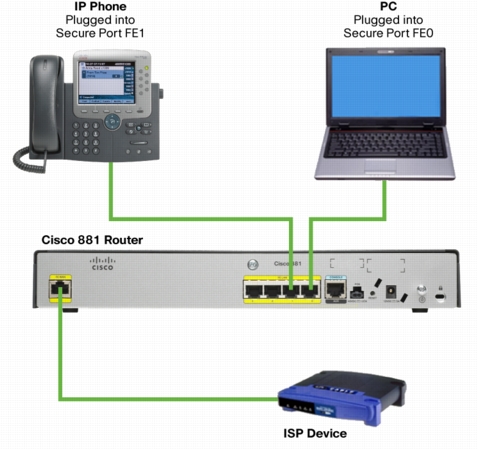
Routers ordered with the Cisco Virtual Office option come with a factory-default configuration that has DHCP enabled on the WAN side. After connecting according to the setup, you should have Internet connection through your PC.
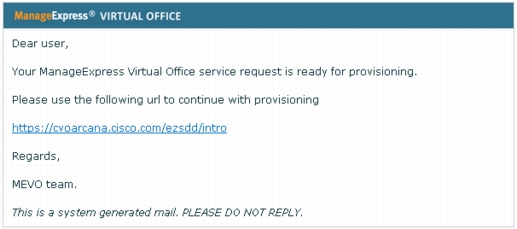
1. After the configuration is generated on ArcanaNetworks MEVO, you will get an email message similar to the one shown in Figure 32 with a link to start the SDP process. Click the link to continue.
Figure 32. Sample email with link to start the SDP process for Cisco Virtual Office.
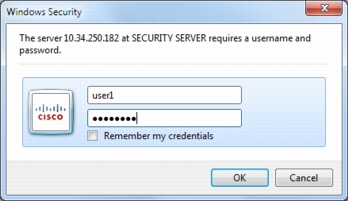
1. Enter the appropriate AAA credentials when the pop-up screen asks for user credentials (Figure 33).
Figure 33. User enters the appropriate AAA credentials to verify identity before the SDP process can start.
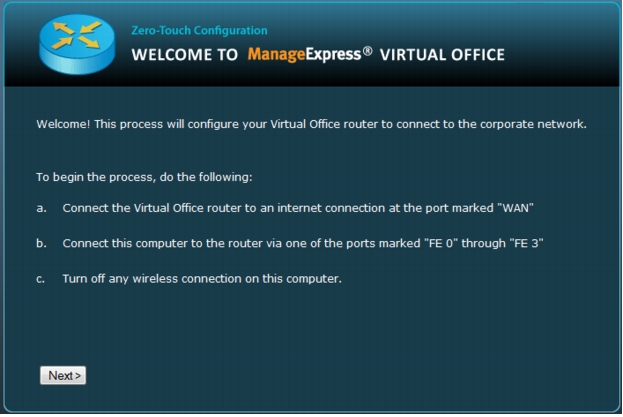
1. Click Next on the welcome screen to begin provisioning the router (Figure 34).
Figure 34. Welcome screen for Cisco Virtual Office's zero-touch router provisioning. User clicks "Next" button to begin.
1. ArcanaNetworks MEVO will connect to the router to begin configuration (Figure 35).
Figure 35. ArcanaNetworks MEVO connects to the router to begin configuration.
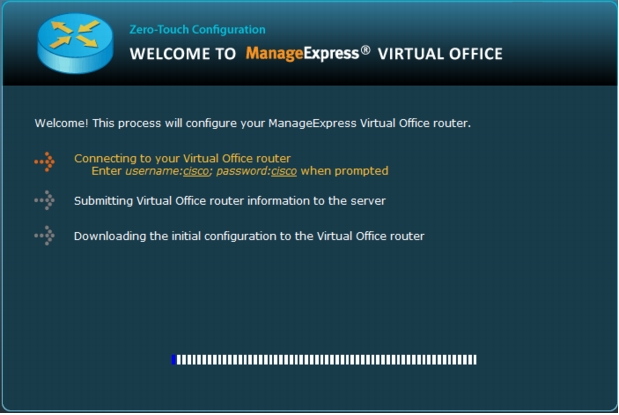
1. Enter the username cisco and the password cisco if you are asked for the router login credentials.
Figure 36. Router configuration pushed automatically.
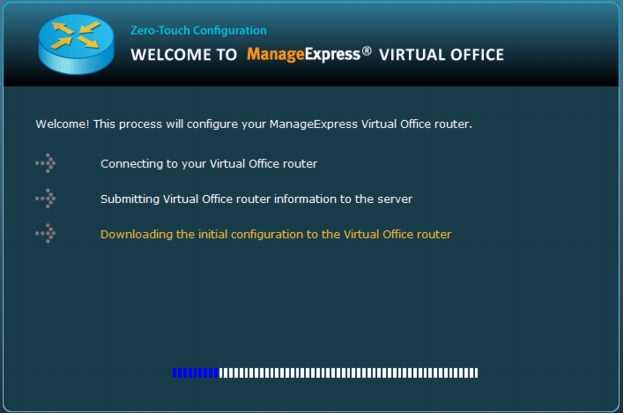
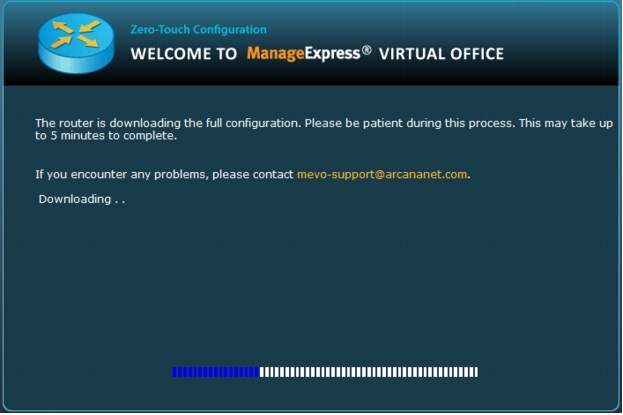
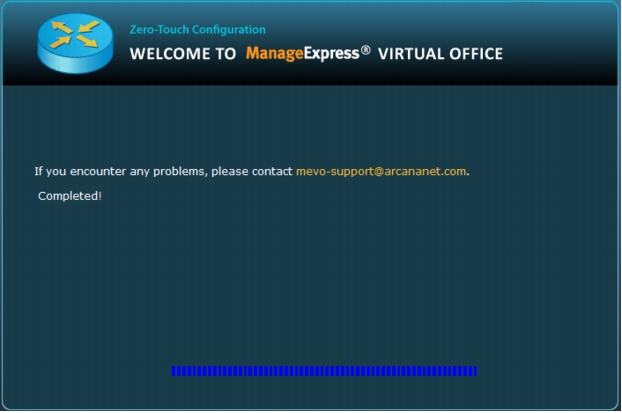
Figure 37. Once the router configuration push is complete, the user will be able to connect to the corporate network.
Appendix
Updating the Configuration
Step 1: Add a New Configuration Template to ArcanaNetworks MEVO.
Note: If you are only modifying an existing configuration template, go to Step 2 and make the changes (skip Steps 1 and 3).
1. Create a new configuration in a text file and save it.
2. Log into ArcanaNetworks MEVO and choose Configuration > Templates.
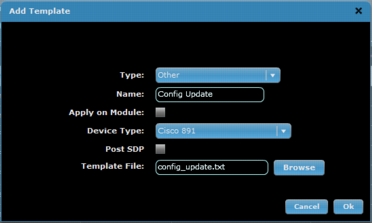
3. Click the Add button at the lower right and enter or select the information as listed here. When you are finished, click Ok (Figure A1).
a. Type: Choose the type of configuration to be added: Authproxy, DMVPN, Dot1x, EEM, Base, Other, or Firewall. If you choose Other, provide a name for the configuration.
b. Apply on Module: Select this option if the configuration is to go on a module within the router (for example, wireless configurations on the Cisco 881 ISR will need Apply on Module selected).
c. Device Type: Choose the device platform on which the configuration is to be used. If the configuration is the same for all device types, choose Universal.
d. Post SDP: Select the checkbox if the configuration is to be pushed after SDP is completed. In most cases, this option does not need to be selected.
e. Template File: To upload the configuration file you created, click the Browse button and choose the file.
Figure A1. Add a template.
Step 2: Apply the Configuration Update to Deployed Routers
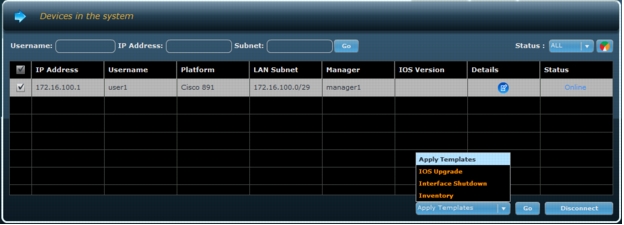
1. On the Device tab, select the devices that require a configuration update.
2. Choose Apply Templates and then click Go (Figure A2).
Note: Currently, only devices that are online can be updated.
Figure A2. Apply template
1. Select the configuration templates to be applied; then click Next.
Note: Base Configuration and EEM Configuration cannot be changed after provisioning.
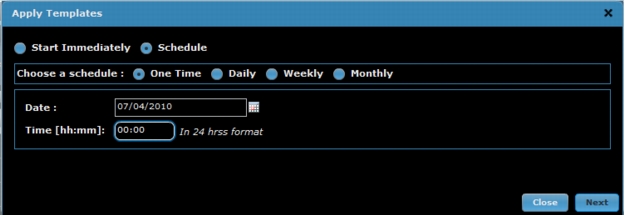
1. To apply the configuration update immediately, select Start Immediately, or to select the date and time to apply the update, select Schedule. Click Next to complete the update or schedule (Figure A3).
Figure A3. Schedule time for template push.
Updating the Image
Step 1: Add a New Image to ArcanaNetworks MEVO
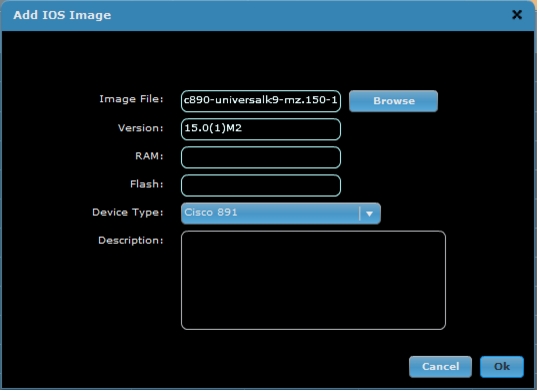
1. Log into ArcanaNetworks MEVO, choose Configuration > IOS Images, and click Add.
2. Browse to select the image file to be added, enter the image version, and select the device type. RAM, Flash, and Description are optional (Figure A4).
Figure A4. Add a new image toArcanaNetworks MEVO.
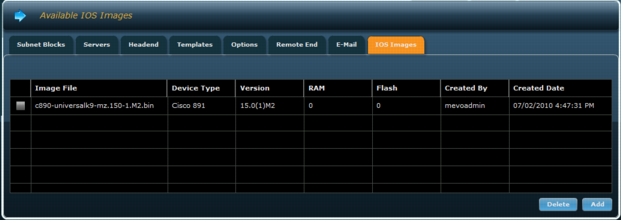
1. When you are done, click Ok to finish adding the image (Figure A5).
Figure A5. New IOS image added to ArcanaNetworks.
Step 2: Apply the Image Update to Deployed Routers
1. Under the Device tab in ArcanaNetworks MEVO, select the devices that require an image update.
2. At the bottom right, select IOS Upgrade and then click Go.
If ArcanaNetworks MEVO asks for an inventory run, continue to Step 3; otherwise, skip to Step 4.
Note: Currently, only devices that are online can have image upgraded.
1. Run the inventory.
a. Select the appropriate devices, select Inventory, and click Go.
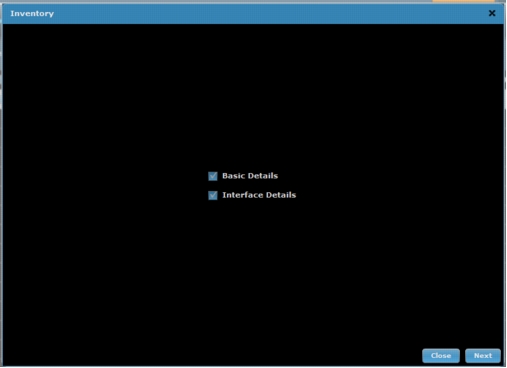
b. Basic Details and Interface Details should be checked automatically. Click Next to continue (Figure A6).
Figure A6. Select Inventory settings.
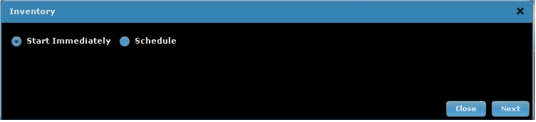
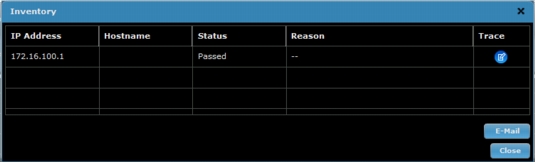
a. Select the Start Immediately button and click Next to complete the inventory run (Figure A7).
Figure A7. Schedule inventory or start immediately. Inventory will show status of "Passed" if successful.
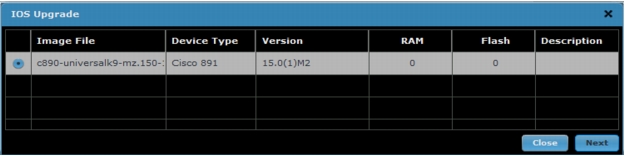
1. Select the image to be pushed to the routers and click Next to complete the image update (Figure A8).
Figure A8. Select image for the image push.
Disconnecting a Device and Removing a User
1. Click the Device tab, and go to the chart view.
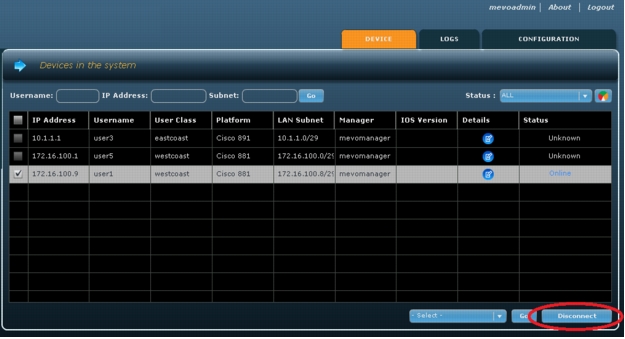
1. Select the device to be removed and click Disconnect to remove the device. ArcanaNetworks MEVO will use SSH to access that device and reload the router with the default configuration, thereby disconnecting the router from the network. ArcanaNetworks will also remove the device profile on the Cisco ACS for that device if PKI-AAA is enabled (Figure A9).
Note: The device must be online in order for it to be removed. If the device is not currently online, you can still remove the user (see step 3). ArcanaNetoworks currently removes the device profile automatically with Cisco ACS Version 5.0.
Figure A9. Select the device to be removed and click "Disconnect."
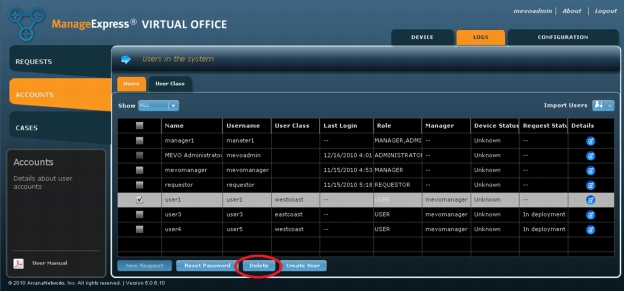
1. Delete the user associated with the device under the Accounts > Users page (Figure A10).
Figure A10. Delete the user associated with the removed device.
1. Remove the user profiles from the Cisco ACS.
2. Revoke the router certificate from the CA server.
If you are using a Cisco IOS Software router as the CA server, use the following command:
crypto pki server cs-label revoke certificate-serial-number
For More Information
• http://www.cisco.com/en/US/tech/tk583/tk372/technologies_configuration_example09186a0080210cdc.shtml