Disclaimer
THE CUSTOMER ASSUMES ALL RESPONSIBILITY FOR PROPERLY CONFIGURING THE CISCO EMERGENCY RESPONDER. CISCO HEREBY DISCLAIMS ANY AND ALL LIABILITY ARISING FROM OR IN CONNECTION WITH A USERS INABILITY TO REACH EMERGENCY SERVICE RESPONDERS (INCLUDING INABILITY TO ACCESS A PUBLIC SAFETY ANSWERING POINT) OR THE INABILITY OF EMERGENCY SERVICE RESPONDERS TO IDENTIFY A USER'S LOCATION. CISCO STRONGLY RECOMMENDS THAT ALL CUSTOMERS VERIFY AND TEST CONFIGURATION OF THE CISCO EMERGENCY RESPONDER IMMEDIATELY FOLLOWING INITIAL CONFIGURATION AND ON A PERIODIC BASIS THEREAFTER. CISCO FURTHER RECOMMENDS THAT ALL CUSTOMERS PROVIDE ADEQUATE TRUNK AND BANDWIDTH CAPACITY TO ENSURE THAT AUDIO PATHS ARE AVAILABLE FOR EMERGENCY CALLS.
IN NO EVENT SHALL CISCO OR ITS SUPPLIERS BE LIABLE FOR ANY INDIRECT, SPECIAL, CONSEQUENTIAL, OR INCIDENTAL DAMAGES, INCLUDING, WITHOUT LIMITATION, LOST PROFITS OR LOSS OR DAMAGE TO DATA ARISING OUT OF THE USE OR INABILITY TO USE THIS PRODUCT, EVEN IF CISCO OR ITS SUPPLIERS HAVE BEEN ADVISED OF THE POSSIBILITY OF SUCH DAMAGES.
Important Additional Information
Cisco Virtual Office and Cisco Emergency Responder do not include the capability to automatically locate remote devices not on the customer's premises. If an emergency call is placed from one of these devices, the call may be delivered to an inappropriate emergency service responder or with an incorrect location. You may be able to support user-provided off-premises locations and deliver emergency calls to the appropriate emergency service responder by using Cisco Virtual Office with Cisco Emergency Responder, and you will also need third-party emergency call delivery with location services that interoperate with Cisco Virtual Office and Cisco Emergency Responder. If you choose to use a third-party service to augment the capability of Cisco Virtual Office and Cisco Emergency Responder, you must work directly with the third-party service provider; Cisco does not provide any such services. It is your responsibility to evaluate and test the third-party services; Cisco assumes no responsibility or liability whatsoever with respect to any such third-party services. It is your responsibility to notify the remote worker of the extent and limitations of your support for emergency calls from off-premises locations and to reinforce the user's responsibility. It is also your responsibility before using an off-premises device to provide your correct and current location data. If you place an emergency call from an off-premises device without providing your location, your emergency call may be delivered to an inappropriate emergency service responder or with an incorrect location.
IN THIS DOCUMENT CISCO DESCRIBES THE USE OF A THIRD PARTY'S PRODUCTS AND SERVICES FOR 911 LOCATION PURPOSES. CISCO PROVIDES THIS INFORMATION FOR YOUR GENERAL REFERENCE ONLY, BUT CISCO DOES NOT SUPPORT AND DOES NOT ASSUME ANY RESPONSIBILITY OR LIABILITY WHATSOEVER WITH RESPECT TO THE INFORMATION REGARDING THE THIRD PARTY OR WITH RESPECT TO THE THIRD PARTY PRODUCT AND SERVICES. IT IS YOUR RESPONSIBILITY AS THE USER TO OBTAIN DIRECTLY FROM THE THIRD PARTY AND/OR WORK DIRECTLY WITH THE THIRD PARTY (IF YOU CHOOSE TO DO SO) AND OBTAIN ALL NECESSARY INFORMATION REGARDING THE CORRECT CONFIGURATION, TESTING AND USE OF ITS PRODUCTS AND SERVICES.
Challenge
• Selective routing is provided by the E911 selective router feature, which routes emergency calls to the correct PSAP for the location of the caller.
• Automatic location information (ALI) for the point of interconnection provided by the carrier is delivered to PSAP operators.
• Private switch ALI (PS-ALI) provides caller-specific location information to PSAP operators about callers behind a private branch exchange (PBX).
• In voice-over-IP (VoIP) environments, moves, additions, and changes can be accomplished without administrative action, and that flexibility is one of the reasons that users migrate to VoIP services. However, moves, additions, and changes are cumbersome processes for 911 services and require several steps: an administrator must update the PBX, update the PS-ALI database in the enterprise, and manually send a file to the PSAP, which then must update its ALI database. This manual process can require a business day or more to accomplish, thereby increasing both cost and risk.
• Providing E911 services for Cisco® Virtual Office and branch-office users presents an additional challenge. One of the primary requirements for an E911 service is tracking the location of the user; however, until now no mechanism has been available to track the location from which calls were initiated because teleworkers usually have the same direct inward dialing (DID) extension at the data center and branch and home office. Furthermore, teleworkers may shift their permanent addresses and take their routers to new locations or work remotely using their laptop computers. Also, the number of internal DID extensions in a branch office is usually higher than the actual number of lines purchased from the service provider. Hence, the number sent to the PSAP operator may not map to the address information one to one.
Solution
What Happens When a Cisco Virtual Office User Makes a VoIP 911 Call
Figure 1. Cisco Virtual Office, Branch-Office, and Laptop Computer User with V911 Services from Intrado
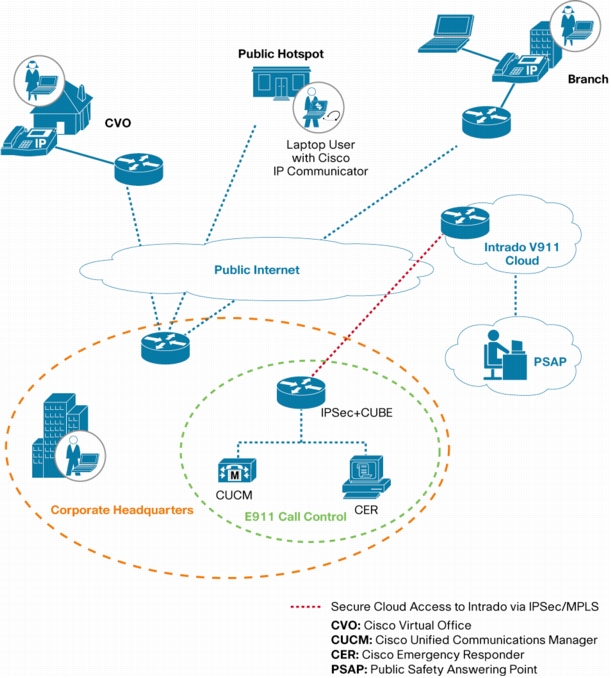
High-Level Call Flow
• Emergency call reaches the Cisco Virtual Office infrastructure to the Cisco Integrated Services Routers Generation 2 (ISR G2) or Cisco ASR Aggregation Services Routers VPN headend deployed using Cisco Virtual Office.
• Call is sent to the Cisco Unified Communications Manager for initial signaling.
• Cisco Unified Communications Manager routes the call to Cisco Emergency Responder.
• Cisco Emergency Responder sends the call back to Cisco Unified Communications Manager after mapping the emergency location identification number (ELIN) to the location for on-premises locations. If the call is from an off-premises location as in the case of Cisco Virtual Office, the off-premises user address location is chosen.
• Cisco Unified Communications Manager sends the call to Cisco Unified Border Element through the Session Initiation Protocol (SIP) trunk.
• Cisco Unified Border Element sends the call to an Intrado gateway.
• Intrado receives the 10-digit ELIN for on-premises locations or the actual calling party number for the off-premises calling party and fetches the ALI data for the caller from this calling party number to determine which PSAP should receive the call.
• Intrado completes the call to the PSAP and delivers the corresponding ALI data using the PSAP ALI database.
Solution Components
• Cisco Unified Border Element (CUBE)
– Software version: Cisco IOS® Software Release 15.1.2T or later
– Hardware platforms: Cisco Unified Border Element on Cisco ISR G2 (Cisco 2900 and 3900 Series ISRs).
– License: Feature license required (For more information about licensing, visit http://www.cisco.com/en/US/prod/collateral/voicesw/ps6790/gatecont/ps5640/product_data_sheet09186a00801da698.html.)
• Cisco Emergency Responder
– Software version: Cisco Emergency Responder 7.1 or later
– Hardware platforms: Refer to the release-specific data sheet at http://www.cisco.com/en/US/prod/collateral/voicesw/ps6789/ps7046/ps842/data_sheet_c78-574744.html.
• Cisco Unified Communications Manager
– Software version: Cisco Unified Communications Manager 7.1 or later
– Hardware platforms: Refer to the release-specific data sheet at http://www.cisco.com/en/US/products/sw/voicesw/ps556/products_data_sheets_list.html.
• Services from Intrado
– Intrado is the service provider that supports off-premises Cisco Virtual Office users. Enterprise's should contact Intrado directly and negotiate the cost of the associated services.
Administrator Steps
Step 1. Configure the Cisco Unified Communications Manager to support Cisco Emergency Responder and Emergency call handling. See http://www.cisco.com/en/US/docs/voice_ip_comm/cer/8_0/English/administration/guide/CERAG_80.html.
Step 2. Configure the Cisco Emergency Responder to support 911 calls. See http://www.cisco.com/en/US/docs/voice_ip_comm/cer/8_0/English/administration/guide/CERAG_80.html.
Step 3. Configure Cisco Unified Communications Manager and Cisco Unified Border Element. Refer to this document.
Step 4. Configure Intrado V9-1-1 support for off-premises Cisco Virtual Office users using Cisco Emergency Responder. Refer to this document.
Configuration
Configure Cisco Unified Communications Manager and Cisco Unified Border Element
Configuring the SIP Trunk on Cisco Unified Communications Manager
• Cisco Unified Communications Manager 6.0: Create a new SIP trunk and use default values for all the parameters. In addition, configure the following settings:
– Select the check box to require a media termination point (MTP).
– In the SIP information area, in the destination address field, provide the IP address of the Cisco Unified Border Element device.
– Choose the MTP codec 711ulaw.
– For the SIP trunk security profile, use a User Datagram Protocol (UDP)-based profile. (You will need to create a new security profile. Copy the Nonsecure profile and change the outgoing transport type to UDP.)
– On the service parameters page, disable the SIP Rel1XX Enabled parameter.
• Cisco Unified Communications Manager 7.0: In addition to the settings configured for Cisco Unified Communications Manager 6.0, in the Call Routing Info area, enable Asserted-Identity and disable Remote-party-id.
Configuring Cisco Unified Border Element
Establishing the VPN Tunnel
Configure Intrado V9-1-1 Support for Off-Premises Cisco Virtual Office Users Using Cisco Emergency Responder
Configuring Intrado Validation and Update Interface Settings
Step 1. Choose System > Intrado VUI Settings.
Step 2. Click Upload Certificate. An Upload Certificate window opens. Use the Browse button to locate the Intrado certificate file; then select the file and click the Upload button.
Step 3. Enter the certificate password and the VUI URL in the adjacent text boxes. Click Test and Validate.
Step 4. Enter the account information:
• VUI schema URL
• Intrado account ID
• Maximum number of VUI connections
Step 5. Click Update.
Configuring Intrado Route Patterns on Cisco Emergency Responder
Step 1. From Cisco Emergency Responder, choose System > Telephony Settings. The Telephony Settings page appears.
Step 2. Under Intrado Route Pattern Settings, enter the Intrado route and translation pattern and click the Add button.
Step 3. Configure the Intrado emergency response locations (ERLs).
• You must first configure Intrado route patterns before you can add any Intrado ERLs. You can query and validate ALI data from Intrado by using the Intrado VUI. You must submit ALI data (telephone number update) to Intrado by using Intrado VUI before an emergency call can be successfully routed.
• From Cisco Emergency Responder, choose ERL > Intrado ERL > Intrado ERL (Search and List). The Find Intrado ERL Data page appears.
• Click the Add New ERL button. Cisco Emergency Responder opens the Add New ERL window. Fill in the ERL Information. Click ALI Details.
• Cisco Emergency Responder opens the ALI Information window. Enter the ALI Information. To look up an address in the Intrado Master Street Address Guide (MSAG) database, click Query from Intrado.
• When you are finished entering the ALI information, click Pre-validate from Intrado.
• Make the Add New ERL window the active window if it is not already; then click Insert. Cisco Emergency Responder saves the ERL and its ALI.
Configuring Cisco Emergency Responder Location Management in Cisco Unified Communications Manager
Step 1. From the Cisco Unified Communications Manager administration page, choose System > Application Server.
Step 2. Click the Add New button.
Step 3. From the Application Server Type drop-down box, choose Cisco Emergency Responder Location Management. Then click Next.
Step 4. Enter a name that identifies the Cisco Emergency Responder off-premises application. The name is displayed in the navigation drop-down box on the User Option page and will be selected by the user to navigate to the Cisco Emergency Responder Off-Premises page.
Step 5. Enter the URL for the Cisco Emergency Responder Off-Premises page. The URL takes the form of http://cer_host/ofpuser, where cer_host is the name or IP address of the Cisco Emergency Responder publisher or Cisco Emergency Responder subscriber.
Step 6. Click Save.
Configuring the AXL Application User
Step 1. In Cisco Unified Communications Manager, choose UserManagement>Application User. Click the Add New button. Cisco Unified Communications Manager displays the Application User Configuration page.
Step 2. Complete the following required fields:
• User ID-Use a descriptive name such as "AXL Application User."
• Password-Enter a password for this user.
• Confirm Password-Re-enter the password for this user.
Step 3. Click Save.
Step 4. In the Cisco Unified Communications Manager menu at the top, choose User Management>User Group. The user group search page appears.
Step 5. At search criterion, enter standard and click FindThe list of user groups starting with the name standard appears.
Step 6. Click the Standard CCM Admin Users link to display the User Group configuration page.
Step 7. Click Add App Users to Group. The Find and List Application Users pop-up window appears.
Step 8. Enter the User ID created in Step 2 as the search criterion and click Find. The list of Applications users appears.
Step 9. Click the checkbox next to the user ID and click Add Selected. Cisco Unified Communications Manager adds the selected user to the Standard CCM Admin Users user group.
Step 10. Choose User Management>User Group. The user group search page appears.
Step 11. Enter standard as the search criterion and click Find. The list of user groups starting with the name Standard appears.
Step 12. Click the Standard TabSync User group.
Step 13. To add the user to the Standard TabSync User group and to, repeat steps 7 through 9.
Step 14. Choose User Management>User Group. The user group search page appears.
Step 15. Enter standard as the search criterion and click Find. The list of user groups starting with the name Standard appears.
Step 16. Click the Standard RealtimeAndTraceCollection group.
Step 17. Repeat steps 7 through 9 to add the user to the Standard RealtimeAndTraceCollection group.
Configuring AXL Authentication
Step 1. From Cisco Emergency Responder, choose Phone Tracking > Cisco Unified Communications Manager.
Step 2. Under AXL Setting, enter the following information:
• AXL username
• AXL password
• AXL port number
Step 3. Click Insert.
Configuring Off-Premises ERLs
Step 1. From Cisco Emergency Responder, choose ERL > Off-Premises ERL > Off-Premises ERL (Search and List).
Step 2. Click the Add New ERL button.
Step 3. Fill in the following information in the Add New ERL window.
• ERL name
• Description
• Intrado route pattern and translation pattern
• Onsite alerts
Step 4. Click Insert.
Step 5. Fill in the information in the Add New ERL window.
Step 6. As discussed earlier in this document, you must add Intrado route patterns before you can add off-premises ERLs. Assign this off-premises ERL to the IP subnet. An off-premises ERL cannot be allocated to a switch port.
End-User Steps
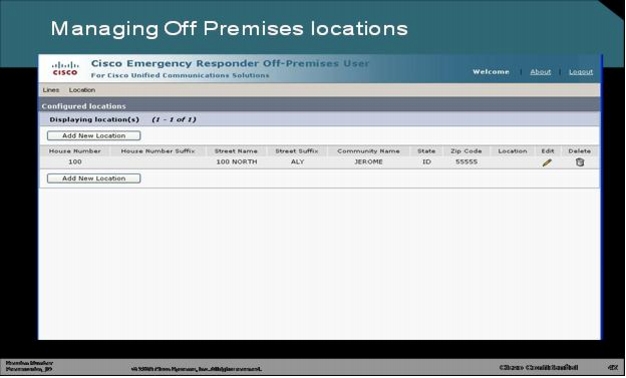
Step 1. The Cisco Virtual Office user opens the Off-Premises webpage.

Step 2. The user in this example has one preferred address in database and has the option of adding a new location.
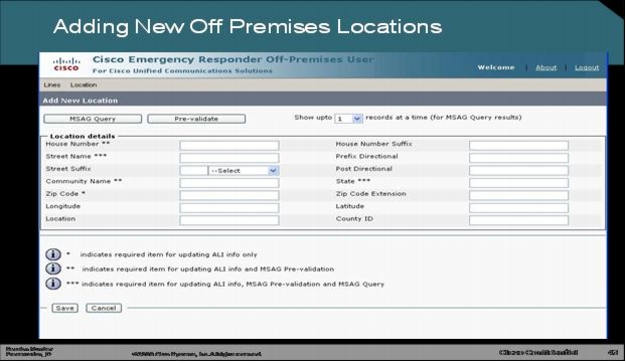
Step 3. The user adds a new off-premises or home-office location and queries the MSAG. Without any administrator intervention, MSAG can validate the user through the PSAP database in the Intrado cloud. If the user enters incorrect or random address information, an error is generated. Locations can be maintained for branch-office users, teleworkers, and laptop computer users.
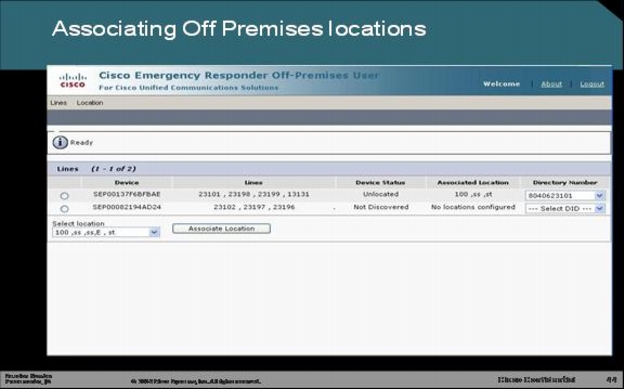
Step 4. The user associates himself or herself with the off-premises location. A user who is using only Cisco Virtual Office needs to do this only once as long as user remains in the same home office. If the user wants to use the service over VoIP on a laptop computer, the user will need to change the location on this webpage every time the user moves to a new location.
For More Information
• Cisco Virtual Office Deployment Guide: http://www.cisco.com/en/US/solutions/collateral/ns340/ns517/ns430/ns855/deployment_guide_c22-493157.html
• Cisco Emergency Responder Administrator Guide: http://www.cisco.com/en/US/docs/voice_ip_comm/cer/8_0/English/administration/guide/CERAG_80.html