Document ID: 82076
Updated: Jul 24, 2007


Contents
Introduction
This document describes how to recover a pre-shared key on the PIX/ASA security appliance.
Prerequisites
Requirements
This document assumes that you have already configured the security appliance with VPN configurations and provided pre-shared key as the authentication parameter.
Components Used
The information in this document is based on the Cisco PIX 500 Series Firewall with software version 7.x and later.
The information in this document was created from the devices in a specific lab environment. All of the devices used in this document started with a cleared (default) configuration. If your network is live, make sure that you understand the potential impact of any command.
Related Products
This document can also be used with the Cisco 5500 Series Adaptive Security Appliance (ASA) with software version 7.x and later.
Conventions
Refer to Cisco Technical Tips Conventions for more information on document conventions.
Problem
Once a pre-shared key is configured, it is encrypted, and you cannot see it in the running configuration. It is displayed as *******.
Example:
pixfirewall#show running-config
Cryptochecksum: 1b6862ce 661c9155 ff13b462 7b11c531
: Saved
: Written by enable_15 at 00:38:35.188 UTC Fri Feb 16 2007
!
PIX Version 7.2(2)
!
hostname pixfirewall
domain-name default.domain.invalid
enable password 8Ry2YjIyt7RRXU24 encrypted
names
!
interface Ethernet0
 nameif inside
 security-level 100
 ip address 172.16.124.1 255.255.255.0

crypto isakmp policy 1
 authentication pre-share
 encryption des
 hash md5
 group 2
 lifetime 86400

!--- Output is suppressed.

tunnel-group mytunnel type ipsec-ra
tunnel-group mytunnel general-attributes
 default-group-policy myGROUP
tunnel-group mytunnel ipsec-attributes
 pre-shared-key *
telnet timeout 5
ssh timeout 5
Solutions
Use any of the solutions in this section to solve the problem.
Solution 1
In order to recover a pre-shared key in the VPN configuration, issue the more system:running-config command. This command shows the pre-shared key in clear-text format.
Example:
pixfirewall#more system:running-config
Cryptochecksum: 1b6862ce 661c9155 ff13b462 7b11c531
: Saved
: Written by enable_15 at 00:38:35.188 UTC Fri Feb 16 2007
!
PIX Version 7.2(2)
!
hostname pixfirewall
domain-name default.domain.invalid
enable password 8Ry2YjIyt7RRXU24 encrypted
names
!
interface Ethernet0
 nameif inside
 security-level 100
 ip address 172.16.124.1 255.255.255.0

crypto isakmp policy 1
 authentication pre-share
 encryption des
 hash md5
 group 2
 lifetime 86400

!--- Output is suppressed.

tunnel-group mytunnel type ipsec-ra
tunnel-group mytunnel general-attributes
 default-group-policy myGROUP
tunnel-group mytunnel ipsec-attributes
 pre-shared-key cisco
telnet timeout 5
ssh timeout 5
Solution 2
Copy your configuration to a TFTP server. This is needed because once the configuration is sent to the TFTP server, the pre-shared key appears as clear text (instead of ******** , as in the show run command).
Issue this command in order to copy your configuration to a TFTP server:
ASA#write net [[tftp server_ip]:[filename]]:
OR
ASA#copy running-config tftp:
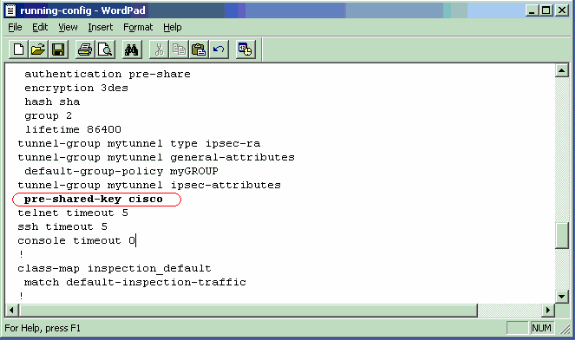
Once the file is saved on the TFTP server, you can open it with a text editor and view the passwords in clear text.
Example:
Text Editor Viewpixfirewall#copy running-config tftp: Source filename [running-config]? Address or name of remote host []? 172.16.124.2 Destination filename [running-config]? Cryptochecksum: 1b6862ce 661c9155 ff13b462 7b11c531 ! 3312 bytes copied in 0.420 secs
Refer to the write net section of the Cisco Security Appliance Command Reference in order to learn more about this command.
Solution 3
In order to get the clear text of the pre-shared key, access the PIX/ASA through HTTPS.
Create a username/password to get the access of the PIX/ASA configuration.
pix(config)#username username password password
In order to enable the security appliance HTTP server, use the http server enable command in global configuration mode. In order to disable the HTTP server, use the no form of this command.
hostname(config)#http server enable
In order to specify hosts that can access the HTTP server internal to the security appliance, use the http command in global configuration mode. In order to remove one or more hosts, use the no form of this command. In order to remove the attribute from the configuration, use the no form of this command without arguments.
hostname(config)#http 10.10.99.1 255.255.255.255 outside
Use the username/password to login to the PIX/ASA using the browser as this example shows.
https://10.10.99.1/config
Solution 4
The configuration can also be uploaded to an FTP server. This is the command:
ASA#copy running-config ftp:<url>
Example:
ASA#copy run ftp://172.16.124.2/running-config

Source filename [running-config]?

Address or name of remote host [172.16.124.2]?

Destination filename [running-config]?
Cryptochecksum: 1b6862ce 661c9155 ff13b462 7b11c531
!
3312 bytes copied in 1.120 secs (3312 bytes/sec)
See the figure for text editor view.
Note: If your security policy requires that plain text passwords be securely stored in encrypted format, consider the Master Passphrase feature introduced in ASA version 8.3.1. These commands were introduced for this capability.
-
key config-key password-encryption
-
password encryption aes
Refer to the New features section of ASA version 8.3 release notes for more information.
Here is a link to a video on the
Cisco Support
Community
![]() which explains the procedure to recover pre-shared key on
PIX/ASA:
which explains the procedure to recover pre-shared key on
PIX/ASA:
Pre-shared key recovery on
PIX/ASA
![]()

Related Information
Open a Support Case  (Requires a Cisco Service Contract.)
Related Cisco Support Community Discussions
The Cisco Support Community is a forum for you to ask and answer questions, share suggestions, and collaborate with your peers.
Refer to Cisco Technical Tips Conventions for information on conventions used in this document.