Cisco MXE 3500 Release 3.0
Introduction
On-Demand Content for Microsoft WMS Server
• Transcode the video into Windows Media Video (WMV) format and make it available on a predefined Microsoft WMS server as a video-on-demand (VoD) offering
• Make the content look more professional by automatically applying a graphic overlay on the bottom third of every video that includes the video title and the company logo
• Show a watermark at the bottom right indicating that the video is subject to copyright and is confidential
• Add a short, introductory bumper video and follow the video with a trailer video
Resulting End-User Workflow
1. User places source video from the Cisco Flip camera in a folder on a PC.
2. User launches the Cisco MXE 3500 web UI, submits the Cisco Flip video to the Cisco MXE 3500 as a file-to-file transcoding job using a predefined job profile.
3. Cisco MXE 3500 processes the video; adds the bumper, trailer, and graphics overlay; and transcodes the video to WMV format. As it completes the job, it will use FTP to send the transcoded video to a specific folder on the integrated Microsoft WMS server (Figure 1).
Figure 1. Video Enhanced with a Bumper, Graphic Overlays, and a Trailer

4. Through email, the user shares the video URL, comprising the Microsoft WMS server IP address, publishing point, and filename in the format mms://<WMS_IP>/<publishing_Point_name>/<file_name>. The VoD can be viewed by using Microsoft Windows Media Player.
All these terms are discussed in the On-Demand Configuration Overview section.
On-Demand Configuration Overview
Detailed Configuration for On-Demand Content
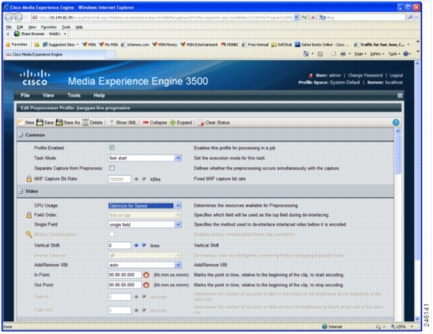
Step 1. Create a preprocessor profile for media transformation. Make sure to use the following options (Figure 2):
• For Task Mode, choose Fast Start.
• For CPU Usage, choose Optimized for Speed.
• Specify files for the bumper and trailer, graphics overlay, and watermark in the preprocessor.
Figure 2. Creating a Preprocessor Profile
Step 2. Create an encoder profile. Make sure to choose a Windows Media Server (WMS) encoder profile.
Step 3. Create a distribution profile that points to the encoder profile created in Step 2. Choose Delivery Option when creating the distribution profile and make sure to use the following options (Figure 3):
• Check the FTP option.
• Enter the IP address of the external Microsoft WMS server, which also has an FTP server setup.
• Enter the username and password for the FTP login.
Figure 3. Distribution Profile: FTP Setup

Step 4. Create a job profile that includes the preprocessor, encoder, and distribution profiles created in Steps 1 through 3.
Step 5. Submit a file-to-file transcoding job by using the job profile of Step 4.
Configuring a Publishing Point on Microsoft WMS for On-Demand Content
Step 1. Use Microsoft Remote Desktop to log in to the Windows server on which the Microsoft WMS is running.
Step 2. Choose Start > All Programs > Administrative Tools > Windows Media Services to launch the application.
Step 3. Select the Publishing Points tree node, right-click to open the context menu, and choose Add Publishing Point (Wizard) (Figure 4).
Figure 4. Launching Windows Media Services: Add Publishing Point Wizard
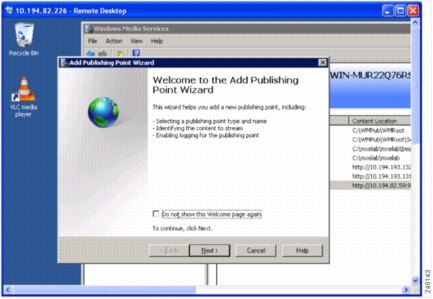
Step 4. Click Next.
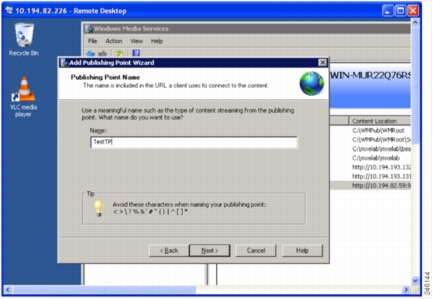
Step 5. In the Publishing Point Name panel, specify a name (Figure 5). Then click Next.
Figure 5. Add Publishing Point Wizard: Publish Point Name Panel
Step 6. In the Content Type panel, choose the type of content you want to stream. Select One file (Figure 6). Then click Next.
Figure 6. Add Publishing Point Wizard: Content Type Panel

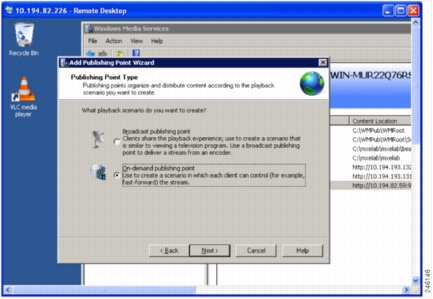
Step 7. In the Publishing Point Type panel, choose On-demand publishing point (Figure 7). Then click Next.
Figure 7. Add Publishing Point Wizard: Publish Point Name Panel
Step 8. In the Existing Publishing Point panel, choose Add a new publishing point (Figure 8). Then click Next.
Figure 8. Add Publishing Point Wizard: Existing Publishing Point Panel

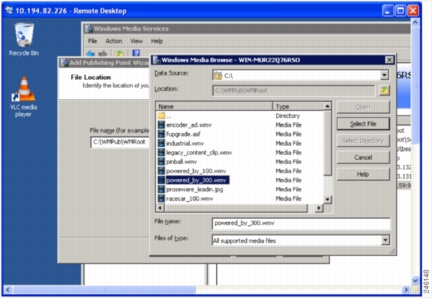
Step 9. In the File Location panel, enter the path for the Cisco MXE 3500 transcoded video file, or use the browse button to select the file (Figure 9). Then click Next.
Figure 9. Add Publishing Point Wizard: Select File Pop-Up Window
Step 10. On the Unicast Logging page, enable logging if you want to log (Figure 10). Then click Next.
Figure 10. Add Publishing Point Wizard: Unicast Logging Panel

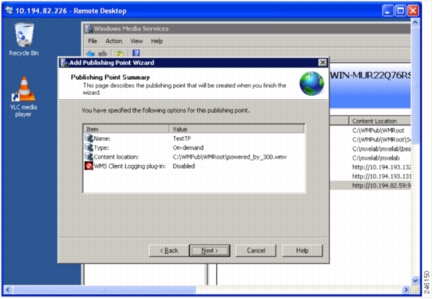
Step 11. Review your settings in the Publishing Point Summary panel (Figure 11). Then click Next to proceed.
Figure 11. Add Publishing Point Wizard: Publishing Point Summary Panel
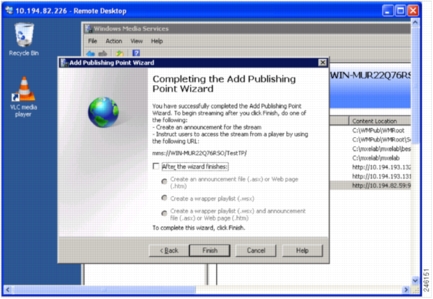
Step 12. In the Completing the Add Publishing Point Wizard panel, note the URL for accessing the stream from a player. Uncheck the After the wizard finishes option (Figure 12). Then click Finish.
Figure 12. Add Publishing Point Wizard: Finish Panel
Step 13. To play the transcoded video, launch Windows Media Player, and by using the parameters that you specified in the configuration wizard, enter the URL as follows:
mms://IP-of-WMS/publishingPointName/FileName.wmv.
Live Streaming Content for Microsoft WMS Server
Live Streaming Configuration Overview
Step 1. Verify the video source.
You can skip this step if you are sure that the Cisco MXE 3500 can receive the input stream, and that the input stream is indeed in MPEG-2 TS format. This step is documented because it is an effective troubleshooting tool as well.
Step 2. Verify that Cisco MXE 3500 can receive the input stream.
1. Install VLC media player on the Cisco MXE 3500 Microsoft Windows desktop. Download VLC from http://www.videolan.org/vlc/download-windows.html.
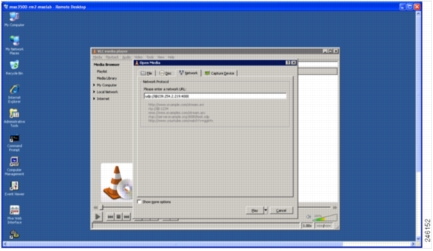
2. Launch VLC player, select Media/Open Network Stream, and then in the dialog box enter the network URL in the following format: udp://@IP of encoder or multicast:port (Figure 13).
3. Click Play.
If the video shows up in VLC player, Cisco MXE 3500 can receive the input stream.
Figure 13. VLC Open Network Stream Dialog Box
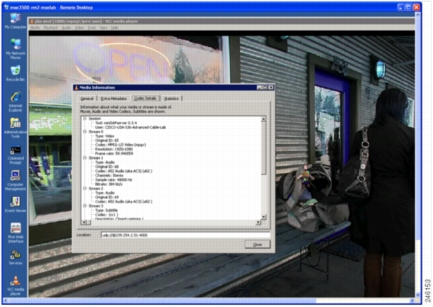
Step 3. Verify that the stream is MPEG-2 in MPEG-2 TS. While the video is playing in VLC media player, select Tools/Codec Information, which will list video codec details. Verify that the stream is MPEG-2 (Figure 14).
Figure 14. Use VLC to Check Media Information
Detailed Configuration for Live Streaming Content
Configuring Cisco MXE 3500 for Live Streaming
1. Configure an IP capture in the Cisco MXE 3500.
2. Create a job profile, which consists of a preprocessor, encoder, and distribution profile.
3. Submit a live job.
4. Check the job status.
5. Verify Microsoft WMS live streaming.
Configuring an IP Capture
Step 1. Log into the Cisco MXE 3500 UI.
Step 2. From the toolbox, select Administration/IP Capture.
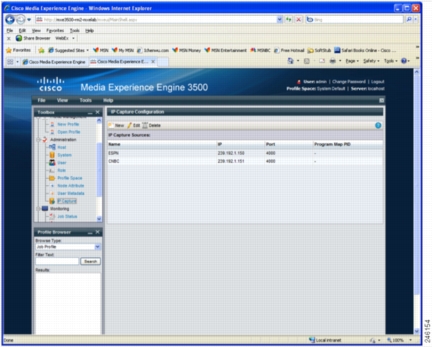
Step 3. On the IP Capture Configuration page, click New (Figure 15).
Figure 15. Cisco MXE 3500 UI: IP Capture Configuration
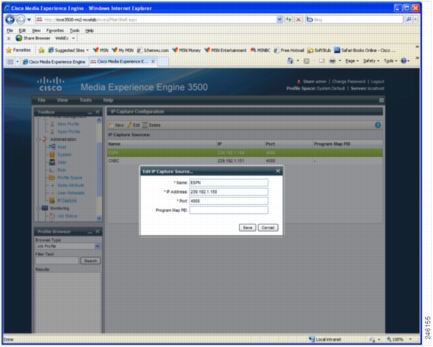
Step 4. Enter the name, IP address, and port number for the input stream (Figure 16). Then click Save.
Figure 16. Edit IP Capture Source
Step 5. Configure preprocessor, encoder, and distribution component profiles.
Configuring a Job Profile
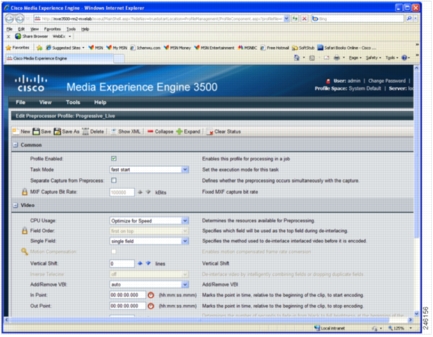
Step 1. Create a preprocessor profile for media transformation. Make sure to use the following options (Figure 17):
• For Task Mode, choose Fast Start.
• For CPU Usage, choose Optimized for Speed.
• Specify the graphics overlay of your choice.
Note: Watermark is not supported for a live streaming job.
Figure 17. Progressive Preprocessor Profile for a Live Job
Step 2. For Encoder profile, choose a Windows Media encoder profile.
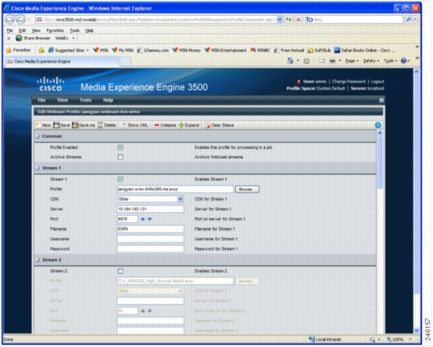
Step 3. For Distribution profile, choose a webcast distribution profile and have it refer to the encoder profile that you just created.
Step 4. For the CDN field, choose Other.
Step 5. In the Server field, enter the IP address of the Cisco MXE 3500.
Step 6. In the Port field, enter a valid port number (for example, 9876).
Step 7. In the Filename field, enter a name for the stream (for example, ESPN) (Figure 18).
Figure 18. Webcast Distribution Profile for a Live Job
Step 8. Save the profile.
Submitting a Live Job
Step 1. To submit a live job on the Cisco MXE 3500, select Submission > Live (Figure 19).
Figure 19. Live Job Submission Window
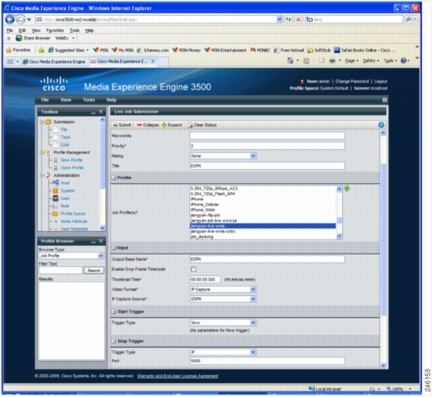
Step 2. In the File Information/Title field, enter a title for this live job.
Step 3. In the Profile section, select a live streaming job profile.
Step 4. In the Input section, enter an output base name (for example, ESPN).
Step 5. In Video Format drop-down list, choose IP Capture.
Step 6. In the IP Capture Source drop-down list, choose the IP capture source you created in Step 5.
Step 7. In the Start Trigger section, for Trigger Type choose Now.
Step 8. In the Stop Trigger section, select a method (time or duration). If you want the live streaming to run continuously, choose IP and then define a port number. This option means that the stream will be stopped by a request sent through the specified port. Since such a request will not be sent, this live streaming will keep running and will not be stopped.
Step 9. Click Submit. A message will appear indicating that the job has been submitted successfully.
Step 10. Check the job status and verify live streaming.
Checking Job Status
Figure 20. Job Status Monitor
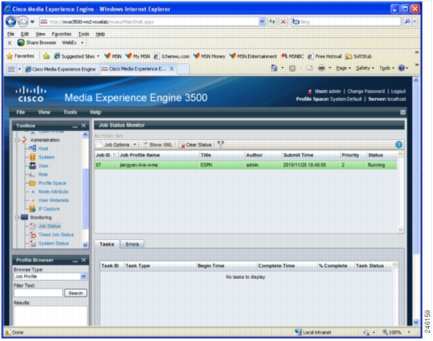
Verifying Microsoft WMS Live Streaming
1. Launch a Windows Media Player on a local PC.
2. Right-click the player's title bar.
3. Choose File/Open URL and then enter the URL as follows: mms://IP address of the MXE:Port Number. You should see the live streaming content that the Cisco MXE 3500 produces.
Step 1. Use Microsoft Remote Desktop to log into the Windows server on which Microsoft WMS is running.
Step 2. Choose Start > All Programs > Administrative Tools > Windows Media Services to launch the application.
Step 3. Select the Publishing Points tree node, right-click to open the context menu, and choose Add Publishing Point (Wizard) (Figure 21).
Figure 21. Add Publishing Point Wizard: Start Panel
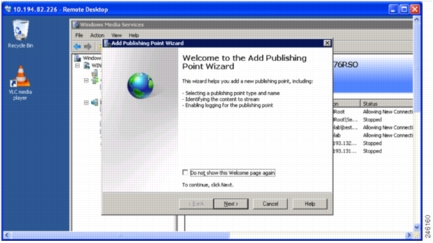
Step 4. Click Next.
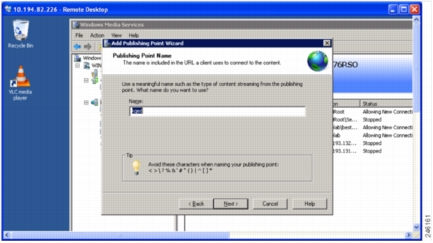
Step 5. In the Publishing Point Name panel, specify a name (Figure 22). Then click Next.
Figure 22. Add Publishing Point Wizard: Publishing Point Name Panel
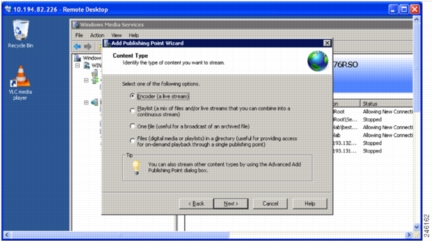
Step 6. On the Content Type panel, choose the type of content you want to stream. Select Encoder (Figure 23). Then click Next.
Figure 23. Add Publishing Point Wizard: Select Encoder for a Live Stream
Step 7. In the Publishing Point Type panel, select the broadcast type (Figure 24). Then click Next.
Figure 24. Add Publishing Point Wizard: Publishing Point Type Panel

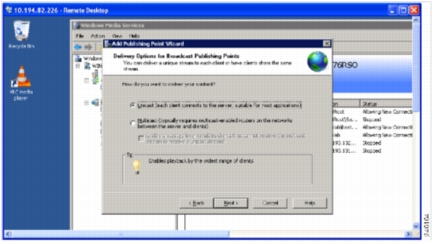
Step 8. In the Delivery Options for Broadcast Publishing Points panel, choose Unicast (Figure 25). Then click Next.
Figure 25. Add Publishing Point Wizard: Delivery Options for Broadcast Publishing Points
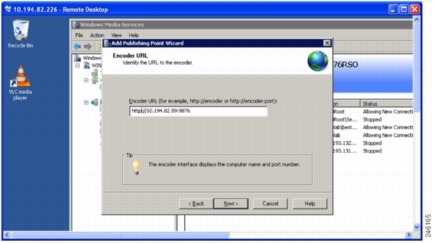
Step 9. In the Encoder URL panel, enter the path as http://mxe_IP:port_number (Figure 26). Then click Next.
Figure 26. Add Publishing Point: Encoder URL Panel
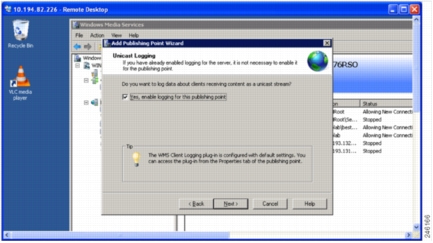
Step 10. On the Unicast Logging page, choose logging if you want to log (Figure 27). Click Next.
Figure 27. Add Publishing Point Wizard: Unicast Logging Panel
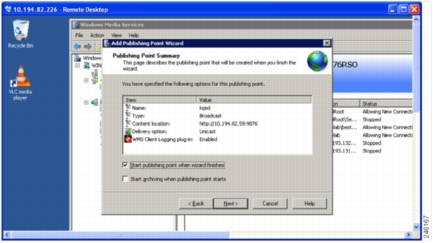
Step 11. Review your settings in the Publishing Point Summary panel (Figure 28). Then click Next to proceed.
Figure 28. Add Publishing Point Wizard: Summary Panel
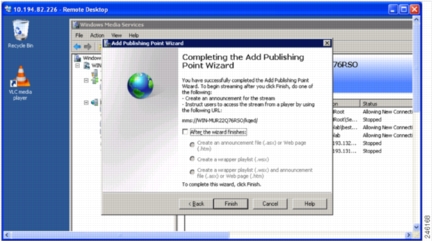
Step 12. On the Completing the Add Publishing Point Wizard panel, note the URL for accessing the stream from a player. Uncheck After the wizard finishes (Figure 29). Then click Finish.
Figure 29. Add Publishing Point Wizard: Finish Panel
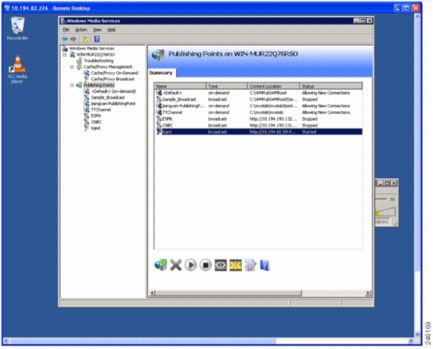
Step 13. Verify that the publishing point is started correctly in the Microsoft WMS main window (Figure 30).
Figure 30. Microsoft Windows Media Services: Publishing Points List
Step 14. To watch the live stream, launch Windows Media Player and enter the URL as follows: mms://IP-of-WMS/publishingPointName (Figure 31).
Figure 31. Open a Live Stream on Windows Media Player

Configuring Live Streaming with a Cisco MXE 3500 Resource Manager Cluster
1. You must configure the external Windows Media Server to connect to the IP address and port of the actual node that handles the job.
2. Any IP address that you configured in the distribution profile is not relevant. The stream will always be available only on the node that is performing the encoding.