Cisco® Network Assistant provides a simple, smart, and secure way to manage your network. The following quick tips are provided to help you take advantage of some of the exciting features that this tool offers. The following ten tips are covered in this document:
1. Toolbar Icons
2. Checking Total Power Usage of the IP Phones and Wireless Access Points
3. Topology View
4. Checking Link Properties from the Topology View
5. Configuring VLANs or Applying Port Configurations to Multiple Ports Across Switches
6. Cisco IOS® Software Upgrade
7. Need Help?
8. Saving and Restoring Configuration Files
9. Smartports Advisor
10. Creating a Community
1. TOOLBAR ICONS
Save time by using the toolbar icons to accomplish the tasks faster (Figure 1).
Figure 1. Toolbar Icons
2. CHECKING TOTAL POWER USAGE OF THE IP PHONES AND WIRELESS ACCESS POINTS
Cisco Network Assistant gives you the option to check the total power usage of the Cisco IP phones and access points connected to the Power over Ethernet (PoE) Cisco Catalyst® switches. This allows you to supervise power budgeting and displays information about whether you have enough power to connect additional powered devices to the switch. To check the power usage, do the following (Figure 2):
1. From the toolbar, click the Port Settings icon.
2. From the pull-down menu, choose the device.
3. Select the Runtime Status tab to view power consumption of the inline powered devices.
Figure 2. Checking Total Power Usage of IP Phones and Wireless Access Points
3. TOPOLOGY VIEW
Cisco Network Assistant can recognize different kinds of Cisco Systems® devices: switches, routers, access points, and IP phones.
To customize the Topology View:
Click the Topology Options icon. This lets you change the Topology View with different types of options, such as what devices to view, link ID or speed, host name, IP or MAC address, etc. (Figure 3).
Figure 3. Topology Options
To cross-launch the router device manager:
From the Topology View, you can also cross-launch the device mangers of other supported Cisco devices such as routers, access points, or IP phones (if Cisco CallManager is configured). To cross-launch Cisco Router and Security Device Manager (SDM), double-click the Router icon from the Topology View and select Device Manager. The Cisco SDM has a similar design (Figure 4).
Figure 4. Cross-Launching Cisco SDM
To exclude devices that you do not want to manage:
Cisco Network Assistant uses Cisco Discovery Protocol to discover the network topology; it shows all the devices that can be part of your community or cluster (Figure 5).
Figure 5. Using Cisco Discovery Protocol to Discover Network Topology
To exclude some of the devices from the Topology View that you do not control or you do not want to manage:
1. If you are in community mode, click the Topology Options icon in the toolbar and uncheck the box next to Neighbors (Figure 6).
2. If you are in cluster mode, click the Topology Options icon in the toolbar and uncheck the box next to Candidates.
Figure 6. Excluding Some Devices from Topology View
4. CHECKING LINK PROPERTIES FROM THE TOPOLOGY VIEW
From the Topology View, click any link followed by a right mouse click to highlight the following options:
• Link Reports-View Spanning Tree Protocol mode (forward FWD or blocking BLK).
• Properties (Figure 7)-Check the status of the link.
• Link Graphs (Figure 8 & 9)-This graph shows you the link usage of a selected device.
Figure 7. Link Reports
Figure 8. Steps to Get to Link Graphs
Figure 9. Link Graphs
5. CONFIGURING VLANS OR APPLYING PORT CONFIGURATIONS TO MULTIPLE PORTS ACROSS SWITCHES
One of the main benefits of Cisco Network Assistant is that it allows users to save time and money by letting them configure multiple ports across multiple switches all at once.
1. To configure VLANs or apply port configurations to multiple ports across switches, do the following:
2. Click the Front Panel View icon from the toolbar.
3. Select the switches from the left tab to do the configuration (Figure 10)
4. From the Front Panel View, do a rubber-band selection by holding the left mouse button and selecting ports across multiple switches (Figure 11). If you need to configure noncontiguous ports (that is, a group of ports across multiple switches), hold down the CTRL key and then select the ports with the left mouse button (Figure 12).
5. When the ports are selected, you can apply uniform configuration to all the selected ports at once by doing a right mouse click and selecting from the drop-down options (Figure 13).
6. Choose VLAN and configure specific parameters for VLAN creation in all the selected ports.
Figure 10. Selecting Switches for Front Panel View
Figure 11. Rubber-Band Selection of Ports
To select noncontiguous ports, hold down the CTRL key and select the individual port or groups of ports across switches. (Figures 12).
Figure 12. Selecting Noncontiguous Ports
Figure 13. Applying Configurations to Selected Ports
6. CISCO IOS® SOFTWARE UPGRADE
Cisco Network Assistant simplifies Cisco IOS Software upgrading with the following easy-to-use options:
Drag-and-drop Cisco IOS Software Upgrade
You can take advantage of Drag-and-Drop feature (Figure 14) only in the community mode:
1. Download the Cisco IOS Software of the desired device to upgrade onto your desktop from (www.cisco.com).
2. Drag and drop the software file onto the icon of the device to be upgraded, located in the Topology View-then just hit Upgrade and you are done.
Figure 14. Drag-and-Drop Option to Upgrade Cisco IOS Software
Cisco Network Assistant automatically checks for Cisco IOS Software integrity before upgrading the existing software in the device.
For example, dragging and dropping the Cisco Catalyst 2950 with Cisco IOS Software on the Cisco Catalyst 3750 Switch will make an error message appear (Figure 15).
Figure 15. Error Message
Upgrading Multiple Devices
1. From the toolbar click the Software Upgrade icon (Figure 16).
2. Select the device that you want to upgrade; if you have multiple devices of the same kind, you can select all of them and run the upgrade at once.
3. Choose the appropriate mode. Select Standard to use a Cisco IOS Software image that is stored locally; otherwise, select Remote TFTP Server. If you selected Standard, enter the filename of the Cisco IOS Software image in the [Cisco] IOS Image field. You can click Browse to find the file. If you selected Remote TFTP Server: In the [Cisco] IOS Image field, enter the full path and filename of the Cisco IOS Software image. In the TFTP Server IP Address field, enter the IP address of your TFTP server.
Figure 16. Upgrading Multiple Devices
7. NEED HELP?
Cisco Network Assistant provides extensive online help. If you are not sure about a parameter or configuration on the current window:
Click the Help icon from the toolbar menu-this will tell you everything about different parameters, options, and settings (Figure 17).
Figure 17. Getting Help
If you cannot find something that you are looking for, click the Search tab and type the name of the feature you want to find. You can click the result and it will take you directly to the pop-up window of that feature (Figure 18).
Figure 18. Using Search Tab
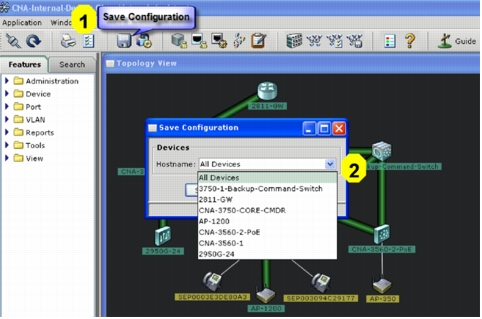
8. SAVING AND RESTORING CONFIGURATION FILES
With a single mouse click of the Save Configuration icon in the toolbar, you can save running configurations of all the devices in your network or individual devices (Figure 19).
Figure 19. Saving Configuration Files
To back up configuration files onto the PC, do the following:
1. From the Administration features tab, select Back Up/ Restore Configuration.
2. Select all devices or a particular one from the pull-down menu.
3. Click Back Up Configuration to PC (Figure 20).
Figure 20. Backing Up Configuration Files
After you back up the configuration, you have the option to restore the configuration if the switch loses its saved configuration for any reason or you need to revert back to the old configuration. From the Back Up/Restore Configuration pop-up window, select the Restore Configuration tab, choose the device from the pull-down menu, and choose the configuration that you want to restore.
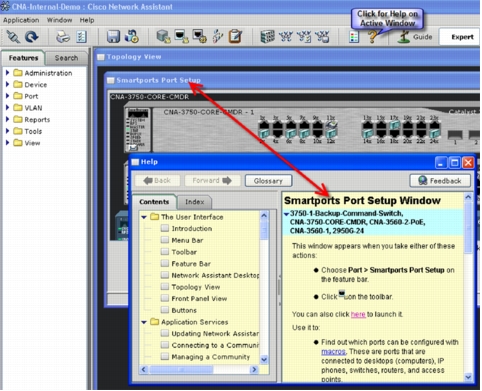
9. SMARTPORTS ADVISOR
Take advantage of Smartports Advisor to apply Cisco recommended best-practice configurations for your IP phones, wireless access points, desktop PCs, routers, and switches.
Smartports Advisor automatically detects the type of device (for example, an IP phone, desktop computer, or access point) connected to the switch and offers to apply best-practice configurations recommended by Cisco Systems to the ports. To take advantage of this feature, do the following (Figure 21):
1. Click the Smartports Port Setup icon from the toolbar.
2. From the Smartports Port Setup Window, Click Suggest.
3. Blinking icons of IP phones, access points, routers, and switches will indicate where the Smartports settings can be implemented.
4. Select the port or multiple ports, and then click Modify to apply the Cisco recommended settings.
Figure 21. Smartports Advisor
10. CREATING A COMMUNITY
To take advantage of new features in Cisco Network Assistant Version 2.0, you should run the application in the community mode.
Creating a community is very easy and straightforward. First assign an IP address to each device that you want to manage. Then do the following:
1. Start the Cisco Network Assistant and choose Connect to a new community and click Connect (Figure 22).
Figure 22. Connecting to a New Community
2. In the Create Community pop-up window, assign a name to the community (Figure 23).
3. Enter the IP address of the device that you want to add.
4. Click Add To Community to add that single device, or click Discover Neighbors if you want the network assistant to discover all the neighbors automatically.
5. When you see the device list, click OK; you can also remove a device that you do not want to be added by highlighting it and then clicking the Remove button.
Figure 23. Assigning a New Community Name
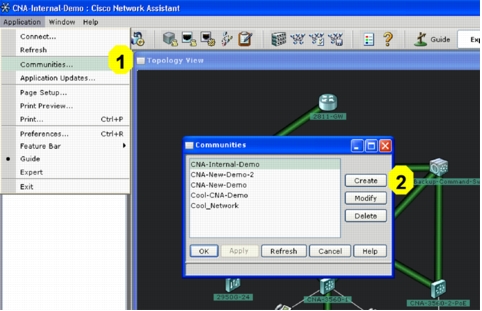
To create a new community after the application is running in cluster mode or to modify an existing one, do the following (Figure 24):
1. Click Application, and choose Communities from the drop-down menu.
2. From the Communities pop-up window, click Create or Modify.
3. Follow the same steps as before to add devices to the community.