This document demonstrates how to use the eToken with Cisco IOS® Software Release 12.3(14)T. This software release introduced support for the USB drivers into Cisco IOS Software for both flash memory and eToken secure memory. The security provided by the eToken (also known as an Aladdin USB eToken key) makes it attractive for storing and distributing secure information, such as VPN credentials and software configurations. eToken support is enabled on certain models of Cisco Systems® routers with a built-in USB port, such as the Cisco® integrated services routers (ISRs).
eTOKEN BACKGROUND
The eToken is a USB-based smartcard device for cost-effective strong authentication and e-commerce. It provides:
• Enhanced security and safe information access
• Improved and cost-effective password and ID management
• Secure mobility of digital credentials, certificates, and keys
The eToken is an ideal device for signing valued transactions requiring absolute proof and guaranteed nonrepudiation. The eToken offers strong authentication and guaranteed nonrepudiation for sensitive applications such as e-banking, stock trading, e-commerce, and financial transactions.
The eToken is cost-effective and easy to use; it is a smartcard that can be easily taken from one workstation to another on a key ring or in your pocket.
Note: For more information about the eToken Pro key by Aladdin Knowledge Systems, see the Aladdin Website at http://www.ealaddin.com/etoken/cisco.
Figure 1. eToken Key
eTOKEN APPLICATIONS
The eToken support on a Cisco® router provides the following applications.
Portable Credentials Storage for VPN RSA Key Pairs
The USB eToken Pro key by Aladdin Knowledge Systems provides a secure means to store and deploy credentials separate from the router chassis, such as VPN access information or VPN key pair credentials. The eToken uses smartcard technology to protect a small area of memory and grants access through a PIN. When IP Security (IPSec) VPN credentials are stored on the eToken, they are safely external to the router. The token provides secure access to the VPN credentials; both the token and a correct PIN are necessary to access the VPN tunnel. When the token is inserted in a USB port, the router can pass the PIN and unlock it, retrieving the credentials and copying them into running memory. When the token is removed, the router erases the credentials from running memory, ensuring that they cannot be retrieved from the router itself, and then tears down the VPN tunnel, either at the default or configured timeout.
Benefits include:
• It provides off-platform storage, and generation of VPN credentials.
• Encryption keys are loaded when eToken is plugged in, and removed when eToken is removed.
Configuration Provisioning with eToken
The eToken can store a protected router configuration file, which is secured with a PIN. The router can be configured to automatically load a configuration from the eToken after the eToken is inserted and successfully logged in. The router also can load a configuration file from the unprotected area of the eToken during the booting time, or a configuration file can be applied manually from the command-line interface. The configuration file can contain relevant router configuration, the VPN preshared keys, or a subset VPN configuration for accessing the central VPN site. The router does not load the configuration file unless the proper PIN has been configured for secure deployment of router configuration files.
Benefits include:
• Distribution of encryption keys and preshared keys is easily secured.
• Users can provision the custom configuration into an eToken, and then send the eToken to a location.
• The router loads the custom configuration from the eToken at startup, or merges the configuration when the eToken is plugged in.
Note: This document shows using the eToken and applications; for details about managing the eToken file system, check the "Cisco IOS USB Flash Module and USB eToken Support" feature documentation.
USING PORTABLE CREDENTIAL STORAGE WITH eTOKEN
The credentials stored on the eToken can be used with any VPN configuration type: cryptology map, Dynamic Multipoint VPN (DMVPN), or Easy VPN. The stored credentials are used with IPSec VPN when the authentication method for the cryptographic ISAKMP policy is configured as RSA signatures (RSA-RIG). The following steps are required to use the credential with the eToken:
1. Store the credentials on the eToken.
2. Use the credentials with the eToken.
Storing the Credentials on the eToken
Storing the credentials on the eToken must be performed by the administrator on the remote router. The PIN key is provisioned and should be changed from the default PIN at the time of provisioning.
The credentials can be created at a central site, but the router configuration, including the certificates, should also be stored on the eToken. Before the credentials can be used on the remote router, the configuration should be transferred to the running memory onto the remote router with the credentials.
To access the eToken to store or modify information, a PIN must be used to log in to the eToken file system. There are two methods to log in to the file system: automatic and manual login.
Automatic Login
With automatic login, the router sends the PIN to the eToken file system when the eToken is plugged into the router USB port. When the router logs in to the eToken, it automatically discovers the presence of the key-pair credentials, and the presence of a secondary configuration file. The secondary configuration file is described in detail in the next section. The PIN is previously configured by the administrator on the router with the following command:
The default PIN with a newly shipped router is 1234567890. It should be changed at the time of provisioning to ensure the security of the provisioned data. Check the feature documentations for details about changing the PIN on the eToken.
Manual Login
With manual login, the end user plugs in the eToken first, and then logs in to the eToken from the router command-line interface (CLI). The user can log in from either the user mode or the enable mode. From the CLI, use the following command to log in to the eToken:
Use the following steps to store the key-pair credentials on the eToken:
1. Plug the eToken into the router.
2. Log in to the eToken with either manual or automatic login.
3. Generate the key pair with the CLI.
4. Write to memory: Credentials are stored on the eToken instead of private nonvolatile RAM (NVRAM).
The following section shows the details for performing each of the steps.
1. Plug the eToken into the router.
When the eToken is inserted in the router, the router automatically recognizes the eToken, and adds the device usbtoken0: for eToken inserted in the USB port 0, or usbtoken1: for eToken inserted in port 1.
c2851-27#
*Jan 13 05:17:20.001: %USB_HOST_STACK-6-USB_DEVICE_CONNECTED: A Low speed USB device has been inserted in port 0.
*Jan 13 05:17:21.497: %USB_TOKEN_FILESYS-6-USB_TOKEN_INSERTED: USB Token device inserted: usbtoken0.
*Jan 13 05:17:21.501: %USB_TOKEN_FILESYS-6-REGISTERING_WITH_IFS: Registering USB Token File System usbtoken0: might take a while...
*Jan 13 05:17:21.841: %CRYPTO-6-TOKENINSERTED: Cryptographic token eToken inserted in usbtoken0
2. Log in to the eToken with either manual or automatic login.
When the router recognizes the eToken insertion, if a PIN is configured on the router, it automatically logs in to the eToken and loads the key-pair credential. The following log shows the successful router login to the eToken:
The following router log shows in detail the key generation progress. Note that for purposes of illustration, this configuration uses the lowest possible bits size of 512 bytes. For an actual deployment, a larger size key is recommended.
c2851-27#show crypto key mypubkey rsa
c2851-27#show crypto ca certificates
c2851-27#conf t
Enter configuration commands, one per line. End with CNTL/Z.
c2851-27(config)#
c2851-27(config)#cry key gen rsa
The name for the keys will be: c2851-27.cisco.com
Choose the size of the key modulus in the range of 360 to 2048 for your
General Purpose Keys. Choosing a key modulus greater than 512 may take
a few minutes.
How many bits in the modulus [512]:
% Generating 512 bit RSA keys ...[OK]
c2851-27(config)#
*Jan 13 06:46:26.633: %SSH-5-ENABLED: SSH 1.99 has been enabled
*Jan 13 06:47:21.021: %PKI-6-CERTRET: Certificate received from Certificate Authority
c2851-27(config)#do write mem
Building configuration...
[OK]
c2851-27(config)#
*Jan 13 06:47:29.481: %CRYPTO-6-TOKENSTOREKEY: Key c2851-27.cisco.com stored on
Cryptographic Token eToken Successfully
4. Write to memory: Credentials are stored on the eToken instead of private nonvolatile RAM (NVRAM).
In this configuration, the certificate authority server immediately provided a grant for the certificate. In cases where the certificate authority requires a manual approval for the certificate, the user must wait until after the approval is granted to perform the write memory command.
c2851-27# write mem
Building configuration...
[OK]
c2851-27#
*Jan 13 06:47:29.481: %CRYPTO-6-TOKENSTOREKEY: Key c2851-27.cisco.com stored on
Cryptographic Token eToken Successfully
Display the Stored Credentials
The credentials are stored on the eToken in the protected area. When storing the credentials on the eToken, the files are stored in a directory called /keystore. The key files however, are hidden from the CLI. The following configuration shows the stored credentials when they are successfully loaded from the eToken:
c2851-27#show crypto key mypubkey rsa
% Key pair was generated at: 06:37:26 UTC Jan 13 2005
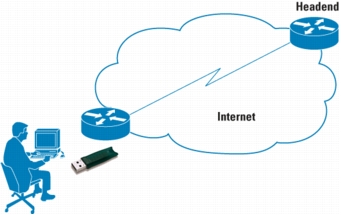
When the eToken is inserted and logged in, the key-pair credentials stored on the eToken take precedence over the key pair stored on the router. During the establishment of a new VPN tunnel, the router uses this new credential from the eToken. Following are the required steps to establish the VPN tunnel using the eToken (Figure 2).
1. The user plugs in the eToken.
2. The user logs in to eToken automatically or from the CLI.
3. The router initiates the VPN tunnel using the stored credentials.
4. The user is connected to the VPN.
5. The user removes the eToken.
6. The router tears down the VPN tunnel after timeout.
Figure 2.User Connecting to the VPN with eToken
Token Removal Timeout
By default, the router uses the current cryptographic ISAKMP timeout period to initiate a rekey of the encryption keys. Use the following command to override this behavior and cause the router to time out the VPN tunnel when the user removes the eToken from the router:
This command causes the router to remove the credentials 10 seconds after the eToken is removed (available range: 0 to 480).
Removing the Credentials from the eToken
Removing the eToken causes the router to remove the cryptographic keys and time out the VPN tunnel. To remove the key pair from the eToken, plug the eToken into the router, and after a successful login to the eToken, use the following commands to remove the RSA key pair.
router(config)# cryto key zeroize rsa
router(config)# no crypto pki trustpoint IOSCA
router(config)#do write mem
Building configuration...
[OK]
The following router log shows no cryptographic keys configured on the eToken.
c2851-27#show crypto key mypubkey rsa
c2851-27#
CONFIGURATION PROVISIONING WITH eTOKEN
Configuration provisioning with eToken is enabled by downloading a configuration file from the eToken into the running configuration memory of the router. There are two ways for provisioning with eToken: secondary and boot configuration.
Secondary Configuration
With secondary configuration upload, the router is configured to load a configuration file after the router is logged in to the eToken with the correct PIN. The router can log in to the eToken with either automatic login or manual login, as shown in the previous section.
The configuration file on the eToken can be stored with protected or unprotected file attributes. When a file is protected, it can be accessed only when logged into the eToken. Placing a configuration with protected attributes should be done from a management station. The secondary configuration file can contain a full configuration of the router, or a partial configuration related to establishing a VPN tunnel. The secondary configuration file is merged with the running configuration on the router. To store these configuration changes to the startup configuration, the user must issue a write memory command.
Use the following configuration command to configure the router to load a secondary configuration file after the login to the eToken:
The eToken module can store a configuration file in the unprotected space in its memory. The router can boot from this configuration as well, and can then contact a Cisco CNS 2100 Series Intelligence Engine or Trivial File Transfer Protocol (TFTP) server for full, final configuration. This scenario can be expanded when the intelligence engine pushes a security Cisco IOS Software feature set to the router. When the router has a security feature set and the correct PIN in its configuration, it can unlock the protected area of the eToken module that contains a digital certificate or VPN credentials to authenticate an IPSec tunnel.
To manually retrieve a configuration file from the eToken, use the following command in the startup configuration file; this command causes the router to load the configuration file from the eToken during booting time:
Router(config)# boot config usbtoken0:CONFIG1.CFG
Configuration File Format
The configuration file uses a secondary or boot configuration (.cfg) file that is a text file containing a router configuration command that the router can interpret. The configuration file can be a partial or a complete configuration file. The configuration file should have the "end" statement at the last line; otherwise the configuration is applied but the following error is logged:
c2851-27#
*Jan 13 18:06:54.594: %PARSER-4-BADCFG: Unexpected end of configuration file.
c2851-27#
REFERENCES
USB eToken and USB Flash Feature Support Data Sheet