Cisco IOS® SSLVPN provides remote secure corporate network (intranet) access over the standard public Internet using a web browser and its native Secure Sockets Layer (SSL) encryption. SSL authentication and encryption/decryption operate at the application level. The end host can be any IP-based host (PC, Mac, Linux/UNIX, etc.) that supports Cisco SSLVPN.
SSLVPN can be used as to provide standalone secure remote access to corporate services. It can also be deployed as a complement to the Cisco Virtual Office solution for mobile users who sometimes need to have access to the corporate intranet from a public Internet access location. Please refer to the Cisco Virtual Office overview (found at http://www.cisco.com/go/cvo) for further information about the solution, its architecture, and all of its components.
This guide describes how to configure and deploy a Cisco IOS Software-based router as an SSLVPN gateway.
Network Architecture
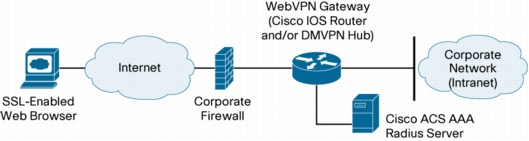
Figure 1 shows an example of how Cisco SSLVPN can be deployed with Cisco Virtual Office.
Figure 1. SSLVPN Topology for an Cisco Virtual Office Deployment
SSLVPN is configured in a Cisco IOS Software-based router.
Using an SSL-enabled web browser, the user establishes a connection to the SSLVPN gateway. Once the user has been authenticated by the authentication, authorization, and accounting (AAA) server, an SSLVPN session is established and the user can access the internal corporate network.
Since the SSLVPN gateway provides an entrance into the corporate network, it should always be installed behind a firewall. Only the SSL port (port 443) should be opened on the corporate firewall for secure access back to the SSLVPN gateway.
Feature Description
Using an SSL-enabled web browser (Internet Explorer, Firefox, or the equivalent), the user can establish a connection to the SSLVPN gateway. The SSLVPN gateway responds to the initial user request with a user logon HTML page. The username and password are submitted to the gateway for authentication with a RADIUS server, and a session is granted only if the authentication is successful.
If a session is established, it is maintained by sending a session cookie to the user browser. This cookie has to be embedded in all subsequent user HTTP requests for authentication at the SSLVPN gateway. If the cookie is missing or incorrect, the session will be dropped, and the user will no longer be able to access the corporate network.
Normally, the session remains until the user logs out, the session times out, or the session is cleared from the SSLVPN gateway.
Cisco IOS SSLVPN delivers full-tunnel SSL VPN access. If a popup blocker is enabled in the user's browser, it is possible that the small SSLVPN toolbar window will not be displayed. To avoid this, disable the popup blocker for this SSLVPN session page.
In a SSLVPN connection, SSL tunnel is used to move data to and from the internal networks at the network (IP) layer. When the user logs into the SSLVPN gateway, the SSL VPN client (AnyConnect) is automatically downloaded and installed on the end user's PC, and the tunnel connection is established. Once the connection is established, the user has full VPN access to the corporate network. Using SSLVPN, it is also possible to have voice support. Using Cisco IP Communicator, the user can register with the Cisco Call Manager in the corporate network and thus have a portable "office phone."
To connect different types of clients (Windows, Mac, Linux), the SSLVPN gateway should have corresponding AnyConnect software installed.
Cisco Secure Desktop is a multifunctional component of the Cisco SSLVPN solution. It does a preconnect assessment to make sure PCs with worms and viruses cannot gain access to the SSLVPN gateway; additionally, Cisco Secure Desktop provides a consistent and reliable means of fully eliminating all traces of sensitive session data by creating a virtual desktop.
Platforms and Images
Supported platforms for Cisco IOS SSLVPN are:
• Cisco 2800 and 3800 Series Integrated Services Routers, and Cisco 7206 Router
• Cisco IOS SSLVPN is available in image 12.4(15)T and later.
The following SSLVPN-specific configurations are required on the gateway.
Configuring the Public Key Infrastructure
SSLVPN is based on HTTPS, which requires a public key infrastructure (PKI) trust point to be configured.
One of the first things checked within a certificate is the expiration. A valid date is required, and the router has to have the correct time. To configure the router as a Network Time Protocol (NTP) client, use the following configuration:
ntp server <ntp-server-ip>
The host name and the domain name must be set as well:
The name for the keys will be: sslvpn-certificate-server.cisco.com
% The key modulus size is 1024 bits
% Generating 1024 bit RSA keys ...[OK]
To configure a trust point and enroll with the certificate server, use the following configuration:
crypto pki trustpoint <trustpoint-name>
enrollment url http://certificate-server
To tell the SSLVPN gateway to use a trust point, use the following configuration:
webvpn gateway <gateway-name>
ssl trustpoint <trustpoint-name>
For more details on certificate management, see Appendix A.
Configuring the User Database
A user database is needed for authenticating the end user with the SSLVPN gateway. The database can be local or any RADIUS/TACACS+ AAA server.
It is best to use a separate AAA server so that unique passwords can be provided for each user, and so that user connections can be logged. This is how the SSLVPN gateway will be configured to use a remote AAA RADIUS server for authentication purposes:
aaa authentication login default local group sslvpn
ip http authentication aaa
SSLVPN Configuration
The following sections describe how to enable and configure SSLVPN.
Configuring the Virtual Gateway
Before using the SSLVPN feature, a virtual gateway must be configured and put into service. This specifies the IP address and port to use for SSLVPN and configures the trust point to use. The IP address should be a public IP address configured on an interface or loopback interface on the SSLVPN gateway. The default port is 443. Putting the virtual gateway into service enables SSLVPN service on the gateway.
webvpn gateway sslvpn-gw
ip address 10.10.10.30 port 443
ssl trustpoint SSLVPN
inservice
Configuring the Virtual Context
A SSLVPN virtual context must be configured to associate the virtual SSLVPN gateway with the configured features. Multiple virtual contexts can be configured on the secure gateway, giving access to various features and access modes, depending on the domain configured for each context. Following is an example of configuring a virtual context and putting it into service:
webvpn context sslvpn_context
title "MyCompany SSLVPN Server"
gateway sslvpn-gw domain <domain-name>
inservice
The end user gets access to the different features configured in each context by specifying the domain in the URL when accessing the SSLVPN gateway: https://<SSLVPN-gateway-IP>/<domain-name>. If no domain name is specified in the URL, the default context will be used.
Multiple contexts can be configured, giving different levels of access. For example, two contexts can be configured, one with full-tunnel access and one with Cisco Secure Desktop and full-tunnel access. By going to https://<SSLVPN-gateway>/tunnel, the user will get full-tunnel access to the internal network. Accessing https://<SSLVPN-gateway/csd will give the user access to Cisco Secure Desktop and full-tunnel access.
Configuring the Group Policy
A group policy is configured for each SSLVPN virtual instance. The group policy specifies the SSLVPN features and parameters to be used for this virtual instance. Full-tunnel mode can be enabled or disabled in the group policy, which is then associated with the SSLVPN context.
The following is a configuration example for full-tunnel mode:
webvpn context sslvpn_context
policy group policy-group
functions svc-enabled
svc address-pool "sslvpn-pool"
svc split include 10.0.0.0 255.0.0.0
svc split include 192.168.0.0 255.255.0.0
svc dns-server primary 10.2.2.2
The following associates the group policy with the SSLVPN context:
webvpn context sslvpn_context
default-group-policy policy-group
Configuring the SSLVPN Tunneling Client
To establish an SSLVPN connection, the remote client will download the AnyConnect client package software from the SSLVPN gateway.
Configuration example:
service internal
webvpn install svc flash:sslclient-pkg sequence #
The `sequence #' option is for installing multiple client packages in same gateway.
Example: Anyconnect client packages for Windows, Mac and Linux can be installed in the
Same gateway.
The SSLVPN gateway supplies an IP address to each of the clients logged into the gateway. A local IP address pool must be configured on the gateway, and this pool must be specified in the policy group configuration for the SSLVPN context that allows full-tunnel access.
Configuring the IP address pool:
ip local pool sslvpn-pool 10.1.1.2 10.1.1.62
Full-tunnel mode must be enabled in the SSLVPN context by configuring it in the context's policy group. Split tunneling can also be configured to specify which traffic should be tunneled to the internal network and which traffic should be sent directly to the Internet.
webvpn context sslvpn_context
policy group policy-group
functions svc-required
svc address-pool "sslvpn-pool"
svc split include 10.0.0.0 255.0.0.0
svc split include 192.168.0.0 255.255.0.0
svc dns-server primary 10.2.2.2
When the end user logs into an SSLVPN gateway domain, the AnyConnect client is automatically downloaded and installed on the user's PC. The routing table on the PC is modified to route internal traffic to the internal network and all other traffic directly to the Internet.
Configuring Cisco Secure Desktop
Cisco Secure Desktop eliminates all traces of sensitive data by providing a single, secure location for session activity and removal on the client system. It helps ensure that cookies, browser history, temporary files, and downloaded content are removed from the system after a remote user has logged out or after an SSLVPN session has timed out.
First, the Cisco Secure Desktop package must be installed on the internal flash device on the SSLVPN gateway; then Cisco Secure Desktop can be enabled in the context sub mode.
Before the client can use Cisco Secure Desktop, the Cisco Secure Desktop Manager must be launched to configure settings for the context in which Cisco Secure Desktop was enabled. This is done by going to https://<gateway-ip>/csd_admin and logging in as "admin" with the enable password configured on the SSLVPN gateway.
Using Cisco Secure Desktop Manager, you can configure the VPN feature policies to use for remote users at different locations. Access can be differentiated based on IP address, certificate, and file and registry information. System detection can also be done before giving the user access to the SSLVPN features.
When the end user navigates to an SSLVPN gateway domain that has Cisco Secure Desktop enabled, Cisco Secure Desktop is installed on the user's PC. Once the desktop is installed, the user can go to the secure desktop and log in to create an SSLVPN session. The user can also switch between the secure desktop and the guest computer (regular desktop) by clicking in the respective icon/menu option.
Troubleshooting
The following section describes the troubleshooting commands available.
SSLVPN Troubleshooting Commands
Use the following debug commands to help troubleshooting possible problems:
debug webvpn aaa AAA debugs
debug webvpn cookie cookie debugs
debug webvpn count data count code debugs
debug webvpn csd Cisco Secure Desktop debugs
debug webvpn data data code debugs
debug webvpn dns DNS debugs
debug webvpn emweb emweb debugs
debug webvpn emweb state emweb state debugs
debug webvpn http HTTP debugs
debug webvpn package client package debugs
debug webvpn sdps Shim Data Path debugs
debug webvpn sock Socket Layer debugs
debug webvpn sock flow Socket async flow debugs
debug webvpn timer timer code debugs
debug webvpn trie trie code debugs
debug webvpn tunnel tunnel debugs
debug webvpn tunnel detail detailed display of tunnel transactions
debug webvpn tunnel traffic tunnel data packets debugs
debug webvpn url_disp URL disp code debugs
debug webvpn webservice web service debugs
debug webvpn basic debugs
Note: Enabling debug commands affects performance, and enabling multiple debug commands at the same time will make the gateway very slow.
Sessions can be monitored on the SSLVPN gateway using the following show commands:
title "Welcome to SSLVPN : unauthorized access is prohibited"
title-color #336699
ssl authenticate verify all
!
!
policy group tunnelpolicy
functions svc-required
timeout idle 3555
timeout session 1209555
svc address-pool "sslvpn-pool"
svc keep-client-installed
svc split include 128.10.0.0 255.255.0.0
svc split include 144.254.0.0 255.255.0.0
svc dns-server primary 171.68.226.120
svc wins-server primary 171.69.2.87
svc wins-server secondary 171.68.235.228
default-group-policy tunnelpolicy
gateway webvpn-gw domain tunnel
inservice
!
webvpn context csd
ssl encryption
ssl authenticate verify all
!
!
policy group csdpolicy
functions svc-enabled
svc address-pool "sslvpn-pool"
svc split include 10.0.0.0 255.0.0.0
svc split include 20.0.0.0 255.255.0.0
svc dns-server primary 171.68.226.120
default-group-policy csdpolicy
gateway sslvpn-gw domain csd
csd enable
inservice
!
End
Appendix B: Certificate Management
The SSLVPN server can be deployed with a certificate issued by an in-house certificate server or by a public trusted certificate server (such as Verisign). If an in-house certificate server is used, the web browsers will prompt users to accept the certificate every time a session is established to the SSLVPN gateway, until the root certificate is permanently installed into the browser's trusted root store. This can be avoided if a certificate issued by a public root is used. Most of the well-known public roots are already packaged with the prominent browsers such as Internet Explorer, Firefox, and so on.
Configuration
Note: Before doing any certificate-related configuration, make sure that the router's clock and time zone are accurately configured.
The RSA key pair name and common name in the subject-name should match the actual URL used for connecting to the SSLVPN gateway. If there is a mismatch, the web browsers will issue a warning, and the users will be prompted to accept the certificate.
Configuration for Simple Certificate Enrollment Protocol (SCEP)
The following sample is for a Microsoft certificate server.
The name for the keys will be: sslvpn.mydomain.com
% The key modulus size is 1024 bits
% Generating 1024 bit RSA keys ...[OK]
The RSA keys can be generated as exportable or nonexportable. Appending the exportable keyword to the command above will generate exportable RSA keys.
Exportable RSA keys should be carefully evaluated before use, because they introduce the risk that the keys might be exposed. The advantage of using exportable keys is that in case of hardware failure, the gateway can be easily replaced with a new router, and the keys and certificates can be imported from backup. However, the saved backup copy of the keys has to be kept very safe.
Nonexportable keys cannot be copied from the gateway, but in case of "write erase," flash corruption, or hardware failure, the certificates are lost. In this case, new certificates must be generated, and the user has the overhead of contacting the certificate vendor for new certificates, possibly at extra cost. If an in-house certificate authority (CA) server is used, this is not a big issue.
Installing an In-House Certificate
If the certificate server supports SCEP, the certificate can be requested from the CA server using the following command:
The certificate can then be enrolled, and the CA will send a signed certificate:
sslvpn-gateway(config)#cry pki enroll myca
%
% Start certificate enrollment ..
% Create a challenge password. You will need to verbally provide this
password to the CA Administrator in order to revoke your certificate.
For security reasons your password will not be saved in the configuration.
Please make a note of it.
Password:
Re-enter password:
% The subject name in the certificate will include: sslvpn.mydomain.com
% The serial number in the certificate will be: 00E2C3D1
% Include an IP address in the subject name? [no]:
Request certificate from CA? [yes/no]: yes
% Certificate request sent to Certificate Authority
% The 'show crypto ca certificate myca verbose' command will show the fingerprint.
If the certificate server does not support SCEP, an offline method needs to be used as explained in the next section.
Installing a Certificate Issued by Public Certificate Authority
Usually the public certificate authorities use a web-based or email-based certificate enrollment mechanism.
Generating the Certificate Signing Request File
Whether the offline enrollment method is email or web, the steps on the router are the same. First, a certificate signing request (CSR) needs to be generated. The CSR can be generated only after the corresponding RSA key pair and trust point are configured. Once the CSR is generated, issue the command to complete enrollment. Authentication is not necessary at this time. It may not be known from which certificate server the certificate is going to be issued. One vendor can operate multiple certificate servers. If it is known, authentication can be performed after downloading the root certificate. If not, wait to authenticate until the certificate is issued.
The enrollment request will display the CSR on the router console, as shown below. Copy only the base64-encoded portion and save it in a text file with .csr extension. Some vendors may need it to be enclosed in "-----BEGIN CERTIFICATE REQUEST-----" and "-----END CERTIFICATE REQUEST-----" lines. The following is a sample CSR generation:
test-router(config)#crypto pki enroll myca
% Start certificate enrollment ..
% The subject name in the certificate will include: cn=test
% The fully-qualified domain name will not be included in the certificate
% Include the router serial number in the subject name? [yes/no]: no
% Include an IP address in the subject name? [no]: no
Display Certificate Request to terminal? [yes/no]: yes
The user must now send this CSR to the certificate vendor by email or the Internet. The vendor will return the signed certificate as a text file in base64-encoded format. Make sure that the vendor sends all the files encoded in base64; these files will usually have a .cer extension. The vendor may also provide the corresponding root certificate in the same format. If the root certificate is not provided, it can easily be exported from a standard web browser. First, open the issued certificate and look at the "issued by" field. On a Windows platform, opening the certificate is as simple as double-clicking on the .cer file. Once the issuer is identified, open the root certificate store of the browser and look for the certificate of the issuer. When it is located, export it as a .cer file.
The next step is authenticating and loading the enrolled certificate on the SSLVPN router.
Loading the Root Certificate
To load the root certificate (authentication), issue the "crypto pki authenticate <trust point>" command and paste the contents of the root certificate file. Then type "quit" on a new line or simply press the Enter key on a new line.
test-router(config)#crypto pki authenticate myca
Enter the base 64 encoded CA certificate.
End with a blank line or the word "quit" on a line by itself
-----BEGIN CERTIFICATE-----
<certificate content here>
-----END CERTIFICATE-----
quit
Certificate has the following attributes:
Fingerprint MD5: <actual finger print>
Fingerprint SHA1: <actual finger print>
% Do you accept this certificate? [yes/no]: yes
Trustpoint CA certificate accepted.
% Certificate successfully imported
test-router(config)#
Loading the Router Certificate
Now the certificate issued by the vendor needs to be installed on the SSLVPN router. This is the certificate identifying the server; it will be presented to SSLVPN clients during SSL negotiation. The command is "crypto pki import <trust point name> certificate." Paste the certificate file content followed by "quit" or a blank line.
% The fully-qualified domain name will not be included in the certificate
Enter the base 64 encoded certificate.
End with a blank line or the word "quit" on a line by itself
-----BEGIN CERTIFICATE-----
<paste the certificate content here>
-----END CERTIFICATE-----
% Router Certificate successfully imported
test-router(config)#
The router is now ready to function as a SSLVPN server.
Appendix C: Client Access Restriction
This appendix explains how to restrict access to SSLVPN full-tunnel mode based on the antivirus software and operating system on the client end host system.
Configure Using Cisco Secure Desktop
Cisco Secure Desktop has a mechanism for restricting access to SSLVPN full-tunnel mode based on the existence of antivirus software and operating system on the client PC. These access criteria are configured in the Cisco Secure Desktop admin page.
To enable checking for antivirus software and OS version, configure Cisco Secure Desktop and full-tunnel mode on the SSLVPN gateway for a virtual context.
To configure, log into https://<sslvpn-gateway>/csd_admin, and select the correct virtual context.
Go to the VPN Feature Policy under the location for which you are configuring access.
Select "ON if criteria are matched" for full tunneling and click the "..." button.
This pops up a window where the criteria can be configured. Select the appropriate antivirus software and OS version, and save your changes.
A client who logs in from a PC that does not match the OS and antivirus criteria will not be able to establish an SSLVPN tunnel to the gateway.