This document provides configuration guidance for users of Cisco IOS® SSL VPN. This feature is designed to terminate SSL VPN connections on Cisco IOS Software-based routers (1800, 2800, 3700, 3800, 7200, and 7301). SSL VPN is comparable to and complements the popular IP Security (IPsec) remote-access VPN.
The testing was performed at the NSITE lab in Research Triangle Park, North Carolina (RTP) on the devices defined above. The objective of the testing was to configure and test the uses of WebVPN gateways, and how they work with contexts. Basically, we will look at how the WebVPN gateway is used and applied with the context. We will also look at how each setup is used from the end-user perspective.
This document discusses some of the configuration concepts and usage. The gateway and context are the two main configuration modes for a Cisco IOS SSL VPN service.
Note: All Cisco IOS SSL VPN/WebVPN features are included in a single, cost-effective license that would be purchased separately. You can purchase the feature license in packs of 10, 25, or 100 simultaneous users directly from the Cisco.com configuration tool. If you already have a router, use the following SKUs to order the license: FL-WEBVPN-10-K9=, FL-WEBVPN-25-K9=, FL-WEBVPN-100-K9=. Check the data sheet to find the maximum supported users for your platform.
2. Audience
This configuration guide is intended for customers and partners working to provide configuration guidelines and best practices for smaller SSL VPN deployments.
3. Network Topology
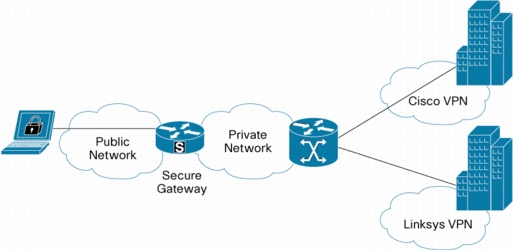
Figure 1 shows a basic Cisco IOS SSL VPN topology.
Figure 1. Basic SSL VPN Topology
4. WebVPN Configuration
4.1 Configuration Overview
This document only considers the configuration of the WebVPN gateway, contexts, and how these components work together.
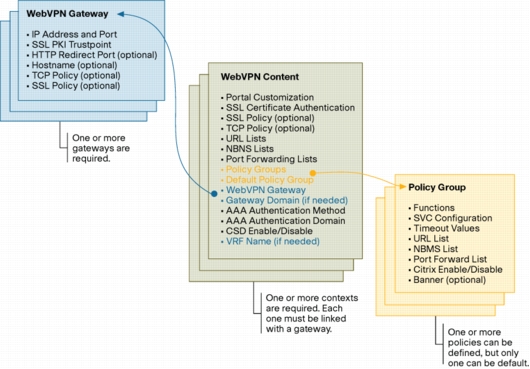
Figure 2 shows how the gateways, contexts, and policy groups are related. You can also see that the context is the main focus for the user sessions. The gateway is just the destination IP endpoint for the user session, and the context is where the policy group is defined and applied to the user session. The policy group determines the parameters of the user session, and how the session will behave.
Figure 2. Cisco IOS SSL VPN Configuration Map
4.2 WebVPN Gateway
The WebVPN Gateway is used to terminate the SSL connection from the user. The basic configuration requires an IP address on the same subnet as one of the public network interfaces; this could be the same address used on the public network interface, or another address in the same subnet. Alternately, you can define a loopback interface, and use an address in that subnet, just as long as the address is reachable on the public network.
The other mandatory component is the crypto PKI trustpoint used. This can be a Certificate Authority (CA) signed certificate, or a self-signed certificate. This is discussed in more detail in the next subsections.
Optionally, you may provide a hostname that is associated with the gateway, since there may be multiple WebVPN gateways. It is also a common practice to register the addresses and hostnames with a DNS authority.
Note: The inservice command is comparable to the no shutdown command in Cisco IOS Software configurations.
webvpn gateway ssl-gw1
hostname sslvpn1
ip address 172.18.143.195 port 443
ssl trustpoint TP1
inservice
!
Note: The hostname command is only locally significant. You must register a hostname on a global DNS server for users to be able to use this name.
4.2.1 Certificate Authority (CA) Signed Certificates
There are two methods to setting up a CA with Cisco IOS SSLVPN. First, we can use a true trusted third-party certificate, like Verisign, which has advantages, but costs money for the certificate. It allows the client side to automatically verify the authenticity of the certificates used in the SSL connection. Alternately, you can set up your own private CA (Windows 2003 Server with SCEP add-on, Cisco IOS CA, etc.), and manually distribute the root certificate to the SSL VPN users. This is cheaper, but requires manual distribution of the root certificate for automatic verification of the SSL connection. See Appendix B for more information to setup a PKI trustpoint with the CA server.
Regardless of the CA method you choose, the trustpoint must be defined for the gateway to use it. If using multiple gateways, it is a good practice to define one trustpoint per gateway. This is mainly because the DNS hostname is included in the signed certificate used in tunnel mode. When a user browses to the WebVPN gateway, the URL of the WebVPN gateway should match the name in the certificate, or it will flag an error, which may become bothersome for users. It is best to have a clean session establishment.
The sample below shows two WebVPN gateways, which have different addresses in the same subnet and share the same trustpoint. They can be in separate subnets, as long as the address is reachable through the public network, and the subnet corresponds to that of another interface on the device.
webvpn gateway ssl-gw1
hostname sslvpn1
ip address 172.18.143.195 port 443
ssl trustpoint TP1
inservice
!
webvpn gateway ssl-gw2
hostname sslvpn2
ip address 172.18.143.196 port 443
ssl trustpoint TP2
inservice
!
4.2.2 Self-Signed Certificates
The alternative to using a CA server is to use the self-signed certificate. If you do not define a trustpoint before configuring the WebVPN gateway, a self-signed certificate will be generated for this gateway, and automatically assigned to it. This is the most painless way to set up Cisco IOS SSL VPN; however, this is not a globally known certificate. Therefore, any user initiating a tunnel mode session will always be asked if they want to trust the certificate, which may become bothersome for users.
sslvpn1(config)#webvpn gateway gw1
sslvpn1 (config-webvpn-gateway)#
*Jul 31 19:18:15.284: %PKI-4-NOAUTOSAVE: Configuration was modified. Issue "write memory" to save new certificate
sslvpn1(config-webvpn-gateway)#end
By defining the WebVPN gateway, the trustpoint was automatically generated.
The WebVPN context is where the SSL VPN is terminated, and the user's VPN session is established. The context also contains all of the policies that can be applied to a user, including authentication, authorization, and accounting (AAA), virtual routing and forwarding instances (VRFs), and group policies. This is where the user authentication takes place, and group policies are applied to the user session. Furthermore, the context can define the way the SSL VPN Web portal will appear to the user by specifying the colors and the images. The context is basically a container for user sessions.
The WebVPN context uses a WebVPN gateway for the SSL session termination endpoint IP address. Multiple contexts can use one WebVPN gateway by using the domain keyword, and specifying a label.
4.3.1 WebVPN Context Configuration-One Gateway, One Context
The context configuration sample below shows two basic WebVPN contexts, one in clientless mode, and the other in tunnel mode configuration. This is just to illustrate the way the WebVPN gateway and context tie together. Basically, with this configuration, the context is the only one that will use the gateway. This is the 1:1 model.
Note: The configurations above do not include the configuration of VRF on the contexts. If you need to use internal VRF instances, add the command "vrfvrf-name" to the context configuration.
The context configuration sample below shows two basic WebVPN contexts, one in clientless mode, and the other in tunnel mode configuration. This time, we illustrate the way one WebVPN gateway can be used by multiple contexts. Basically, with this configuration, the contexts are both using the gateway, and the appropriate context is selected by the domain keyword. This is the 1:N model.
Note: The configurations above do not include the configuration of VRF on the contexts. If you need to use internal VRF instances, add the command "vrfvrf-name" to the context configuration.
5. Accessing WebVPN from the Public Network
This section discusses the various ways an end user initiates the SSL VPN session, and what actually happens.
5.1 One Gateway, One Context
This example uses the configuration displayed below. There are two contexts: one setup for clientless mode, and the second setup for tunnel mode. There are also two gateways, each corresponding to one of the contexts. With a sample configuration to work with, we will look at how this is used by end users to build the SSL VPN sessions.
This is the easiest setup to use. The end user simply has to enter the IP address or DNS name of the gateway in the Web browser. Since the gateway is only used by one context, the user will automatically be moved into the corresponding context. The user will still need to be authenticated by the AAA method specified in the context. Since the AAA method has not been specified, the default authentication method will be used. In this case it will be local authentication.
For a user to log into these contexts, they simply have to enter the URL in the Web browser. For the two contexts shown in the example, these would be either https://172.18.143.195, and https://172.18.143.196. Typically, these would be regular DNS names, so they would be https://sslvpn1, and https://sslvpn2 respectively.
5.2 One Gateway, Multiple Contexts
This example uses the configuration displayed below. There are two contexts: one setup for clientless mode, and the second setup for tunnel mode. There is only one gateway for this example, with both contexts using it. With a sample configuration to work with, we will look at how this is used by end users to build the SSL VPN sessions.
This setup is more difficult from a user perspective. The end user has to enter the IP address or DNS name of the gateway in the Web browser, followed by a domain string. Since the gateway is used by both contexts, the user has to select which context to use. This is done using the domain string as a selector of the context using the gateway. Once the correct context is located under the gateway, the user is moved into that context. The user will still need to be authenticated by the AAA method specified in the context. Since we have not specified the AAA method, the default authentication method will be used. In this case, it will be local authentication.
For a user to log into these contexts, they simply have to enter the URL, followed by the /domain, in the Web browser. For the two contexts shown in this example, these would be either https://172.18.143.195/cisco, and https://172.18.143.196/linksys. Typically, these would be regular DNS names, so they would be https://sslvpn1/cisco, and https://sslvpn2/linksys respectively.
6. SSL VPN Session Establishment
6.1 End-to-End User Data Flow
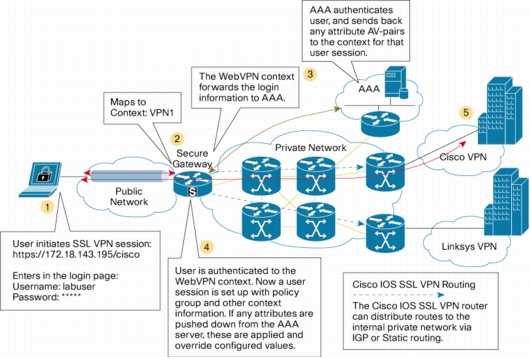
Figure 3 shows the sequence of events that take place when a user establishes an SSL VPN session to the IOS SSL VPN router.
Figure 3. End-to-End SSL VPN
Figure 3 shows how the end-to-end SSL VPN is established. This basically applies to all SSL VPN modes.
1. The end user initiates the SSL VPN connection to the WebVPN gateway. This can be a DNS name or IP address. Depending on the method being used to log into the gateway, the user will have to enter the username and password.
2. The context a user is attempting to connect to is identified by the URL or login information. Now the user must be authenticated under the context they belong to.
3. The secure gateway must determine if it will let this user into the WebVPN context, so it will send the username and password to the AAA server. The method of AAA does not matter, just so authentication can be done.
4. If the AAA server authenticates the user, it will indicate this to the context. It may also push down any RADIUS attributes for that user. The WebVPN context will build a user session under the context, and apply the policy group information and RADIUS attributes. Now the workflow changes depending on the policy group parameters applied to the user session.
• If the user is using Clientless mode, which is the default mode for a context, the process is complete. The WebVPN portal will now be displayed to the end user in the Web browser. The user will have the specified access to the VPN.
• If the user is going to do Tunnel mode, using function svc-enabled or svc-required in the group policy or RADIUS attributes, the process to push down the SSL VPN Client will happen next. This will mean that the SSL VPN Client once installed on the client PC will establish a new SSL session to the context, and the original context will be removed. Furthermore, it will alter the PC routing table to do the specified tunnel function defined in the policy.
5. Now that the user session is established to the SSL VPN secure gateway, the backend interfaces handle the access to the inside network.
Once a user is authenticated under a given context, the user session is established. This user session will embody the parameters specified globally in the context, the group policy, and any RADIUS attributes pushed down during authentication for that user.
Note: RADIUS attributes pushed from the AAA server for a user session will override the equivalent configured values. This allows the group policy to apply the entire default configuration for a group of users, and the RADIUS attributes will fine-tune the user session.
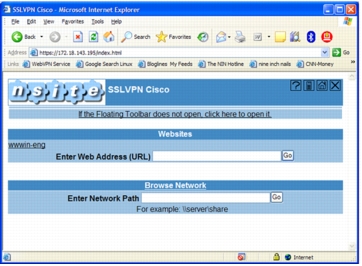
6.2 SSL VPN Clientless Mode Portal
In Clientless mode, the SSL VPN tunnel endpoint exists in the Web browser used to establish the SSL VPN connection. Once a user logs in, and is authenticated by a specific context, the user is now attached to the SSL VPN. This means the user session in the context has the policy applied, and any RADIUS attributes. Furthermore, if the context is in a VRF, the user session is also in that VRF.
The SSL VPN portal is the VPN interface used to access the resources located inside the VPN. This is where the configuration of the policy group, and other settings inside the context, really enhance the user experience. These provide the user links and controls to work inside the VPN through a Web browser. The user can access any Web-based application through the portal if the service is available (citrix, exchange, call manager, etc.). If a user needs more than Web-based applications, they can ask the provider for thin-client or port-forwarding mode.
6.2.1 SSL VPN Login
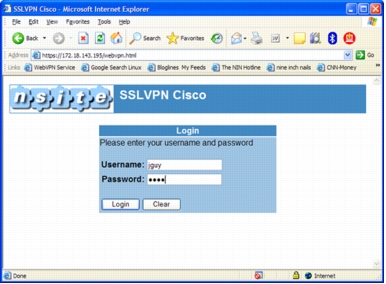
Figure 4 shows the SSL VPN login page for VPN1.
Figure 4. SSL VPN Login Screen
6.2.2 SSL VPN Clientless Portal
After authentication has completed, the user is mapped into the policy group containing any session-level settings to be applied to the user session. This includes the settings for URL lists, CIFS, Citrix, and other session parameters. Figure 5 shows the clientless portal after the user is authenticated.
Figure 5. SSL VPN Portal
6.3 SSL VPN Tunnel Mode and SSL VPN Client
In Tunnel mode, the SSL VPN tunnel endpoint on the client PC is the SSL VPN Client. Once a user logs in, and is authenticated by a specific context, the SSL VPN Client is pushed down to the client PC over the SSL connection, and installed. Once this is successfully installed, the SSL VPN Client creates a new SSL connection for the tunnel, and alters the routing table on the PC. The user is now attached via the SSL VPN tunnel. If the context is in a VRF, the user tunnel is also in that VRF.
The SSL VPN Client creates a virtual adapter in the user's PC. This is the tunnel interface for the SSL VPN tunnel. So, the full tunnel mode allows a user to attach the entire machine to the VPN. There is no extra software installed, or needed for the tunnel mode deployment.
6.3.1 SSL VPN Login
Figure 6 shows the SSL VPN login page for VPN1. This is identical to the login screen seen in figure 4.
Figure 6. SSL VPN Login Screen
6.3.2 SSL VPN Tunnel Initiation
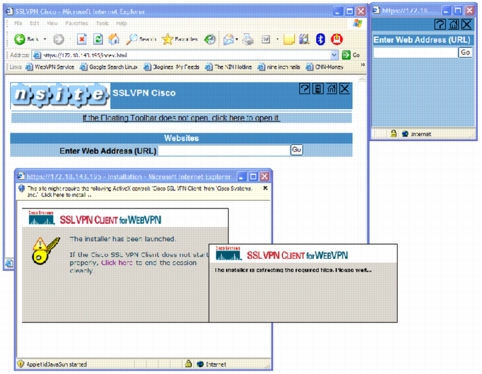
After authentication has completed, and the user is mapped into the policy group containing the svc-enabled command, the SSL VPN Client will begin to push down to the client PC; however, the clientless portal is also available if that fails, and you can see that it is in the background in Figure 7.
If the policy group specifies svc-required, you will not see a clientless portal, and the session goes immediately to SSL VPN Client download (Figure 8).
Figure 8. SSL VPN Client Installer
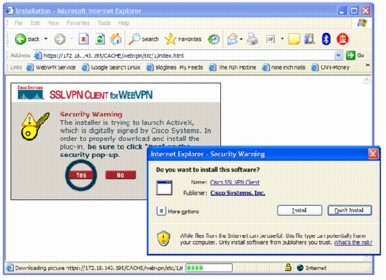
The SSL VPN Client download is done in various ways. It will try ActiveX on windows machines, causing the ActiveX warning. If you do not accept it, or ActiveX is denied, the Java installer will attempt to install the SSL VPN Client. Once the method of downloading the SSL VPN Client is determined, you will see other windows in certain circumstances. If it cannot initiate the download with one of the methods, it will display an error. See Section 6.3.3 for more details.
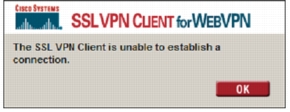
6.3.3 SSL VPN Client Install Error
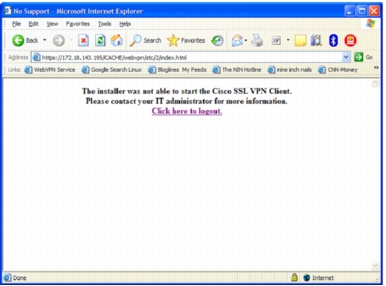
Figure 9. SSL VPN Client Download Error
In some cases, the SSL VPN Client download fails. Typically, if everything is set up correctly, this will only happen if the user declines the SSL VPN Client download or the certificate. The window shown in Figure 9 will display, and the user will need to reinitiate the session.
However, if for some reason the installer is the problem, and cannot download the SSL VPN Client due to not allowing the ActiveX, a Java problem, or other related issue, the screen in Figure 10 will be displayed.
Figure 10. SSL VPN Client Installer Error
6.3.4 SSL VPN Client Certificate Authentication
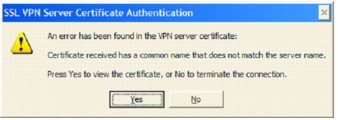
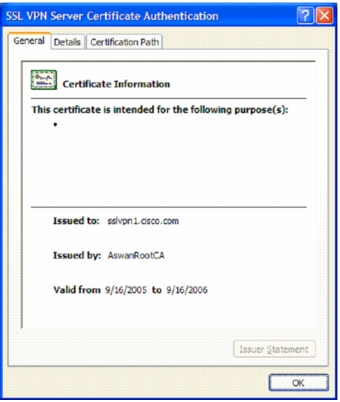
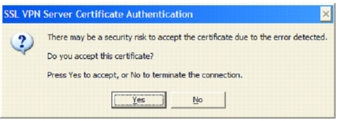
In some cases, you will need to manually authenticate the certificate the secure gateway sends the client PC. This occurs when the client PC finds a discrepancy in the certificate, typically due to the URL used to contact the secure gateway being different from the `DNS Name' or `Name' field in the certificate. It is important to view the certificate, and verify it is trustworthy (Figures 11-13). Close the certificate and manually accept the certificate.
Figure 11. Certificate Error Detected
Figure 12. Certificate View
Figure 13. Manual Certificate Authentication
This problem can easily be solved by doing the following:
• Use the DNS name for the WebVPN gateway in the HTTPS://<gateway>/<domain> URL.
• Ensure the trustpoint is enrolled with the DNS name for the gateway. It is best to have a trustpoint per WebVPN gateway. By doing so, the gateway address will have a DNS name, and that can be specified while enrolling the trustpoint to a known CA, which creates the proper certificate.
• The client PC MUST have that CA's root certificate, so it can verify automatically that the downloaded certificate is good.
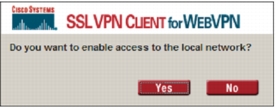
6.3.5 SSL VPN Client Enable Local LAN
Figure 14. SSL VPN Client Local LAN Access
If the policy group is set up for split tunneling and excluding local LAN, a message will pop up asking the user if they want to enable access to the local LAN (Figure 14). This will impact the client PC routing table, as described in Section 6.2.2 of this document.
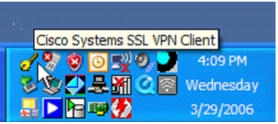
6.3.6 SSL VPN Client Installed
Figure 15. SSL VPN Client Icon
As soon as the certificate passes authentication, the tunnel will be established. This means the SSL VPN tunnel is active, and you will see a key icon in the toolbar of a windows machine (Figure 15).
By double-clicking on this icon, you can open the SSL VPN Client window, and see the client side information for the tunnel.
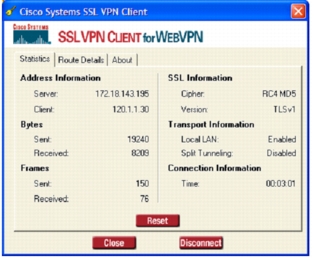
Figure 16. SSL VPN Client Statistics Tab
The Statistics tab lists the SSL VPN Client address allocated from the IP local pool (Figure 16). It also indicates the traffic stats, encryption information, transport setup, and connection time.
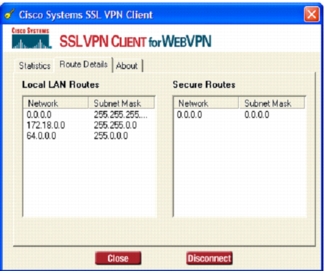
Figure 17. SSL VPN Client Route Details Tab
The Route Details tab shows the routing the SSL VPN Client is using. It lists the secure routes, and which of those routes are included on the SSL VPN tunnel. The local LAN routes are excluded from the SSL VPN tunnel and routed out over the local LAN connection.
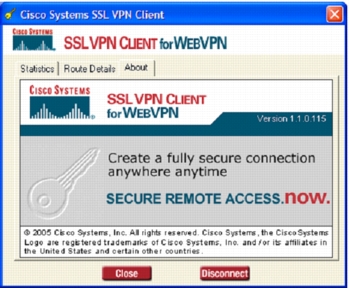
In the About tab, you can see the version of the SSL VPN Client (Figure 18).
Figure 18. SSL VPN Client About Tab
7. SSL VPN Verification and Debugging
This section covers the operation of the WebVPN gateway and context. It includes some basic debugging of the configuration but does not go into troubleshooting. The complete configuration can be seen in the appendices. We will be focusing on WebVPN context vpn1 for some of the context-specific operations.
Note: All the output below is from Cisco IOS Software Release 12.4(9)T.
7.1 WebVPN Gateway
sslvpn1#show webvpn gateway
Gateway Name Admin Operation
------------ ----- ---------
ssl-gw1 up up
ssl-gw2 up up
sslvpn1#show webvpn gateway ssl-gw1
Admin Status: up
Operation Status: up
IP: 172.18.143.195, port: 443
SSL Trustpoint: win2k3
7.2 WebVPN Context
The command show webvpn context will display a table of the context names. Included for each context is the associated gateway, domain, and VRF. It will also show the status of the context, Admin Status (AS), and Operational Status (OS).
Certificate authentication type: All attributes (like CRL) are verified
AAA Authentication List: ssl_global
AAA Authentication Domain: @cisco
Default Group Policy: aswan
Not associated with any WebVPN Gateway
Domain Name and Virtual Host not configured
Maximum Users Allowed: 1000 (default)
NAT Address not configured
VRF Name not configured
There are times when a context can get into a "bad" state. The output will look like the following example; the configs can be fine, but the context will not work. The way to fix this is to remove the context and reconfigure it.
The RSA algorithm is widely used by certificate authorities and SSL servers to generate key pairs. Each certificate authority and each SSL server has its own RSA key pair. The SSL server sends its public key to the certificate authority when enrolling for a certificate. The SSL server uses the certificate to prove its identity to clients when setting up the SSL session. This should be done prior to defining the PKI trustpoint.
The SSL server keeps the private key in a secure storage, and sends only the public key to the certificate authority, which uses its private key to sign the certificate that contains the server's public key and other identifying information about the server. Each certificate authority keeps the private key secret and uses the private key to sign certificates for its subordinate certificate authorities and SSL servers. The certificate authority has a certificate that contains its public key.
The example below shows the creation of a 2048-bit RSA key named win2k3, which is exportable.
sslvpn1(config)#crypto key generate rsa general-keys label win2k3 mod 2048 export
Certificate Authority Authentication and Enrollment
Now you have to authenticate the trustpoint to the CA server. This basically means you are obtaining the certificate that contains the public key of the certificate authority.
Once the trustpoint is authenticated, it must be enrolled. When you enroll your trustpoint, you obtain a signed certificate from the certificate authority for your trustpoint. This has to be done for every trustpoint.
sslvpn1(config)#crypto pki enroll win2k3
%
% Start certificate enrollment ..
% Create a challenge password. You will need to verbally provide this
password to the CA Administrator in order to revoke your certificate.
For security reasons your password will not be saved in the configuration.
Please make a note of it.
Password:
Re-enter password:
% The subject name in the certificate will include: sslvpn1.cisco.com
% The serial number in the certificate will be: 30461873
% Include an IP address in the subject name? [no]:
Request certificate from CA? [yes/no]: yes
% Certificate request sent to Certificate Authority
% The 'show crypto ca certificate win2k3 verbose' command will show the fingerprint.