Table of Contents
Introduction
In today's diverse workplaces, partners, consultants, contractors and even guests require access to network resources over the same LAN connections as regular employees. While IEEE 802.1X secures the internal network by requiring employees to present valid credentials before accessing the network, some provision must be made for users without IEEE 802.1X supplicants or without valid IEEE 802.1X credentials. Web authentication (WebAuth) provides supplemental authentication while maintaining the primary benefits of an IEEE 802.1X-protected network.1
• Fully customizable login pages and acceptable use policies
• Parity for wired and wireless
• Support for sponsored guest access
• Support for employee access
• Compatibility with IEEE 802.1X
• Centralized webpage management
• Centralized policy definition and accounting
Prerequisites
Solution Scope
• Cisco Catalyst® 2960 with Cisco IOS® Software Release 12.2(52)SE
• Cisco Catalyst 3560 with Cisco IOS Software Release 12.2(52)SE
• Cisco Catalyst 3750 with Cisco IOS Software Release 12.2(52)SE
• Cisco Catalyst 4500 with Cisco IOS Software Release 12.2(50)SG
• Cisco Catalyst 6500 with Cisco IOS Software Release 12.2(33)SXI
• Cisco Wireless LAN Controllers Version 4.1
• Cisco Network Admission Control (NAC) Guest Server (NGS) Version 2.0.2
• Cisco Secure Access Control Server (ACS) Version 5.12
About Integrated Local Web Authentication
Benefits
Figure 1. Cisco integrated local WebAuth Solution
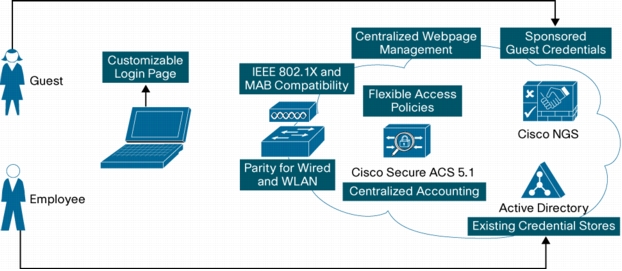
• Centralized webpage management: Integrated local WebAuth enables network administrators to use webpages that are centrally managed and hosted on the Cisco NGS. Centralized management greatly reduces the operating expenses associated with maintaining a WebAuth solution, since webpage updates and changes can be made in a single place.
• Fully customizable login pages and acceptable use policies: Because webpages are centrally defined and hosted on the Cisco NGS, they can be fully customized, enabling administrators to give these pages the look and feel of their organizations.
• Parity for wired and wireless: Cisco Catalyst switches and Cisco Wireless LAN Controllers both support the functions needed for integrated local WebAuth. Wired and wireless users will be subject to the same authentication process and will experience the same interface.
• Support for sponsored guest access: With integrated local WebAuth, guests can authenticate using temporary, sponsored credentials in the form of a username and password. The Cisco NGS allows authorized sponsors to create these credentials for guest users. When guests enter these credentials at the web login page, the credentials are forwarded to Cisco NGS for validation.
• Support for employee access: With integrated local WebAuth, employees can authenticate using usernames and passwords that are already defined in existing identity stores such as Microsoft Active Directory. When employees enter their existing credentials on the web login page, the credentials are forwarded to Active Directory for validation.
• Compatibility with IEEE 802.1X: Integrated local WebAuth integrates with other forms of authentication such as IEEE 802.1X and MAC authentication bypass (MAB). Wired switches support flexible authentication (FlexAuth), a feature set that enables administrators to configure WebAuth to be triggered after an IEEE 802.1X timeout, an IEEE 802.1X failure, or a MAB failure. Cisco Wireless LAN Controllers can be configured to provide separate wireless LANs (WLANs) for IEEE 802.1X authentication and WebAuth.
• Centralized policy definition: Integrated local WebAuth uses Cisco Secure ACS 5.1 as a policy engine for all types of authentication: IEEE 802.1X, MAB, WebAuth, wired and wireless, and employee and guest. Centralized policy management reduces operating expenses by allowing network administrators to configure network access for all users in a single place.
• Centralized accounting: With integrated local WebAuth, all authentication activity flows through Cisco Secure ACS. As the central repository for RADIUS accounting and authentication records, Cisco Secure ACS 5.1 provides a comprehensive view of the network. All users and devices connecting to the network-weather wired or wireless, using guest or employee credentials, or authenticating through IEEE 802.1X, MAB, or WebAuth-will be accounted for in Cisco Secure ACS.
Functional Overview
Figure 2. High-Level WebAuth Sequence
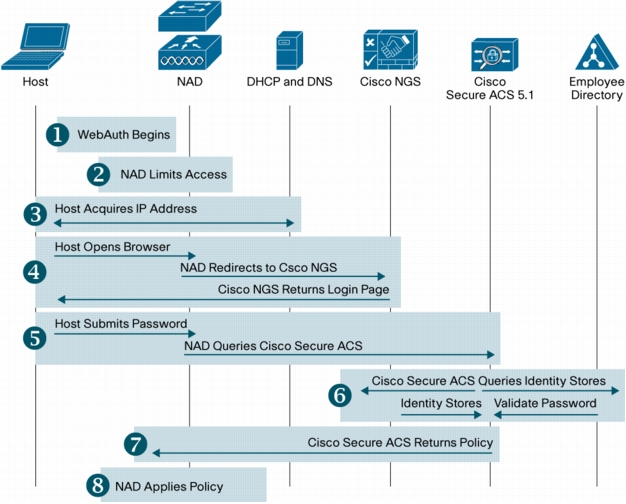
1. WebAuth begins: In wireless networks, users manually select a service set ID (SSID) that provides a WebAuth service. In wired networks, WebAuth begins after IEEE 802.1X has timed out or failed or MAB has failed.
2. Network access device (NAD) limits access: The NAD can be either a Cisco Catalyst switch or a Cisco Wireless LAN Controller. When WebAuth begins, the NAD permits the traffic types (such as Dynamic Host Configuration Protocol [DHCP] and Domain Name System [DNS]) required for WebAuth.
3. Host acquires IP address: The host requests and receives an IP address.
4. Host acquires login page: The host opens a browser. The NAD intercepts the host's HTTP traffic and redirects the user's browser to the Cisco NGS. The Cisco NGS returns the login page.
5. User submits credentials: When the user enters his or her username and password, the browser sends the credentials to the NAD. The NAD sends these credentials to Cisco Secure ACS.
6. Credentials are validated: Cisco Secure ACS sends the credentials to the Cisco NGS or the employee directory for validation. The identity store that contains the credentials validates the credentials.
7. Cisco Secure ACS returns policy: If the credentials are valid, Cisco Secure ACS sends the NAD an Accept message with specific policy instructions (if required).
8. NAD applies policy: The NAD applies the policy sent by Cisco Secure ACS, and the browser is redirected to the original destination.
Functional Differences Between Wired and Wireless Web Authentication
Start of Web Authentication
Access Limitation Prior to Authentication
Traffic Redirection to Cisco NGS
Note: Why Redirect to Port 8443 on Cisco NGS?
Service Type Attribute in RADIUS Request
• The WLC will send a RADIUS request to Cisco Secure ACS with Service-Type =1 [Login].
• A Cisco Catalyst switch will send a RADIUS request to Cisco Secure ACS with Service-Type = 5 [Outbound].
Authorization Policy Applied After Authentication
Summary of Main Differences Between Wired and Wireless Web Authentication
Table 1. Main Differences Between Wired and Wireless WebAuth
HTTPS Certificate Considerations
Configuring Web Authentication
Configure Cisco Secure ACS
Configure AAA Clients (Switch and Wireless LAN Controller)
1. Open the Cisco Secure ACS Management interface.
2. In the left navigation column, expand Network Resources and select Network Devices and AAA Clients.
3. Click Create. The following window will appear:
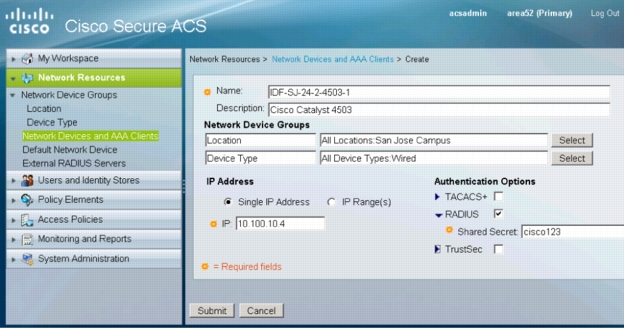
4. Specify the name, IP address, and RADIUS shared secret for this switch. Optionally, add Description, Location, and Device Type information.
Note: The RADIUS shared secret must match the key configured on the switch. The IP address must match the IP address of the RADIUS source interface that the switch uses to source RADIUS packets for Cisco Secure ACS. See the Verify Basic Web Authentication Configuration section for more information about how to configure the key and the RADIUS source interface on the switch.
5. Click Submit.
6. Repeat this process to add the WLC as an authentication, authorization, and accounting (AAA) client in Cisco Secure ACS, using the WLC's name, IP address, and RADIUS shared secret.
Note: The RADIUS shared secret configured in Cisco Secure ACS must match the shared secret configured on the WLC. The IP address must match the IP address of the management interface that the WLC uses to source RADIUS packets to Cisco Secure ACS. See the Configure the WLC to Authenticate Against Cisco Secure ACS section for more information about how to configure the shared secret on the WLC.
Configure Cisco Secure ACS to Validate Employee Credentials with Active Directory
1. Open the Cisco Secure ACS Management interface.
2. In the left navigation column, expand Users and Identity Stores. Under Users and Identity Stores, expand External Identity Stores and select Active Directory. The following window will appear:
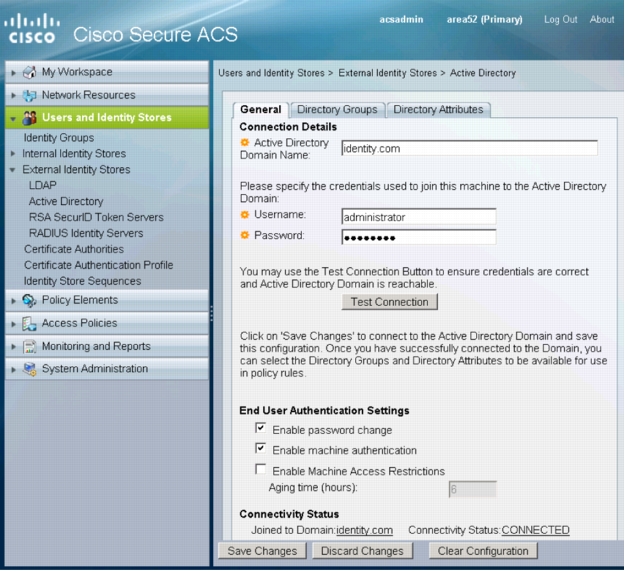
3. Specify the Active Directory domain name
4. Specify the username and password of an Active Directory user who has permission to create computer objects in the domain.
5. Click Save Changes.
6. Verify that the connectivity status is CONNECTED.
Configure Cisco Secure ACS to Validate Sponsored Guest Credentials with Cisco NGS
1. Open the Cisco Secure ACS Management interface.
2. In the left navigation column, expand Users and Identity Stores. Under Users and Identity Stores,
expand External Identity Stores and select RADIUS Identity Servers.
3. Click Create. The following window will appear:
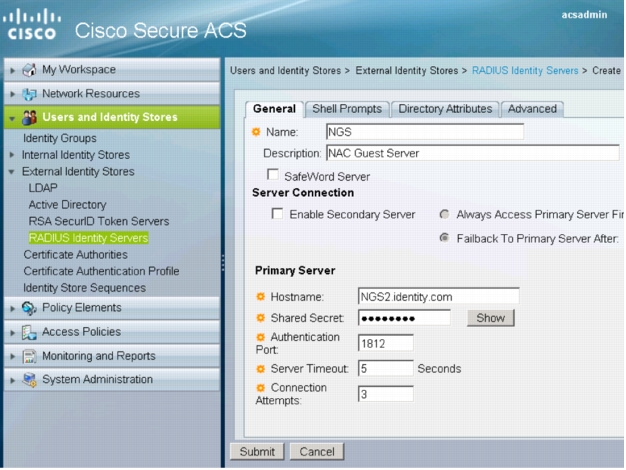
4. Enter the Cisco NGS name, hostname, and shared secret. Optionally, add a description.
Note: The RADIUS shared secret configured in Cisco Secure ACS must match the shared secret configured on the Cisco NGS. The IP address must match the IP address that the Cisco NGS uses to source RADIUS packets for Cisco Secure ACS. See the Validating Guest Credentials from Cisco Secure ACS section for more information about how to configure the shared secret on the Cisco NGS.
5. Click Submit.
Create an Identity Store Sequence with Active Directory and Cisco NGS
1. Open the Cisco Secure ACS Management interface.
2. In the left navigation column, expand Users and Identity Stores. Under Users and Identity Stores, expand External Identity Stores and select Identity Store Sequences.
3. Click Create. The following window will appear:
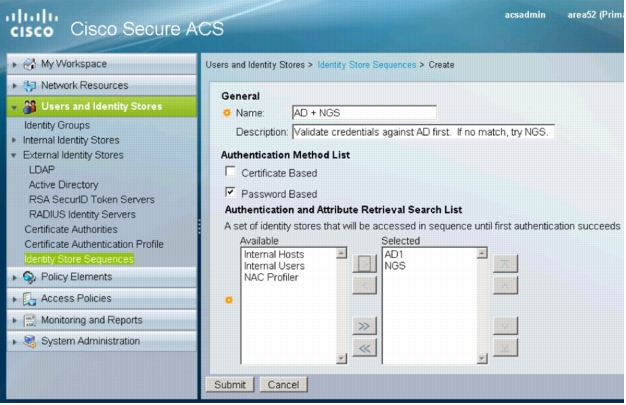
4. Enter a name for the sequence and, optionally, a description.
5. Under Authentication Method List, select Password Based.
6. Under Authentication and Attribute Retrieval Search List, select AD1 and NGS from the list in the Available column. Click > to move AD1 and NGS to the Selected column on the right.
Note: The order of the identity stores is important. Cisco Secure ACS processes this list sequentially. By default, Cisco Secure ACS treats a RADIUS Reject message from RADIUS identity servers as an authentication failure (for example, as if the user submitted a bad password). Cisco Secure ACS will not try the next identity store in a sequence if authentication fails, which may defeat the purpose of the identity store sequence. There are two ways to handle this situation. First, when creating a store sequence that contains a RADIUS identity server, make sure that the RADIUS identity server (Cisco NGS) comes last. This option is used in this configuration guide. The second alternative is to use the Advanced tab in the RADIUS identity server configuration to change the default handling of RADIUS Reject messages.
7. Click Submit.
Create a Downloadable ACL in Cisco Secure ACS
1. Open the Cisco Secure ACS Management interface.
2. In the left navigation column, under Policy Elements, expand Authorization and Permissions. Then expand Named Permission Objects and select Downloadable ACLs.
3. Click Create. The following window will appear:
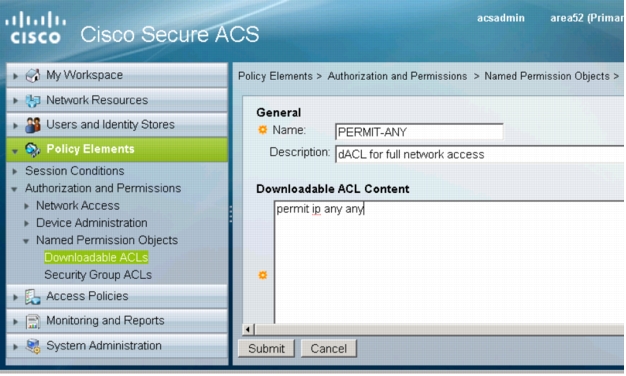
4. Enter a name for this dACL and specify the ACL elements. A very simple example (granting full network access) is shown. The syntax for the ACL must conform to the requirements for extended Layer 3 ACLs in Cisco IOS Software with the additional requirement that the source of the ACL must be "any."
Note: The switch will replace the source "any" in each ACL element with the IP address of the end host when it applies the dACL to the port.
5. Click Submit.
Create a Wired Authorization Profile in Cisco Secure ACS
and a manually entered RADIUS attribute that enables the switch to apply the dACL.
1. Open the Cisco Secure ACS Management interface.
2. In the left navigation column, under Policy Elements, expand Authorization and Permissions. Then expand Network Access and select Authorization Profiles.
3. Click Create. The following window will appear:
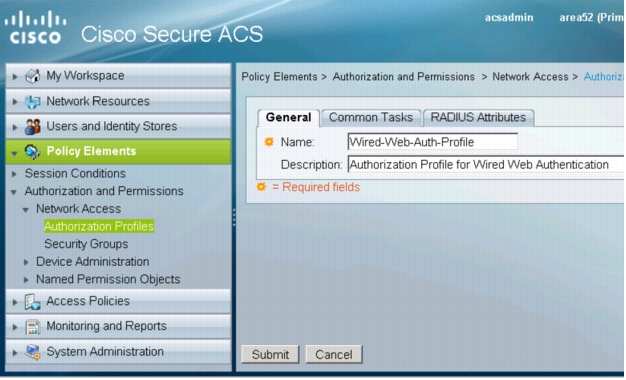
4. On the General tab, specify a name for this profile.
5. Click the Common Tasks tab. Under ACLs, navigate to Downloadable ACL Name and choose Static
and then the name of the dACL configured in the previous step (PERMIT-ANY in this example).
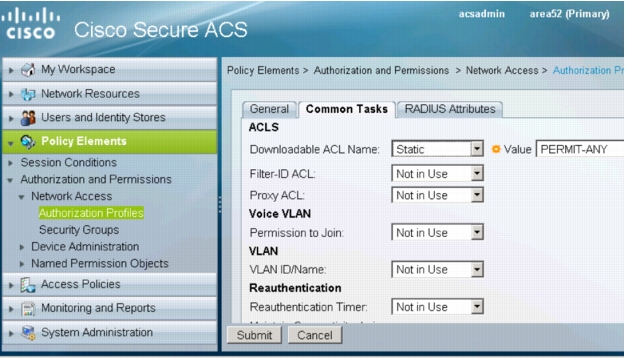
6. Click the RADIUS Attributes tab. For Dictionary Type, choose RADIUS-Cisco. For RADIUS Attribute, select cisco-av-pair. For Attribute Value, choose Static and type priv-lvl=15 in the text box. Click Add.
Note: The cisco-av-pair "priv-lvl=15" is a special attribute that is required to enable the switch to applied the dACL. Without this attribute, the switch will fail the authorization and the WebAuth user will not get access to the network.
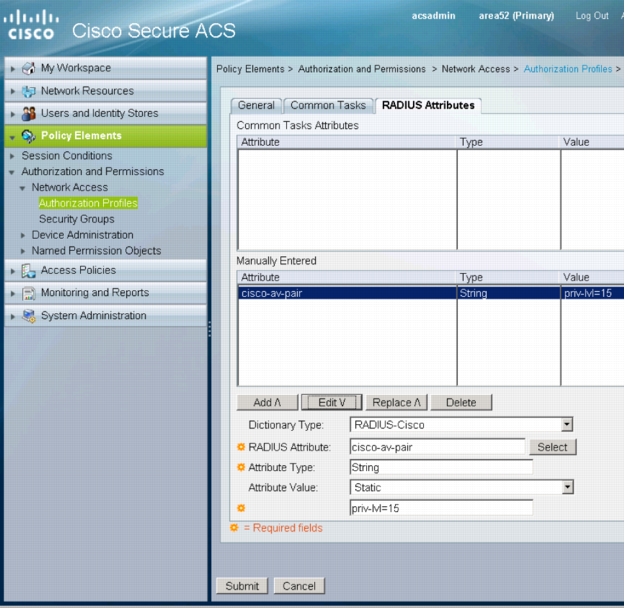
7. Click Submit.
Create a Web Authentication Access Service
Configure the Protocol Filter
1. Open the Cisco Secure ACS Management interface.
2. In the left navigation column, under Access Policies, click Access Services. The list of existing access services will appear.
3. At the bottom of the right pane, click Create. The following window will appear:
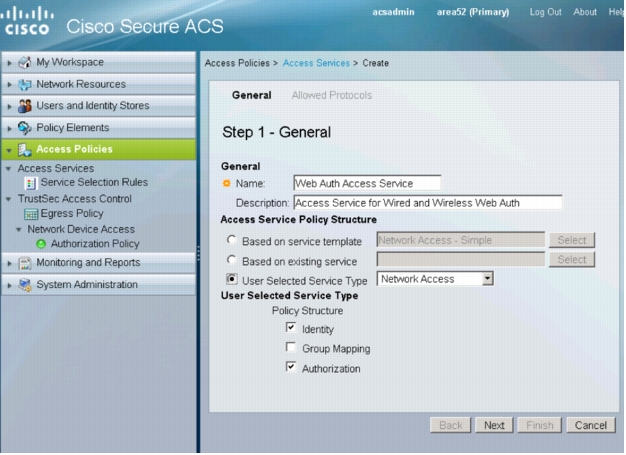
4. In Step 1 - General, specify a name for this service. Under Access Service Policy Structure, select User Selected Service Type. For User Selected Service Type, choose Network Access. Under User Selected Service Type, select Identity and Authorization. Click Next. The following window appears:
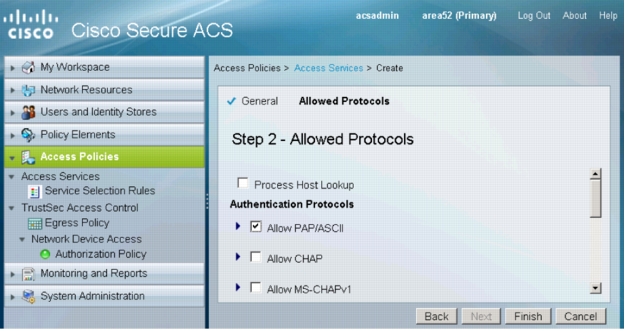
5. In Step 2 - Allowed Protocols, deselect Process Host Lookup. Select Allow PAP/ASCII. Click Finish. You will be prompted to modify the service selection policy. Click No.
Define the Identity Policy
1. In the left navigation column, expand Access Policies to list the access service that was just created. Expand Web Auth Access Service and click Identity. The following window will appear:
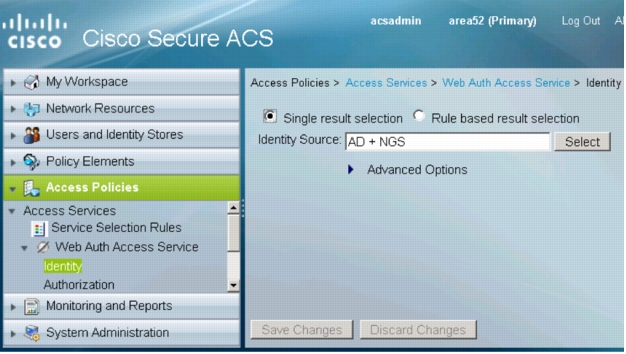
2. In the WebAuth Identity policy window, select Single result selection. For Identity Source, select the identity store sequence you created in the Create an Identity Store Sequence with Active Directory and Cisco NGS section (AD + NGS). Click Save Changes.
Define the Authorization Policy
1. In the left navigation column, expand Access Policies to list the access service that was just created. Expand Web Auth Access Service and click Authorization. Click Create. The following window will appear.
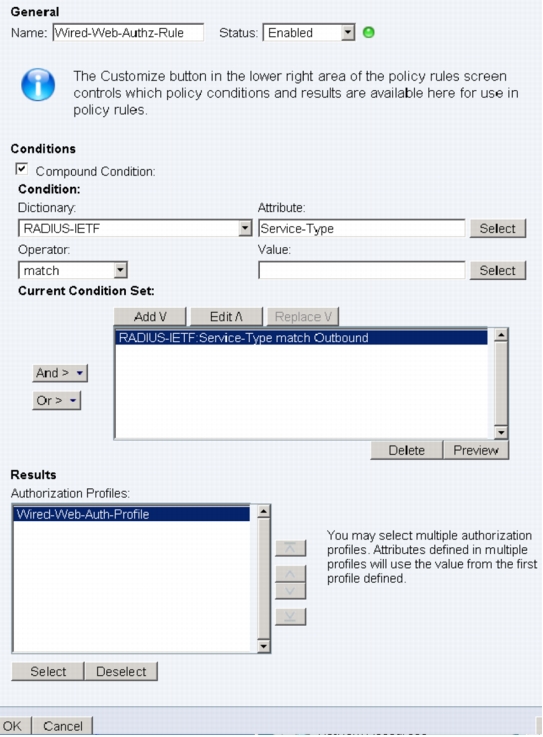
2. Specify the name of the rule for wired WebAuth.
3. Select Compound Condition. Under Condition, choose RADIUS-IETF for Dictionary and Service-Type for Attribute. For Value, select Outbound and click Add to add the condition to the Current Condition Set table.
4. Scroll down to the Results section and click Select. An Authorization Profiles dialog box appears:
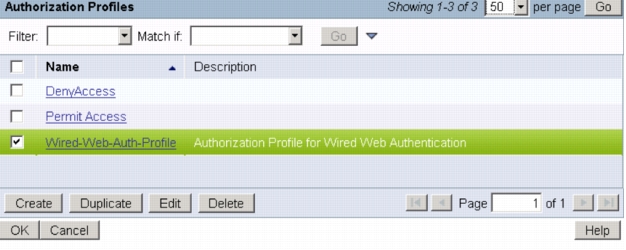
5. Select the wired WebAuth profile that was created in the Create a Wired Authorization Profile in Cisco Secure ACS section. Click OK.
6. The dialog box will disappear, returning you to the rule definition window. Click OK.
7. The main Authorization Policy window will reappear:
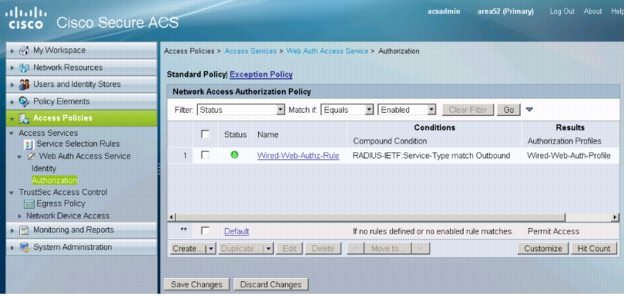
8. Click Save Changes.
Note: You do not need to create a special authorization rule for wireless WebAuth. Wireless WebAuth users will match the default rule in the authorization policy, which will permit full access.
Create a Web Authentication Service Selection Rule
1. Open the Cisco Secure ACS Management interface.
2. In the left navigation column, under Access Policies, click Service Selection. The list of existing service selection rules will appear.
3. At the bottom of the right pane, click Create. The Service Selection Rule dialog box will appear and should be filled out as described in the following steps:
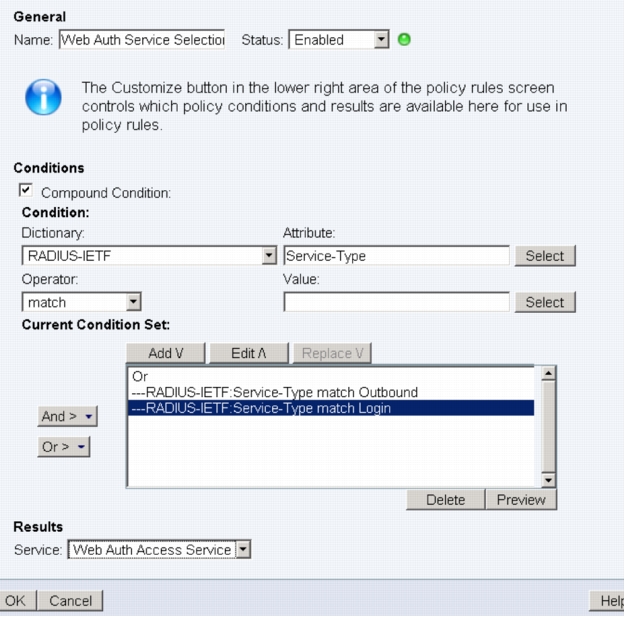
4. Specify a name for the rule (Web Auth Service Select is used here).
5. Under Conditions, select Compound Condition.
6. Under Dictionary, choose RADIUS-IETF.
7. Under Attribute, select Service-Type.
8. Under Operator, choose match.
9. Under Value, select Outbound.
10. Under Current Condition Set, click Add.
Note: The condition just added (Service-Type = Outbound) will match all inbound requests for wired WebAuth.
11. Under Current Condition Set, click Or > Insert.
12. Under Conditions, select Compound Condition.
13. Under Dictionary, choose RADIUS-IETF.
14. Under Attribute, select Service-Type.
15. Under Operator, choose match.
16. Under Value, select Login.
17. Under Current Condition Set, click Add.
Note: The condition just added (Service-Type = Login) will match all inbound requests for Wireless WebAuth.
18. Under Results, select the access service that was created in the Create a Web Authentication Access Service section.
19. Click OK. The Service Selection Rules summary will appear with the new rule:
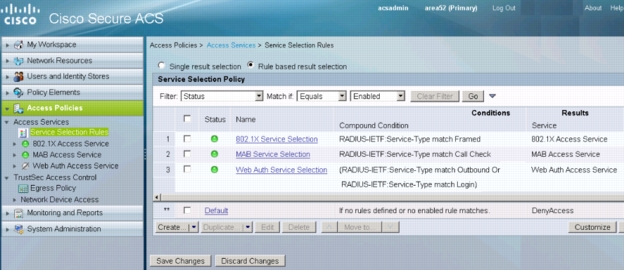
20. Click Save Changes.
Configure the NAC Guest Server
Validating Guest Credentials from Cisco Secure ACS
1. Open the Cisco NGS Administrative interface.
2. In the left navigation column, expand Devices and click RADIUS Clients. The list of existing RADIUS clients will appear. Click Add RADIUS Client. The following window appears:
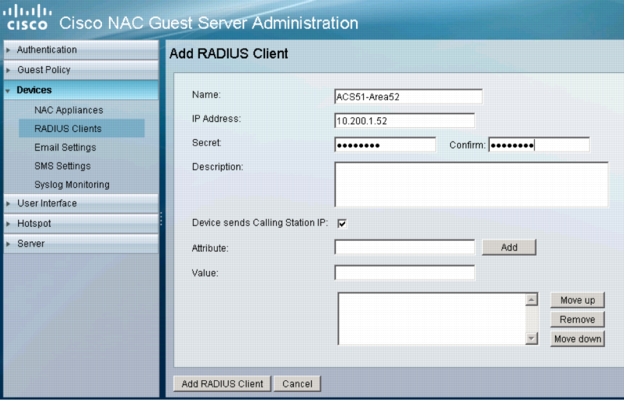
3. Enter the name, IP address, and shared secret belonging to Cisco Secure ACS. The shared secret must match what was previously configured in Configure Cisco Secure ACS to Validate Sponsored Guest Credentials with Cisco NGS section. Click Add RADIUS Client. The RADIUS Clients summary window reappears.
4. In the main RADIUS Clients summary window, click Add RADIUS Client. The following window appears:
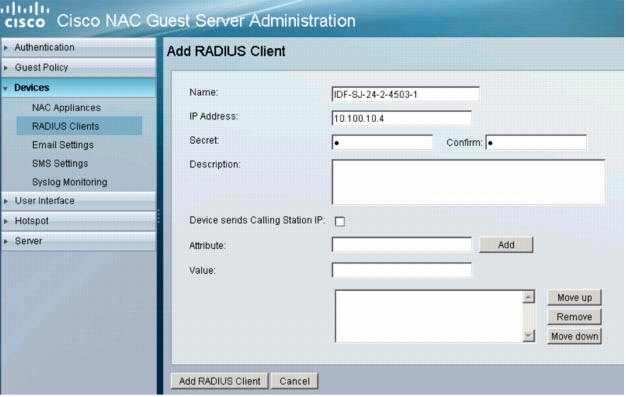
5. Enter the name and IP address associated with the wired switch. The Secret fields cannot be empty, but the value does not need to match what is configured on the switch or Cisco Secure ACS. Uncheck the Device sends Calling Station IP box. Click Add RADIUS Client. The RADIUS Clients summary window reappears.
6. In the main RADIUS Clients summary window, click Add RADIUS Client. The following window appears:
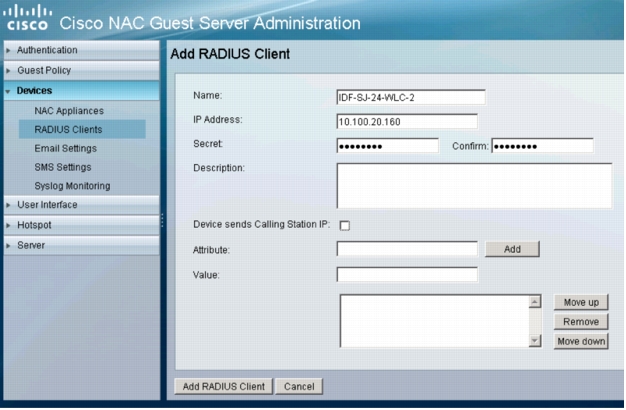
7. Enter the name and IP address associated with WLC. The Secret fields cannot be empty, but the value does not need to match what is configured on the WLC or in Cisco Secure ACS. Uncheck the Device sends Calling Station IP box. Click Add RADIUS Client. The RADIUS Clients summary window reappears:
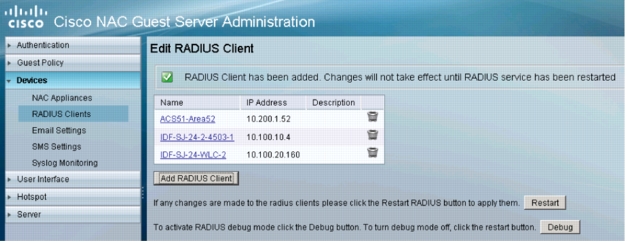
8. Click Restart.
Creating Wired Login Pages
1. Open the Cisco NGS Administrative interface.
2. In the left navigation column, expand Hotspot and select Sites. Click Add Site. The following window will appear:
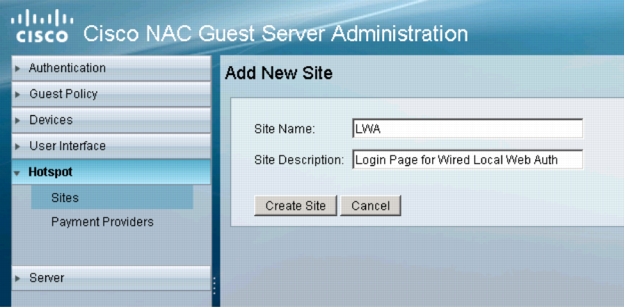
3. Enter a name and description for this site. Click Create Site.
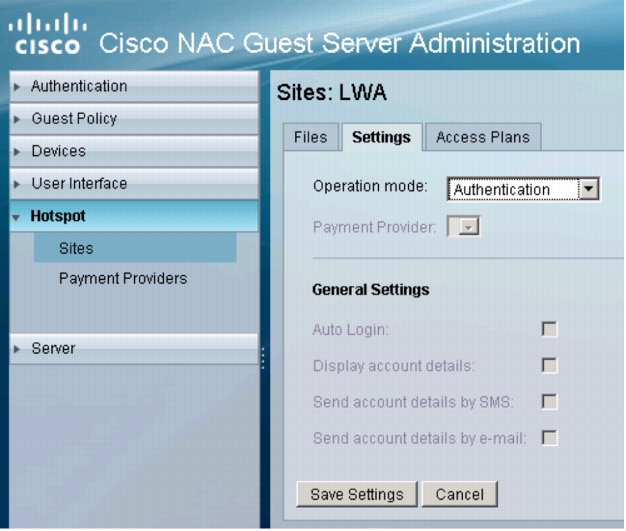
4. The Settings tab for the newly created site will appear. Verify that Operation mode is set to Authentication as shown here:
5. Click the Files tab for the site. The following window will appear:

6. Connect to the Cisco NGS using the console port or SSH.
7. Move to the directory specified on the Files tab in step 5.
8. Copy the following sample files to the wired hotspot directory: /guest/sites/samples/switch_login.html and /guests/sites/samples/wlc_aup.html. The sample files are shown here:

9. The switch_login.html file will be the wired login page. It includes the widget code required for switch-based WebAuth. Customize this file as required for your site.
10. The wlc_aup.html file will be the acceptable-use page presented to users authenticating with sponsored-guest credentials. Customize this file as required for your site.
11. Use secure FTP (SFTP) or Secure Copy Protocol (SCP) to transfer any image files or other secondary files referenced in the switch_login.html and wlc_autp.html files to this directory.
Creating Wireless Login Pages
1. Open the Cisco NGS Administrative interface.
2. In the left navigation column, expand Hotspot and select Sites. Click Add Site. The following window will appear:
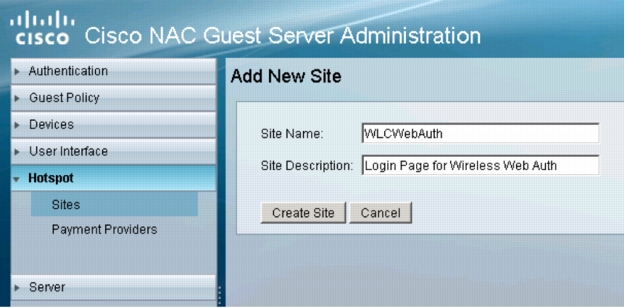
3. Enter a name and description for this site. Click Create Site.
4. The Settings tab for the newly created site will appear. Verify that Operation mode is set to Authentication as shown here:
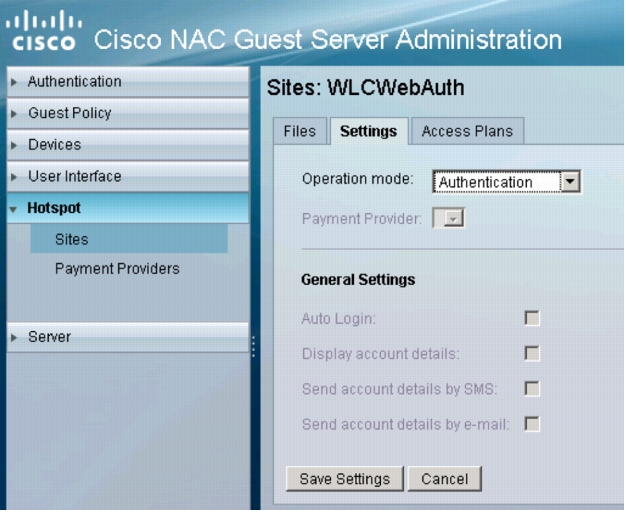
5. Click the Files tab for the site. The following window will appear:

6. Connect to the Cisco NGS using the console port or SSH.
7. Change to the directory specified in the Files tab in step 5.
8. Copy the following sample files to the wireless hotspot directory: /guest/sites/samples/wlc_login.html and /guests/sites/samples/wlc_aup.html. The sample files are shown here:

9. The wlc_login.html file will be the wireless login page. It includes the widget code required for WLC-based WebAuth. Customize this file as required for your site. Other than the widget, the content of this page can be the same as that for the wired WebAuth page.
10. The wlc_aup.html file will be the acceptable-use page presented to users authenticating with sponsored-guest credentials. Customize this file as required for your site. The content of this page can be the same as that for the wired WebAuth aup file.
11. Use SFTP or SCP to transfer any image files or other secondary files referenced in the wlc_login.html and wlc_autp.html files to this directory.
Configure the Switch
Verify Basic Web Authentication Configuration
Create Customized Webpages for URL Redirect
Note: Sample versions of the special login pages required on the switch can be found on the Cisco NGS. These files must be modified and downloaded to the switch as described here.
1. Use SFTP or SCP to go to the Cisco NGS and retrieve the following sample files:
• /guest/sites/samples/switch_includes/login.html
• /guest/sites/samples/switch_includes/expired.html
• /guest/sites/samples/switch_includes/failed.html
• /guest/sites/samples/switch_includes/success.html
2. Edit the sample login.html file, modifying all the URLs to match the IP address of your Cisco NGS and the hotspot site name for wired WebAuth. In this example, the Cisco NGS has an IP address of 10.100.10.227, and the hotspot site name for wired WebAuth is LWA. The login.html file should look like this (modified lines are highlighted in red):
3. If desired, customize the other three pages.
4. Copy the four customized HTML files on the switch's internal disk or flash memory.
5. Configure the switch to use the customized HTML files. In the following example, the customized files are stored on disk1:
Modify Port ACL to Allow Redirected Traffic
1. Modify the port ACL in the WebAuth fallback profile to allow traffic to port 8443. In the sample configuration in the Verify Basic Web Authentication Configuration section, this ACL was called PRE_WEBAUTH_POLICY:
Configure the WLC
Configure the WLC to Redirect to Cisco NGS
1. Open the WLC management interface. Select the top-level WLAN tab and select the profile name of the WLAN that has been created for WebAuth. Click the Security tab and then click the Layer 3 tab. The following window will appear:
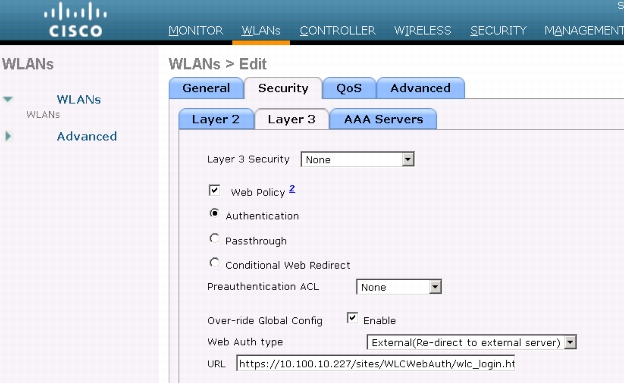
2. For Web Auth type, choose External(Re-direct to external server).
3. For URL, specify the wireless login page created on the Cisco NGS. In this example, the Cisco NGS's IP address is 10.100.10.227, the hotspot name is WLCWebAuth, and the login page is wlc_login.html, so the URL is https://10.100.10.227/sites/WLCWebAuth/wlc_login.html.
4. Click Apply.
Configure the WLC to Authenticate Against Cisco Secure ACS
1. Open the WLC management interface and click the top-level Security tab. In the left navigation pane, expand RADIUS and click Authentication. Click New. The following window will appear:
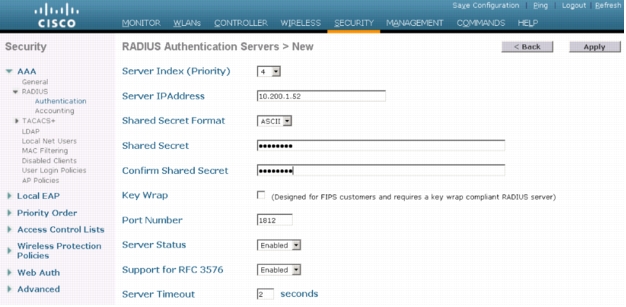
2. Enter the IP address and shared secret of the Cisco Secure ACS. Click Apply.
3. Click the top-level WLAN tab and select the profile name of WLAN that has been created for WebAuth.
Click the Security tab and then click the AAA Servers tab. The following window will appear:
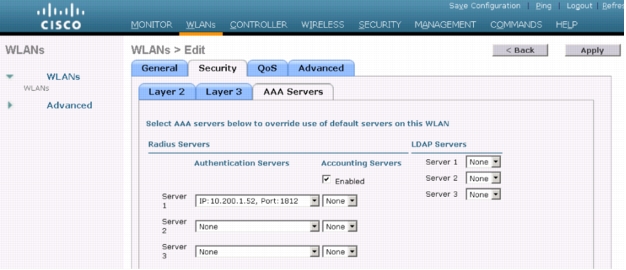
4. For Server 1, choose the Cisco Secure ACS. Click Apply.
Conclusion
Appendix A: References
Cisco Product Documentation
• Basic WebAuth Deployment and Configuration Guide: http://www.cisco.com/en/US/products/ps6638/prod_white_papers_list.html
• Configuring WebAuth on Cisco Catalyst 3750 Series Switches: http://www.cisco.com/en/US/partner/docs/switches/lan/catalyst3750/software/release/12.2_50_se/configuration/guide/sw8021x.html
• Configuring WebAuth on Cisco Catalyst 4500 Series Switches: http://www.cisco.com/en/US/partner/docs/switches/lan/catalyst4500/12.2/53SG/configuration/webauth.html
• Configuring WebAuth on Cisco Catalyst 6500 Series Switches: http://www.cisco.com/en/US/partner/docs/switches/lan/catalyst6500/ios/12.2SX/configuration/guide/webauth.html
• WebAuth with Cisco Wireless LAN Controllers: http://www.cisco.com/en/US/partner/tech/tk722/tk809/technologies_configuration_example09186a008076f974.shtml#external-process
• Cisco NGS configuration guide: (http://www.cisco.com/en/US/products/ps10160/products_installation_and_configuration_guides_list.html)
• Scenario-based IEEE 802.1X design guide: http://www.cisco.com/en/US/prod/collateral/iosswrel/ps6537/ps6586/ps6638/whitepaper_C11-530469.html
• Scenario-based IEEE 802.1X configuration guide: http://www.cisco.com/en/US/prod/collateral/iosswrel/ps6537/ps6586/ps6638/Whitepaper_c11-532065.html
• Cisco IOS Firewall authentication proxy: http://www.cisco.com/en/US/products/sw/secursw/ps1018/products_tech_note09186a0080094eb0.shtml