Contents
Enabling and Creating Virtual Blades
Preparing to Use Virtual Blades
New Deployment from Physical Media (CD/DVD)
New Installation from a Virtual Disk Image (ISO)
Deploying a Prebuilt Image Using FTP
Deployment Using Network Booting (PXE)
Starting and Stopping Virtual Blades
Accessing the Virtual Blade Console
Securing the Virtual Blade Console
Installing Paravirtualized Networking
Microsoft Windows-Based Virtual Blades
Transferring Virtual Blade Files
Copying a Virtual Disk (ISO) Image to a Cisco WAAS Device
Copying a Virtual Blade Disk to an FTP Server
Restoring a Virtual Blade Disk to a Cisco WAAS Device
What You Will Learn
Enabling and Creating Virtual Blades
Preparing to Use Virtual Blades
Step 1. From the Cisco WAAS Central Manager GUI navigation pane, choose My WAN > Manage Devices.
Step 2. Click the Edit icon next to the Cisco WAE device that you want to configure.
Note: (1) You can enable virtual blades only on Cisco Wide Area Application Engine (WAE) application accelerators, not on Cisco WAAS Central Manager devices. (2) You can configure virtual blades only on individual Cisco WAAS devices. You cannot configure virtual blades on device groups.
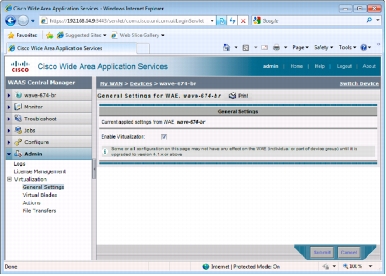
Step 3. From the navigation pane, choose Admin > Virtualization > General Settings. The General Settings pane appears (Figure 1).
Step 4. Check Enable Virtualization to enable virtualization.
Figure 1. General Settings Pane
Step 5. Click Submit.
Note: (1) You are prompted to confirm that you want to modify general settings. Doing so will reboot the Cisco WAE. After the reboot, the Cisco WAE will have a disk partition and other resources reserved for virtual blade use. (2) You will not be able to undo this change unless you restore the Cisco WAE from the rescue CD. (3) When you configure a virtual blade on your Cisco WAE device, system resources are reserved for the virtual blade. These resources are not available to your Cisco WAAS system, even if the virtual blade is not active. This can affect the performance of your Cisco WAAS system.
Step 6. Click OK. The Cisco WAE restarts.
Step 7. Locate the disk or image of the operating system that you want to run on the virtual blade. Make sure either that you have the CD-ROM available or that you have copied the disk image to the Cisco WAE hard drive.
To enable virtualization with the Cisco WAAS command-line interface (CLI), use the virtual-blade global configuration command.
Configuring Virtual Blades
Step 1. From the Cisco WAAS Central Manager GUI navigation pane, choose My WAN > Manage Devices.
Step 2. Click the Edit icon next to the Cisco WAE device that you want to configure.
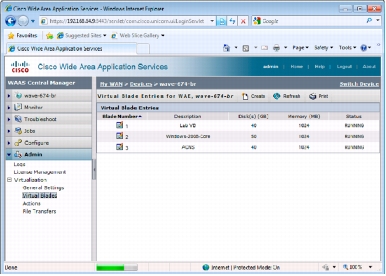
Step 3. From the navigation pane, choose Admin > Virtualization > Virtual Blades. The Virtual Blade Entries pane appears (Figure 2). Any existing virtual blade entries are displayed in the Virtual Blade Entries list.
Figure 2. Virtual Blade Entries List Window
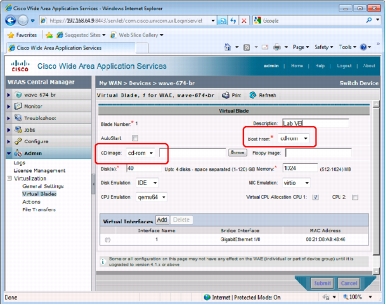
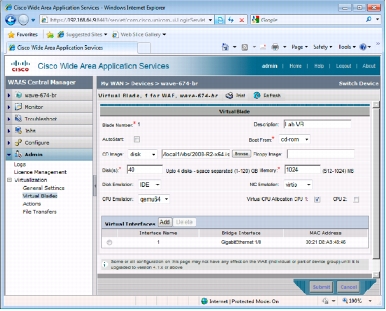
Step 4. Click the Edit icon next to the virtual blade that you want to configure, or click the Create button to create a new virtual blade. The Virtual Blade configuration pane appears (Figure 3)
Figure 3. Virtual Blade Configuration Pane

Step 5. Configure the virtual blade system parameters as needed to run your operating system and applications:
• If you want to use the physical CD/DVD drive in the Cisco WAAS device, choose cd-rom.
• For a virtual CD/DVD disk image (ISO), choose disk. You will then need to specify the path to the disk image file on the Cisco WAAS file system (for example, /local1/vbs/windows_2003.iso). For more information about how to place virtual CD/DVD files on the Cisco WAAS device, see Copying a Virtual Disk (ISO) Image to a Cisco WAAS Device.
• If you are not using a CD-ROM device, you can leave this choice blank.
Note: Although virtio disk drivers are listed as an option, these are not recommended for current Cisco WAAS 4.2 releases.
• rtl8139 specifies a Realtek network card emulator (10/100).
• e1000 specifies an Intel PRO/1000 network card emulator.
• virtio (virtual IO) configures the virtual blade to use paravirtualization for network card emulation. If you select the virtio network device, you must have the paravirtualization drivers installed on your system. For more information, see Installing Paravirtualized (PV) Networking.
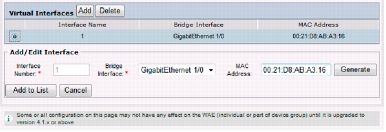
Step 6. Configure the interface bridge you want to use between the virtual blade and the physical interfaces on your Cisco WAE by doing the following:
Figure 4. Virtual Interfaces Add Pane
Note: You access the virtual blade console through the Remote FrameBuffer (RFB) protocol, commonly used by virtual network computing (VNC). For more information, see Accessing the Virtual Blade Console.
Step 7. Choose the virtual interface by selecting its radio button on the display.
Step 8. Click Submit.
Deploying Virtual Blades
New Deployment from Physical Media (CD/DVD)
Step 1. Create a new virtual blade following the steps in the Configuring Virtual Blades section, with the following choices set:
Figure 5. Virtual Blade Configuration Using Physical Device
Step 2. Start the virtual blade and attach it through the console to complete the operating system installation. For more information about starting and connecting to the virtual blade console, see Starting and Stopping Virtual Blades and Accessing the Virtual Blade Console.
New Installation from a Virtual Disk Image (ISO)
Step 1. Deploy the virtual media to the Cisco WAAS device. For specific instructions, see Copying a Virtual Disk (ISO) Image to a Cisco WAAS Device.
Step 2. Create a new virtual blade following the steps in the Configuring Virtual Blades section, with the following choices set:
Figure 6. Virtual Blade Configuration Using Virtual Disk Image
Step 3. Start the virtual blade and attach it using the console to complete the operating system installation. For more information about starting and connecting to the virtual blade console, see Starting and Stopping Virtual Blades and Accessing the Virtual Blade Console.
Deploying a Prebuilt Image Using FTP
Note: You will need a virtual blade-capable Cisco WAAS device to create a virtual blade deployment image. You will also need an FTP server to stage the virtual blade deployment image. Locating both of these in a central location in the core of the network is recommended.
Step 1. Create a virtual blade on a Cisco WAAS device to serve as the virtual blade deployment image. When creating the virtual blade, verify that the configured disk space will be available on all your Cisco WAAS installation targets. For more information about creating a virtual bade, see Configuring Virtual Blades.
Step 2. Start the virtual blade and install the virtual blade operating system.
Step 3. Install the applications, drivers, and services needed for your virtual blade deployment.
Note: Some applications and services do not support installation prior to cloning of a system and must be installed manually after cloning. Check with your application or service vendor for information about cloning your selected applications and services.
Step 4. Prepare the virtual blade for deployment. This operation typically involves removing license keys and security identifiers from the virtual blade image and putting the image in a deployment-ready state. For Microsoft Windows Servers, this process is accomplished through the Sysprep utility. Consult your application and operating system documentation for additional details.
Step 5. Shut down the virtual blade.
Step 6. Back up the virtual blade disk to an FTP server for deployment. For more information about this process, see Copying a Virtual Blade Disk to an FTP Server.
After the virtual blade deployment disk image has been fully transferred to the FTP server, you are ready to begin deployment of the virtual blade to remote locations.
Step 7. On each remote device that will be receiving the virtual blade disk image, create a new virtual blade. Save, but do not start, this virtual blade.
Step 8. Transfer the virtual blade deployment disk image to each remote virtual blade. This is done using the virtual blade restoration function. For more information, see Restoring a Virtual Blade Disk to a Cisco WAAS Device.
Step 9. Verify that the virtual blade deployment disk image has been transferred and then start the virtual blade.
Step 10. Connect to the virtual blade console to perform any remaining installation tasks and application installation processes.
Deployment Using Network Booting (PXE)
Note: The following steps assume that your preboot execution environment is configured and functioning correctly. For support and assistance with your PXE deployment system, please consult the manufacturers documentation.
Step 1. Create a new virtual blade following the steps in the Configuring Virtual Blades section, with the following choices set (Figure 7):
Figure 7. Virtual Blade Configuration for Network Booting

Step 2. Start the virtual blade and attach it using the console to complete the operating system installation. For more information about starting and connecting to the virtual blade console, see Starting and Stopping Virtual Blades and Accessing the Virtual Blade Console.
Note: (1) Verify that the Boot From field is changed from network to disk before any automatic system restart by the operating system installer. This change will prevent the virtual blade from attempting to reinstall the operating system after rebooting. (2) Depending on your PXE deployment, you may be required to press F12 on the virtual blade console to initiate the virtual blade installation.
Virtual Blade Operations
Starting and Stopping Virtual Blades
Step 1. From the Cisco WAAS Central Manager GUI navigation pane, choose My WAN > Manage Devices.
Step 2. Click the Edit icon next to the Cisco WAE device that you want to configure.
Step 3. From the navigation pane, choose Admin > Virtualization > Actions. The Virtual Blade Actions pane appears (Figure 8).
Figure 8. Virtual Blade Actions Pane
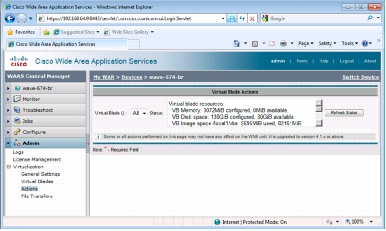
Step 4. From the Virtual Blade() menu, choose the virtual blade that you want to enable or disable. The status of the virtual blade is displayed in the Status field. See Figure 9 for an example.
Figure 9. Virtual Blade Actions Pane
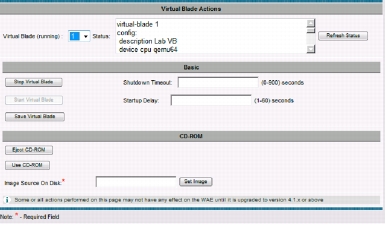
Start the Virtual Blade
Step 1. Click Start Virtual Blade to enable the selected virtual blade.
Step 2. (Optional) Enter a startup delay by typing a value, in seconds, in the Startup Delay field.
The startup delay can be used to give you time to connect a VNC session to the console before the virtual blade boots, so you can observe the initial startup.
Stop the Virtual Blade
Step 1. Click Stop Virtual Blade to disable the selected virtual blade.
Step 2. (Optional) To give the virtual blade operating system time to shut down the virtual blade after you click the Stop Virtual Blade button, enter a value (in seconds) in the Shutdown Timeout field.
The shutdown timeout provides a delay period during which the operating system can shut down gracefully. If the operating system has not shut down the virtual blade by the end of this period, Cisco WAAS will cancel the shutdown.
If you set the Shutdown Timeout value to 0, Cisco WAAS will force a shutdown immediately. A forced shutdown is comparable to pulling the power cord on a real computer.
To avoid losing data in open programs running on the virtual blade, you should perform a graceful shutdown or have the operating system itself perform the shutdown.
Save the Virtual Blade
Note: To reboot your Cisco WAAS device, you must stop or save all virtual blades.
Resetting a Virtual Blade
Note: This command performs an instant reset and can cause data loss in virtual blades similar to the way that pressing the Reset button on a physical computer can.
Accessing the Virtual Blade Console
• TightVNC (Microsoft Windows and Unix)
• Chicken of the VNC (Mac OS)
Note: VNC uses TCP, but the display number is not the TCP port number. VNC display numbers 1 through 6 use TCP ports 5901 through 5906, respectively.
Note: If you want to reboot the virtual blade without disconnecting the console, enter a reset command from the Cisco WAAS CLI.
Securing the Virtual Blade Console
Installing Paravirtualized Networking
Microsoft Windows-Based Virtual Blades
Step 1. Copy the virtio driver disk image to the Cisco WAAS device. For detailed steps for copying files, see Copying a Virtual Disk (ISO) Image to a Cisco WAAS Device.
Step 2. Fully install the virtual blade operating system. For more information about this step, see the Configuring Virtual Blades section.
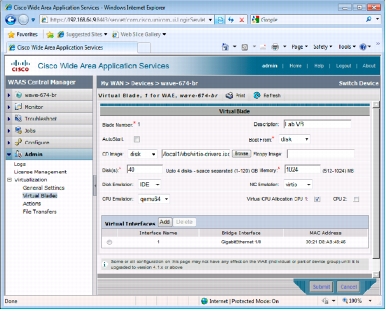
Step 3. In the Virtual Blade configuration pane, make the following changes (Figure 10):
• From the NIC Emulation menu, choose the virtio device.
• Verify that the Boot From menu is set to disk.
• From the CD Image menu, choose disk.
• In the CD Image disk name field, specify the name of the virtio driver disk image file (for example, /local1/vbs/virtio-drivers.iso).
Figure 10. Virtual Blade Configuration Pane
Step 4. Restart the virtual blade.
Note: To avoid restarting the virtual blade, you can specify the virtio device during creation of the virtual blade and prior to the Microsoft Windows installation. However, the virtual blade will not be able to access network resources until the drivers in Step 5 are installed.
Step 5. After the virtual blade has restarted, perform the following steps according to on your Microsoft Windows version.
Microsoft Windows Server 2008 Core and 2008 Release 2 (R2) Core:
Note: "D:" in the commands shown here represents the drive letter of your virtual CD-ROM drive containing the virtio driver disk image. Your drive letter may differ if more than one virtual disk is present.
Microsoft Windows 2008 x64 Core and Windows 2008 R2 Core:
Microsoft Windows 2008 x86 Core:
Microsoft Windows Server 2003 and 2008 Full Installation, and 2008 R2 Full installation:
Note: After installation, the virtio interface will appear in Microsoft Windows as a RedHat VirtIO Ethernet Adapter.
Linux-Based Virtual Blades
Transferring Virtual Blade Files
Note: All file transfers to and from virtual blades use FTP and require an FTP server to copy files to or from.
Copying a Virtual Disk (ISO) Image to a Cisco WAAS Device
Step 1. From the Cisco WAAS Central Manager GUI navigation pane, choose My WAN > Manage Devices.
Step 2. Click the Edit icon next to the Cisco WAAS device to which that you want to copy the image.
Step 3. From the navigation pane, choose Admin > Virtualization > Virtual Blades > File Transfers. The Virtual Blade File Transfers pane appears (Figure 11).
Step 4. Begin configuring the values to transfer your virtual disk (ISO) image to the Cisco WAAS device as follows:
Figure 11. Virtual Blade File Transfers Pane: FTP
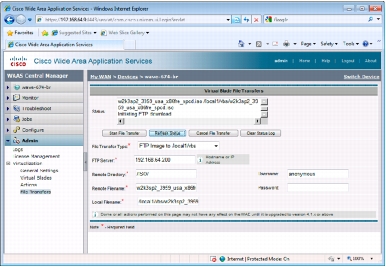
Note: (1) All virtual disk image files transferred to a Cisco WAAS device must reside in the /local1/vbs directory to be used by virtual blades. (2) A remote directory value of . (period) tells Cisco WAAS to transfer files from the directory used on initial login. This value can save time, eliminating the need to type the full path to the login directory.
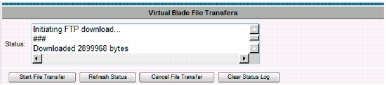
Step 5. Click the Start File Transfer button to begin the FTP transfer. The file should begin transferring from the FTP server to the device. To view the status of the file transfer, click the Refresh Status button. The status of the transfer will appear in the text area above the buttons (Figure 12).
Figure 12. Virtual Blade File Transfers Pane: Status
Copying a Virtual Blade Disk to an FTP Server
Note: The virtual blade must be stopped before you perform a virtual blade disk backup or restore operation.
Step 1. From the Cisco WAAS Central Manager GUI navigation pane, choose My WAN > Manage Devices.
Step 2. Click the Edit icon next to the Cisco WAAS device from which you want to copy the virtual blade disk image.
Step 3. From the navigation pane, choose Admin > Virtualization > Virtual Blades > File Transfers. The Virtual Blade File Transfers pane appears (Figure 13).
Step 4. Begin configuring the values to transfer your virtual blade disk image to an FTP server as follows:
Figure 13. Virtual Blade File Transfers Pane: Virtual Blade Backup

Note: A remote directory value of . (period) tells Cisco WAAS to transfer files to the directory used on initial login. This entry can save time, eliminating the need to type the full path to the login directory.
Step 5. Click the Start File Transfer button to begin the virtual blade disk image transfer. The file should begin transferring from the Cisco WAAS device to the FTP server. To view the status of the file transfer, click the Refresh Status button. The status of the transfer will appear in the text area above the buttons
Restoring a Virtual Blade Disk to a Cisco WAAS Device
Step 1. Create or decide which virtual blade will be transferred the virtual blade disk image. Virtual blade disk images can be transferred only to a configured virtual blade. If you do not have a virtual blade configured, create one. For more information about creating a virtual blade, see Configuring Virtual Blades.
Note: (1) Restoring a virtual blade disk image will overwrite the contents of the virtual disk being restored. (2) Restoring a virtual blade disk image will change the configured disk size of the virtual blade to match the configured disk size of the virtual disk image that is being restored. (3) The virtual blade must be stopped before you perform a virtual blade disk backup or restore operation.
Step 2. From the Cisco WAAS Central Manager GUI navigation pane, choose My WAN > Manage Devices.
Step 3. Click the Edit icon next to the Cisco WAAS device to which you want to copy the virtual blade disk image.
Step 4. From the navigation pane, choose Admin > Virtualization > Virtual Blades > File Transfers. The Virtual Blade File Transfers pane appears (Figure 14).
Step 5. Begin configuring the values to restore your virtual blade disk image to the Cisco WAAS device as follows:
Figure 14. Virtual Blade File Transfers Pane: Virtual Blade Restoration
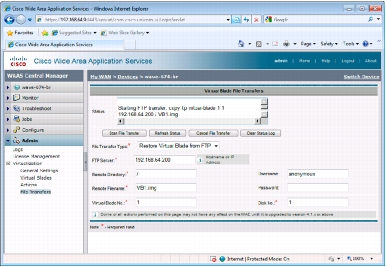
Note: A remote directory value of . (period) tells Cisco WAAS to transfer files to the directory used on initial login. This entry can save time, eliminating the need to type the full path to the login directory.
Step 6. Click the Start File Transfer button to begin the virtual blade disk image transfer. The Cisco WAAS device should begin restoring the virtual blade disk image from the FTP server. To view the status of the file transfer, click the Refresh Status button. The status of the transfer will appear in the text area above the buttons
Backing Up Virtual Blades
Agent Backup
Full Disk Image Backup
• The virtual blade must be stopped before backup or restoration of the virtual blade.
• The virtual blade disk is transferred to a server using FTP.
• Only the used disk data amount is transferred. If you have a 40-GB disk and only 3 GB in use, 3 GB will be transferred.
• Since the transport is FTP, Cisco WAAS can optimize the backup traffic if a peer device is available.