-
Cisco Hosted Unified Communication Services Provisioning Guide Release 7.1(a)
-
Preface
-
Hosted UCS Call Routing and Dial Plans
-
Hosted UCS Static Configuration
-
Defining and Configuring Core Network Elements and Resources
-
Managing Countries and Provider Resources
-
Managing Legacy PBX Support
-
Provisioning Movius VoiceMail and Auto Attendant Services
-
Provisioning the Local PSTN Breakout Support
-
Provisioning LBO Location with Cisco Emergency Responder
-
Provisioning NAT/PAT Support
-
Provisioning Other Hosted Unified Communications Services Features
-
Provisioning Analog Gateway
-
Provisioning Linked Locations
-
Provisioning Single Number Reach
-
Hosted Unified Communications Services Location Administration
-
Hosted Unified Communications Services Division Administration
-
Hosted Unified Communications Services Customer Administration
-
Sample PGW, Unified CM, and IP Unity Transactions
-
Local Gateway Supported Call Scenarios
-
Legacy PBX Information
-
Phone Details
-
Local Gateway Configuration
-
 Feedback
Table Of Contents
Support for NAT/PAT Through Autoregistration of IP Phones
Supported Scenarios for DHCP Services
How IP Phone Autoregistration Provides NAT/PAT Support
Limitations in Support for NAT/PAT
Provisioning Unified CM to Support NAT/PAT
Provisioning USM to Support NAT/PAT
Configuring DHCP Services on an External Server
Provisioning NAT/PAT Support
This chapter describes the steps required to configure the Hosted UCS platform when a Cisco NAT/PAT router or firewall connects the IP phones and the VOSS USM server. This functionality was tested in Hosted UCS Release 5.1(b), Maintenance Release 1 (MR1). This chapter includes the following sections:
•
Provisioning Unified CM to Support NAT/PAT
•
Support for NAT/PAT
This section describes support for NAT/PAT through autoregistration of IP phones when VOSS USM and the DHCP server are connected by a Cisco router or firewall providing NAT/PAT services. It includes the following topics:
•
•
•
•
Support for NAT/PAT Through Autoregistration of IP Phones
In Hosted UCS deployments before Release 5.1(b), MR1, DHCP services were always managed directly by VOSS USM. USM depended on IP address information from the DHCP server to determine the location of phones, and this was a dependency for the USM AutoMove feature.
When USM manages DHCP services, Hosted UCS supports a centralized pool of DHCP servers for each customer. Two customer locations in different subnets connected to a common PAT router cannot be supported because USM associates every location with an IP address subnet. As a workaround, separate IP address pools can be created on the PAT router. However, if the DHCP server and USM server are separated by a NAT/PAT router, this scenario is not supported.
Note
Hosted UCS Release 5.1(b), MR1, now supports DHCP services that are not managed by USM. This allows the DHCP server to be separated from the USM server by a Cisco NAT/PAT device, such as a Cisco IOS software router, PIX firewall, or Adaptive Security Appliance (ASA). In this scenario, information required for the USM AutoMove feature is received through the syslog messages provided by the Unified CM Server.
Supported Scenarios for DHCP Services
USM now supports DHCP services in the following scenarios, using auto-registration provided by the Unified CM server:
•
•
•
•
Scenarios that are still unsupported are described in "Limitations in Support for NAT/PAT" section.
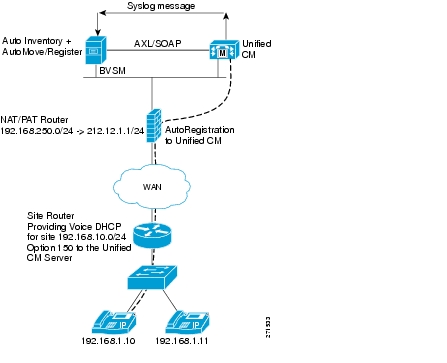
Figure 1 Unmanaged DHCP with Support for NAT/PAT (IP Phone Autoregistration)
How IP Phone Autoregistration Provides NAT/PAT Support
As shown in Figure 1, when the USM server receives a syslog message from Unified CM, the AutoReg service picks it up from the log and triggers the AutoCCMNewPhone transaction in USM. This transaction performs the following steps:
1.
2.
3.
4.
This completes the transaction and the phone is fully registered in USM with an allocated extension number.
USM performs all four steps when a new phone is added and Auto-register is turned on for the location. If the IP address for an existing phone is changed, only Step 3 occurs.
Limitations in Support for NAT/PAT
When the DHCP service runs on an external server and is managed by USM, the DHCP server and the USM server cannot be separated by a NAT/PAT device.
Currently, overlapping IP addresses are supported only if a separate DHCP server is used for each customer.
When USM manages the DHCP server, customer locations in different subnets connected to a common PAT router are not supported because USM associates every location with an IP address subnet. As a workaround, separate IP address pools can be created on the PAT router. However, if the DHCP server and USM server are separated by a NAT/PAT router, this scenario is not supported.
Provisioning Unified CM to Support NAT/PAT
This section describes the configuration required to provision the Unified CM server to support IP phones connected to the USM server through a Cisco NAT/PAT device. It includes the following topics:
•
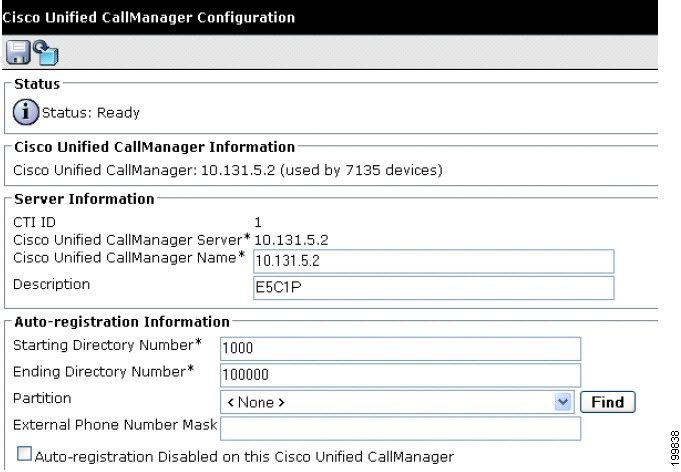
Auto-registration
Auto-registration automatically assigns directory numbers to new devices as they connect to the IP telephony network. When auto-registration is enabled, a range of directory numbers is specified so that Cisco Unified CM can assign an unused number to each new phone that is connected to the network. As new phones connect to the network, Cisco Unified CM assigns the next available directory number in the specified range. After a directory number is assigned to an auto-registered phone, the phone is moved to a new location, and its directory number remains the same. This task is accomplished by sending the Unified CM syslog messages to the USM server. This automatically triggers a transaction that moves the phone to the location, as explained in the "How IP Phone Autoregistration Provides NAT/PAT Support" section.
Configuring Auto-registration
To configure auto-registration on the Unified CM server, complete the following steps:
Procedure
Step 1
Step 2
Step 3
Figure 9-2 Auto-registration - Unified CM Configuration
Step 4
Perform this step for all the Unified CM servers.
Step 5
Step 6
Step 7
Step 8
Note
Step 9
Step 10
Step 11
Provisioning USM to Support NAT/PAT
This section describes the configuration required for the USM server when it is connected to IP phones by a Cisco NAT/PAT device. It includes the following topics:
Configuring USM Webmin
To complete the configuration required using USM Webmin, complete the following steps:
Procedure
Step 1
Step 2
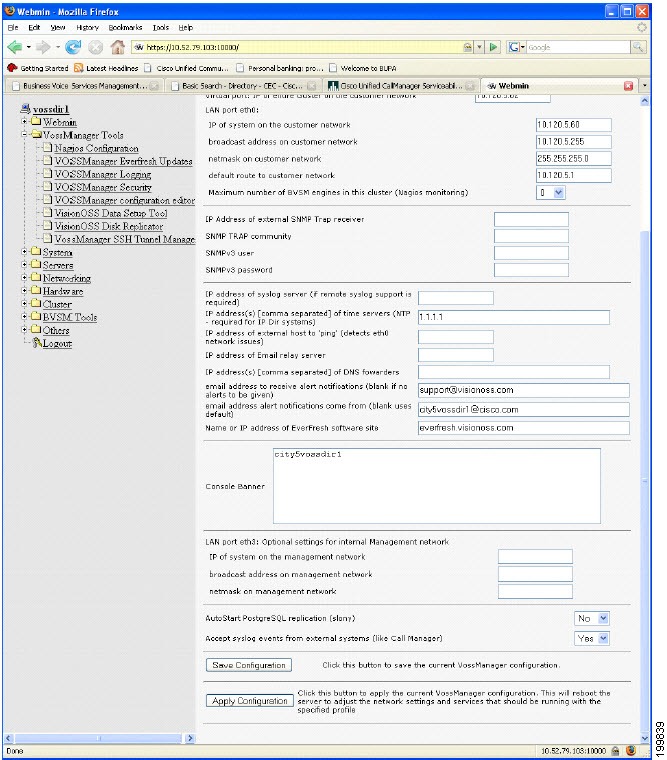
The system displays the screen shown in Figure 9-3.
Figure 9-3 USM Webmin Syslog Configuration
Step 3
Step 4
Step 5
/data/intdhcp/allmessagesStep 6
Step 7
Note
Step 8
The USM server reboots and the new configuration is enabled.Step 9
Step 10
cd /data/intdhcp/tail -f allmessagesStep 11
Step 12
Configuring DHCP Services on an External Server
To configure DHCP services running on an external server, complete the following steps on the webmin of the external DHCP server:
Procedure
Step 1
Step 2
Step 3
Step 4
Step 5
Step 6
USM DHCP Configuration
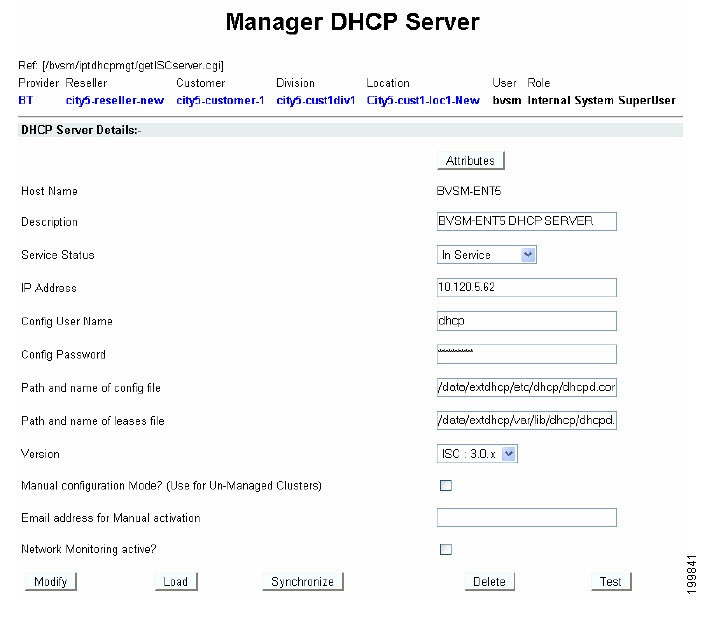
The configuration for a DHCP server managed by USM is similar whether it runs on the USM server or on an external server. However, you use the IP address of the USM server if the DHCP service is running on the USM server machine. You use the IP address of the external server if the DHCP service is running on a different machine.
Figure 9-4 illustrates the screen used in the USM GUI to configure the DHCP service.
Figure 9-4 USM DHCP Configuration
Make sure, once the DHCP server is defined on USM, the server is Loaded and Synchronized.
USM Provider Configuration
To configure the USM server to receive Auto-register requests from the Unified CM server, complete the following steps:
Procedure
Step 1
Step 2
Step 3
Step 4
This setting is used when phones register with the same IP address (PAT).
Step 5
Step 6
This causes USM to automatically add phones discovered through Auto-registration to the Phone Inventory.
USM Customer Configuration
To complete the Customer configuration required on the USM server, complete the following steps:
Procedure
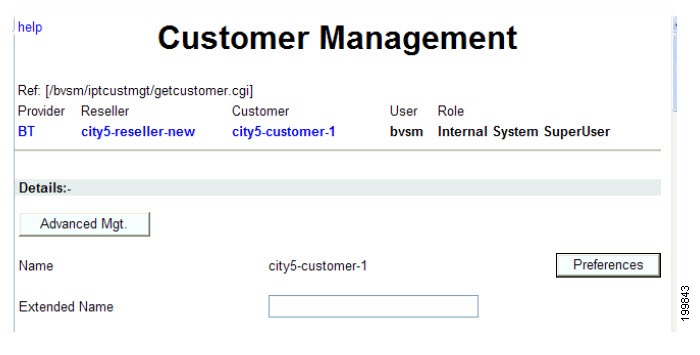
Step 1
The system displays the screen shown in Figure 9-5.
Figure 9-5 Customer Management
Step 2
Step 3
Step 4
Step 5
Step 6
Step 7
Step 8
USM Location Administration
Step 1
Step 2
Step 3
Step 4
Step 5
Step 6
Step 7
Step 8
Step 9
Step 10