![]() |
Table Of Contents
Cisco Unified Reporting Administration Guide for Cisco Unified Presence Release 8.0, 8.5, and 8.6
What is Cisco Unified Reporting?
How the Cisco Unified Reporting Application Works
Supported Cisco Unified Presence Reports
Prerequisites for Cisco Unified Reporting
How to Access Cisco Unified Reporting
Accessing Cisco Unified Reporting
How to Work with Reports in Cisco Unified Reporting
Viewing A Copy of an Existing Report
Downloading and Archiving Reports
Where to Find More Information
Cisco Unified Presence Documentation
Accessing On-Line and Report Help
Cisco Unified Reporting Administration Guide for Cisco Unified Presence Release 8.0, 8.5, and 8.6
April 30, 2013
•
About Cisco Unified Reporting
•
Prerequisites for Cisco Unified Reporting
•
How to Access Cisco Unified Reporting
•
How to Work with Reports in Cisco Unified Reporting
•
Where to Find More Information
About Cisco Unified Reporting
•
What is Cisco Unified Reporting?
•
How the Cisco Unified Reporting Application Works
•
Supported Cisco Unified Presence Reports
What is Cisco Unified Reporting?
The Cisco Unified Reporting web application, which you access at the Cisco Unified Presence console, generates reports with a snapshot of cluster data. The tool enables you to gather cluster data from existing sources, inspect and compare the data, and troubleshoot any reported issues.
Cisco Unified Reporting includes a user interface for generating, downloading and archiving, and uploading the reports. Notification messages let you know if a report will take excessive time to generate or consume excessive CPU.
How the Cisco Unified Reporting Application Works
The Cisco Unified Reporting web application deploys to all servers in a cluster at installation time. Reports are generated from database records. When you generate a report in Cisco Unified Reporting, the report combines data from one or more sources on one or more servers into one output view. For example, you can view a report that shows the hosts file for all servers in the cluster.
Data Sources
The application captures information from any of the following sources on the publisher server and each subscriber server:
•
RTMT counters
•
CDR_CAR
•
CUP DB
•
disk files
•
OS API calls
•
network API calls
•
CLI
The report includes data for all active cluster nodes that are accessible at the time that you generate the report. If the database on the publisher server is down, you can generate a report for the active nodes.
Data Output
This release supports HTML output for reports. You can identify a report in Cisco Unified Reporting by the report name and the date-and-time stamp. The application stores a local copy of the most recent report for you to view. You can archive the local copy of the most recent report or a new report to your hard disk, as described in Downloading and Archiving Reports. When you archive a report, you can rename archived files or store them in different folders for identification purposes.
Status Verification
Some reports run checks to identify conditions that could impact cluster operations. Status messages indicate the outcome of every data check that you run as follows:
Supported Cisco Unified Presence Reports
Table 1 describes the types of system reports that display in Cisco Unified Reporting after you install Cisco Unified Presence. You can view and generate any of the report types in Table 1.
Prerequisites for Cisco Unified Reporting
Access Permission
The Cisco Unified Reporting application uses the Cisco Tomcat service to authenticate users before allowing access to the web application. Only authorized users can access the Cisco Unified Reporting application. By default, only administrator users in the Standard CUP Super Users group can access Cisco Unified Reporting to view and create reports.
As an authorized user, you can use the Cisco Unified Reporting user interface to view reports, generate new reports, or download reports.
Note
Administrator users in the Standard CUP Super Users group can access all administrative applications in the Cisco Unified Presence Administration navigation menu, including Cisco Unified Reporting, with a single signon to one of the applications. If required, you can set up a new administrator account for Cisco Unified Reporting in the Application User Configuration window in Cisco Unified Presence Administration (select User Management > Application User).
System Requirements
•
Cisco Unified Reporting runs as an application on the Cisco Tomcat service, which activates at Cisco Unified Presence installation. Ensure that Cisco Unified Presence is running on all servers in the cluster.
•
The report subsystem gathers information from other servers by using an RPC mechanism via HTTPS. Ensure the HTTPS port is open and the Cisco Tomcat service is running on the server to successfully generate a report.
•
To access the application, you access Cisco Unified Presence Administration in a browser window. Cisco Unified Reporting uses HTTPS to establish a secure connection to the browser.
How to Access Cisco Unified Reporting
•
Accessing Cisco Unified Reporting
Before You Begin
Ensure that you are authorized to access the Cisco Unified Reporting application. See Access Permission.
Procedure
Step 1
Access the Cisco Unified Reporting application in one of these ways:
Troubleshooting Tips
•
If a security alert informs you that the site is not trusted, the server certificate has not yet downloaded. Refer to the IE 8 Restrictions related topic.
•
To sign out of Cisco Unified Reporting, select Logout on the menu bar.
User Interface Navigation
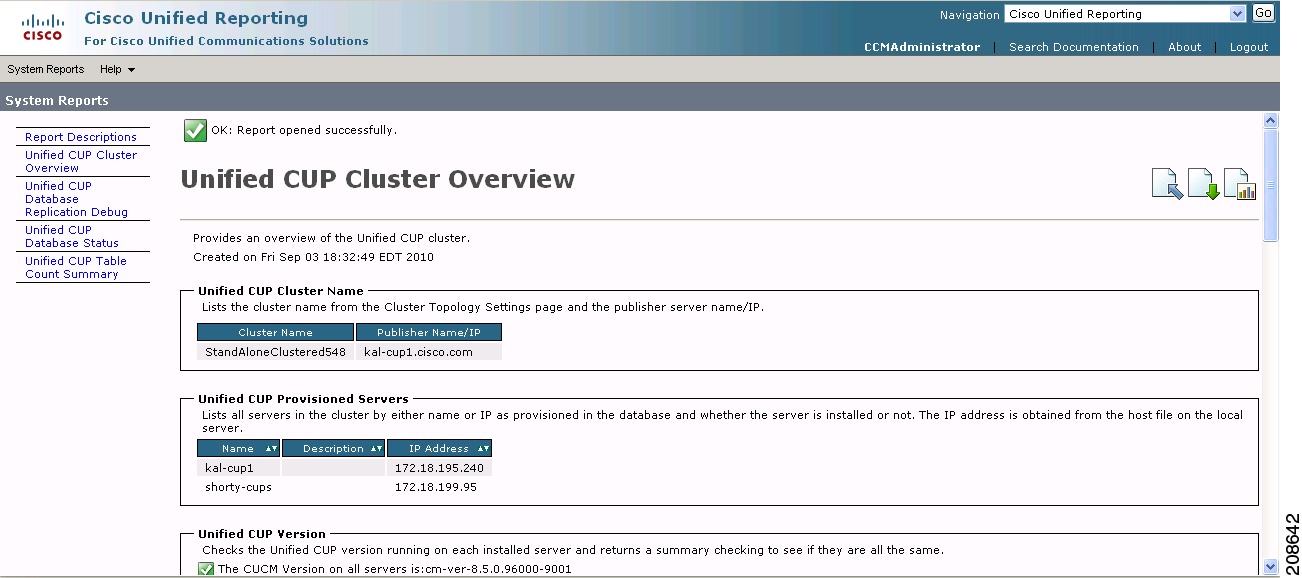
Figure 1 shows the UI elements for Cisco Unified Reporting:
Navigational Control DescriptionNavigational Frame
The left frame is the navigational frame, showing the report categories. The list of reports for a selected category (in this example, System Reports) displays in the left frame under the category name. After you select a report in the left frame, the right frame displays the details and allows you to view and manipulate the configuration of the selected report.
Contents Frame
The right frame is the contents frame, illustrating the report details. When opened, a report displays the report name, a date and time stamp, and a brief description of the report.
The report organizes data into information groups, which specify the data item or source.
•
Status messages display for an information group. See the About Cisco Unified Reporting section for more information.
•
Operations icons display in the top right corner of the window for the operations that are available for a selected report. See the Operation Icons section for more information.
•
The Report Descriptions report displays in the list of reports. Note that this report provides more detailed information for all of the reports that are installed as well as troubleshooting information. See the About Cisco Unified Reporting section for more information.
Figure 1 provides an example of the Cisco Unified Reporting interface. The report categories, available reports, and report data will vary, depending on release.
Figure 1 User Interface
How to Work with Reports in Cisco Unified Reporting
•
Viewing A Copy of an Existing Report
•
Downloading and Archiving Reports
Operation Icons
The interface displays these icons for report operations. Move the mouse over the icon to view the icon caption. If an operation is not available for a window, the icon does not display.
Upload Report icon. See Uploading Reports for this procedure.
Download Report icon. See Downloading and Archiving Reports for this procedure.
Generate Report icon. See Generating New Reports for this procedure.
Viewing A Copy of an Existing Report
You can view a copy of an existing report. Note, however, that during a fresh install or upgrade, the Cisco Unified Reporting application does not save a local copy of the most recent report.
Before You Begin
•
Ensure that the Cisco Tomcat service is running on at least one server and you are using a supported web browser to view the report. See Prerequisites for Cisco Unified Reporting.
•
If you select a report type for which a previous report already exists on your hard drive, the message "A local copy of report with name <filename> already exists." displays with a link to the local copy. If no local copy exists, the application prompts you to generate a new report with this message: "A report by name <filename> does not exist. Generate a new report.".
Procedure
Step 1
Open Cisco Unified Reporting and select System Reports from the menu bar.
Step 2
Select the report that you want to view from the list of reports in the left frame.
Step 3
Select the link for the report name to view the report (dated and time stamped).
Step 4
Perform one of the following actions if required:
a.
Select the View Details link to expose details for a section that does not automatically display.
b.
Select the View Details again to close the section display.
What To Do Next
Downloading and Archiving Reports
Troubleshooting Tips
•
To print a report, use the browser print function. Be sure to click the View Details link to expose all the data that you want to print before printing.
•
If the green checkmark icon displays for an information group, you can choose not to view the details for that group. This icon indicates that the data check for that information group was successful.
•
If the report shows an unsuccessful data check for an item, select the Report Descriptions report and review the troubleshooting information for possible remedies as described in Supported Cisco Unified Presence Reports.
Related Topics
Generating New Reports
You can generate and view a new report.
Before You Begin
Ensure that the Cisco Tomcat service is running on at least one server and you are using a supported web browser to view the report. See Prerequisites for Cisco Unified Reporting.
Procedure
Step 1
Open Cisco Unified Reporting and select System Reports from the menu bar.
Step 2
Perform one of the following actions to generate and view a new report
a.
Select the Generate a New Report link.
b.
Select the Generate Report (bar chart) icon.
Step 3
Perform one of the following actions if required:
a.
Select the View Details link to expose details for a section that does not automatically display.
b.
Select the View Details again to close the section display.
What To Do Next
Downloading and Archiving Reports
Troubleshooting Tips
•
To print a report, use the browser print function. Be sure to click the View Details link to expose all the data that you want to print before printing.
•
The application notifies you if a report will take excessive time to generate or consume excessive CPU time. A progress bar displays while the report generates. The new report displays, and the date and time updates.
•
If the green checkmark icon displays for an information group, you can choose not to view the details for that group. This icon indicates that the data check for that information group was successful.
•
If the report shows an unsuccessful data check for an item, select the Report Descriptions report and review the troubleshooting information and possible remedies as described in Supported Cisco Unified Presence Reports. Because the Report Descriptions report is dynamically generated from the database, you can also generate a new Report Descriptions report.
Related Topics
Downloading and Archiving Reports
To archive reports, you download the report and store it locally on your hard drive. Downloading a report downloads the raw XML data file to your hard disk.
Before You Begin
Either select an existing report to download or generate a new report to download.
Procedure
Step 1
Open Cisco Unified Reporting and select System Reports from the menu bar.
Step 2
Perform one of the following actions:
To download: ActionsAn existing report with the date and time stamp that is shown
a.
Open and view the details of the existing report. See Viewing A Copy of an Existing Report.
b.
Select the Download Report (green arrow) icon.
Note
You do not need to click the View Details link to expose report details before you download the document. All the data is captured in the downloaded file.
A new report
a.
Generate the new report. See Generating New Reports.
b.
When the new report displays, select the Download Report (green arrow) icon.
Note
You do not need to click the View Details link to expose report details before you download the document. All the data is captured in the downloaded file.
Step 3
Perform one of the following actions when the File Download dialog box displays:
a.
Select Open to open the file and save the file to a temporary location on your disk. The XML file for the report displays.
b.
Select Save to save the file to the location on your disk that you designate.
Step 4
When the download completes, complete these steps:
a.
Select Close in the Download Complete window.
b.
Select Open to open the folder that contains the file and view the XML report.
What To Do Next
To view a downloaded or archived file in your browser, upload the file to your server as described in Uploading Reports.
Troubleshooting Tips
•
You can navigate to the file location and click the filename link to view the XML report file at any time.To change the file name or the location where your file is stored on your hard disk, enter a new location or rename the file (optional). A progress bar shows the download in progress.
•
Be careful not to change the contents in the XML file, or your report may not display properly.
•
For technical assistance, you can attach the downloaded file in an e-mail or upload the file to another server.
Related Topics
Uploading Reports
To view a report (that you have archived to your hard disk) in your browser window, you must upload the report to the server.
Before you Begin
Download and archive a report on your hard drive.
Procedure
Step 1
Open Cisco Unified Reporting and select System Reports from the menu bar.
Step 2
Access any report to display the Upload Report (blue arrow) icon in the Reports window.
Step 3
Select the Upload Report icon.
Step 4
To locate the .xml file, either enter the path for the file or select Browse to navigate to its location on your hard drive.
Step 5
Select Upload.
Step 6
Select Continue to display the uploaded file in the browser window.
What To Do Next
You can compare an uploaded report and a newly generated report side-by-side during an upgrade, for example.
Troubleshooting Tips
A progress bar shows the upload in progress. When the upload to the server completes, the Upload Results window displays the uploaded filename.
Where to Find More Information
•
Cisco Unified Presence Documentation
•
Accessing On-Line and Report Help
Cisco Unified Presence Documentation
See the following Cisco Unified Presence documentation on Cisco.com:
•
Real-Time Monitoring Tool (RTMT) Administration Guide for Cisco Unified Presence
•
Serviceability Configuration and Maintenance Guide for Cisco Unified Presence
•
Cisco Unified Operating System Maintenance Guide for Cisco Unified Presence
•
Command Line Interface (CLI) Reference Guide for Cisco Unified Presence
•
Any release notes, installation/upgrade, and configuration guides for the applications that you want to integrate with Cisco Unified Presence.
Accessing On-Line and Report Help
The Cisco Unified Reporting UI provides two types of on-line help: administrative help and report help.
•
To access the administrative help, select Help > This Page in the menu bar. You can use the topics list in the navigation frame or the up (previous) and down (next) arrows in the content frame to find additional information.
•
To access report help, select the Report Descriptions link in the list of reports. This report provides descriptions for the report, for each information group, and for each data item, as well as the data sources, symptoms of related problems, and remedies.
Note
The Report Descriptions link provides common fixes for the symptoms that are listed. You may still need to contact TAC for additional assistance.
Cisco and the Cisco logo are trademarks or registered trademarks of Cisco and/or its affiliates in the U.S. and other countries. To view a list of Cisco trademarks, go to this URL: www.cisco.com/go/trademarks. Third-party trademarks mentioned are the property of their respective owners. The use of the word partner does not imply a partnership relationship between Cisco and any other company. (1110R)
Any Internet Protocol (IP) addresses used in this document are not intended to be actual addresses. Any examples, command display output, and figures included in the document are shown for illustrative purposes only. Any use of actual IP addresses in illustrative content is unintentional and coincidental.
© 2013 Cisco Systems, Inc. All rights reserved.Cisco Unified Reporting Administration Guide for Cisco Unified Presence Release 8.0, 8.5, 8.6